


后端测试接口与前端交互测试接口:
简介:
Swagger是一款简单并且功能强大的API表达工具。我们可以通过Swagger生成的API得到接口的交互式文档。
例如:没用swagger3之前,一般用postman来测试接口,并且出一份接口详细文档给到前端 这是很麻烦的事。但是现在Swagger3能帮我们很好的解决测试接口和接口文档这些事。
Swagger作用:
1将项目中所有的接口展现在页面上,这样后端程序员就不需要专门为前端使用者编写专门的接口文 档;
2当接口更新之后,只需要修改代码中的 Swagger
描述就可以实时生成新的接口文档了,从而规避 了接口文档老旧不能使用的问题;
3通过 Swagger
页面,我们可以直接进行接口调用,降低了项目开发阶段的调试成本。
Swagger3的使用:
第一步:
springboot 框架导入swagger依赖Maven
<dependency>
    <groupId>io.springfox</groupId>
    <artifactId>springfox-boot-starter</artifactId>
    <version>3.0.0</version>
</dependency>
注释:这里用的是 springfox,Swagger 可以看作是一个遵循了 OpenAPI 规范的一项技术,而 springfox 则 是这项技术的具体实现。
类似JDBC的一套技术规范,各大数据库都有JDBC的技术实现。
第二步:
在 Spring Boot 的启动类添加 @EnableOpenApi 注解,开启 Swagger支持;
@EnableOpenApi
@SpringBootApplication
public class SwaggerTestApplication {
    public static void main(String[] args) {
        SpringApplication.run(SwaggerTestApplication.class, args);
    }
}
第三步:
@RestController
public class HelloWorldController {
@RequestMapping("/helloWorld")
public String helloWorld(){
return "helloWorld";
}
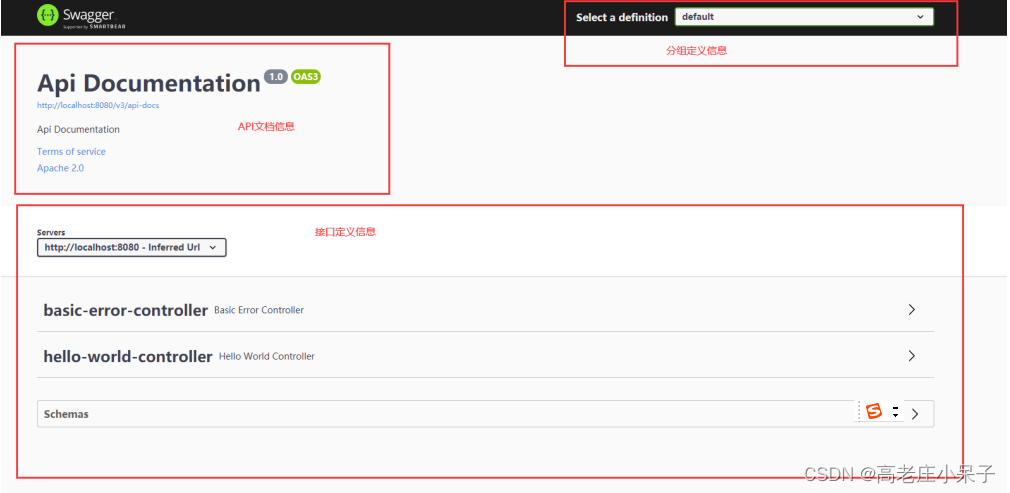
}启动项目 浏览器访问:http://localhost:8080/swagger-ui/
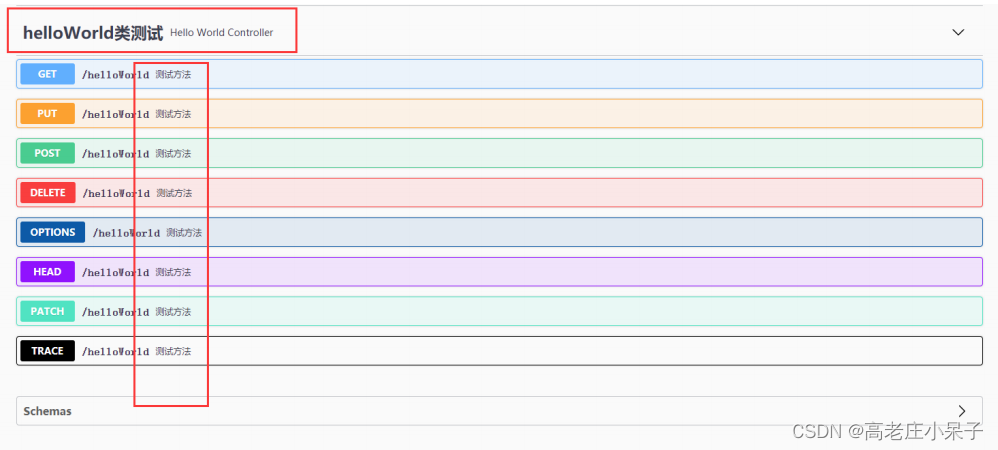
第四步:注释接口
@Api(tags="helloWorld类测试")
@RestController
public class HelloWorldController {
    @ApiOperation("测试方法")
    @RequestMapping("/helloWorld")
    public String helloWorld(){
        return "helloWorld";
    }
}
Swagger3 常用配置注解讲解:
3.1 Swagger3
常用配置如下
@Api :用在请求的类上,表示对类的说明tags="说明该类的作用,可以在 UI 界面上看到的注解 "value="该参数没什么意义,在 UI 界面上也看到,所以不需要配置 "@ApiOperation :用在请求的方法上,说明方法的用途、作用value="说明方法的用途、作用 "notes="方法的备注说明 "@ApiImplicitParams :用在请求的方法上,表示一组参数说明@ApiImplicitParam:用在@ApiImplicitParams 注解中,指定一个请求参数的各个方面name:参数名value:参数的汉字说明、解释required:参数是否必须传paramType:参数放在哪个地方· header --> 请求参数的获取:@RequestHeader· query --> 请求参数的获取:@RequestParam· path(用于restful接口) --> 请求参数的获取: @PathVariable· div(不常用)· form(不常用)dataType:参数类型,默认 String ,其它值 dataType="Integer"defaultValue:参数的默认值@ApiResponses :用在请求的方法上,表示一组响应@ApiResponse:用在 @ApiResponses 中,一般用于表达一个错误的响应信息code:数字,例如400message:信息,例如" 请求参数没填好 "response:抛出异常的类@ApiModel :用于响应类上,表示一个返回响应数据的信息(这种一般用在post 创建的时候,使用 @RequestBody 这样的场景,请求参数无法使用@ApiImplicitParam注解进行描述的时候)@ApiModelProperty :用在属性上,描述响应类的属性
实例一 @ApiImplicitParams 和 @ApiImplicitParam 参数描述
post
方式,根据
name
和
age
两个参数查询数据,返回信息;
我们用
@ApiImplicitParams
和
@ApiImplicitParam
,描述请求参数
/**
* 查询
* @param name
* @param age
* @return
*/
@PostMapping("/search")
@ApiImplicitParams({
    @ApiImplicitParam(name = "name",value = "姓名",required = true,paramType
= "query"),
    @ApiImplicitParam(name = "age",value = "年龄",required = true,paramType =
"query",dataType = "Integer")
})
@ApiOperation("测试查询")
public String search(String name,Integer age){
    return name+":"+age;
}


//第二种
@ApiOperation(value = "接口信息", notes = "接口其他描述")
@ResponseBody
@RequestMapping(value="/search",method = RequestMethod.GET)
public MessageResult addTastType(@SessionAttribute(SESSION_MEMBER) AuthMember user,
                                           @ApiParam("每日任务种类名字")@RequestParam(name = "name")String name,
                                           @ApiParam("任务条件描述")@RequestParam(name = "description",required = false,defaultValue = "默认值")String description,
                                           @ApiParam("1:上架 0:下架")@RequestParam(name = "putOff")Integer putOff) {

        return success();
    }
实例二 @ApiModel , @ApiModelProperty 实体参数描述
@SuppressWarnings("serial")
@Data
@ApiModel("行业")
public class Industry extends Model<Industry> {

    @TableId(value="id",type= IdType.AUTO)
    private Integer id;

    @ApiModelProperty("行业名称")
    private String name;

    @ApiModelProperty("1存在 0删除")
    private Integer isDelete;

    @ApiModelProperty("1上架 2下架")
    private Integer status;

    @ApiModelProperty("父类id")
    private Integer parentId;

    private Date createTime;

    private Date updateTime;


}
参数上,直接用 Industry industry
@PostMapping("/add")
@ApiOperation("测试添加")
public String add(ndustry industry ){
    return null;
}
实例三 @ApiResponses , @ApiResponse
@ApiResponses , @ApiResponse ,描述响应码对应的描述信息
@GetMapping("/user/{id}")
@ApiOperation("根据ID获取用户信息")
@ApiImplicitParams({
    @ApiImplicitParam(name = "id",value = "用户编号",required = true,paramType
= "path")
})
@ApiResponses({
    @ApiResponse(code=408,message="指定业务得报错信息,返回客户端"),
    @ApiResponse(code=400,message="请求参数没填好"),
    @ApiResponse(code=404,message="请求路径没有或页面跳转路径不对")
})
public User load(@PathVariable("id") Integer id){
    return new User(id,"jack",32);
}修改API信息默认配置:
可以通过新建一个配置类重写 ApiInfo 实现,以及重写 Docket 实现并且设置apiInfo;
@Configuration
public class SwaggerApp {

    /**
    * 配置swagger的Docket bean
    * @return
    */
    @Bean
    public Docket createRestApi() {
        return new Docket(DocumentationType.OAS_30) // 指定swagger3.0版本
        .apiInfo(createApiInfo());
    }

    //构建 api文档的详细信息函数,注意这里的注解引用的是哪个
    private ApiInfo apiInfo() {
        return new ApiInfoBuilder()
                //页面标题
                .title("Spring Boot 使用 Swagger2 构建RESTful API")
                //创建人
                .contact(new Contact("Bryan", "http://blog.blockchan.com/", ""))
                //版本号
                .version("1.0")
                //描述
                .description("API 描述")
                .build();
    }
Swagger3 Docket 开关&过滤&分组 配置详解
我们可以通过设置
Docket
,可以配置很多功能,比如是否开启
swagger
,过滤,分组等;
1.开关设置
enable
一般情况,我们只有在开发环境才会用到
swagger
,正式环境需要关闭
swagger
,一个是安全问题,还
有一个是用了
swagger
会影响系统运行速度;
我们通过设置
Docket
对象的
enable
即可;
/**
* 配置swagger的Docket bean
* @return
*/
@Bean
public Docket createRestApi() {
    return new Docket(DocumentationType.OAS_30) // 指定swagger3.0版本
    .enable(false) // 开关
    .apiInfo(apiInfo());
}
2.设置过滤
有些情况,我们需要指定固定包路径下的类生成API
,或者根据前端用户路径请求过滤;
使用过滤,必须先调用
select
方法;
通过apis
方法,
basePackage
可以根据包路径来生成特定类的
API,
any 方法是默认所有都有效,
none
方法都无效;
withClassAnnotation 根据类注解,
withMethodAnnotation
是根据方法注解;
一般我们用的是
basePackage
方法;
/**
* 配置swagger的Docket bean
* @return
*/
@Bean
public Docket createRestApi() {
    return new Docket(DocumentationType.OAS_30) // 指定swagger3.0版本
        .enable(true) // 开关
        .select()
        .apis(RequestHandlerSelectors.basePackage("com.test.controller")) // 指定扫描的包 常用方式
        .build()
        .apiInfo(apiInfo());
}
类似的还有一个根据请求路径的
paths
方法;
一般用
ant
匹配路径;
any
是匹配任意路径,
none
是都不匹配,
regex
是正则匹配;
/**
* 配置swagger的Docket bean
* @return
*/
@Bean
public Docket createRestApi() {
    return new Docket(DocumentationType.OAS_30) // 指定swagger3.0版本
    .enable(true) // 开关
    .select()
    .paths(PathSelectors.ant("/test/**")) // 匹配 /test/**请求路径
    .build()
    .apiInfo(apiInfo());
}
swagger-ui
视图只显示过滤后的
API
接口信息;
3.设置分组
通过
groupName
方法可以设置组名;
/**
* 配置swagger的Docket bean
* @return
*/
@Bean
public Docket createRestApi() {
    return new Docket(DocumentationType.OAS_30) // 指定swagger3.0版本
    .groupName("开发组001")
    .enable(true) // 开关
    .select()
    .build()
    .apiInfo(apiInfo());
}
模拟分组:
controller
包下建两个子包,分别是
one
和
two
包,用来模拟两个业务模块;
@Configuration
public class SwaggerApp {
/**
* 配置swagger的Docket bean
* @return
*/
@Bean
public Docket createRestApi() {
    return new Docket(DocumentationType.OAS_30) // 指定swagger3.0版本
        .groupName("开发组001")
        .select()
        .apis(RequestHandlerSelectors.basePackage("com.test.controller.one")) // 指定扫描的包 常用方式
        .build()
        .apiInfo(apiInfo());
}

/**
* 配置swagger的Docket bean
* @return
*/
@Bean
public Docket createRestApi2() {
    return new Docket(DocumentationType.OAS_30) // 指定swagger3.0版本
        .groupName("开发组002")
        .select()
        .apis(RequestHandlerSelectors.basePackage("com.test.controller.two")) // 指定扫描的包 常用方式
        .build()
        .apiInfo(apiInfo2());
}

/**
* 配置swagger的ApiInfo bean
* @return
*/
 private ApiInfo apiInfo() {
        return new ApiInfoBuilder()
                //页面标题
                .title("Spring Boot 使用 Swagger2 构建RESTful API")
                //创建人
                .contact(new Contact("开发人名1", "http://blog.blockchan.com/", "联系邮箱"))
                //版本号
                .version("1.0")
                //描述
                .description("API 描述")
                .build();
    }

/**
* 配置swagger的ApiInfo bean
* @return
*/
@Bean
 private ApiInfo apiInfo2() {
        return new ApiInfoBuilder()
                //页面标题
                .title("Spring Boot 使用 Swagger2 构建RESTful API")
                //创建人
                .contact(new Contact("开发人名2", "http://blog.blockchan.com/", "联系邮箱"))
                //版本号
                .version("1.0")
                //描述
                .description("API 描述")
                .build();
    }
}


 1316
1316


 被折叠的 条评论
为什么被折叠?
被折叠的 条评论
为什么被折叠?
 到【灌水乐园】发言


