


SpringBoot中对SpringMvc的特殊定制
在SpringMvc的自动配置类中有很多的@Bean,SpringBoot就是根据这些类去自动配置一些SpringMvc的默认属性,我们可以覆盖掉这个@Bean去自定义一些我们自己特殊化的东西。
自动配置类名称:WebMvcAutoConfiguration
在大多数情况下,SpringBoot在自动配置中标记了很多@ConditionalOnMissingBean(xxx.class)(意思就是如果IOC容器中没有,当前的@Bean才会生效),如果我们自己配置了xxx.class,就会覆盖掉SpringBoot的默认配置。
实现一个自定义WebMvcAutoConfiguration类,让其实现于WebMvcConfigurer接口并注册到IOC容器中,在其中写相应代码就会覆盖掉默认配置。
1、自定义拦截器
package cool.ale.config;

import cool.ale.interceptor.TimeInterceptor;
import org.springframework.stereotype.Component;
import org.springframework.web.servlet.config.annotation.InterceptorRegistry;
import org.springframework.web.servlet.config.annotation.WebMvcConfigurer;

@Component
public class MyWebMvcConfiguration implements WebMvcConfigurer {

    /**
     * 添加拦截器
     * @param registry
     */
    @Override
    public void addInterceptors(InterceptorRegistry registry) {
        registry.addInterceptor(new TimeInterceptor())      // 添加一个拦截器
            .addPathPatterns("/**");     // 拦截映射规则,拦截所有请求
                //.excludePathPatterns("")  // 设置排除的映射规则
    }
}
实现拦截器具体的类:
package cool.ale.interceptor;

import org.slf4j.Logger;
import org.slf4j.LoggerFactory;
import org.springframework.web.servlet.HandlerInterceptor;
import org.springframework.web.servlet.ModelAndView;

import javax.servlet.http.HttpServletRequest;
import javax.servlet.http.HttpServletResponse;
import java.time.Duration;
import java.time.LocalDateTime;

public class TimeInterceptor implements HandlerInterceptor {

    Logger logger = LoggerFactory.getLogger(TimeInterceptor.class);

    LocalDateTime start;

    @Override
    public boolean preHandle(HttpServletRequest request, HttpServletResponse response, Object handler) throws Exception {
        // 开始时间
        start = LocalDateTime.now();
        return true;
    }

    @Override
    public void postHandle(HttpServletRequest request, HttpServletResponse response, Object handler, ModelAndView modelAndView) throws Exception {
        // 结束时间
        LocalDateTime end = LocalDateTime.now();

        // 计算两个时间差
        Duration between = Duration.between(start, end);

        // 获得相差毫秒
        long millis = between.toMillis();

        logger.info("当前请求:" + request.getRequestURI() + ":执行时间:" + millis + "毫秒。");
    }
}
2、CORS跨域请求
2.1、全局配置
就比如说我们两个系统模块之前的请求,就称之为跨域请求。
首先我在一个模块写一个ajax请求来请求另一个模块,本模块目前设置其它端口:
<!DOCTYPE html>
<html lang="en">
<head>
    <meta charset="UTF-8">
    <title>rest首页</title>
    <script src="https://cdn.staticfile.org/jquery/1.10.0/jquery.min.js"></script>
</head>
<body>
    <button id="restButton">请求跨域请求</button>
</body>

    <script type="text/javascript">
        $("#restButton").click(function () {
            $.ajax({
                url:'http://localhost:8080/user/1',
                type:'GET',
                success:function (result) {
                    alert(result)
                }
            });
        })
    </script>
</html>
然后我们启动服务,按照图片中的方式操作时报错,如下:
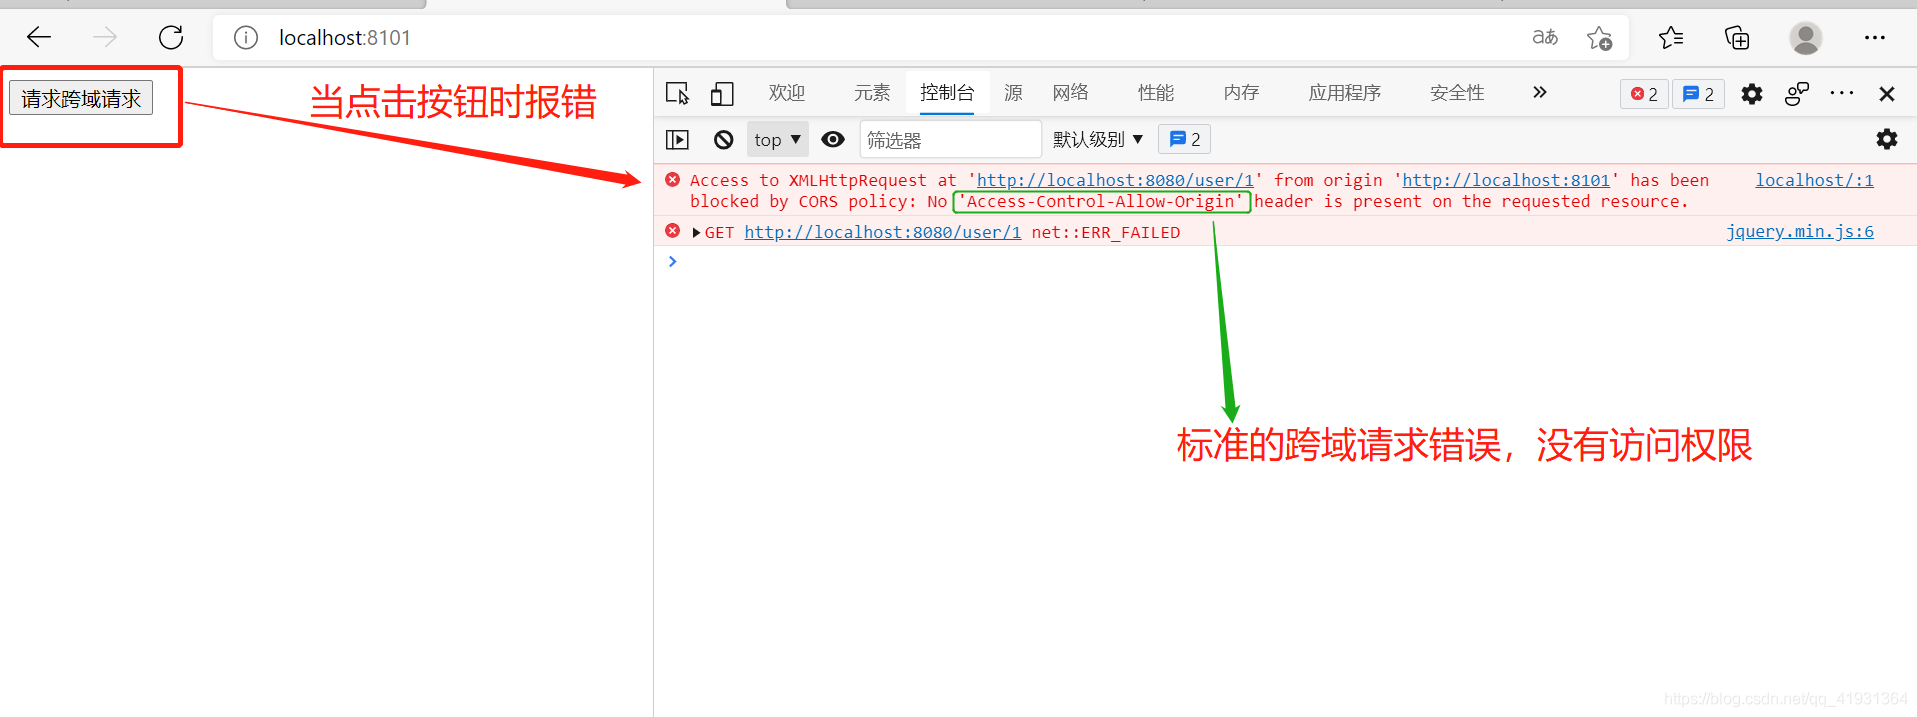
如果我们需要访问成功的话,我们需要在跳转后的模块添加上跨域访问的配置,步骤如下:
在我们自定义的SpringMvc类中重写跨域请求的方法,如下操作:
/**
 * 跨域请求处理(全局的配置)
 * @param registry
 */
@Override
public void addCorsMappings(CorsRegistry registry) {
        registry.addMapping("/user/*")            // 映射本服务器中哪些http接口可以进行跨域请求
            .allowedOrigins("http://localhost:8101")           // 配置哪些来源有权限跨域
            .allowedMethods("GET","POST","DELETE","PUT");      // 配置允许跨域请求的方法
    }
就可以成功了!
2.2、单个配置
在上面的基础上,我们可以去掉自定义类中的跨域请求配置,在相应的controller方法上添加@CrossOrigin注解即可。
/**
 * 查询
 * @param id
 * @return
 */
@GetMapping("/{id}")
@ApiOperation("根据用户id查询相应的用户信息")
@CrossOrigin
public Result getUser(@PathVariable Integer id){
    User user = userService.getUser(id);
    return new Result<>(200,"查询成功!",user);
}
3、Json
SpringBoot默认提供了三种JSON映射库(Gson、Jackson、JSON-B)的继承,默认的是jackson。
3.1、Jackson的使用
| 注解 | 含义 |
|---|---|
| @JsonIgnore | 排除json序列化,将它标注在属性上将不会进行json格式化 |
| @JsonFormat(pattern = “yyyy-MM-dd hh:mm:ss”, locale = “zh”) | 进行日期格式化 |
| @JsonInclude(JsonInclude.Include.NON_NULL) | 当这个字段不为null时,给它进行json序列化 |
| @JsonProperty(“ha”) | 可以通过这个属性给字段设置别名 |
3.2、自定义json的序列化与反序列化
首先顶一个一个序列化的类,必须加上注解@JsonComponent。
接着指定需要序列化的对象,在静态类的泛型上直接指定即可,代码示例如下:
package cool.ale.config;

import com.fasterxml.jackson.core.JsonGenerator;
import com.fasterxml.jackson.core.JsonParser;
import com.fasterxml.jackson.core.JsonProcessingException;
import com.fasterxml.jackson.core.ObjectCodec;
import com.fasterxml.jackson.databind.*;
import cool.ale.entity.User;
import org.springframework.boot.jackson.JsonComponent;
import org.springframework.boot.jackson.JsonObjectDeserializer;
import org.springframework.boot.jackson.JsonObjectSerializer;

import java.io.IOException;

@JsonComponent
public class UserJsonCustom {
    public static class Serializer extends JsonObjectSerializer<User> {

        @Override
        protected void serializeObject(User user, JsonGenerator jgen, SerializerProvider provider) throws IOException {
            jgen.writeObjectField("userId",user.getId());
            jgen.writeObjectField("addR",user.getAddress());
        }
    }

    public static class deserializer extends JsonObjectDeserializer<User>{

        @Override
        protected User deserializeObject(JsonParser jsonParser, DeserializationContext context, ObjectCodec codec, JsonNode tree) throws IOException {
            User user = new User();
            // 这里的反序列化相当于是请求进来的id会进行json封装
            user.setId(tree.findValue("id").asInt());
            return user;
        }
    }
}
4、国际化
国际化我们一般有两种方式,一种是根据浏览器目前设置的语言去国际化,还有一种是传递相应的国际化标识参数来实现国际化。
下面两种都进行说明一下
4.1、通过浏览器设置的语言参数,在请求头中获取实现国际化
在SpringBoot中进行国际化文本的操作我们需要进行以下几个步骤:
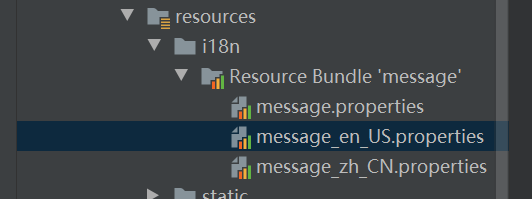
4.1.1、添加国际化资源文件
4.1.2、配置messageResource 设置国际化文本
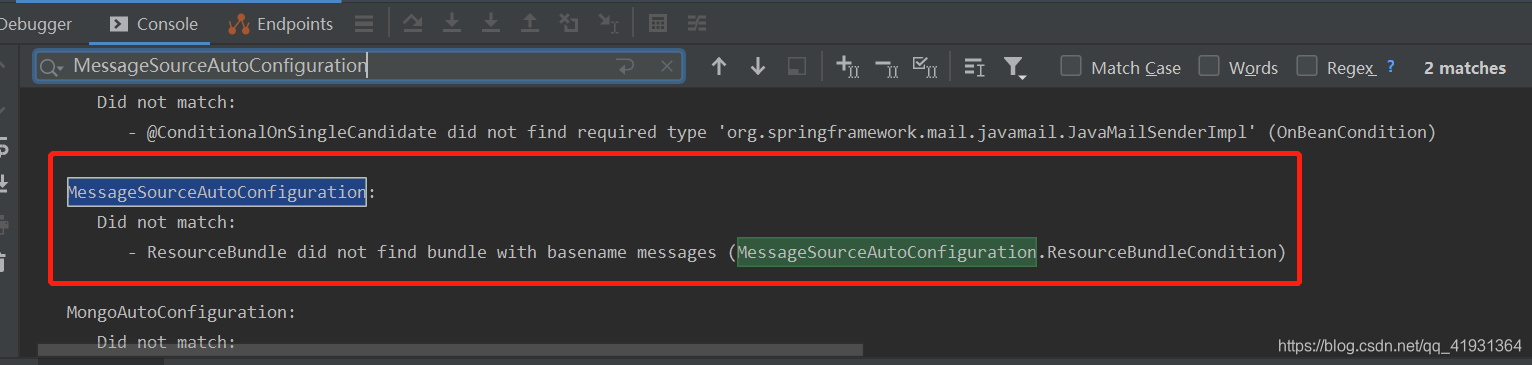
SpringBoot中提供了MessageSourceAutoConfiguration,所以我们不需要去配置messageResource。
但是他并没有生效,我们可以通过设置debug=true参数在控制台看到以下信息
下面我们通过代码分析一下为什么没有生效:
@Configuration(
    proxyBeanMethods = false
)
// 如果自己配置了@Bean名字叫messageSource的bean,就会用自定义的
@ConditionalOnMissingBean(
    name = {"messageSource"},
    search = SearchStrategy.CURRENT
)
@AutoConfigureOrder(-2147483648)
// @Conditional自定义条件匹配,会传入一个实现了Condition接口的类ResourceBundleCondition
// ResourceBundleCondition 会重写matches方法,自定义匹配规则,如果该方法返回true,则代表匹配成功
@Conditional({MessageSourceAutoConfiguration.ResourceBundleCondition.class})
@EnableConfigurationProperties
public class MessageSourceAutoConfiguration {
调用下面的matches方法,然后返回匹配结果
public final boolean matches(ConditionContext context, AnnotatedTypeMetadata metadata) {
    String classOrMethodName = getClassOrMethodName(metadata);

    try {
    	// 具体的匹配规则在 getMatchOutcome 方法里面
        ConditionOutcome outcome = this.getMatchOutcome(context, metadata);
        this.logOutcome(classOrMethodName, outcome);
        this.recordEvaluation(context, classOrMethodName, outcome);
        return outcome.isMatch();
    } catch (NoClassDefFoundError var5) {
        throw new IllegalStateException("Could not evaluate condition on " + classOrMethodName + " due to " + var5.getMessage() + " not found. Make sure your own configuration does not rely on that class. This can also happen if you are @ComponentScanning a springframework package (e.g. if you put a @ComponentScan in the default package by mistake)", var5);
    } catch (RuntimeException var6) {
        throw new IllegalStateException("Error processing condition on " + this.getName(metadata), var6);
    }
}
getMatchOutcome方法代码如下:
public ConditionOutcome getMatchOutcome(ConditionContext context, AnnotatedTypeMetadata metadata) {
	// 获取配置文件中 spring.messages.basename 属性的值,默认值为 messages
    String basename = context.getEnvironment().getProperty("spring.messages.basename", "messages");
    ConditionOutcome outcome = (ConditionOutcome)cache.get(basename);
    if (outcome == null) {
        outcome = this.getMatchOutcomeForBasename(context, basename);
        cache.put(basename, outcome);
    }

    return outcome;
}
getMatchOutcomeForBasename方法代码如下:
private ConditionOutcome getMatchOutcomeForBasename(ConditionContext context, String basename) {
    Builder message = ConditionMessage.forCondition("ResourceBundle", new Object[0]);
    String[] var4 = StringUtils.commaDelimitedListToStringArray(StringUtils.trimAllWhitespace(basename));
    int var5 = var4.length;

    for(int var6 = 0; var6 < var5; ++var6) {
        String name = var4[var6];
        Resource[] var8 = this.getResources(context.getClassLoader(), name);
        int var9 = var8.length;
		// 根据 message 获取 该类路径下的所有 properties 的资源文件
		// 当如果这个路径下有属性资源文件时,匹配结果将会是true
        for(int var10 = 0; var10 < var9; ++var10) {
            Resource resource = var8[var10];
            if (resource.exists()) {
                return ConditionOutcome.match(message.found("bundle").items(new Object[]{resource}));
            }
        }
    }

    return ConditionOutcome.noMatch(message.didNotFind("bundle with basename " + basename).atAll());
}
所以,根据以上的代码跟踪,MessageSourceAutoConfiguration没有匹配到是因为系统没有找到相应的国际化文本属性资源文件,所以,根据刚才代码的逻辑,有以下两种解决方式:
1、将文件夹i18n的名称改为messages。
2、在配置文件中配置spring.messages.basename属性,指定i18n文件夹的位置。
我们再次重启观察控制台,如下所示:

4.1.3、通过去解析请求头中的accept-language 或者 解析url参数中?local=
在WebMvcAutoConfiguration类中有一个解析请求头中的accept-language方法localeResolver
@Bean
@ConditionalOnMissingBean(
    name = {"localeResolver"}
)
public LocaleResolver localeResolver() {
	// 当配置文件中有 spring.mvc.locale-resolver=fixed
	// 就会去配置文件里面找 spring.mvc.locale,这里相当于设置了一个固定值
    if (this.webProperties.getLocaleResolver() == org.springframework.boot.autoconfigure.web.WebProperties.LocaleResolver.FIXED) {
        return new FixedLocaleResolver(this.webProperties.getLocale());
    } else if (this.mvcProperties.getLocaleResolver() == org.springframework.boot.autoconfigure.web.servlet.WebMvcProperties.LocaleResolver.FIXED) {
        return new FixedLocaleResolver(this.mvcProperties.getLocale());
    } else {
    	// 如果上面没有设置fixed,则会以AcceptHeaderLocaleResolver 类去解析
    	// 将配置文件里面的这个参数当成一个默认值,如果请求头没有的话,则会去取这个默认值
        AcceptHeaderLocaleResolver localeResolver = new AcceptHeaderLocaleResolver();
        Locale locale = this.webProperties.getLocale() != null ? this.webProperties.getLocale() : this.mvcProperties.getLocale();
        localeResolver.setDefaultLocale(locale);
        return localeResolver;
    }
}
AcceptHeaderLocaleResolver类的解析方法,代码如下:
public Locale resolveLocale(HttpServletRequest request) {
    Locale defaultLocale = this.getDefaultLocale();
    // 先去请求头的Accept-Language参数去找,如果没有,则会找配置文件里面默认的
    if (defaultLocale != null && request.getHeader("Accept-Language") == null) {
        return defaultLocale;
    } else {
        Locale requestLocale = request.getLocale();
        List<Locale> supportedLocales = this.getSupportedLocales();
        if (!supportedLocales.isEmpty() && !supportedLocales.contains(requestLocale)) {
            Locale supportedLocale = this.findSupportedLocale(request, supportedLocales);
            if (supportedLocale != null) {
                return supportedLocale;
            } else {
                return defaultLocale != null ? defaultLocale : requestLocale;
            }
        } else {
            return requestLocale;
        }
    }
}
4.1.4、直接通过MessageSource类调用
在需要使用的类中先注入MessageSource类,然后通过这个类调用相应的国际化文本信息。
package cool.ale.controller;

import cool.ale.entity.Result;
import cool.ale.entity.User;
import cool.ale.service.UserService;
import io.swagger.annotations.Api;
import io.swagger.annotations.ApiOperation;
import org.springframework.beans.factory.annotation.Autowired;
import org.springframework.context.MessageSource;
import org.springframework.context.i18n.LocaleContextHolder;
import org.springframework.web.bind.annotation.*;

@RestController
@RequestMapping("/user")
@Api("用户控制类")
public class UserController {

    @Autowired
    UserService userService;

    @Autowired
    MessageSource messageSource;

    /**
     * 查询
     * @param id
     * @return
     */
    @GetMapping("/{id}")
    @ApiOperation("根据用户id查询相应的用户信息")
    public Result getUser(@PathVariable Integer id){
        String message = messageSource.getMessage("user.query.success",null, LocaleContextHolder.getLocale());
        User user = userService.getUser(id);
        return new Result<>(200,message,user);
    }
}
4.2、根据传递参数的形式实现国际化
传递参数的形式也就类似于在页面搞一个下拉列表,当选择中文页面就显示中文,当选择英文页面就展示英文。
我们在上面的基础上有以下几个步骤需要操作:
4.2.1、添加国际化拦截器(在MyWebMvcConfiguration类中,自定义的)
/**
 * 添加拦截器
 * @param registry
 */
@Override
public void addInterceptors(InterceptorRegistry registry) {
    // 添加国际化拦截器
    registry.addInterceptor(new LocaleChangeInterceptor())
            .addPathPatterns("/**");    // 拦截映射规则
}
4.2.2、覆盖掉之前的获取国际化标识的方法(在MyWebMvcConfiguration类中,自定义的)
/**
 * 重写localeResolver方法,让其在 url 中取参数设置国际化文本
 * @return
 */
@Bean
public LocaleResolver localeResolver() {
    CookieLocaleResolver cookieLocaleResolver = new CookieLocaleResolver();
    // 设置过期时间,设计一个月
    cookieLocaleResolver.setCookieMaxAge(60*60*24*30);
    cookieLocaleResolver.setCookieName("locale");
    return cookieLocaleResolver;
}
4.2.3、测试
http://localhost:8080/user/2?locale=en_US
10、其它
10.1、WebMvcConfigurer原理
其实在SpringMvc的自动配置类WebMvcAutoConfiguration里面有一个静态类也实现了WebMvcConfigurer类,也是通过与上面同样的配置来对一些默认配置的扩展,我们自己只需要扩展一些其它的东西来完善我们的系统。
但是现在有一个问题就是,我们虽然重写了这个接口,但是SpringBoot的配置依然生效,那么这些配置相互之前是如何配合的,需要接下来来研究。
在WebMvcAutoConfiguration类上我们导入了一个EnableWebMvcConfiguration类,如下所示:
@Import({WebMvcAutoConfiguration.EnableWebMvcConfiguration.class})
EnableWebMvcConfiguration类又继承于DelegatingWebMvcConfiguration类,在这个类中会将所有的实现了WebMvcConfigurer接口的类组成一个list存储到delegates委派器中。
private final WebMvcConfigurerComposite configurers = new WebMvcConfigurerComposite();

public DelegatingWebMvcConfiguration() {
}

@Autowired(
    required = false
)
public void setConfigurers(List<WebMvcConfigurer> configurers) {
    if (!CollectionUtils.isEmpty(configurers)) {
        this.configurers.addWebMvcConfigurers(configurers);
    }

}
在调用这个方法时,会去循环刚才存储的委派器,进行获取。如下所示:
public void configureDefaultServletHandling(DefaultServletHandlerConfigurer configurer) {
    Iterator var2 = this.delegates.iterator();

    while(var2.hasNext()) {
        WebMvcConfigurer delegate = (WebMvcConfigurer)var2.next();
        delegate.configureDefaultServletHandling(configurer);
    }

}
注意:我们在自定义的SpringMvc类上千万不能加上@EnableWebMvc注解,因为当我们加上这个注解之后,WebMvcAutoConfiguration类中的扩展方法将会失效。
失效原理:
当我们进入@EnableWebMvc注解的实现的时候,会发现它导入了DelegatingWebMvcConfiguration类
@Retention(RetentionPolicy.RUNTIME)
@Target({ElementType.TYPE})
@Documented
@Import({DelegatingWebMvcConfiguration.class})
public @interface EnableWebMvc {
}
然而DelegatingWebMvcConfiguration又继承于WebMvcConfigurationSupport类。
而再次看到我们的WebMvcAutoConfiguration类只有在IOC容器中不存在WebMvcConfigurationSupport类的时候才生效,所以,这个时候WebMvcAutoConfiguration类就失效了。
@Configuration(
    proxyBeanMethods = false
)
@ConditionalOnWebApplication(
    type = Type.SERVLET
)
@ConditionalOnClass({Servlet.class, DispatcherServlet.class, WebMvcConfigurer.class})
@ConditionalOnMissingBean({WebMvcConfigurationSupport.class})
@AutoConfigureOrder(-2147483638)
@AutoConfigureAfter({DispatcherServletAutoConfiguration.class, TaskExecutionAutoConfiguration.class, ValidationAutoConfiguration.class})
public class WebMvcAutoConfiguration {


 被折叠的 条评论
为什么被折叠?
被折叠的 条评论
为什么被折叠?
 到【灌水乐园】发言


