


一、高并发下缓存失效问题–缓存穿透,缓存击穿,缓存雪崩
一、缓存穿透
缓存穿透:
指查询一个一定不存在的数据,由于缓存是不命中,将去查数据库,但是数据库也无此记录,我们没有把这次查询的null写入缓存,这将导致这个不存在的数据每次请求都要到存储层去查询,失去了缓存的意义。
一句话概括:
一直来查询一个不存在的数据,导致缓存一直不命中,全部去查数据库。导致数据库瞬时压力过大,导致数据库崩溃。
风险:
利用不存在的数据进行攻击,数据库瞬时压力增大,最终导致崩溃。
解决办法:
null结果缓存,并加入短暂过期时间。
二、缓存雪崩
缓存雪崩:
缓存雪崩是指我们设置缓存时key采用的相同的过期时间,导致缓存在某一段时刻同时失效,请求全部到数据库,数据库瞬时压力过重,导致雪崩。
解决:
原有的失效时间上增加一个随机值,比如1~5分钟随机,这样每一个缓存的过期时间的重复率就会降低,就很难引发集体失效事件。
三、缓存击穿
缓存击穿:
对于一些设置了过期时间的key,如果这些key可能会在某些时间点被超高并发访问,是一种非常“热点”的数据。
如果这个key在大量请求同时进来时刚好失效,那么所有的对这个key的数据查询都会落到数据库,我们称为缓存击穿。
解决:
加锁
大量的并发只让一个人查,其他人等待,查到以后释放锁,其他人获取到锁,先查缓存,就会有数据,不用去数据库。
二、分布式锁的原理和使用
2.1 redisson使用
1)引入依赖
<!-- https://mvnrepository.com/artifact/org.redisson/redisson -->
<dependency>
    <groupId>org.redisson</groupId>
    <artifactId>redisson</artifactId>
    <version>3.12.0</version>
</dependency>
2)配置redisson
 @Bean(destroyMethod="shutdown")
        RedissonClient redisson() throws IOException {
            //1.创建配置
            Config config = new Config();
            config.useSingleServer()
                  .setAddress("redis://127.0.0.1:6379");
            //2.根据config创建出RedissonClient
            RedissonClient redissonClient = Redisson.create(config);
            return redissonClient;
        }
3) 使用
	@Autowired
    RedissonClient redisson;

    @ResponseBody
    @GetMapping("/hello")
    public String hello(){
        //1.获取一把锁,只要锁的名字一样,就是同一把锁
        RLock lock = redisson.getLock("my-lock");
        //2.加锁
       // lock.lock(); //阻塞式等待。默认加的锁都是30秒
        //1.锁的自动续期,如果业务超长,运行期间自动给锁续上30s。不用担心业务时间长,锁自动过期删掉
        //2.加锁的业务只要运行完成,就不会给当前锁续期,即使不手动解锁,默认在30s后自动删除
        lock.lock(10, TimeUnit.SECONDS);//10秒自动解锁,自动解锁时间一定要大于业务的执行时间。
        //问题:lock.lock(10,TimeUnit.SECONDS);在锁时间到了以后,不会自动续期。
        //1.如果我们传递了锁的超时时间,就发送给redis执行脚本,进行占锁,默认超时就是我们指定的时间
        //2.如果我们未指定锁的超时时间,就使用30 * 1000 【LockWatchdogTimeout看门狗的默认时间】;
        //只要占锁成功,就会启动一个定时任务【重新给锁设置过期时间,新的过期时间就是看门狗的默认时间】,每隔10s都会自动再次续期
        //最佳实战    lock.lock(30, TimeUnit.SECONDS); 省掉了整个续期操作
        try {
            System.out.println("加锁成功,执行业务。。。"+Thread.currentThread().getId());
            Thread.sleep(30000);
        } catch (Exception e) {
            throw new RuntimeException("执行失败");
        } finally {
            //3.解锁
            System.out.println("释放锁。。。"+Thread.currentThread().getId());
            lock.unlock();
        }
        return "hello";
    }
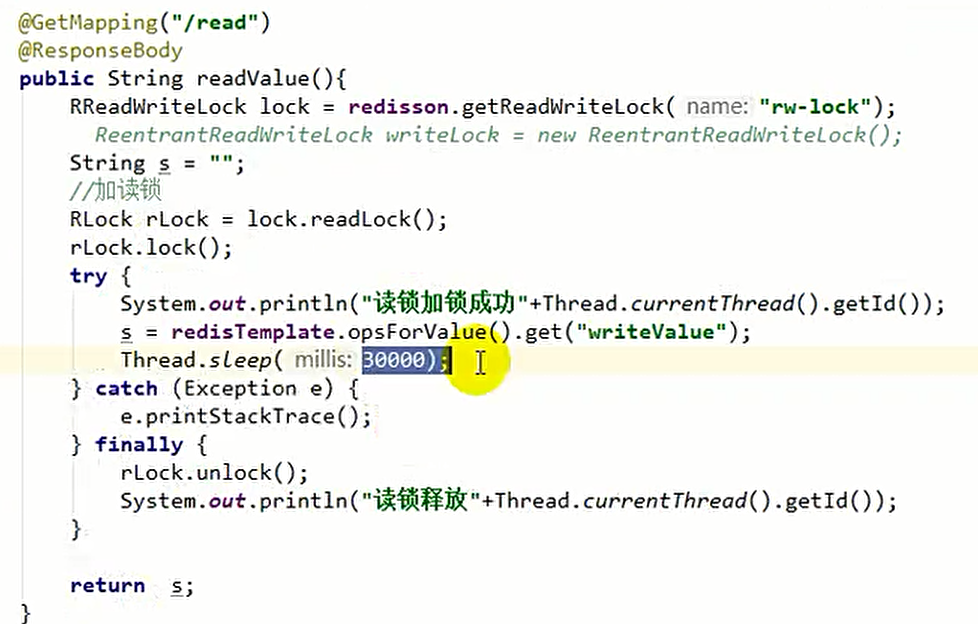
读写锁
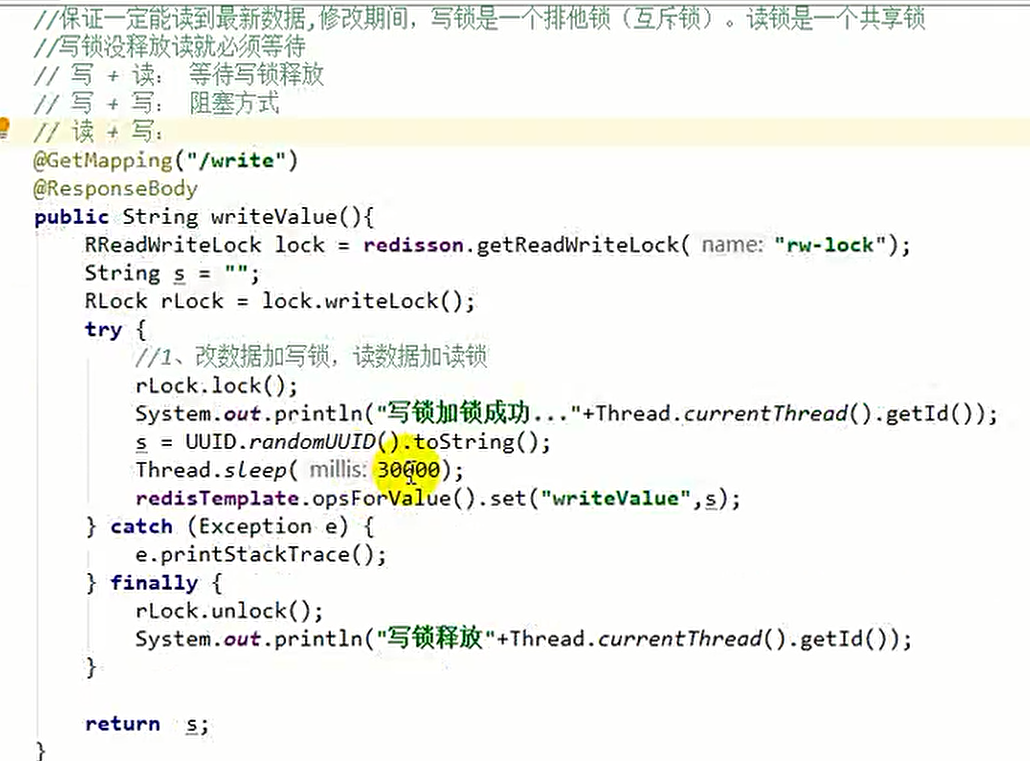
保证一定能读到最新数据,修改期间,写锁是一个排他锁(互斥锁)。读锁是一个共享锁
写锁没释放读就必须等待
写+读:等待写锁释放
写+写:阻塞方式
读+写:有读锁。写也需要等待。
读+读:相当于无锁,并发读,只会在redis中记录好,所有当前的读锁。他们都会同时加锁成功
总结:只要有写的存在,都必须等待
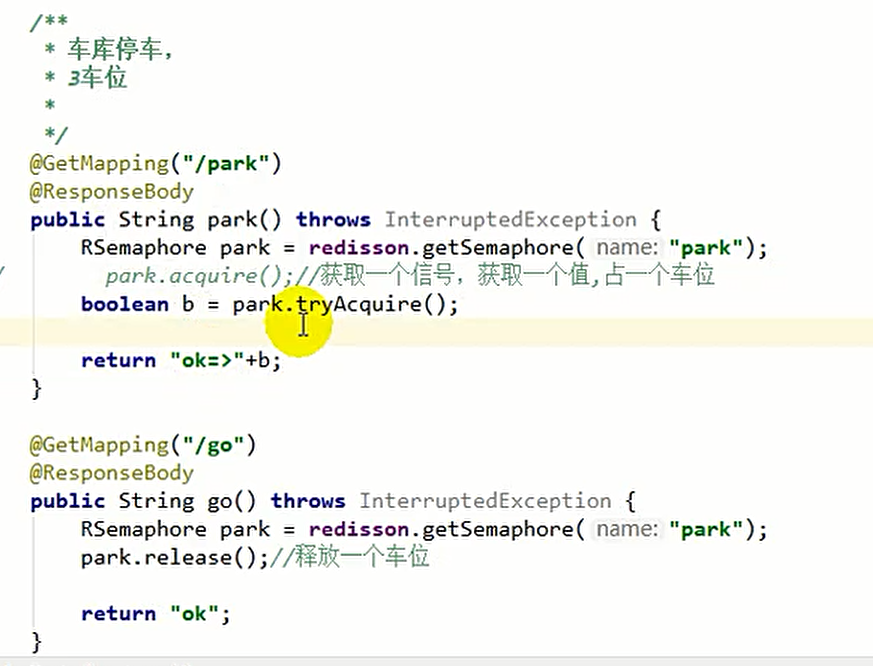
信号量(semaphore)也可用做分布式限流
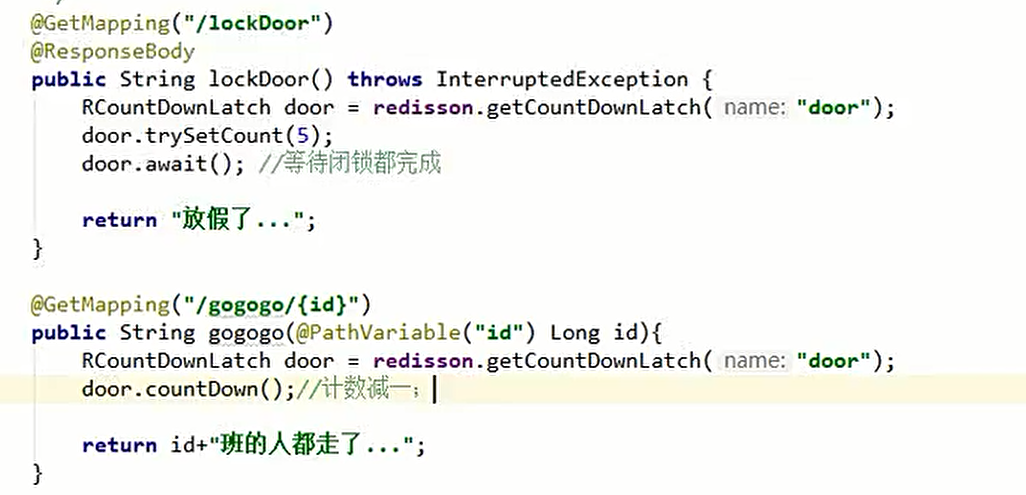
闭锁(模拟放假)
锁的粒度
1.锁的名字。锁的粒度,越细越快
//锁的粒度:具体缓存的的某个数据,11号商品: product-11-lock
2.2 整合SpringCache简化缓存开发
缓存里面的数据如何和数据库保持一致
缓存的一致性
1.双写模式
2.失效模式
1)引入依赖
<dependency>
			<groupId>org.springframework.boot</groupId>
			<artifactId>spring-boot-starter-data-redis</artifactId>
		</dependency>
		<dependency>
			<groupId>org.springframework.boot</groupId>
			<artifactId>spring-boot-starter-cache</artifactId>
		</dependency>
2.)写配置
(1.)自动配置了那些
CacheAuroConfiguration会导入RedisCacheConfiguration;
自动配好了缓存管理器RedisCacheManager
(2.)配置redis作为缓存
spring.cache.type=redis
3.)测试使用缓存
@Cacheable: Triggers cache popuLation.:触发将数据保存到缓存的操作
@CacheEvict:Triggers cache eviction.:触发将数据从缓存删除的操作
@CachePut:Updates the cache without interfering with the method execution.:不影响方法执行更新缓存
@Caching:Regroups multiple cache operations to be applied on a method.:组合以上多个操作
@CacheConfig:Shares some common cache-related settings at class-Level.在类级别共享缓存的相同配置
1.)开启缓存功能
@EnableCaching
2.)只需要使用注解就能完成缓存功能
读模式下:
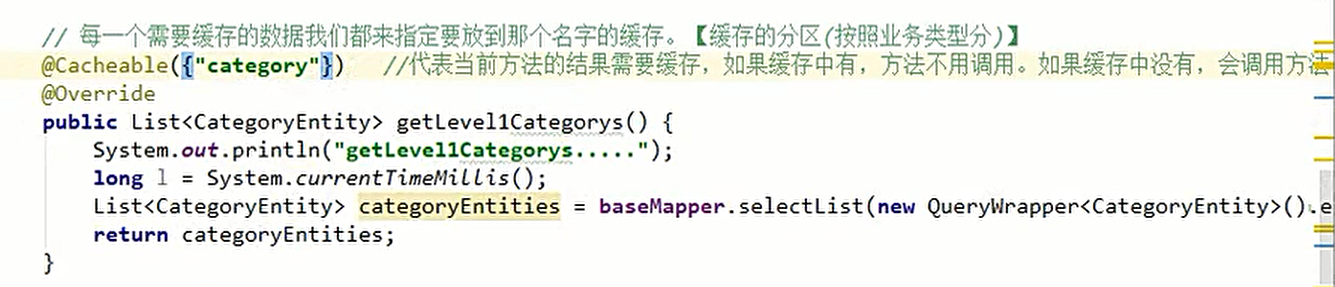
@Cacheable(value = {"category"},key = "'level1categorys'",sync = true)
3)自定义
1,指定生成的key: key属性指定(默认::SimpleKey)
2.指定缓存的数据存活时间,配置文件中修改ttl(默认-1永久)
spring.cache.redis.time-to-live=3600000
spring.cache.redis.key-prefix=CACHE_
spring.cache.redis.use-key-prefix=true
#是否缓存null值 防止缓存穿透
spring.cache.redis.cache-null-values=true
3.将数据保存为json格式(默认java序列化)
package com.cache.study.config;

import com.alibaba.fastjson.support.spring.GenericFastJsonRedisSerializer;
import org.springframework.boot.autoconfigure.cache.CacheProperties;
import org.springframework.boot.context.properties.EnableConfigurationProperties;
import org.springframework.cache.annotation.EnableCaching;
import org.springframework.context.annotation.Bean;
import org.springframework.context.annotation.Configuration;
import org.springframework.data.redis.cache.RedisCacheConfiguration;
import org.springframework.data.redis.serializer.RedisSerializationContext;
import org.springframework.data.redis.serializer.StringRedisSerializer;

/**
 * @create 2020-10-03 13:41
 * @description:
 */
@EnableCaching
@Configuration
@EnableConfigurationProperties(CacheProperties.class)
public class MyCatheConfig {

    @Bean
    RedisCacheConfiguration redisCacheConfiguration(CacheProperties cacheProperties){
        RedisCacheConfiguration config = RedisCacheConfiguration.defaultCacheConfig();
        config = config.serializeKeysWith(RedisSerializationContext.SerializationPair.fromSerializer(new StringRedisSerializer()));
        config = config.serializeValuesWith(RedisSerializationContext.SerializationPair.fromSerializer(new GenericFastJsonRedisSerializer()));

        CacheProperties.Redis redisProperties = cacheProperties.getRedis();

        //让配置文件的东西生效
        if (redisProperties.getTimeToLive() != null) {
            config = config.entryTtl(redisProperties.getTimeToLive());
        }

        if (redisProperties.getKeyPrefix() != null) {
            config = config.prefixCacheNameWith(redisProperties.getKeyPrefix());
        }

        if (!redisProperties.isCacheNullValues()) {
            config = config.disableCachingNullValues();
        }

        if (!redisProperties.isUseKeyPrefix()) {
            config = config.disableKeyPrefix();
        }


        return config;
    }

}
写模式下
@CacheEvict:失效模式

//同时进行多种缓存操作
@Caching(evict = {
        @CacheEvict(value = {"category"},key = "'level1categorys'"),
        @CacheEvict(value = {"category"},key = "'categoryJson'")
})
或者删除缓存分区

@CacheEvict(value = "category",allEntries = true)
存储同一类型的数据,都可以指定成同一个分区。分区名默认就是缓存的前缀(不指定前缀)
三,、异步与线程池的使用
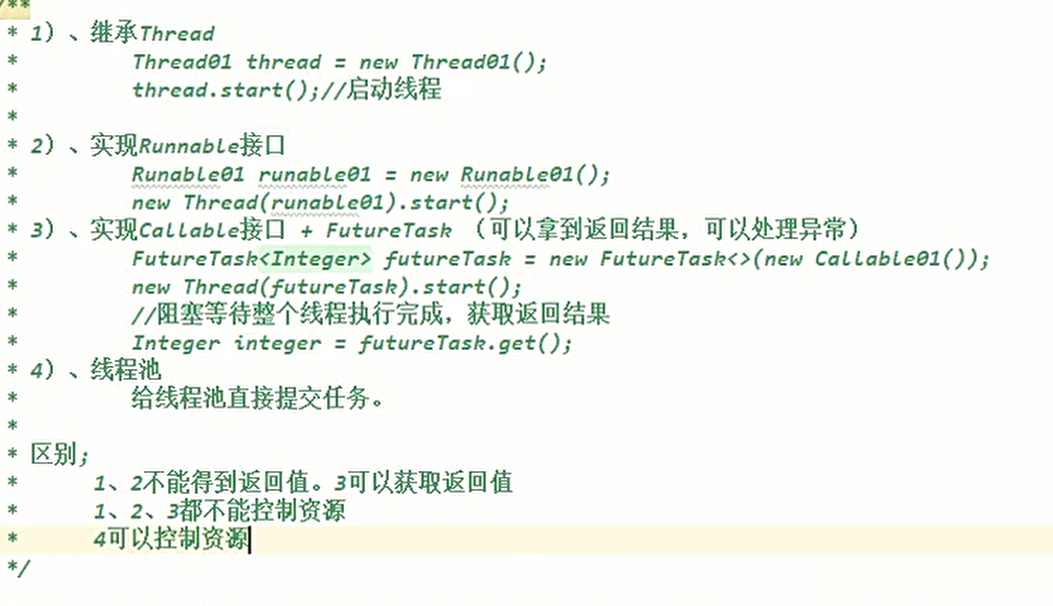
1.创建线程的四种方式
2.线程池的使用及详解
第一种:
public static ExecutorService service= Executors.newFixedThreadPool(Threads: 10)
第二种:
 ThreadPoolExecutor executor = new ThreadPoolExecutor(5,
                200,
                10,
                TimeUnit.SECONDS,
                new LinkedBlockingDeque<>(100000),
                Executors.defaultThreadFactory(),
                new ThreadPoolExecutor.AbortPolicy());
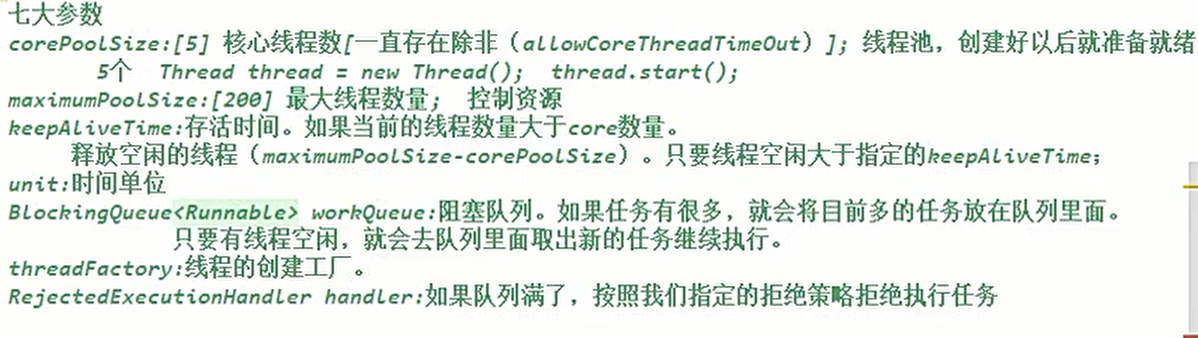
参数详解:
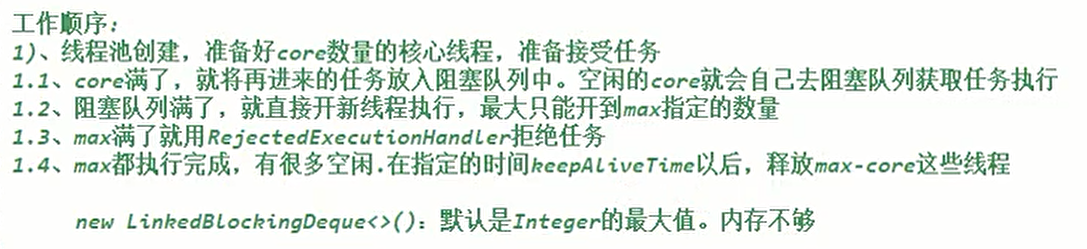
工作顺序:
面试题:一个线程池core7,max 20,queue: 50 100个并发进来怎么分配?
7个立即得到执行,50个进入队列,再开13个进行执行。剩下的30个就是用拒绝策略一般丢弃
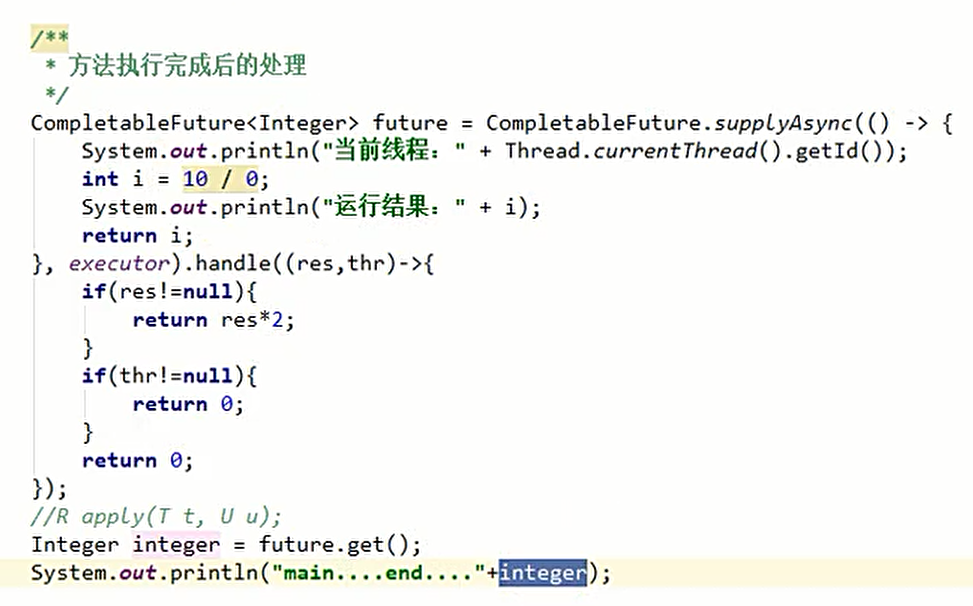
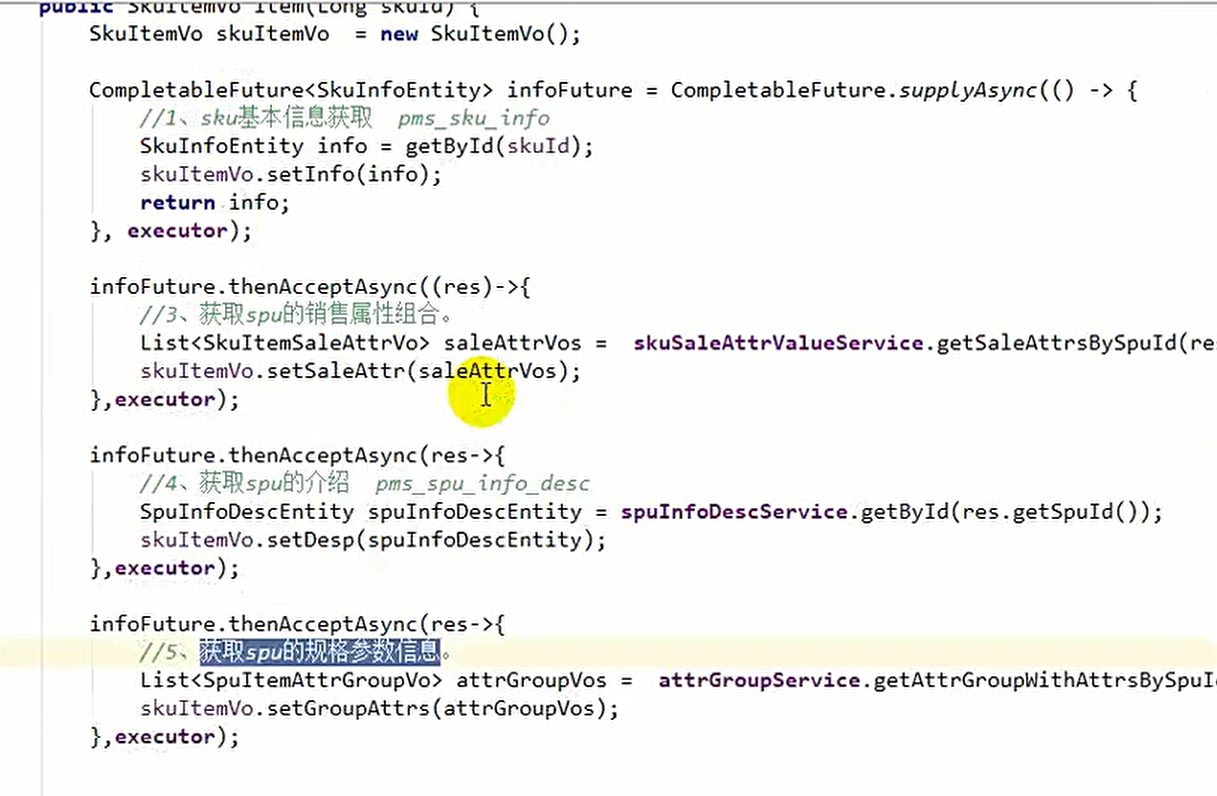
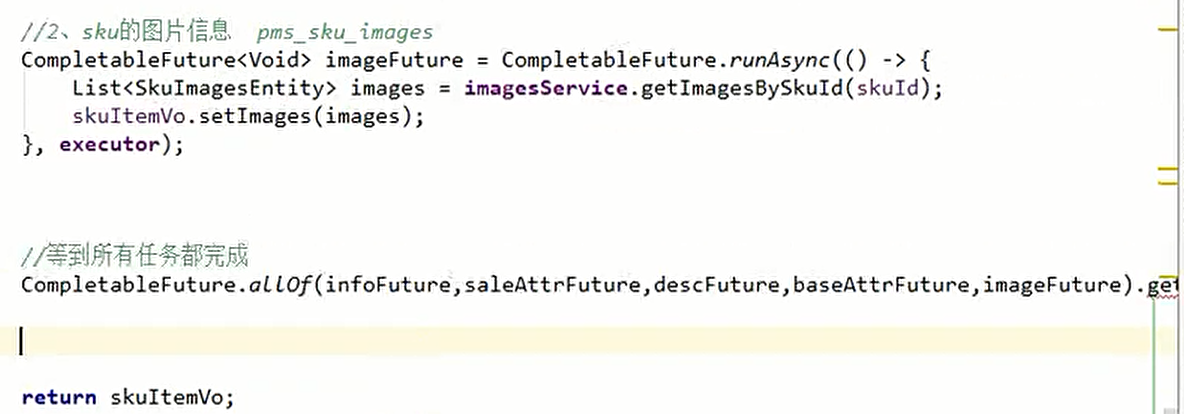
3.completablefuture使用
1.whenComplete方法
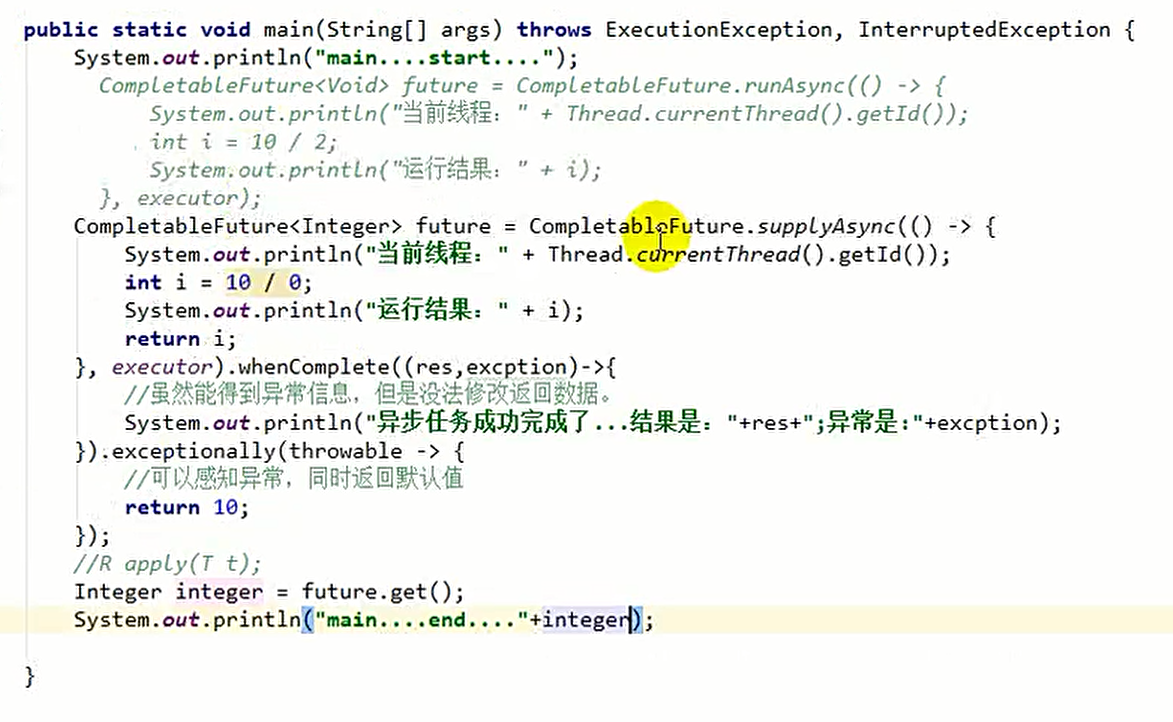
2.handle方法
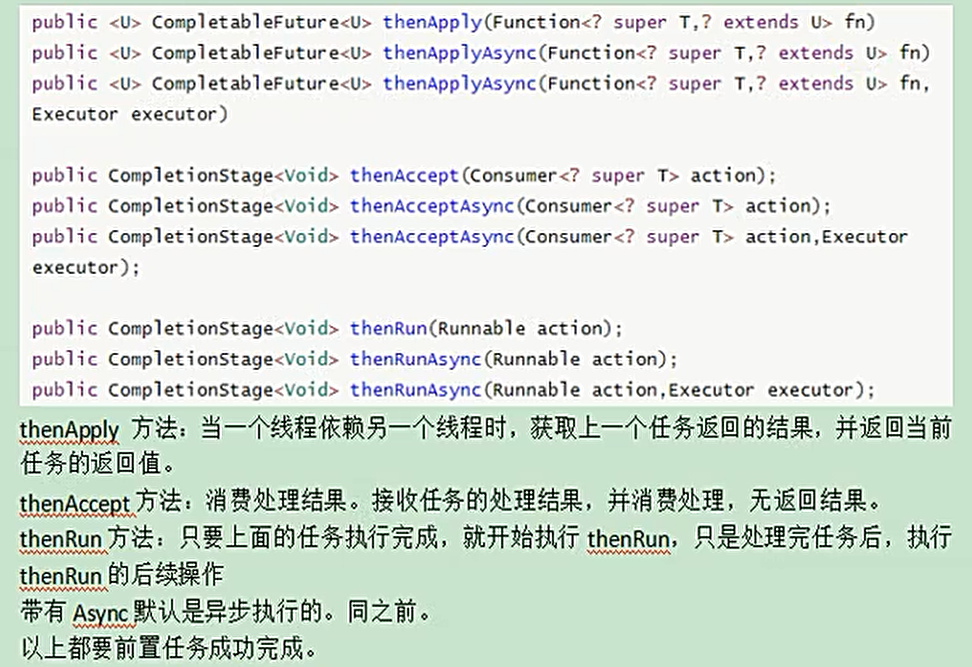
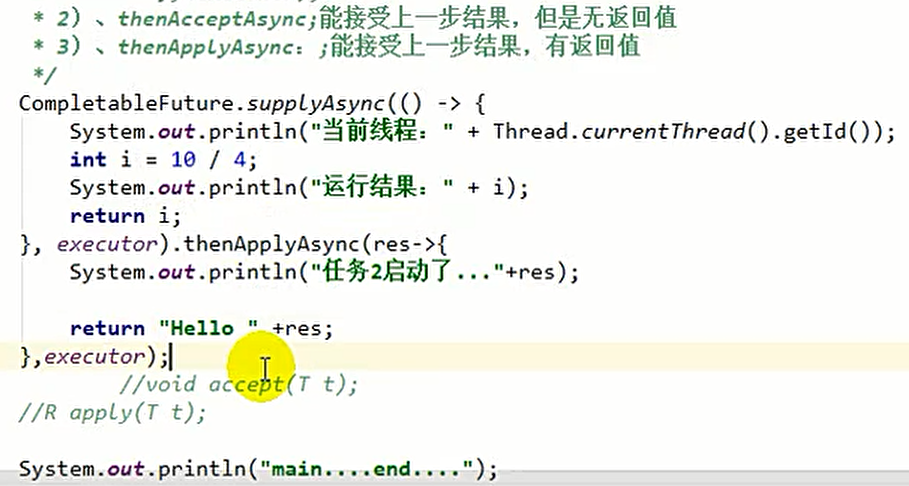
3.线程串行化方法

package com.thead.study.config;

import org.springframework.boot.context.properties.EnableConfigurationProperties;
import org.springframework.context.annotation.Bean;
import org.springframework.context.annotation.Configuration;

import java.util.concurrent.Executors;
import java.util.concurrent.LinkedBlockingDeque;
import java.util.concurrent.ThreadPoolExecutor;
import java.util.concurrent.TimeUnit;

/**
 * @create 2020-10-04 13:17
 * @description:
 */
@Configuration
//@EnableConfigurationProperties(ThreadPoolConfigProperties.class)
public class MyThreadConfig {

    @Bean
    public ThreadPoolExecutor threadPoolExecutor(ThreadPoolConfigProperties pool){
        return new ThreadPoolExecutor(
                pool.getCoreSize(),
                pool.getMaxSize(),
                pool.getKeepAliveTime(),
                TimeUnit.SECONDS,
                new LinkedBlockingDeque<>(100000),
                Executors.defaultThreadFactory(),
                new ThreadPoolExecutor.AbortPolicy());
    }
}
package com.thread.study.config;

import lombok.Data;
import org.springframework.boot.context.properties.ConfigurationProperties;
import org.springframework.stereotype.Component;

/**
 * @create 2020-10-04 13:18
 * @description:
 */
@Component
@ConfigurationProperties(prefix = "test.thread")
@Data
public class ThreadPoolConfigProperties {

    private Integer coreSize;
    private Integer maxSize;
    private Integer keepAliveTime;
}
test.thread.core-size=20
test.thread.max-size=200
test.thread.keep-alive-time=10
实战:
 [外链图片转存失败,源站可能有防盗链机制,建议将图片保存下来直接上传(img-7fjk2ndY-1602665533647)(http://echo20.oss-cn-chengdu.aliyuncs.com//PicGo/image-20201004133021121.png)]
四、解决分布式session不共享问题
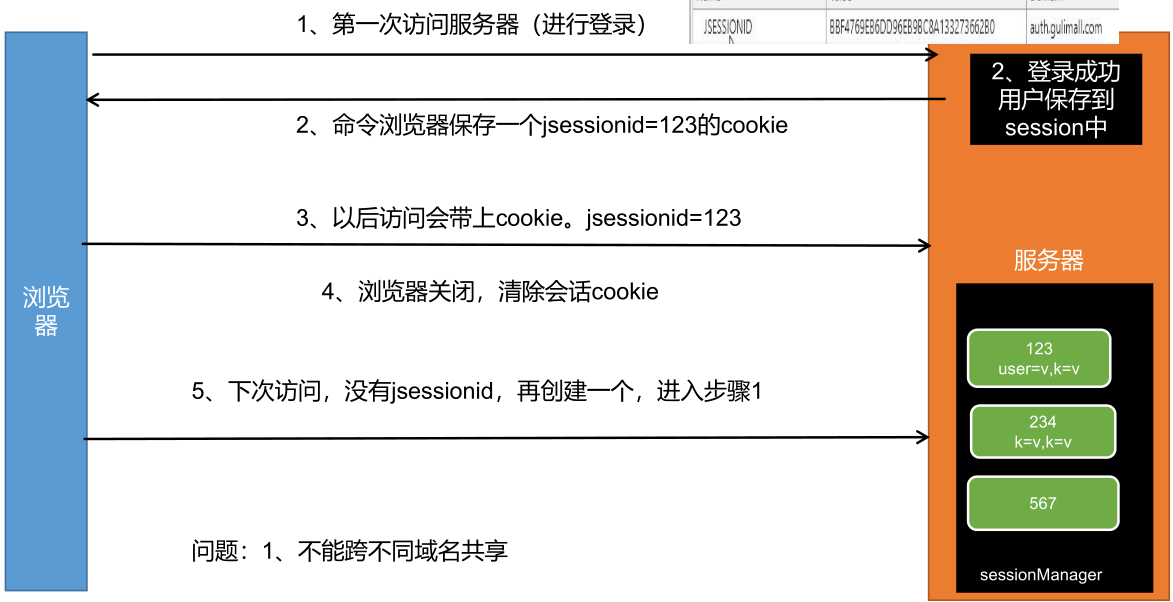
session共享原理
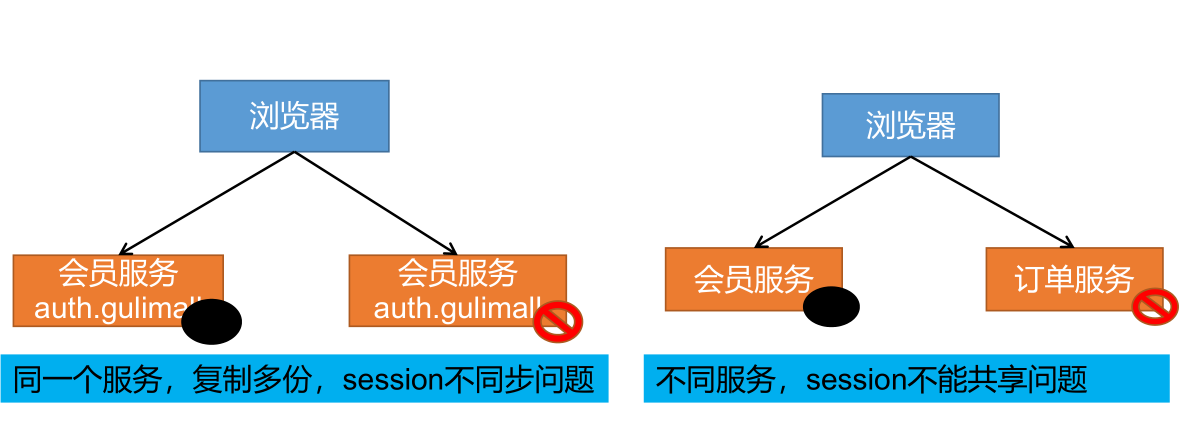
解决思路
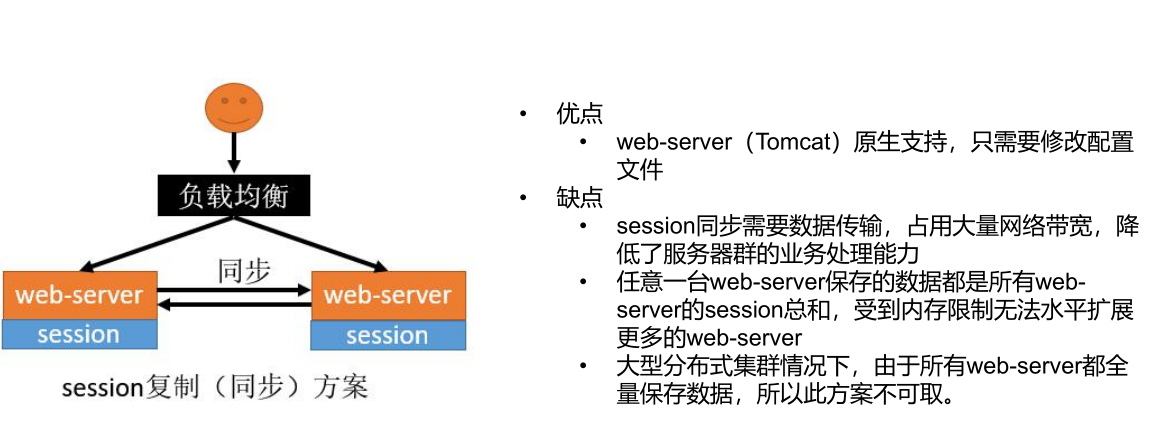
1.Session共享问题解决-session复制
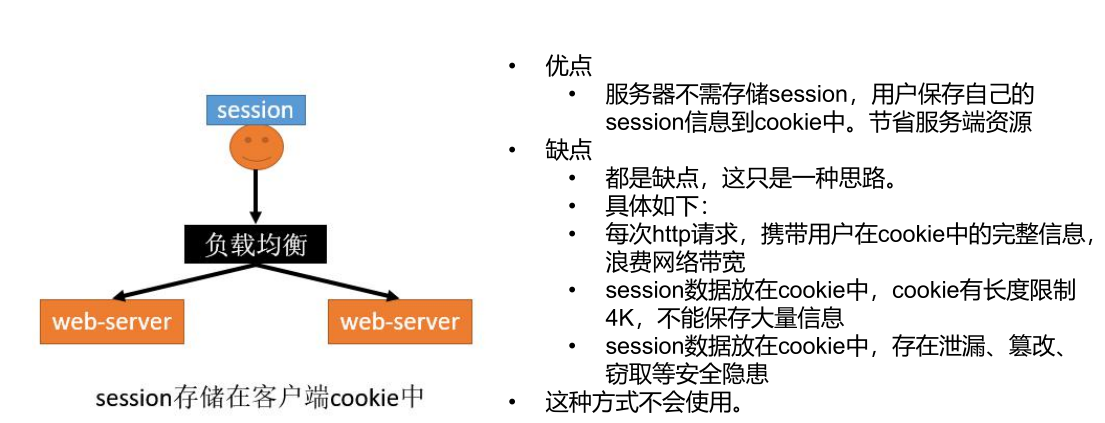
2.Session共享问题解决-客户端存储
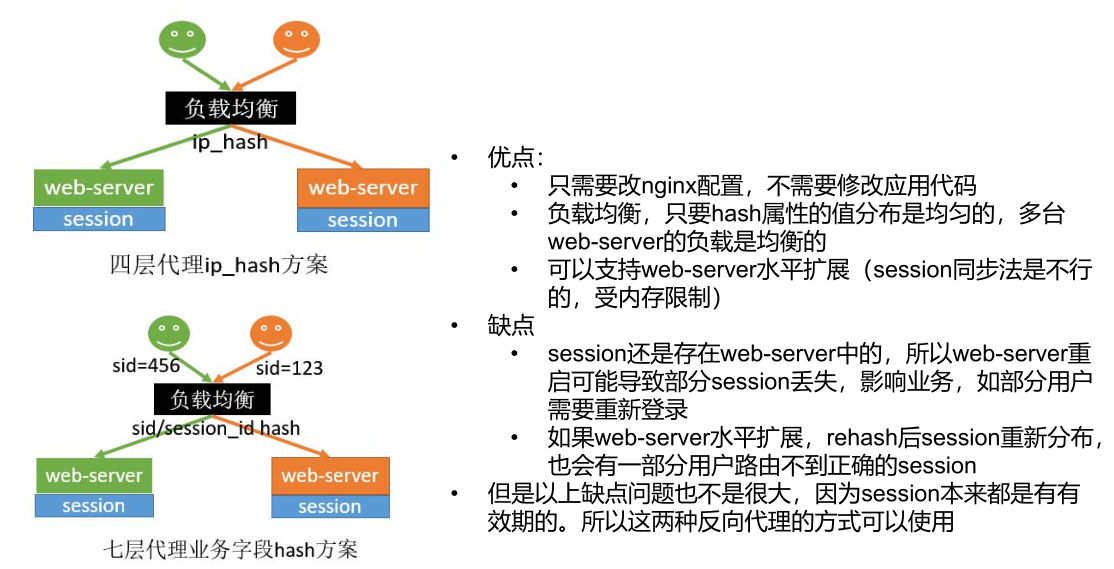
3.Session共享问题解决-hash一致性
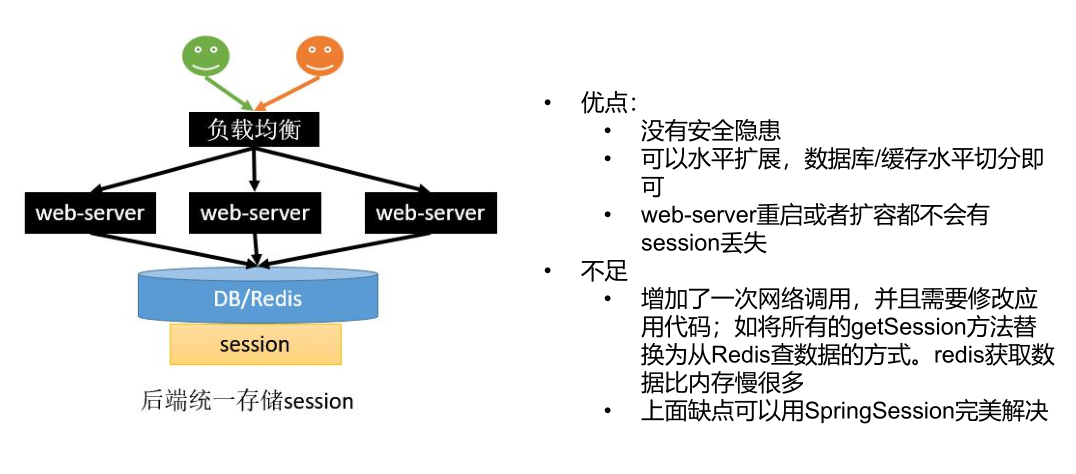
4.Session共享问题解决-统一存储(主要解决方式)
实现:
1.导jar
 <!-- 整合springsession -->
        <dependency>
            <groupId>org.springframework.session</groupId>
            <artifactId>spring-session-data-redis</artifactId>
        </dependency>
2.写配置
spring.session.store-type=redis
3.开启session
@EnableRedisHttpSession
4.子域共享
@Configuration
public class GulimallSessionConfig {

    @Bean
    public CookieSerializer cookieSerializer() {

        DefaultCookieSerializer cookieSerializer = new DefaultCookieSerializer();

        //放大作用域
        cookieSerializer.setDomainName("test.com");
        cookieSerializer.setCookieName("GULISESSION");

        return cookieSerializer;
    }

	//json序列化
    @Bean
    public RedisSerializer<Object> springSessionDefaultRedisSerializer() {
        return new GenericJackson2JsonRedisSerializer();
    }

}
mallSessionConfig {
@Bean
public CookieSerializer cookieSerializer() {

    DefaultCookieSerializer cookieSerializer = new DefaultCookieSerializer();

    //放大作用域
    cookieSerializer.setDomainName("test.com");
    cookieSerializer.setCookieName("GULISESSION");

    return cookieSerializer;
}

//json序列化
@Bean
public RedisSerializer<Object> springSessionDefaultRedisSerializer() {
    return new GenericJackson2JsonRedisSerializer();
}
}


 1万+
1万+

 被折叠的 条评论
为什么被折叠?
被折叠的 条评论
为什么被折叠?
 到【灌水乐园】发言


