


大家看到这个标题,可能会感觉很熟悉,觉得似曾相识!!!但是请注意,这是注解,不是注释!!!让我们来区分一下两者
- 给程序员看的是注释(单行注释、多行注释、doc注释)
- Annotation 其实就是代码里的特殊标记, 它用于替代配置文件,也就是说,传统方式通过配置文件告诉类如何运行,有了注解技术后,开发人员可以通过注解告诉类如何运行。在Java技术里注解的典型应用是:可以通过反射技术去得到类里面的注解,以决定怎么去运行类。
注解的分类
- 标记注解
- 单值注解
- 多值/普通注解
JDK提供的常见注解
- @Override(限定重写父类方法, 该注解只能用于方法)
- @Deprecated(这个方法或类不再建议使用。在新版本中有其他方法或类可以代替这个使用,以后的版本也不会再更新这个方法或类)
- @SupperessWarnings(抑制编译器发出警告)
举个栗子:
抑制所有警告提示 —— 在方法前添加 @SuppressWarnings(“all”)
变量未被使用的警告提示 —— 在方法前添加 @SuppressWarnings(“unused”)
抑制与使用Closeable类型资源相关的警告 —— @SuppressWarnings(“resource”)
例如此类的关键字还有很多,此处只列举常见的几个。。。
元注解(解释注解的注解数据)
- @Target(限定注解的使用目标)
格式:@Target(value = { ElementType.* })
ElementType是枚举类型的;这里的 * 可以是 :
TYPE, FIELD, METHOD, PARAMETER, CONSTRUCTOR, LOCAL_VARIABLE,
ANNOTATION_TYPE, PACKAGE
- @Retention(指明注解信息的保存时间)
格式:@Retention(value = RetentionPolicy.*)
RetentionPolicy是枚举类型的;这里的 * 可以是:
- SOURCE:注解信息只保存在源程序中,在类文件中不保存
- CLASS (Default):注解信息保存在类文件中,程序运行时不能通过反射找到
- RUNTIME:注解保存在类文件中,程序运行时通过反射API可以找到
接下来给出一个小例子,让大家明白注解的基本用法
import java.lang.annotation.ElementType;
import java.lang.annotation.Retention;
import java.lang.annotation.RetentionPolicy;
import java.lang.annotation.Target;

// 元注解
@Target(ElementType.TYPE)
@Retention(RetentionPolicy.RUNTIME)
public @interface MyAnnotation
{
    // 如果注解的某属性有default,则该注解里面的属性可以不赋值,只写而不赋值
    String name() default "";

    int len();
    // 注解是由属性和值构成的键值对
    // 注解属性的类型共有24种
    // 基本类型, String, Class, enums, annotations, 以及它们的数组

}

}
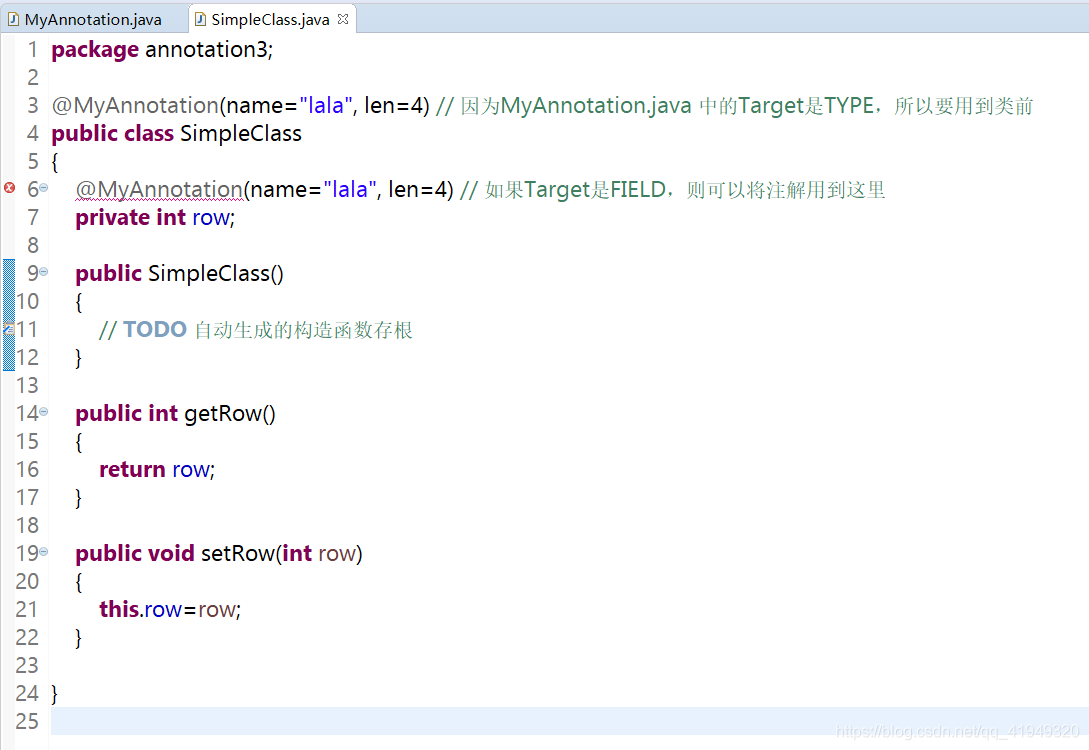
注意看图中报错的那部分
注解 与 反射机制 结合实例:
首先给出一个注解 Column(这个注解的目标是 成员):
import static java.lang.annotation.ElementType.FIELD;
import static java.lang.annotation.RetentionPolicy.RUNTIME;

import java.lang.annotation.Retention;
import java.lang.annotation.Target;

@Retention(RUNTIME)
@Target(FIELD)
public @interface Column
{
    String name() default "";
}
给出一个注解 Table(这个注解的目标是 方法):
import static java.lang.annotation.ElementType.TYPE;
import static java.lang.annotation.RetentionPolicy.RUNTIME;

import java.lang.annotation.Retention;
import java.lang.annotation.Target;

@Retention(RUNTIME)
@Target(TYPE)
public @interface Table
{
    String value();
}
给出一个应用上面两个注解的类:StudentInfo
@Table(value="sys_student_info")
public class StudentInfo
{
    @Column
    private String id;
    @Column(name="name")
    private String name;
    @Column(name="valid")
    private boolean status;

    public StudentInfo()
    {

    }

    public String getId()
    {
        return id;
    }

    public void setId(String id)
    {
        this.id=id;
    }

    public String getName()
    {
        return name;
    }

    public void setName(String name)
    {
        this.name=name;
    }

    public boolean isStatus()
    {
        return status;
    }

    public void setStatus(boolean status)
    {
        this.status=status;
    }

}
再给出将 反射机制 和 注解 相结合使用的类Test:
import java.lang.reflect.Field;
import com.mec.about_annotation_annotation.Column;
import com.mec.about_annotation_annotation.Table;
import com.mec.about_annotation_model.StudentInfo;
public class Test
{
public static void getAnnotation(Class<?> klass)
{
if(!klass.isAnnotationPresent(Table.class))
{
return;
}
Table table=klass.getAnnotation(Table.class);
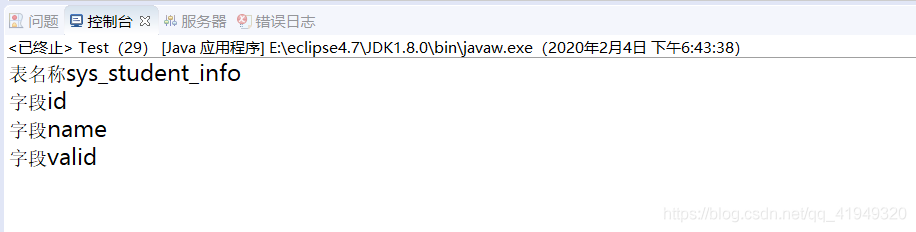
String tableName=table.value();
System.out.println("表名称" + tableName);
Field[] fields=klass.getDeclaredFields();
if(field.isAnnotationPresent(Column.class))
{
Column column=field.getAnnotation(Column.class);
String name=column.name();
if(name.length() > 0)
{
columnName=name;
}
System.out.println("字段" + columnName);
}
}
public static void main(String[] args)
{
getAnnotation(StudentInfo.class);
}
}
运行结果如下


 205
205


 被折叠的 条评论
为什么被折叠?
被折叠的 条评论
为什么被折叠?
 到【灌水乐园】发言


