


MQ的简介
我们以购买商品为例,用户支付后需要调用订单服务完成订单状态修改,调用物流服务,从仓库分配响应的库存并准备发货。
在事件模式中,支付服务是事件发布者(publisher),在支付完成后只需要发布一个支付成功的事件(event),事件中带上订单id。
订单服务和物流服务是事件订阅者(Consumer),订阅支付成功的事件,监听到事件后完成自己业务即可。
为了解除事件发布者与订阅者之间的耦合,两者并不是直接通信,而是有一个中间人(Broker)。发布者发布事件到Broker,不关心谁来订阅事件。订阅者从Broker订阅事件,不关心谁发来的消息。

Broker 是一个像数据总线一样的东西,所有的服务要接收数据和发送数据都发到这个总线上,这个总线就像协议一样,让服务间的通讯变得标准和可控。
好处:
- 吞吐量提升:无需等待订阅者处理完成,响应更快速
- 故障隔离:服务没有直接调用,不存在级联失败问题
- 调用间没有阻塞,不会造成无效的资源占用
- 耦合度极低,每个服务都可以灵活插拔,可替换
- 流量削峰:不管发布事件的流量波动多大,都由Broker接收,订阅者可以按照自己的速度去处理事件
缺点:
- 架构复杂了,业务没有明显的流程线,不好管理
- 需要依赖于Broker的可靠、安全、性能
RabbitMQ的基本结构和安装
RabbitMQ的基本结构
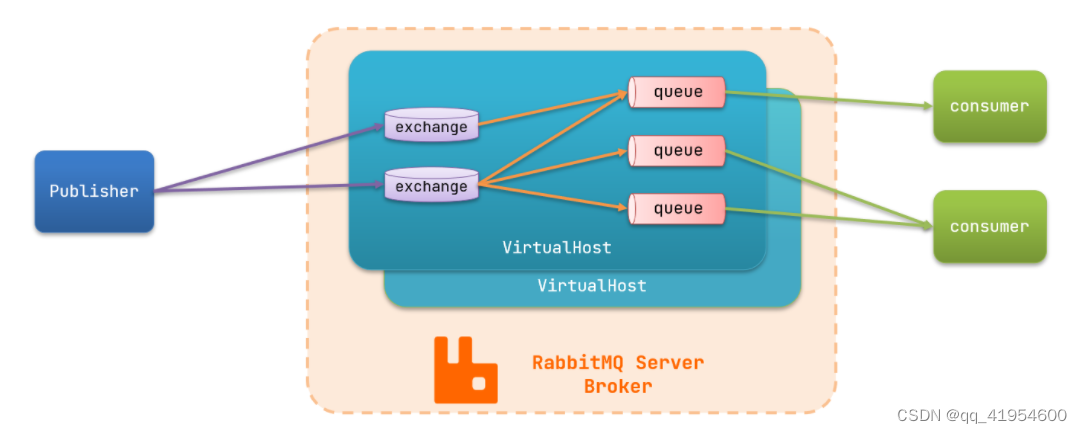
RabbitMQ中的一些角色:
- publisher:生产者
- consumer:消费者
- exchange:交换机,负责消息路由
- queue:队列,存储消息
- virtualHost:虚拟主机,隔离不同租户的exchange、queue、消息的隔离
在docker中单机部署:
//1. 下载镜像
docker pull rabbitmq:3-management
//2.安装RabbitMQ
docker run \
 -e RABBITMQ_DEFAULT_USER=itcast \
 -e RABBITMQ_DEFAULT_PASS=123321 \
 --name mq \
 --hostname mq1 \
 -p 15672:15672 \
 -p 5672:5672 \
 -d \
 rabbitmq:3-management
入门案例
简单队列模式的模型图:

- publisher:消息发布者,将消息发送到队列queue
- queue:消息队列,负责接受并缓存消息
- consumer:订阅队列,处理队列中的消息
项目结构:
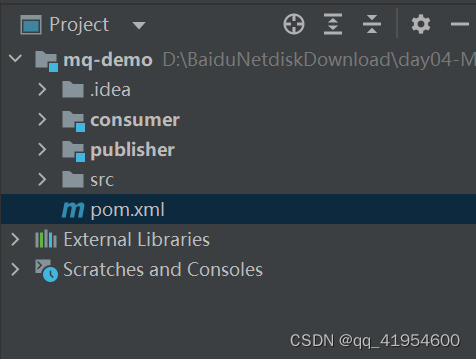
pom.xml
<?xml version="1.0" encoding="UTF-8"?>
<project xmlns="http://maven.apache.org/POM/4.0.0"
         xmlns:xsi="http://www.w3.org/2001/XMLSchema-instance"
         xsi:schemaLocation="http://maven.apache.org/POM/4.0.0 http://maven.apache.org/xsd/maven-4.0.0.xsd">
    <modelVersion>4.0.0</modelVersion>

    <groupId>cn.itcast.demo</groupId>
    <artifactId>mq-demo</artifactId>
    <version>1.0-SNAPSHOT</version>
    <modules>
        <module>publisher</module>
        <module>consumer</module>
    </modules>
    <packaging>pom</packaging>

    <parent>
        <groupId>org.springframework.boot</groupId>
        <artifactId>spring-boot-starter-parent</artifactId>
        <version>2.3.9.RELEASE</version>
        <relativePath/>
    </parent>

    <properties>
        <maven.compiler.source>8</maven.compiler.source>
        <maven.compiler.target>8</maven.compiler.target>
    </properties>

    <dependencies>
        <dependency>
            <groupId>org.projectlombok</groupId>
            <artifactId>lombok</artifactId>
        </dependency>
        <!--AMQP依赖,包含RabbitMQ-->
        <dependency>
            <groupId>org.springframework.boot</groupId>
            <artifactId>spring-boot-starter-amqp</artifactId>
        </dependency>
        <!--单元测试-->
        <dependency>
            <groupId>org.springframework.boot</groupId>
            <artifactId>spring-boot-starter-test</artifactId>
        </dependency>
    </dependencies>
</project>
publisher实现
思路:
- 建立连接
- 创建Channel
- 声明队列
- 发送消息
- 关闭连接和channel
package cn.itcast.mq.helloworld;

import com.rabbitmq.client.Channel;
import com.rabbitmq.client.Connection;
import com.rabbitmq.client.ConnectionFactory;
import org.junit.Test;

import java.io.IOException;
import java.util.concurrent.TimeoutException;

public class PublisherTest {
    @Test
    public void testSendMessage() throws IOException, TimeoutException {
        // 1.建立连接
        ConnectionFactory factory = new ConnectionFactory();
        // 1.1.设置连接参数,分别是:主机名(Rabbit所部署的主机地址)、端口号、vhost、用户名、密码
        factory.setHost("192.168.150.101");
        factory.setPort(5672);
        factory.setVirtualHost("/");
        factory.setUsername("itcast");
        factory.setPassword("123321");
        // 1.2.建立连接
        Connection connection = factory.newConnection();

        // 2.创建通道Channel
        Channel channel = connection.createChannel();

        // 3.创建队列
        String queueName = "simple.queue";
        channel.queueDeclare(queueName, false, false, false, null);

        // 4.发送消息
        String message = "hello, rabbitmq!";
        channel.basicPublish("", queueName, null, message.getBytes());
        System.out.println("发送消息成功:【" + message + "】");

        // 5.关闭通道和连接
        channel.close();
        connection.close();

    }
}
consumer实现
代码思路:
- 建立连接
- 创建Channel
- 声明队列
- 订阅消息
package cn.itcast.mq.helloworld;

import com.rabbitmq.client.*;

import java.io.IOException;
import java.util.concurrent.TimeoutException;

public class ConsumerTest {

    public static void main(String[] args) throws IOException, TimeoutException {
        // 1.建立连接
        ConnectionFactory factory = new ConnectionFactory();
        // 1.1.设置连接参数,分别是:主机名(RabbitMQ所部署的主机地址)、端口号、vhost、用户名、密码
        factory.setHost("192.168.150.101");
        factory.setPort(5672);
        factory.setVirtualHost("/");
        factory.setUsername("itcast");
        factory.setPassword("123321");
        // 1.2.建立连接
        Connection connection = factory.newConnection();

        // 2.创建通道Channel
        Channel channel = connection.createChannel();

        // 3.创建队列
        String queueName = "simple.queue";
        channel.queueDeclare(queueName, false, false, false, null);

        // 4.订阅消息
        channel.basicConsume(queueName, true, new DefaultConsumer(channel){
            @Override
            public void handleDelivery(String consumerTag, Envelope envelope,
                                       AMQP.BasicProperties properties, byte[] body) throws IOException {
                // 5.处理消息
                String message = new String(body);
                System.out.println("接收到消息:【" + message + "】");
            }
        });
        System.out.println("等待接收消息。。。。");
    }
}
基本消息队列的消息发送流程:
-
建立connection
-
创建channel
-
利用channel声明队列
-
利用channel向队列发送消息
基本消息队列的消息接收流程:
-
建立connection
-
创建channel
-
利用channel声明队列
-
定义consumer的消费行为handleDelivery()
-
利用channel将消费者与队列绑定


 被折叠的 条评论
为什么被折叠?
被折叠的 条评论
为什么被折叠?
 到【灌水乐园】发言


