


什么是openapi 3.0
OpenAPI 3.0.0 是 OpenAPI 规范的第一个正式版本,因为它是由 SmartBear Software 捐赠给 OpenAPI Initiative,并在2015年从 Swagger 规范重命名为 OpenAPI 规范。
介绍:
OpenAPI 规范(OAS),是定义一个标准的、与具体编程语言无关的RESTful API的规范。OpenAPI 规范使得人类和计算机都能在“不接触任何程序源代码和文档、不监控网络通信”的情况下理解一个服务的作用。如果您在定义您的 API 时做的很好,那么使用 API 的人就能非常轻松地理解您提供的 API 并与之交互了。
如果您遵循 OpenAPI 规范来定义您的 API,那么您就可以用文档生成工具来展示您的 API,用代码生成工具来自动生成各种编程语言的服务器端和客户端的代码,用自动测试工具进行测试等等。
具体请看官方文档
openapi 中文文档 https://openapi.apifox.cn/
swagger openapi3.0官方文档 https://swagger.io/specification/
请大家一定要先看看官方文档,避免下文对于yaml的配置无法理解,也不需要死记,因为平常的配置不会就查文档
swagger https://editor.swagger.io/ 在线查看文档
为什么需要openapi3.0
在以往的项目中,如果项目想要给别人提供api文档的话,有二种方法,
一种就是项目集成swaager ,然后通过注解的方式来生成对方可访问的api文档,在与前端对接的时候提供便利
优点: 提供了对外可访问的api
缺点:对代码有严重的侵入式,不可维护,需要在控制层写很多不必要的代码
框架代表: swagger2.0, knife4j
代码示例:
加入配置:
 @Bean(value = "defaultApi2")
    public Docket defaultApi2() {
        Docket docket=new Docket(DocumentationType.SWAGGER_2)
                .apiInfo(new ApiInfoBuilder()
                        //.title("swagger-bootstrap-ui-demo RESTful APIs")
                        .description("# swagger-bootstrap-ui-demo RESTful APIs")
                        .termsOfServiceUrl("http://www.xx.com/")
                        .contact("1796789910@qq.com")
                        .version("1.0")
                        .build())
                //分组名称
                .groupName("2.X版本")
                .select()
                //这里指定Controller扫描包路径
                .apis(RequestHandlerSelectors.basePackage("com.example.springbootknife4jintegrate.controller"))
                .paths(PathSelectors.any())
                .build();
        return docket;
    }
控制层需要加入更多注解
 @ApiImplicitParam(name = "name",value = "姓名",required = true)
    @ApiOperation(value = "例子")
    @ApiOperationSupport(author = "1796789910@qq.com")
并且需要加入一些配置,这对于开发来说,非常难受.
第二种.由开发手动去编写接口文档提供外部访问
例如 小幺鸡,yapi, apifox 他们都可以提供在线访问的接口地址,但是,需要开发人员手动去填写,严重耽误开发进度
新型开发模式如何解决
先看下项目架构图
![[外链图片转存失败,源站可能有防盗链机制,建议将图片保存下来直接上传(img-JoEhnqyx-1659105806398)(/Users/qurenneng/Library/Application Support/typora-user-images/image-20220729214718750.png)]](https://img-blog.csdnimg.cn/e2f541e25eb849c28bb1c4049794cce0.png)
api与业务系统节藕开,api服务只设计接口,提供对外访问的api文档,业务系统负责实现API接口.
优点:
1.节藕合:业务系统不需要去写一些不必要的配置,以及注解.
2.安全:所有的接口权限是一个服务,对api的控制更加高效
3.开发高效,开发先设计接口,然后先把接口文档给到前端,随后在开发,双方无需等待
4.对于开发来说,先定义清楚接口,对于业务逻辑更加清晰,避免反工
架构实现
1.api服务
新建一个springboot项目增加以来配置
pom.xml:
<?xml version="1.0" encoding="UTF-8"?>
<project xmlns="http://maven.apache.org/POM/4.0.0" xmlns:xsi="http://www.w3.org/2001/XMLSchema-instance"
  xsi:schemaLocation="http://maven.apache.org/POM/4.0.0 https://maven.apache.org/xsd/maven-4.0.0.xsd">
  <modelVersion>4.0.0</modelVersion>
  <parent>
    <groupId>org.springframework.boot</groupId>
    <artifactId>spring-boot-starter-parent</artifactId>
    <version>2.7.2</version>
    <relativePath/> <!-- lookup parent from repository -->
  </parent>
  <groupId>com.example</groupId>
  <artifactId>spring-boot-openapi-integrat</artifactId>
  <version>0.0.1-SNAPSHOT</version>
  <name>spring-boot-openapi-integrat</name>
  <description>spring-boot-openapi-integrat</description>
  <properties>
    <openapi.generator.version>5.2.0</openapi.generator.version>
    <openapi.package>com.openapi</openapi.package>
    //jdk版本在11或更高版本
    <maven.compiler.source>11</maven.compiler.source>
    <maven.compiler.target>11</maven.compiler.target>
    <project.build.sourceEncoding>UTF-8</project.build.sourceEncoding>
  </properties>

  <dependencies>
    <!-- spring web 依赖 -->
    <dependency>
      <groupId>org.springframework.boot</groupId>
      <artifactId>spring-boot-starter-web</artifactId>
    </dependency>
    <dependency>
      <groupId>jakarta.validation</groupId>
      <artifactId>jakarta.validation-api</artifactId>
      <version>2.0.2</version>
    </dependency>
    <dependency>
      <groupId>org.openapitools</groupId>
      <artifactId>jackson-databind-nullable</artifactId>
      <version>0.2.1</version>
    </dependency>
    <dependency>
      <groupId>io.springfox</groupId>
      <artifactId>springfox-swagger2</artifactId>
      <version>3.0.0</version>
    </dependency>
    <dependency>
      <groupId>io.swagger</groupId>
      <artifactId>swagger-annotations</artifactId>
      <version>1.5.22</version>
    </dependency>
  </dependencies>

  <build>
    <plugins>
      <plugin>
        <groupId>org.apache.maven.plugins</groupId>
        <artifactId>maven-deploy-plugin</artifactId>
        <version>3.0.0-M1</version>
        <configuration>
          <updateReleaseInfo>true</updateReleaseInfo>
        </configuration>
      </plugin>

      <plugin>
        <groupId>org.openapitools</groupId>
        <artifactId>openapi-generator-maven-plugin</artifactId>
        <version>${openapi.generator.version}</version>
        <executions>
          <execution>
            <id>open</id>
            <goals>
              <goal>generate</goal>
            </goals>
            <configuration>
              <!-- API specifications should be split to multiple YML files, when the feature is implemented:
                  https://github.com/OpenAPITools/openapi-generator/issues/6379 -->
              //api定义的yml文件所在
              <inputSpec>${project.basedir}/src/main/resources/openapi.yaml</inputSpec>
              <generatorName>spring</generatorName>
              <apiPackage>${openapi.package}.open.controller</apiPackage>
              <modelPackage>${openapi.package}.open.controller.model</modelPackage>
              <supportingFilesToGenerate>ApiUtil.java</supportingFilesToGenerate>
              <modelNamePrefix>Open</modelNamePrefix>
              //如果api定义为 /users 或者 /oders 那么这里要加上对于的路径 order 否则无法生成对应的api接口
              <apisToGenerate>users</apisToGenerate>
              <configOptions>
                <delegatePattern>true</delegatePattern>
              </configOptions>
            </configuration>
          </execution>
        </executions>
      </plugin>
    </plugins>
  </build>
</project>
添加配置文件: openapi.yaml 名称可以随便命名,不过pom.xml哪里也需要修改
配置就只能自己去看官方文档了或者如果实在不知道的,就访问 https://editor.swagger.io/ 地址
里面会有一些案例,复制下来,放到yaml文件中
自己防着来一下就好了
我贴上我的例子吧:
openapi: 3.0.3
info:
  title: SpringBoot Open APIs
  description: SpringBoot Open APIs
  version: 1.0.0-SNAPSHOT
externalDocs:
  description: Check the source code here
  url: https://gitee.com/xxx/spring-boot-integrate
servers:
  - url: http://localhost:8080/v1
    description: LOCAL Environment
    variables:
      env:
        default: dev
        enum:
          - dev    # DEVELOPMENT ENVIRONMENT
          - gamma  # GAMMA ENVIRONMENT
  - url: http://localhost:8080/v1
    description: applicationion Environment URL

paths:
  /users:
    get:
      summary: '检索用户'
      description: '检索帐号下所有用户信息'
      operationId: ListUsers
      parameters:
        - $ref: '#/components/parameters/IndexParam'
        - $ref: '#/components/parameters/LimitParam'
        - name: name
          description: '用户名'
          in: query
          schema:
            type: string
            minLength: 2
            maxLength: 255
        - name: keyword
          description: '模糊搜索'
          in: query
          schema:
            type: string
      responses:
        '200':
          description: '用户列表'
          content:
            application/json:
              schema:
                $ref: '#/components/schemas/UserList'
        '500':
          $ref: '#/components/responses/Fault'
        default:
          $ref: '#/components/responses/Error'
    post:
      summary: '添加用户'
      description: '添加用户信息'
      operationId: CreateUser
      requestBody:
        content:
          application/json:
            schema:
              $ref: '#/components/schemas/CreateUserRequest'
      responses:
        '201':
          description: '创建用户成功'
          content:
            application/json:
              schema:
                $ref: '#/components/schemas/User'
        '500':
          $ref: '#/components/responses/Fault'
        default:
          $ref: '#/components/responses/Error'
  /users/{id}:
    delete:
      summary: '删除用户'
      description: '删除用户信息'
      operationId: DeleteUser
      parameters:
        - name: id
          in: path
          schema:
            type: string
          required: true
      responses:
        '200':
          description: '删除用户成功'
        '500':
          $ref: '#/components/responses/Fault'
        default:
          $ref: '#/components/responses/Error'
    put:
      summary: '更新用户'
      description: '更新用户信息'
      operationId: UpateUser
      parameters:
        - name: id
          in: path
          schema:
            type: string
          required: true
      requestBody:
        content:
          application/json:
            schema:
              $ref: '#/components/schemas/UpateUserRequest'
      responses:
        '200':
          description: '更新用户成功'
          content:
            application/json:
              schema:
                $ref: '#/components/schemas/User'
        '500':
          $ref: '#/components/responses/Fault'
        default:
          $ref: '#/components/responses/Error'
components:
  securitySchemes:
    ApiKeyAuth: # arbitrary name for the security scheme
      type: apiKey
      name: Authorization   # name of the header, query parameter or cookie
      in: header                  # can be "header", "query" or "cookie"
  schemas:
    UpateUserRequest:
      type: object
      properties:
        name:
          description: '用户的名称'
          type: string
          minLength: 2
          maxLength: 64
        remark:
          description: '用户备注'
          type: string
    CreateUserRequest:
      type: object
      properties:
        name:
          description: '用户的名称'
          type: string
          minLength: 2
          maxLength: 64
        remark:
          description: '用户备注'
          type: string
    UserList:
      description: '用户列表'
      type: object
      properties:
        users:
          description: '用户列表'
          type: array
          items:
            $ref: '#/components/schemas/User'
        pagination:
          $ref: '#/components/schemas/Pagination'
    User:
      description: '用户'
      type: object
      properties:
        id:
          description: '用户的唯一标识'
          type: string
        name:
          description: '用户的名称'
          type: string
          minLength: 2
          maxLength: 64
        remark:
          description: '用户备注'
          type: string
    Pagination:
      description: '分页'
      type: object
      properties:
        index:
          type: integer
          description: '当前页'
        limit:
          type: integer
          description: '每页数量'
        total:
          type: integer
          format: int64
          description: '总数'
    Error:
      type: object
      properties:
        error:
          allOf:
            - $ref: '#/components/schemas/ErrorBody'
            - type: object
              properties:
                details:
                  type: array
                  items:
                    $ref: '#/components/schemas/ErrorBody'
      required: [ error ]
    Fault:
      type: object
      properties:
        fault:
          type: object
          properties:
            code:
              type: string
              default: "InternalFault"
            message:
              type: string
              default: "服务内部错误, 请联系管理员"
    ErrorBody:
      type: object
      properties:
        code:
          type: string
        id:
          type: string
        message:
          type: string
        target:
          type: string
      required: [ code, id, message ]
  parameters:
    IndexParam:
      name: index
      in: query
      description: "当前页"
      schema:
        type: integer
        minimum: 1
        default: 1
    LimitParam:
      name: limit
      in: query
      description: "每页数量"
      schema:
        type: integer
        default: 10
里面定义了用户的一些基本操作.
定义好了之后,我们使用maven的命令来生成对应的代码
mvn clean compile package
如果成功的话,会在对应的项目中生成一个target目录,里面的class 目录里面就对应生成的接口了
完整的项目图
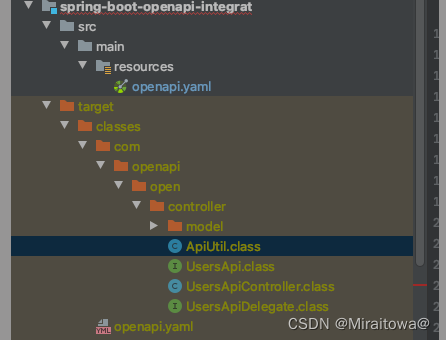
说明api服务以及搭建成功了,接下来我们需要搭建服务层.
2.业务服务
还是一样新建一个springboot服务
Pom.xml:
<?xml version="1.0" encoding="UTF-8"?>
<project xmlns="http://maven.apache.org/POM/4.0.0" xmlns:xsi="http://www.w3.org/2001/XMLSchema-instance"
         xsi:schemaLocation="http://maven.apache.org/POM/4.0.0 https://maven.apache.org/xsd/maven-4.0.0.xsd">
    <modelVersion>4.0.0</modelVersion>
    <parent>
        <groupId>org.springframework.boot</groupId>
        <artifactId>spring-boot-starter-parent</artifactId>
        <version>2.4.5</version>
        <relativePath/> <!-- lookup parent from repository -->
    </parent>
    <groupId>com.example</groupId>
    <artifactId>spring-boot-api-service-integrat</artifactId>
    <version>0.0.1-SNAPSHOT</version>
    <name>spring-boot-api-service-integrat</name>
    <description>Demo project for Spring Boot</description>
    <properties>
        <java.version>1.8</java.version>
    </properties>
    <dependencies>
        <dependency>
            <groupId>com.example</groupId>
            <artifactId>spring-boot-openapi-integrat</artifactId>
            <version>0.0.1-SNAPSHOT</version>
        </dependency>
        <dependency>
            <groupId>org.springframework.boot</groupId>
            <artifactId>spring-boot-starter-data-jpa</artifactId>
        </dependency>
        <dependency>
            <groupId>org.springframework.boot</groupId>
            <artifactId>spring-boot-starter-web</artifactId>
        </dependency>
        <dependency>
            <groupId>org.springframework.boot</groupId>
            <artifactId>spring-boot-devtools</artifactId>
            <scope>runtime</scope>
            <optional>true</optional>
        </dependency>

        <dependency>
            <groupId>mysql</groupId>
            <artifactId>mysql-connector-java</artifactId>
            <scope>runtime</scope>
        </dependency>

        <dependency>
            <groupId>org.springframework.boot</groupId>
            <artifactId>spring-boot-starter-test</artifactId>
            <scope>test</scope>
        </dependency>

        <dependency>
            <groupId>org.projectlombok</groupId>
            <artifactId>lombok</artifactId>
            <version>1.18.20</version>
            <scope>provided</scope>
        </dependency>

    </dependencies>

    <build>
        <plugins>
            <plugin>
                <groupId>org.springframework.boot</groupId>
                <artifactId>spring-boot-maven-plugin</artifactId>
            </plugin>
        </plugins>
    </build>

</project>
请注意,增加了一个api服务的依赖 spring-boot-openapi-integrat 这是我们刚刚新建的api服务
控制层
/**
 * 实现生成的接口,然后实现对应的服务既可
 */
public class UsersApiDelegateImpl implements UsersApiDelegate {

    private final UserService userService;
    private final UserConversion userConversion;

    public UsersApiDelegateImpl(UserService userService,UserConversion userConversion) {
        this.userService = userService;
        this.userConversion = userConversion;
    }

    @Override
    public ResponseEntity<OpenUser> createUser(OpenCreateUserRequest openCreateUserRequest) {
        User user = this.userService.createUser(this.userConversion.toUser(openCreateUserRequest));
        return ResponseEntity.status(HttpStatus.CREATED).body(this.userConversion.toControllerOpenUser(user));
    }

    @Override
    public ResponseEntity<Void> deleteUser(String id) {
        this.userService.deleteUser(id);
        return ResponseEntity.ok().build();
    }

    @Override
    public ResponseEntity<OpenUser> upateUser(String id, OpenUpateUserRequest openUpateUserRequest) {
        User user = this.userService.upateUser(id, this.userConversion.toUser(openUpateUserRequest));
        return ResponseEntity.status(HttpStatus.CREATED).body(this.userConversion.toControllerOpenUser(user));
    }
}
这里实现了api服务生成的接口,然后,在控制层去实现对应的接口就好了,
转换层
一般来说,控制层传递的对象需要专程 model 层,然后才能在 service层进行服务操作开发,然后在操作数据库的时候需要转换为数据库层对应的实体,这样子做的好处是隔离.
代码示例:
@Component
public class UserConversion {

    public User toUser(OpenCreateUserRequest openCreateUserRequest){
       return new User().setName(openCreateUserRequest.getName())
                .setRemark(openCreateUserRequest.getRemark());
    }

    public User toUser(OpenUpateUserRequest openUpateUserRequest){
        return new User().setName(openUpateUserRequest.getName())
                .setRemark(openUpateUserRequest.getRemark());
    }

    public OpenUser toControllerOpenUser(User user){
        if(user == null) return  null;
        return new OpenUser().id(String.valueOf(user.getId()))
                .name(user.getName())
                .remark(user.getRemark());

    }
}
启动项目,如果我们想添加用户的话请求
http://localhost:8080/v1/users post
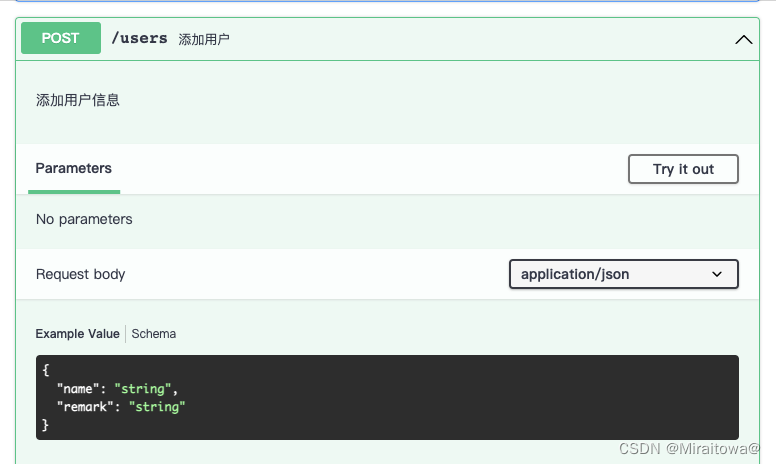
其他请求同理,
总结
Open3.0 开发模式不仅仅是对于开发来说,对于整个公司都是有利的,开发的api逻辑清晰,前端对接高效,每个字段都有注释
对应的项目源码:
https://gitee.com/QuRenNen/spring-boot-integrate/tree/master/spring-boot-openapi-integrat
https://gitee.com/QuRenNen/spring-boot-integrate/tree/master/spring-boot-api-service-integrat
统一的result api风格,对外提供api更加便捷,好了文章介绍就到这里了,喜欢的同学给作者点个关注,谢谢.


 5804
5804


 被折叠的 条评论
为什么被折叠?
被折叠的 条评论
为什么被折叠?
 到【灌水乐园】发言


