


今天我们使用GUI来做一个绘画板小项目
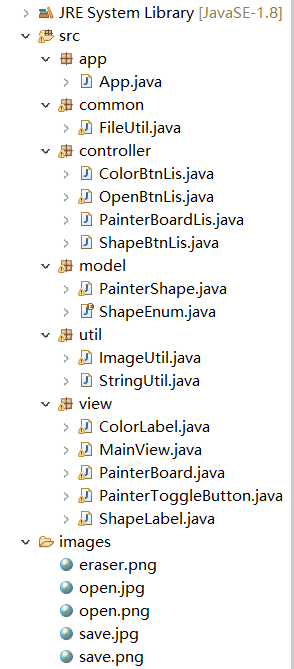
本次项目使用mvc设计,整体框架如下所设计
一、view层
1.1 创建主界面类 MainView.java
/**
 * 绘画板显示界面
 * @author LinChi
 *
 */

import java.awt.BorderLayout;
import java.awt.Color;
import java.awt.FlowLayout;
import java.awt.Graphics;

import javax.swing.BorderFactory;
import javax.swing.ButtonGroup;
import javax.swing.JButton;
import javax.swing.JFrame;
import javax.swing.JLabel;
import javax.swing.JPanel;
import javax.swing.JToggleButton;
import javax.swing.JToolBar;

import controller.ColorBtnLis;
import controller.OpenBtnLis;
import controller.PainterBoardLis;
import controller.ShapeBtnLis;
import model.ShapeEnum;
import util.ImageUtil;

public class MainView extends JFrame{
	//工具条
	private JToolBar jtb;
	//工具栏按钮
	//形状按钮
	private JToggleButton shapeBtns[];
	//颜色按钮
	private JToggleButton colorBtns[];
	//定义颜色
	private static final Color[] COLORS = {Color.BLACK,Color.RED,Color.GREEN,Color.BLUE,Color.WHITE,Color.GRAY};
	//操作按钮
	private JButton saveBtn;
	private JButton openBtn;
	//填充按钮
	private JToggleButton fillBtn;
	//画布
	private PainterBoard painter;
	//状态栏
	private JPanel typeBar;
	//标签
	private ShapeLabel shapeLab;
	private ColorLabel colorLab;
	//当前形状
	private ShapeEnum nowShape = ShapeEnum.values()[0];
	//当前颜色
	private Color nowColor = COLORS[0];
	//橡皮擦半径
	private int eraserRadio = 5;
	public MainView() {
		super("绘画板");
		this.setSize(500,400);
		this.setLocationRelativeTo(null);
		//添加工具栏组件
		addJToolBar();
		//添加状态栏
		addTypeBar();
		//添加画布
		addPainter();
		//添加事件
		addLinstener();
		this.setVisible(true);
		this.setDefaultCloseOperation(JFrame.EXIT_ON_CLOSE);
	}
	/**
	 * 添加画布
	 */
	private void addPainter() {
		this.painter = new PainterBoard();
		//添加到窗口的中部
		this.add(this.painter);
	}
	/**
	 * 添加监听器
	 */
	private void addLinstener() {
		//形状监听器
		//创建监听器对象
		ShapeBtnLis shapeBtnLis = new ShapeBtnLis(this);
		for(JToggleButton shapeLis:this.shapeBtns) {
			shapeLis.addItemListener(shapeBtnLis);
		}
		//颜色监听器
		ColorBtnLis colorBtnLis = new ColorBtnLis(this);
		for(JToggleButton colorLis:this.colorBtns) {
			colorLis.addItemListener(colorBtnLis);
		}
		//画布监听器
		PainterBoardLis pbs = new PainterBoardLis(this);
		//添加鼠标触摸事件
		this.painter.addMouseListener(pbs);
		//添加鼠标拖拽事件
		this.painter.addMouseMotionListener(pbs);
		//添加保存打开操作监听
		OpenBtnLis openLis = new OpenBtnLis(this);
		this.saveBtn.addActionListener(openLis);
		this.openBtn.addActionListener(openLis);
		this.fillBtn.addActionListener(openLis);
	}
	/**
	 * 状态栏组件
	 */
	private void addTypeBar() {
		//构造状态栏  使用流式布局管理器
		typeBar = new JPanel(new FlowLayout(FlowLayout.LEFT,10,5));
		//设置边界
		typeBar.setBorder(BorderFactory.createEtchedBorder());
		//添加标签
		JLabel shapeInFoLab = new JLabel("当前形状:");
		typeBar.add(shapeInFoLab);
		//构造形状
		this.shapeLab = new ShapeLabel(ShapeEnum.SPACE,nowShape);
		typeBar.add(shapeLab);

		JLabel colorInFoLab = new JLabel("当前颜色:");
		typeBar.add(colorInFoLab);
		this.colorLab = new ColorLabel(ShapeEnum.SPACE,nowColor);
		typeBar.add(this.colorLab);
		//添加到南部
		this.add(typeBar,BorderLayout.SOUTH);
	}
	/**
	 * 工具栏组件
	 */
	private void addJToolBar() {
		//构造工具栏按钮
		jtb = new JToolBar();
		//设置按钮数组值
		ShapeEnum[] btnShapeArryays = ShapeEnum.values();
		//定义按钮组
		ButtonGroup shapeBtnsGrop = new ButtonGroup();
		//构造形状按钮
		shapeBtns = new JToggleButton[btnShapeArryays.length];
		//循环构造按钮
		for(int i = 0;i<shapeBtns.length;i++) {
			shapeBtns[i] = new PainterToggleButton(btnShapeArryays[i]);
			//将按钮添加到组
			shapeBtnsGrop.add(shapeBtns[i]);
			//将按钮添加到工具栏
			jtb.add(shapeBtns[i]);
		}
		//设定线为默认图形
		shapeBtns[0].setSelected(true);
		//添加工具栏分割
		jtb.addSeparator();
		//定义颜色按钮组
		ButtonGroup colorsBtnGrop = new ButtonGroup();
		//构造颜色按钮
		colorBtns = new JToggleButton[COLORS.length];
		//循环创建按钮
		for(int i = 0;i<colorBtns.length;i++) {
			//构造按钮,使用矩形填充
			colorBtns[i] = new PainterToggleButton(ShapeEnum.ELLIPSE,COLORS[i]);
			//将按钮添加到按钮组
			colorsBtnGrop.add(colorBtns[i]);
			//将按钮添加到工具栏
			jtb.add(colorBtns[i]);
		}
		//设定黑色为默认颜色
		colorBtns[0].setSelected(true);
		//添加工具栏的分割
		jtb.addSeparator();

		//添加填充状态按钮
		fillBtn = new JToggleButton("绘制") {
			@Override
			public void paint(Graphics g) {
				// TODO Auto-generated method stub
				super.paint(g);
			}
		};
		jtb.add(fillBtn);

		//添加工具栏的分割
		jtb.addSeparator();

		//添加保存按钮
		saveBtn = new JButton(ShapeEnum.SPACE) {
			@Override
			public void paint(Graphics g) {
				//调用Jbutton的paint方法,绘制按钮默认的外观
				super.paint(g);
				//绘制图形
				g.drawImage(ImageUtil.getImageByLocalFilePath("images/save.png"), 5, 5, 20, 20,null);
			}
		};
		//将保存按钮添加到工具栏
		jtb.add(saveBtn);

		//添加打开按钮
		openBtn = new JButton(ShapeEnum.SPACE) {
			@Override
			public void paint(Graphics g) {
			//调用Jbutton的paint方法,绘制按钮默认的外观
			super.paint(g);
			//绘制图形
			g.drawImage(ImageUtil.getImageByLocalFilePath("images/open.png"), 5, 5, 25, 25,null);
		}
		};
		//将保存按钮添加到工具栏
		jtb.add(openBtn);

		//将工具栏添加到面板的北部
		this.add(jtb,BorderLayout.NORTH);
	}
	public JToolBar getJtb() {
		return jtb;
	}
	public void setJtb(JToolBar jtb) {
		this.jtb = jtb;
	}
	public JToggleButton[] getShapeBtns() {
		return shapeBtns;
	}
	public void setShapeBtns(JToggleButton[] shapeBtns) {
		this.shapeBtns = shapeBtns;
	}
	public JToggleButton[] getColorBtns() {
		return colorBtns;
	}
	public void setColorBtns(JToggleButton[] colorBtns) {
		this.colorBtns = colorBtns;
	}
	public JButton getSaveBtn() {
		return saveBtn;
	}
	public void setSaveBtn(JButton saveBtn) {
		this.saveBtn = saveBtn;
	}
	public JButton getOpenBtn() {
		return openBtn;
	}
	public void setOpenBtn(JButton openBtn) {
		this.openBtn = openBtn;
	}

	public PainterBoard getPainter() {
		return painter;
	}
	public void setPainter(PainterBoard painter) {
		this.painter = painter;
	}
	public JPanel getTypeBar() {
		return typeBar;
	}
	public void setTypeBar(JPanel typeBar) {
		this.
最低0.47元/天 解锁文章


 337
337


 被折叠的 条评论
为什么被折叠?
被折叠的 条评论
为什么被折叠?
 到【灌水乐园】发言


