


axios相关使用
一、axios安装
- 使用npm安装axios
npm install axios- 使用cnpm安装axios
cnpm install axios- 使用yarn安装axios
yarn install axios- 使用cdn链接axios
<script src="https://unpkg.com/axios/dist/axios.min.js"></script>二、请求数据方法
- get请求:方式一:
axios({
        // 默认请求方式为get
        method: 'get',
        url: 'api',
        // 传递参数
        params: {
            key: value
        },
        // 设置请求头信息
        headers: {
            key: value
        }
        responseType: 'json'
    }).then(response => {
        // 请求成功
        let res = response.data;
        console.log(res);
    }).catch(error => {
        // 请求失败,
        console.log(error);
});- get请求:方式二
axios.get("api", {
        // 传递参数
        params: {
            key: value
        },
        // 设置请求头信息,可以传递空值
        headers: {
            key: value
        }
    }).then(response => {
        // 请求成功
        let res = response.data;
        console.log(res);
    }).catch(error => {
        // 请求失败,
        console.log(error);
});- post请求:方式一
// 注:post请求方法有的要求参数格式为formdata格式,此时需要借助 Qs.stringify()方法将对象转换为字符串
    let obj = qs.stringify({
        key: value
    });

    axios({
        method: 'post',
        url: 'api',
        // 传递参数
        data: obj,
        // 设置请求头信息
        headers: {
            key: value
        }
        responseType: 'json'
    }).then(response => {
        // 请求成功
        let res = response.data;
        console.log(res);
    }).catch(error => {
        // 请求失败,
        console.log(error);
});- post请求:方式二
let data = {
            key: value
           },
            headers = {
                USERID: "",
                TOKEN: ""
          };
    // 若无headers信息时,可传空对象占用参数位置
    axios.post("api", qs.stringify(data), {
                headers
    }).then(response => {
        // 请求成功
        let res = response.data;
        console.log(res);
    }).catch(error => {
        // 请求失败,
        console.log(error);
});- Qs的使用
- 引用cdn或者使用npm、cnpm或者yarn进行插件安装
- 使用cdn时,默认全局变量为Qs
- Qs基本方法使用
- qs.stringify() 方法:将目标数据转换为string字符串
- qs.parse() 方法:将对象字符串格式的数据转换为对象格式
三、相关文件
数据格式转换文件: Qs.js文件下载
网络数据请求文件: Axios.js文件下载
表单校验文件: jQuery.validate.min.js文件下载
以上是基本使用,现在介绍一些其他的注意事项和官方示例
axios使用post提交方式
进行post提交时
1.需要进行序列化转换
// Form Data方式 (默认是这种方式)
// axios.defaults.headers.post['Content-Type'] = 'application/x-www-form-urlencoded;charset=UTF-8';
2..直接提交json格式不用使用qs进行序列化转换。(后端也要修改为接收json格式)
// Request Payload方式 (不用QS转)
axios.defaults.headers.post['Content-Type'] = 'application/json';
3.qs可通过npm install qs命令进行安装,是一个npm仓库所管理的包。
而qs.stringify()将对象 序列化成URL的形式,以&进行拼接。
JSON是正常类型的JSON,请对比一下输出
var a = {name:'hehe',age:10};
 qs.stringify(a)
// 'name=hehe&age=10'
JSON.stringify(a)
// '{"name":"hehe","age":10}'
let url = 'id=1&name=chenchen' qs.parse(url) // {id:1,name:chenchen}
<script>
// 一般引入qs库都赋值为qs,不过浏览器全局引入的是 window.Qs对象,
// 所以直接用 qs.stringify() 会报 qs undefined
var qs = Qs
// 配置post的请求头
axios.defaults.headers.post['Content-Type'] = 'application/x-www-form-urlencoded'
// qs.stringify() 这里可以做一下封装
axios.post('url', qs.stringify({
id: 1,
name: 'zhangsan'
})).then(function(res) {
// 返回 Promise对象数据
})
</script>需要注意的是,get和post请求中,params和data容易混淆,这里官方给出以下解释:
axios.get(url[, config])
axios.post(url[, data[, config]])
请求配置config:
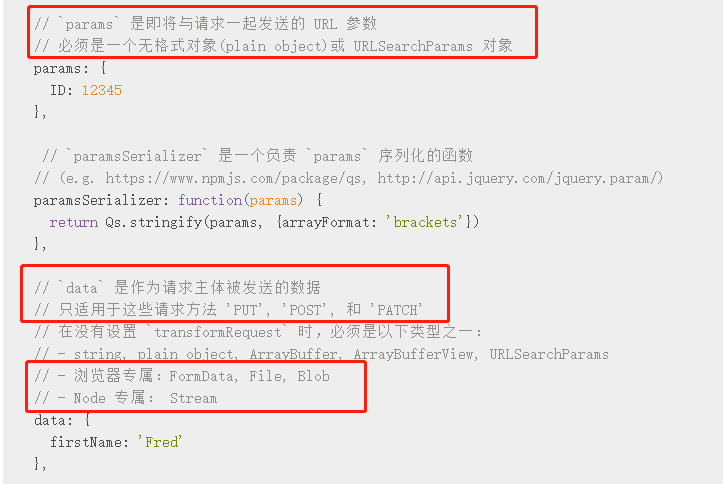
所以需要注意的是 get 请求其实是两个参数的一个是 url 和 config,这里的params是即将与请求一起发送的 URL 参数,必须是一个无格式对象(plain object)或 URLSearchParams 对象
而 post 请求是三个参数的一个是url 、data 和 config,而 data 是作为请求主体被发送的数据,只适用于这些请求方法 'PUT', 'POST', 和 'PATCH'浏览器专属:FormData, File, Blob
其他网站介绍的axios基本使用
axios公共url
1.公共url配置
axios.defaults.baseURL="http://127.0.0.1:8888/api/private/v1/"2.先引入axios
在全局的main.js中引入axios,之后对公共的urll进行配置,在vue的原型上定义一个属性,等于这个axios,因为组件都继承Vue原型对象,所以在任意组件使用this.$http就相当于使用了axios
import axios from "axios"
axios.defaults.baseURL="http://127.0.0.1:8888/api/private/v1/"
Vue.prototype.$http=axios
const {data:res} =await this.$http.post("login",this.loginForm)3.使用async
应为axios返回的是一个promise,因此这里可以使用async函数去简化它
loginHandle(){
      this.$refs.loginFormRef.validate(async valid=>{
         if(!valid) return;
        //  console.log(this.$http);
       const {data:res} =await this.$http.post("login",this.loginForm)
         if(res.meta.status !==200){
           console.log("登陆失败");
         }

      })
    }
axios配置
在使用axios的时候需要进行配置
1.配置所有请求的根路径
axios.defaults.baseURL = 'http://localhost:3000/';2.配置post请求的content-type
axios.defaults.headers.post['Content-Type'] = 'application/x-www-form-urlencoded';3.请求的时候自动携带cookie
axios.defaults.withCredentials = true;get请求
axios.get('/api/getnewslist', {
                  //params里面放的是参数
                  params: {}
                }).then((res) => {
                  console.log(res)
                }).catch(function(error){
                  console.log(error)
                })
post请求
axios.post('api/news/new', {
              //这里传递的是需要传递到后台的数据
                name: '李宁',
                id: '1001'
            })
                .then(function (response) {
                console.log(response.data);
            })
                .catch(function (error) {
                console.log(error);
            });
axios的简单封装
import axios from "axios";

const instance=axios.create({
    //这里是接口公共的url部分,会拼接在url参数前面
    baseURL:"https://api-hmugo-web.itheima.net/api/public/v1",
    timeout:5000,

})
export function get(url,params){
    return  instance.get(url,{
        params
    });
}

export function post(url,data){
    return  instance.post(url,data);
}

export function del(url){
    return instance.get(url);
}

export function put(url,data){
    return  instance.put(url,data);
}
axios全局拦截
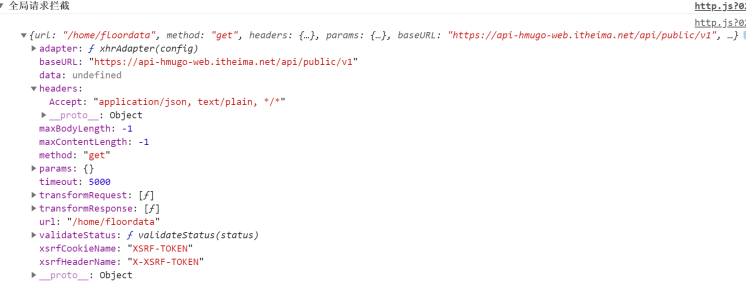
1.请求拦截
所有的网络请求都会先走这个方法,我们可以在它里面为请求添加一些自定义的内容

instance.interceptors.request.use(
    function(config){
        console.group("全局请求拦截");
        console.log(config);
        console.groupEnd()
        //config.headers.token="1234"
        return config;
    },
    function(err){
        return Promise.reject(err)
    }
)
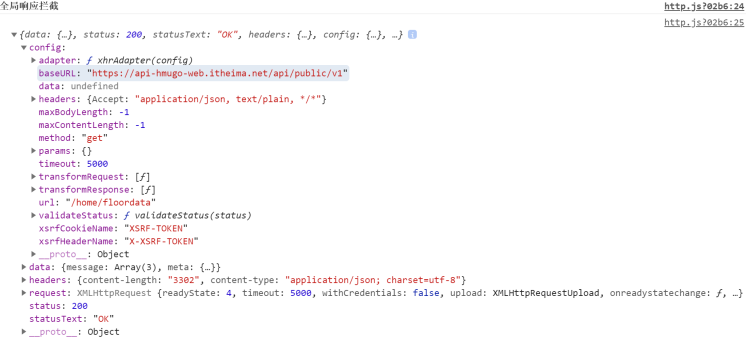
2.响应拦截
所有的网络请求返回数据之后都会执行此方法,这里可以根据服务器放回的状态码做相应的处理
instance.interceptors.response.use(
    function(response){
        console.group("全局响应拦截");
        console.log(response);
        console.groupEnd()
        return response;
    },
    function(err){
        return Promise.reject(err)
    }
)
axios解决跨域
1.跨域问题的描述
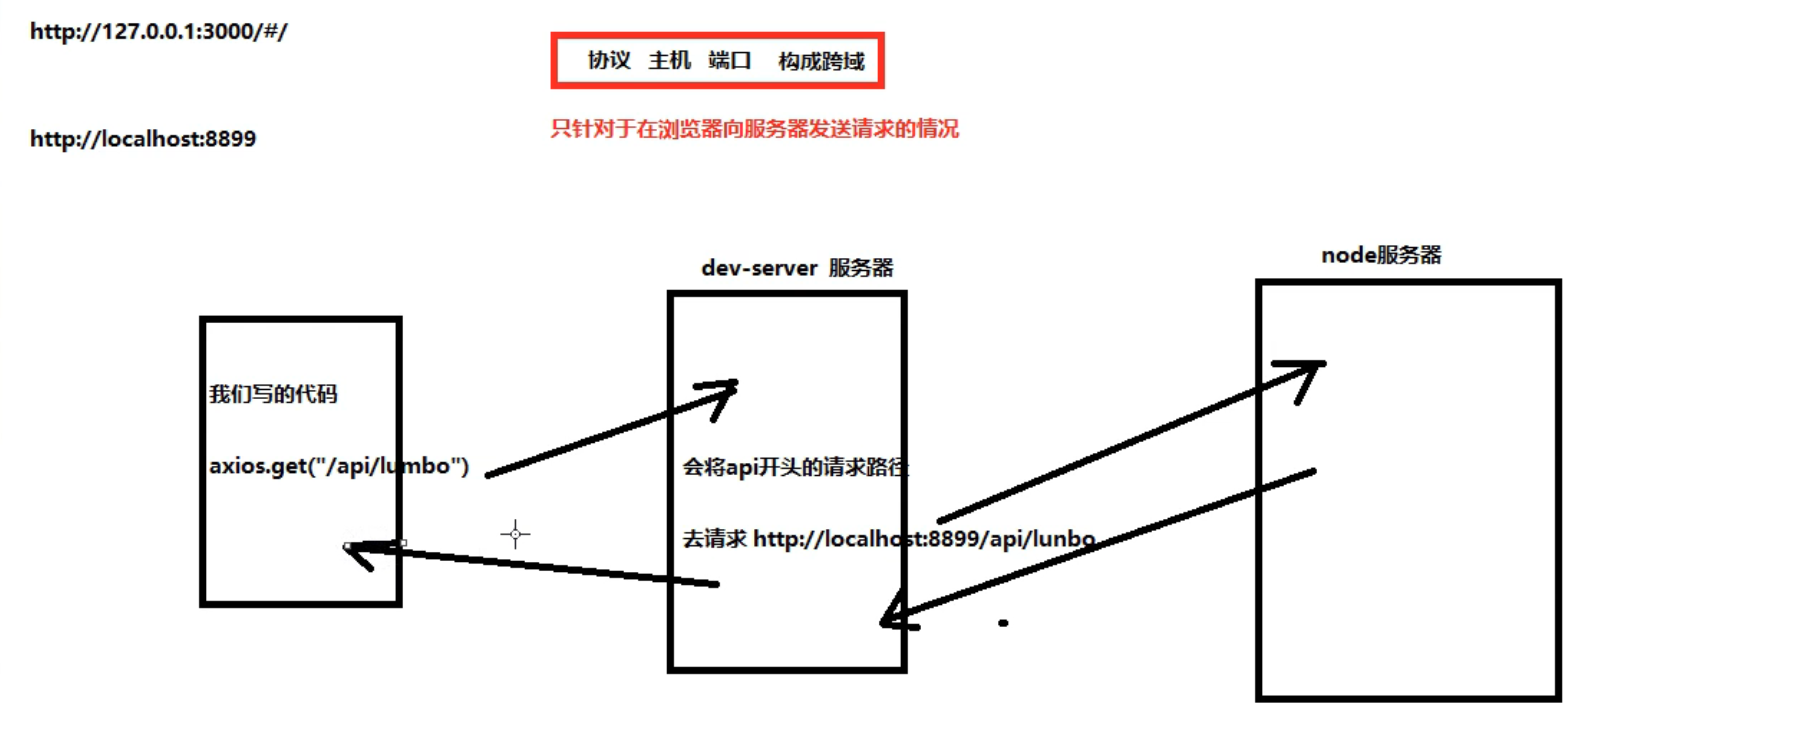
当一个域向另外一个域发送请求时,协议,主机,端口只要又任意一个不同,都会造成跨域问题,只针对于浏览器向服务器发送请求。
2.解决跨域
1.在vue.config.js中配置代理
devServer: {
    open: true,
    host: '127.0.0.1',
    port: 3000,
    https: false,
    hotOnly: false,
    proxy: {
        //凡是请求以api开头的都会使用下面的代理服务器
        '/api/*': {
          target: 'http://localhost:8899/', // 目标服务器地址
          secure: false,                    // 目标服务器地址是否是安全协议
          changeOrigin: true,               // 是否修改来源, 为true时会让目标服务器以为是webpack-dev-server发出的请求!服务端和服务端的请求是没有跨域的
          //pathRewrite: {'^/api': '/'}     // 将/api开头的请求地址, /api 改为 /, 即 /api/xx 改为 /xx
        }
    }
},
2.解决跨域原理
这里的解决方式,实际上是将请求发送给webpack本地配置的一个调试服务器dev--serve,在dev--serve配置一个代理,作用是凡是请求以api开头的都会使用下面的代理服务器。然后这个dev--serve会向node服务器发送请求(这里的api根据不同的地址不一样,这里是api),最后node服务器会将结果返回给这个dev--serve,dev--serve再将结果返回给浏览器。
以上参考网站:https://www.yuque.com/qiannianshiguangliubuxiashunjiandejiyi/pom0qm/qk0qsq
官方api:
axios API
可以通过向 axios 传递相关配置来创建请求
axios(config)
// 发送 POST 请求
axios({
  method: 'post',
  url: '/user/12345',
  data: {
    firstName: 'Fred',
    lastName: 'Flintstone'
  }
});
// 获取远端图片
axios({
method:'get',
url:'http://bit.ly/2mTM3nY',
responseType:'stream'
})
.then(function(response) {
response.data.pipe(fs.createWriteStream('ada_lovelace.jpg'))
});请求方法的别名
为方便起见,为所有支持的请求方法提供了别名
axios.request(config)
axios.get(url[, config])
axios.delete(url[, config])
axios.head(url[, config])
axios.options(url[, config])
axios.post(url[, data[, config]])
axios.put(url[, data[, config]])
axios.patch(url[, data[, config]])
注意:
在使用别名方法时, url、method、data 这些属性都不必在配置中指定。
创建实例
可以使用自定义配置新建一个 axios 实例
axios.create([config])
const instance = axios.create({
  baseURL: 'https://some-domain.com/api/',
  timeout: 1000,
  headers: {'X-Custom-Header': 'foobar'}
});
实例方法
以下是可用的实例方法。指定的配置将与实例的配置合并。
axios#request(config)
axios#get(url[, config])
axios#delete(url[, config])
axios#head(url[, config])
axios#options(url[, config])
axios#post(url[, data[, config]])
axios#put(url[, data[, config]])
axios#patch(url[, data[, config]])
请求配置
这些是创建请求时可以用的配置选项。只有 url 是必需的。如果没有指定 method,请求将默认使用 get 方法。
{
   // `url` 是用于请求的服务器 URL
  url: '/user',

  // `method` 是创建请求时使用的方法
  method: 'get', // default

  // `baseURL` 将自动加在 `url` 前面,除非 `url` 是一个绝对 URL。
  // 它可以通过设置一个 `baseURL` 便于为 axios 实例的方法传递相对 URL
  baseURL: 'https://some-domain.com/api/',

  // `transformRequest` 允许在向服务器发送前,修改请求数据
  // 只能用在 'PUT', 'POST' 和 'PATCH' 这几个请求方法
  // 后面数组中的函数必须返回一个字符串,或 ArrayBuffer,或 Stream
  transformRequest: [function (data, headers) {
    // 对 data 进行任意转换处理
    return data;
  }],

  // `transformResponse` 在传递给 then/catch 前,允许修改响应数据
  transformResponse: [function (data) {
    // 对 data 进行任意转换处理
    return data;
  }],

  // `headers` 是即将被发送的自定义请求头
  headers: {'X-Requested-With': 'XMLHttpRequest'},

  // `params` 是即将与请求一起发送的 URL 参数
  // 必须是一个无格式对象(plain object)或 URLSearchParams 对象
  params: {
    ID: 12345
  },

   // `paramsSerializer` 是一个负责 `params` 序列化的函数
  // (e.g. https://www.npmjs.com/package/qs, http://api.jquery.com/jquery.param/)
  paramsSerializer: function(params) {
    return Qs.stringify(params, {arrayFormat: 'brackets'})
  },

  // `data` 是作为请求主体被发送的数据
  // 只适用于这些请求方法 'PUT', 'POST', 和 'PATCH'
  // 在没有设置 `transformRequest` 时,必须是以下类型之一:
  // - string, plain object, ArrayBuffer, ArrayBufferView, URLSearchParams
  // - 浏览器专属:FormData, File, Blob
  // - Node 专属: Stream
  data: {
    firstName: 'Fred'
  },

  // `timeout` 指定请求超时的毫秒数(0 表示无超时时间)
  // 如果请求话费了超过 `timeout` 的时间,请求将被中断
  timeout: 1000,

   // `withCredentials` 表示跨域请求时是否需要使用凭证
  withCredentials: false, // default

  // `adapter` 允许自定义处理请求,以使测试更轻松
  // 返回一个 promise 并应用一个有效的响应 (查阅 [response docs](#response-api)).
  adapter: function (config) {
    /* ... */
  },

 // `auth` 表示应该使用 HTTP 基础验证,并提供凭据
  // 这将设置一个 `Authorization` 头,覆写掉现有的任意使用 `headers` 设置的自定义 `Authorization`头
  auth: {
    username: 'janedoe',
    password: 's00pers3cret'
  },

   // `responseType` 表示服务器响应的数据类型,可以是 'arraybuffer', 'blob', 'document', 'json', 'text', 'stream'
  responseType: 'json', // default

  // `responseEncoding` indicates encoding to use for decoding responses
  // Note: Ignored for `responseType` of 'stream' or client-side requests
  responseEncoding: 'utf8', // default

   // `xsrfCookieName` 是用作 xsrf token 的值的cookie的名称
  xsrfCookieName: 'XSRF-TOKEN', // default

  // `xsrfHeaderName` is the name of the http header that carries the xsrf token value
  xsrfHeaderName: 'X-XSRF-TOKEN', // default

   // `onUploadProgress` 允许为上传处理进度事件
  onUploadProgress: function (progressEvent) {
    // Do whatever you want with the native progress event
  },

  // `onDownloadProgress` 允许为下载处理进度事件
  onDownloadProgress: function (progressEvent) {
    // 对原生进度事件的处理
  },

   // `maxContentLength` 定义允许的响应内容的最大尺寸
  maxContentLength: 2000,

  // `validateStatus` 定义对于给定的HTTP 响应状态码是 resolve 或 reject  promise 。如果 `validateStatus` 返回 `true` (或者设置为 `null` 或 `undefined`),promise 将被 resolve; 否则,promise 将被 rejecte
  validateStatus: function (status) {
    return status >= 200 && status < 300; // default
  },

  // `maxRedirects` 定义在 node.js 中 follow 的最大重定向数目
  // 如果设置为0,将不会 follow 任何重定向
  maxRedirects: 5, // default

  // `socketPath` defines a UNIX Socket to be used in node.js.
  // e.g. '/var/run/docker.sock' to send requests to the docker daemon.
  // Only either `socketPath` or `proxy` can be specified.
  // If both are specified, `socketPath` is used.
  socketPath: null, // default

  // `httpAgent` 和 `httpsAgent` 分别在 node.js 中用于定义在执行 http 和 https 时使用的自定义代理。允许像这样配置选项:
  // `keepAlive` 默认没有启用
  httpAgent: new http.Agent({ keepAlive: true }),
  httpsAgent: new https.Agent({ keepAlive: true }),

  // 'proxy' 定义代理服务器的主机名称和端口
  // `auth` 表示 HTTP 基础验证应当用于连接代理,并提供凭据
  // 这将会设置一个 `Proxy-Authorization` 头,覆写掉已有的通过使用 `header` 设置的自定义 `Proxy-Authorization` 头。
  proxy: {
    host: '127.0.0.1',
    port: 9000,
    auth: {
      username: 'mikeymike',
      password: 'rapunz3l'
    }
  },

  // `cancelToken` 指定用于取消请求的 cancel token
  // (查看后面的 Cancellation 这节了解更多)
  cancelToken: new CancelToken(function (cancel) {
  })
}
响应结构
某个请求的响应包含以下信息
{
  // `data` 由服务器提供的响应
  data: {},

  // `status` 来自服务器响应的 HTTP 状态码
  status: 200,

  // `statusText` 来自服务器响应的 HTTP 状态信息
  statusText: 'OK',

  // `headers` 服务器响应的头
  headers: {},

   // `config` 是为请求提供的配置信息
  config: {},
 // 'request'
  // `request` is the request that generated this response
  // It is the last ClientRequest instance in node.js (in redirects)
  // and an XMLHttpRequest instance the browser
  request: {}
}官方API网址:http://www.axios-js.com/zh-cn/docs/


 983
983


 被折叠的 条评论
为什么被折叠?
被折叠的 条评论
为什么被折叠?
 到【灌水乐园】发言


