


前言
两台机器集群,一台机器是主节点,且不存储任何数据,一台机器只存储数据
一、设置vm.max_map_count
m.max_map_count 内核设置需要设置为至少 262144 才能用于生产环境
在 /etc/sysctl.conf 中永久设置:
grep vm.max_map_count /etc/sysctl.conf
vm.max_map_count=262144
要在实时系统上应用该设置,请执行以下操作
sudo sysctl -w vm.max_map_count=262144
二、创建目录、文件
每台机器都进行该操作
#创建elasticsearch目录
sudo mkdir /usr/elasticsearch
#进入elasticsearch目录
cd elasticsearch
#创建conf目录
sudo mkdir conf
#创建certs目录
cd conf
sudo mkdir certs
1、创建elasticsearch配置文件
#进入conf目录
cd conf
#在conf目录下创建elasticsearch.yml文件,文件内容如下,按实际情况进行修改
sudo vim elasticsearch.yml
1)主节点,节点名称node-1
# ======================== Elasticsearch Configuration =========================
#
# NOTE: Elasticsearch comes with reasonable defaults for most settings.
#       Before you set out to tweak and tune the configuration, make sure you
#       understand what are you trying to accomplish and the consequences.
#
# The primary way of configuring a node is via this file. This template lists
# the most important settings you may want to configure for a production cluster.
#
# Please consult the documentation for further information on configuration options:
# https://www.elastic.co/guide/en/elasticsearch/reference/index.html
#
# ---------------------------------- Cluster -----------------------------------
#
# Use a descriptive name for your cluster:
#集群名称,es会自动发现在同一网段下的es,如果在同一网段下有多个集群,就可以用这个属性来区分不同的集群,默认为elasticsearch
cluster.name: es-application
#
# ------------------------------------ Node ------------------------------------
#
# Use a descriptive name for the node:
#节点名称
node.name: node-1
#指定该节点是否有资格被选举成为master节点,默认为true,es是默认集群中的第一台机器为master,如果这台机器停止就会重新选举master
node.master: true
#指定该节点是否存储索引数据,默认为true
node.data: true
# 配置文件中给出了三种配置高性能集群拓扑结构的模式,如下:
# 1. 如果你想让节点从不选举为主节点,只用来存储数据,可作为负载器
# node.master: false
# node.data: true
# node.ingest: true  #默认true

# 2. 如果想让节点成为主节点,且不存储任何数据,并保有空闲资源,可作为协调器
# node.master: true
# node.data: false
# node.ingest: true

# 3. 如果想让节点既不称为主节点,又不成为数据节点,那么可将他作为搜索器,从节点中获取数据,生成搜索结果等
# node.master: false
# node.data: false
# node.ingest: true
#

# 4. 仅作为协调器
# node.master: false
# node.data: false
# node.ingest: false
# Add custom attributes to the node:
#
#node.attr.rack: r1
#
# ----------------------------------- Paths ------------------------------------
#
# Path to directory where to store the data (separate multiple locations by comma):
#
# path.data: /usr/elasticsearch/data
#
# Path to log files:
#
#path.logs: /usr/elasticsearch/logs
#
# ----------------------------------- Memory -----------------------------------
#
# Lock the memory on startup:
# 锁定物理内存地址,防止es内存被交换出去,也就是避免es使用swap交换分区,频繁的交换,会导致IOPS变高
bootstrap.memory_lock: true
#
# Make sure that the heap size is set to about half the memory available
# on the system and that the owner of the process is allowed to use this
# limit.
#
# Elasticsearch performs poorly when the system is swapping the memory.
#
# ---------------------------------- Network -----------------------------------
#
# By default Elasticsearch is only accessible on localhost. Set a different
# address here to expose this node on the network:
#绑定监听IP
network.host: 0.0.0.0
#必须修改,设置其它节点和该节点交互的ip地址,如果不设置它会自动设置,值必须是个真实的ip地址
#network.bind_host: 152.136.58.51
network.publish_host: 152.136.58.51
# By default Elasticsearch listens for HTTP traffic on the first free port it
# finds starting at 9200. Set a specific HTTP port here:
#设置对外服务的http端口,默认为9200
http.port: 60001
#
# For more information, consult the network module documentation.
#
# --------------------------------- Discovery ----------------------------------
#
# Pass an initial list of hosts to perform discovery when this node is started:
# The default list of hosts is ["127.0.0.1", "[::1]"]
#必须修改,设置候选主机节点的主机名称列表
discovery.seed_hosts: ["152.136.58.51:60002"]
#集群结点之间通信端口
transport.port: 60002
#
# Bootstrap the cluster using an initial set of master-eligible nodes:
#
#参数设置一系列符合主节点条件的节点的主机名或 IP 地址来引导启动集群
cluster.initial_master_nodes: ["node-1"]
#
# For more information, consult the discovery and cluster formation module documentation.
#
# --------------------------------- Readiness ----------------------------------
#
# Enable an unauthenticated TCP readiness endpoint on localhost
#
#readiness.port: 9399
#
# ---------------------------------- Various -----------------------------------
#
# Allow wildcard deletion of indices:
#
#action.destructive_requires_name: false
#xpack.security.enabled: true

#xpack.security.transport.ssl.enabled: true
#xpack.security.transport.ssl.verification_mode: certificate
#xpack.security.transport.ssl.keystore.path: certs/elastic-stack-ca.p12
#xpack.security.transport.ssl.truststore.path: certs/elastic-stack-ca.p12
2)只存储数据机器,节点名称node-2
# ======================== Elasticsearch Configuration =========================
#
# NOTE: Elasticsearch comes with reasonable defaults for most settings.
#       Before you set out to tweak and tune the configuration, make sure you
#       understand what are you trying to accomplish and the consequences.
#
# The primary way of configuring a node is via this file. This template lists
# the most important settings you may want to configure for a production cluster.
#
# Please consult the documentation for further information on configuration options:
# https://www.elastic.co/guide/en/elasticsearch/reference/index.html
#
# ---------------------------------- Cluster -----------------------------------
#
# Use a descriptive name for your cluster:
#
cluster.name: es-application
#
# ------------------------------------ Node ------------------------------------
#
# Use a descriptive name for the node:
#
node.name: node-2
node.master: false
node.data: true
#
# Add custom attributes to the node:
#
#node.attr.rack: r1
#
# ----------------------------------- Paths ------------------------------------
#
# Path to directory where to store the data (separate multiple locations by comma):
#
#path.data: /usr/elasticsearch/data
#
# Path to log files:
#
#path.logs: /usr/elasticsearch/logs
#
# ----------------------------------- Memory -----------------------------------
#
# Lock the memory on startup:
#
bootstrap.memory_lock: true
#
# Make sure that the heap size is set to about half the memory available
# on the system and that the owner of the process is allowed to use this
# limit.
#
# Elasticsearch performs poorly when the system is swapping the memory.
#
# ---------------------------------- Network -----------------------------------
#
# By default Elasticsearch is only accessible on localhost. Set a different
# address here to expose this node on the network:
network.host: 0.0.0.0
#network.bind_host: 192.144.171.119
#必须修改
network.publish_host: 192.144.171.119
#
# By default Elasticsearch listens for HTTP traffic on the first free port it
# finds starting at 9200. Set a specific HTTP port here:
#
http.port: 60001
#
# For more information, consult the network module documentation.
#
# --------------------------------- Discovery ----------------------------------
#
# Pass an initial list of hosts to perform discovery when this node is started:
# The default list of hosts is ["127.0.0.1", "[::1]"]
#必须修改
discovery.seed_hosts: ["152.136.58.51:60002"]
transport.port: 60002
# Bootstrap the cluster using an initial set of master-eligible nodes:
#
#discovery.zen.minimum_master_nodes: 2
cluster.initial_master_nodes: ["node-1"]

# For more information, consult the discovery and cluster formation module documentation.
#
# --------------------------------- Readiness ----------------------------------
#
# Enable an unauthenticated TCP readiness endpoint on localhost
#
#readiness.port: 9399
#
# ---------------------------------- Various -----------------------------------
#
# Allow wildcard deletion of indices:
#
#action.destructive_requires_name: false
#xpack.security.enabled: true

#xpack.security.transport.ssl.enabled: true
#xpack.security.transport.ssl.verification_mode: certificate
#xpack.security.transport.ssl.keystore.path: certs/elastic-stack-ca.p12
#xpack.security.transport.ssl.truststore.path: certs/elastic-stack-ca.p12
2、创建docker-compose文件(确保机器上已安装docker-compose)
cd /usr/elasticsearch
# 内容如下
sudo vim docker-compose.yml
1)主节点,节点名称node-1
version: '3.0'
services:
  es01:
    image: docker.elastic.co/elasticsearch/elasticsearch:${ELASTIC_STACK_VERSION}
    container_name: node-1
    environment:
      - "ES_JAVA_OPTS=-Xms1g -Xmx1g"
    ulimits:
      memlock:
        soft: -1
        hard: -1
    volumes:
      - /home/ubuntu/elasticsearch/conf/elasticsearch.yml:/usr/share/elasticsearch/config/elasticsearch.yml
      - esdata01:/usr/share/elasticsearch/data
      - eslogs01:/usr/share/elasticsearch/logs
      #- /home/ubuntu/elasticsearch/conf/certs/elastic-stack-ca.p12:/usr/share/elasticsearch/config/certs/elastic-stack-ca.p12
    ports:
      - ${ES_PORT}:60001
      - ${ES1_PORT}:60002
    networks:
      - elastic
volumes:
  esdata01:
    driver: local
  eslogs01:
    driver: local
networks:
  elastic:
2)只存储数据机器,节点名称node-2
version: '3.0'
services:
  es02:
    image: docker.elastic.co/elasticsearch/elasticsearch:${ELASTIC_STACK_VERSION}
    container_name: node-2
    environment:
      - "ES_JAVA_OPTS=-Xms1g -Xmx1g"
    ulimits:
      memlock:
        soft: -1
        hard: -1
    volumes:
      - /home/ubuntu/elasticsearch/conf/elasticsearch.yml:/usr/share/elasticsearch/config/elasticsearch.yml
      - esdata02:/usr/share/elasticsearch/data
      - eslogs02:/usr/share/elasticsearch/logs
      #- /home/ubuntu/elasticsearch/conf/certs/elastic-stack-ca.p12:/usr/share/elasticsearch/config/certs/elastic-stack-ca.p12
    ports:
      - ${ES_PORT}:60001
      - ${ES1_PORT}:60002
    networks:
      - elastic
volumes:
  esdata02:
    driver: local
  eslogs02:
    driver: local
networks:
  elastic:
3、设置环境变量
cd /usr/elasticsearch
sudo vim .env
每台机器配置一样
ELASTIC_STACK_VERSION=7.9.2
ES_PORT=9200
ES1_PORT=9300
三、启动
在每台机器上执行
sudo docker-compose up -d
四、设置安全登录
1、进入到容器内部
# node-1 容器名称
sudo docker exec -it node-1 bash
2、容器内部操作
#使用如下命令,等出现让你命名文件名称时即Please enter the desired output file [elastic-stack-ca.p12] ,连续按两下enter既可,因为我们使用默认的文件名 elastic-stack-ca.p12
./bin/elasticsearch-certutil ca
# 看一下是否生成elastic-stack-ca.p12文件
ls
LICENSE.txt  README.asciidoc  config  elastic-stack-ca.p12  lib   modules
NOTICE.txt   bin              data    jdk                   logs  plugins
#退出容器
exit
3、进入conf/certs目录 将elastic-stack-ca.p12文件copy出来
sudo docker cp node-1:/usr/share/elasticsearch/elastic-stack-ca.p12 .
4、修改elasticsearch.yml和dockers-compose.yml文件
elasticsearch.yml将如下注释打开,保存
xpack.security.enabled: true

xpack.security.transport.ssl.enabled: true
xpack.security.transport.ssl.verification_mode: certificate
xpack.security.transport.ssl.keystore.path: certs/elastic-stack-ca.p12
xpack.security.transport.ssl.truststore.path: certs/elastic-stack-ca.p12
dockers-compose.yml将如下注释打开,保存
- /home/ubuntu/elasticsearch/conf/certs/elastic-stack-ca.p12:/usr/share/elasticsearch/config/certs/elastic-stack-ca.p12
5、删除容器重新启动
sudo docker rm -f node-2
sudo docker-compose up -d
6、设置账号密码
进入到容器内部
sudo docker exec -it node-1 bash
#容器内部输入
./bin/elasticsearch-setup-passwords interactive
按照提示把密码都设置为 123456
设置完毕后,退出容器。在浏览器上访问 http://ip:9200 然后输入 elastic/123456 这个账号即可

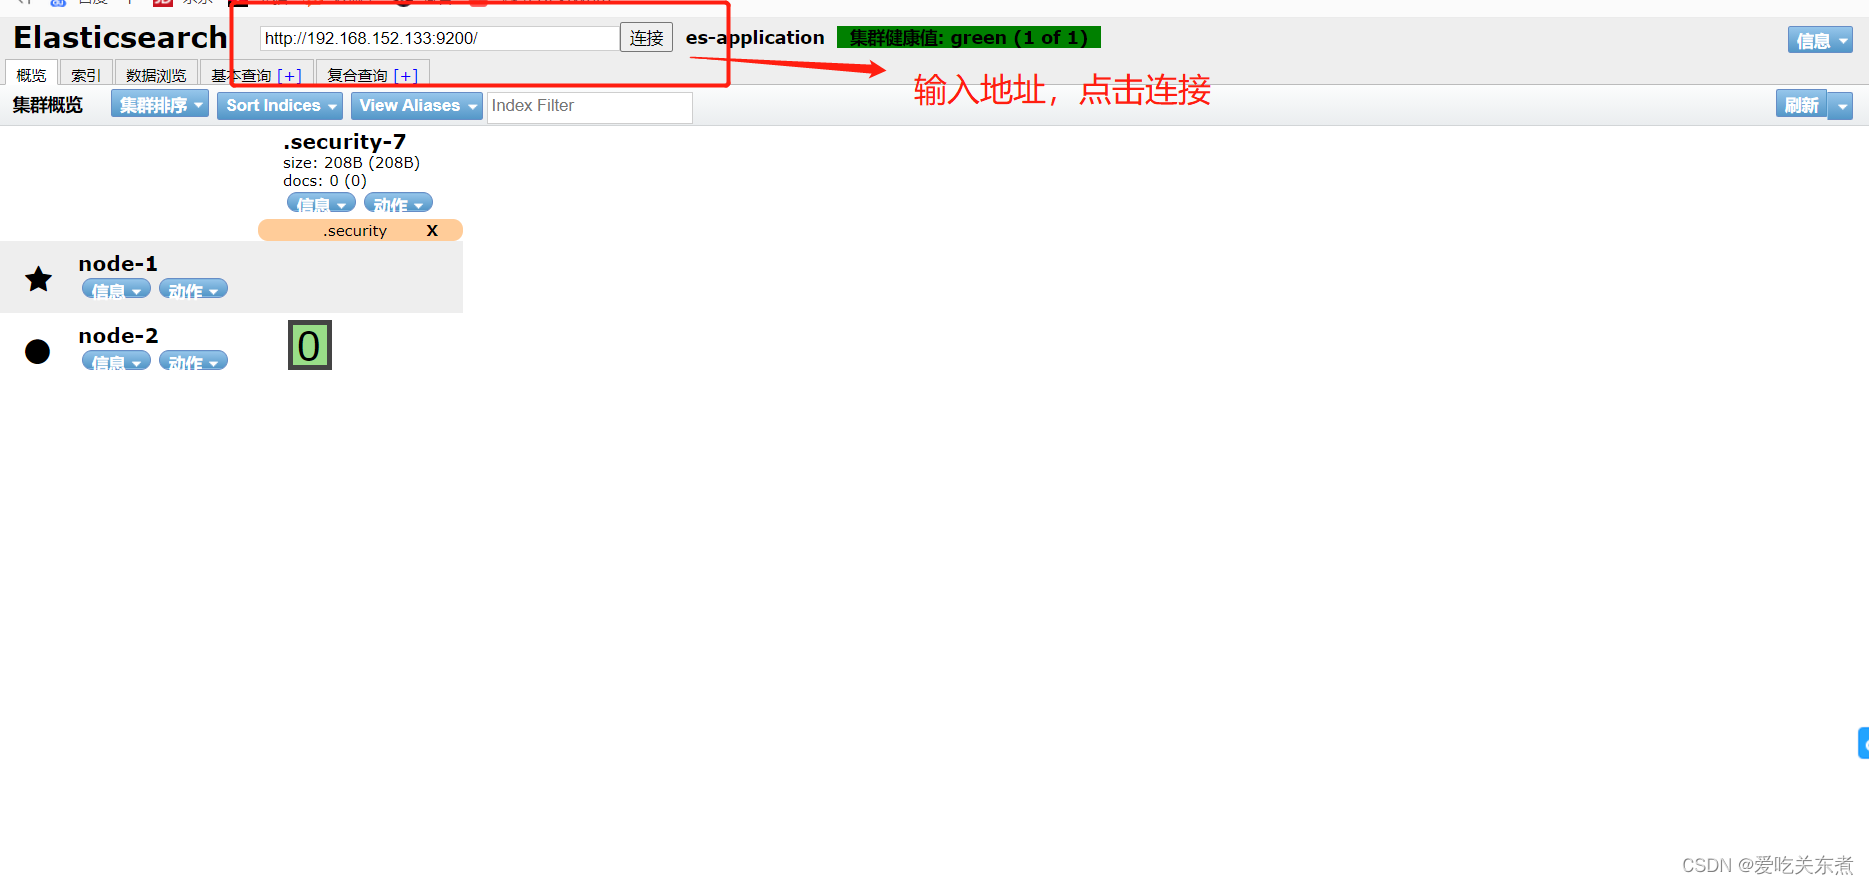
五、验证
在浏览器上安装ElasticSearch Head插件,输入地址点击连接之后,看到两个节点即部署集群成功
后续更新Kibana部署


 1266
1266


 被折叠的 条评论
为什么被折叠?
被折叠的 条评论
为什么被折叠?
 到【灌水乐园】发言


