


spring boot官方文档:https://docs.spring.io/spring-boot/docs/current/reference/html/
浏览器发送hello请求,服务器接受请求并处理,响应Hello World字符串;
1.创建一个maven工程
2.导入依赖
   <parent>
        <groupId>org.springframework.boot</groupId>
        <artifactId>spring-boot-starter-parent</artifactId>
        <version>2.5.4</version>
    </parent>

    <dependencies>
        <dependency>
            <groupId>org.springframework.boot</groupId>
            <artifactId>spring-boot-starter-web</artifactId>//导入了web模块正常运行所依赖的组件
        </dependency>
    </dependencies>
编写主程序类
import org.springframework.boot.SpringApplication;
import org.springframework.boot.autoconfigure.SpringBootApplication;

@SpringBootApplication//标注主程序类,入口
public class MainApplication {
    public static void main(String[] args) {
        SpringApplication.run(MainApplication.class,args);//启动spring应用
    }
}
编写业务逻辑
@RestController//包括@ResponseBody、@Controller
public class HelloController {


    @RequestMapping("/hello")
    public String hand01(){
        return "Hello,Spring Boot";
    }
}
yaml配置文件
- 大小写敏感
- 使用缩进表示层级关系
- 缩进时不允许使用Tab键,只允许使用空格
- 缩进的空格数目不重要,只要相同层级的元素左侧对齐即可
- 用# 表示注释
#对象
friends:
  lastName: zhangsan
  age: 20

 friends: {lastName: zhangsan,age: 18}

 #数组
 pets:
   ‐ cat
   ‐ dog
   ‐ pig

 pets: [cat,dog,pig]


person:
  lastName: hello
  age: 18
  boss: false
  birth: 2017/12/12
  maps: {k1: v1,k2: 12}
  lists:
    ‐ lisi
    ‐ zhaoliu
  dog:
    name: 小狗
    age: 12

#配数据库
spring:
  datasource:
    driver-class-name: com.mysql.cj.jdbc.Driver
    username: root
    password: 123456
    url: jdbc:mysql://localhost:3306/tdoor_user?
@PropertySource:加载指定的配置文件;
@PropertySource:加载指定的配置文件;
SpringBoot推荐给容器中添加组件的方式;推荐使用全注解的方式
1、配置类@Configuration------>Spring配置文件
2、使用@Bean给容器中添加组件
静态资源访问:
默认情况下,类路径下如果有/static、/public、/resource、/META-INF/resources,将静态资源放在其下,可访问。
静态资源访问默认无前缀,可在配置文件中添加前缀
spring:
  mvc:
    static-path-pattern: /res/**
静态资源访问路径也可以改变
resources:
  static-locations: classpath:/aaa
欢迎页
- 静态资源路径下 index.html
在静态资源路径下新建一个html文件
 <!DOCTYPE html>
<html lang="en">
<head>
    <meta charset="UTF-8">
    <title>Title</title>
</head>
<body>
<h1>静态资源欢迎页</h1>
</body>
</html>
//直接http://localhost:8080/index.html
- controller处理
@Controller
public claa IndexController{
 	@GetMapping("/index")
	 public String welcome(){
  	return "index.html";
  }
}
@Controller:在Spring Boot中,专门用于处理Http请求的。
- @RequetMapping("/请求路径")
- @RequetMapping(value = “/请求路径”,method = RequestMethod.方式)
@Date:可以不写getset方法?
@AllArgsConstructor:有参构造器
@NoArgsConstructor:无参构造器
配置文件中,Debug=true可以看自动配置报告
表单
<form action="/user" method="get">
		<input value="REST-POST 提交“ type=”sumbit“/>
</form>
WebMvcConfigurer配置
addViewControllers:页面跳转。重写WebMvcConfigurer中的addViewControllers() 方法。
@Override
    public void addViewControllers(ViewControllerRegistry registry) {
        registry.addViewController("/toLogin").setViewName("login");
        registry.addViewController("/index.html").setViewName("index");
    }
   //addViewController("/toLogin"),是URL路径,就是http://localhost:8080/toLogin

	//setViewName("/login")是你HTML页面名
addResourceHandlers:如果想自定义静态资源映射目录的话,只需重写 addResourceHandlers() 方法即可
- addResoureHandler:对外暴露的访问路径
- addResourceLocations:内部文件放置的路径
@Configuration
public class MyWebMvcConfig implements WebMvcConfigurer {
    @Override
    public void addResourceHandlers(ResourceHandlerRegistry registry) {
        registry.addResourceHandler("/my/**").addResourceLocations("classpath:/my/");
    }
}
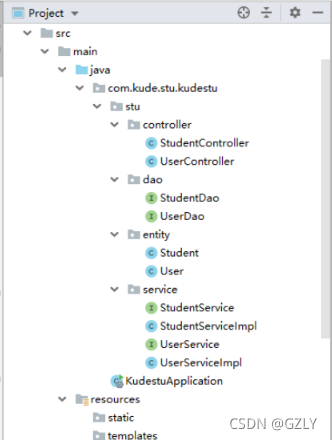
MVC模式
DAO层:主要是做数据持久层的工作,负责与数据库进行联络的一些任务都封装在此
Service层:主要负责业务模块的逻辑应用设计。
Controller层:负责具体的业务模块流程的控制,在此层里面要调用Service层的接口来控制业务流程。
View层:主要负责前台jsp页面的表示。
例子:https://www.cnblogs.com/almm/p/10801796.html
student实体类
@Entity  // 进行实体类的持久化操作,当JPA检测到我们的实体类当中有@Entity 注解的时候,会在数据库中生成对应的表结构信息。
@Table(name = "student")  //在数据库中生成student表
//@Entity  应用在实体类上   @Table(name = "student") 应用在实体类上,并且name属性为数据库表名
//实体类主要作用是存储和管理系统内部数据并提供对这些数据的访问
public class Student {
    @Id  //声明一个实体类的属性映射为数据库的主键列。
    @GeneratedValue(strategy = GenerationType.IDENTITY) //标注主键的生成策略,通过strategy 属性指定
    //ID自增
    private  Integer id;  //可以区分属性是否被设置过值,int默认是0,Integer默认null
    private String name;
    private  int age;
    private  String sex;

    @Override
    public String toString() {
        return "Student{" +
                "id=" + id +
                ", name='" + name + '\'' +
                ", age=" + age +
                ", sex='" + sex + '\'' +
                '}';
    }

    public Student() {
    }

    public Integer getId() {
        return id;
    }

    public void setId(Integer id) {
        this.id = id;
    }

    public String getName() {
        return name;
    }

    public void setName(String name) {
        this.name = name;
    }

    public int getAge() {
        return age;
    }

    public void setAge(int age) {
        this.age = age;
    }

    public String getSex() {
        return sex;
    }

    public void setSex(String sex) {
        this.sex = sex;
    }
}
StudentDao:
@param将表单中name属性中的value值,赋值给方法中的形式参数
@Qurey:name指方法名,nativeQuery = true时可以执行sql。
JpaRepository简单查询,spring data默认已经实现,自定义的简单查询就是根据方法名来自动生成SQL,主要的语法是findXXBy,readAXXBy,queryXXBy,countXXBy, getXXBy后面跟属性名称(https://blog.csdn.net/fly910905/article/details/78557110/)
 List<Student> findStuByName(@Param("name") String name);
 @Query(name = "findStuByName",nativeQuery = true,value   "select * from student where name=:name")//把name传给String name,再赋给sql语句的name。
UserDao
如果两个usernam或者password一样的User用户,回出现500错误
这种方法不能用username或者password登入
@Query(name="login",nativeQuery = true,value =
        "select * from user where username=:username and password=:password")
User login(@Param("username") String username, @Param("password") String password);
StudentService:
public interface StudentService {
    Student save(Student student);//添加学生
    Student update(Student student);//修改
    void  delete(Integer id);//通过id删除学生
    Student findStuById(Integer id);//通过ID查找学生,接口中没有此方法,在StudentDao接口创建
    List<Student> findStuByName(String name);//通过学生姓名查找,在StudentDao接口创建

    /**
     * 分页查询所有数据
     * @param page //当前页
     * @param pageSize //每页记录数
     * @return
     */
    Page<Student> findAll(int page,int pageSize);//调用Dao接口的父类JPA接口分页方法。

}
StudentServiceImpl:实现接口
StudentController:
@RestController
@RequestMapping("/s")
public class StudentController {

    @Autowired//依赖注入
    private StudentService studentService;

    /**
     * 添加学生
     * @param student 要添加学生对象
     * @return
     */
    @PostMapping("/add")
    /*@PostMapping
    映射一个POST请求
*/

    public  Student save(Student student){
        return studentService.save(student);
    }

    /**
     * 修改学生
     * @param student
     */
    @PostMapping("/update")
    public  Student update(Student student){
        return studentService.save(student);
    }

    /**
     * 删除学生
     * @param  id   要删除学生id
     * @return
     */
    @GetMapping("/del/{id}")
    public  String del(@PathVariable  int id){
        studentService.delete(id);
        return  "yes";
    }

    @GetMapping("/findByName/{name}")
    public List<Student> findByName(@PathVariable String name){
    return  studentService.findStuByName(name);
    }


 3710
3710


 被折叠的 条评论
为什么被折叠?
被折叠的 条评论
为什么被折叠?
 到【灌水乐园】发言


