


 博客介绍了在页面使用高德地图API的步骤,包括安装amap/amap-jsapi-loader、在高德开放平台注册并获取key,还说明了在页面构建容器、引入amap/amap-jsapi-loader、初始化地图的操作,最后提及完成搜索框配置及展示完整代码和效果图。
1.安装amap/amap-jsapi-loader
npm i amap-jsapi-loader --save2.注册高德api
官网地址:高德开放平台 | 高德地图API (amap.com)
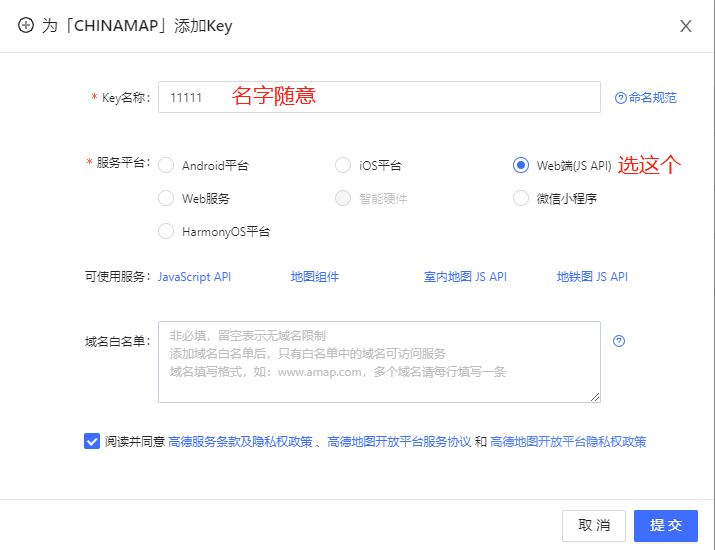
注册之后点击右上角控制台,在如下位置添加key

按下图操作生成属于你的key(后面要用)
3.在页面使用
创建一个组件
1.页面构建
html页面如下,一个容器包裹一个输入框,分别赋予id,container是地图容器
<div id="container" style="width: 100%;height: 600px;position: relative">
      <input
          v-model="keyword"
          class="keyword"
          id="keyword"
          placeholder="请输入搜索位置"
          style="position: absolute;z-index: 99;"
      />
    </div>
  </div>
2.引入amap/amap-jsapi-loader
这里我直接在页面内引用
import AMapLoader from "@amap/amap-jsapi-loader";3.初始化地图
import AMapLoader from "@amap/amap-jsapi-loader";
import { reactive, ref, shallowRef} from 'vue'

const keyword = ref('')
// 存储搜索用的数据
const form: any = reactive({
  address: '',
})
const ininMap = () => {
  AMapLoader.load({
    key: 'your key',//api服务key--另外需要在public中使用安全密钥!!!
    version: '1.4.4',// 指定要加载的 JSAPI 的版本,缺省时默认为 1.4.15
    plugins: ['AMap.PlaceSearch', 'AMap.AutoComplete']// 需要使用的的插件列表
  }).then((AMap) => {
        map = new AMap.Map('container', {
          resizeEnable: true,
          zoom: 9.5, // 地图显示的缩放级别
          center: [117.2, 31.8]//中心点
        })
    }
}
这里的key就是刚刚申请的key,填上即可
另外,还需在项目的public文件夹的index.html文件里添加安全密钥,代码如下
<!DOCTYPE html>
<html lang="">
  <head>
    <meta charset="utf-8">
    <meta http-equiv="X-UA-Compatible" content="IE=edge">
    <meta name="viewport" content="width=device-width,initial-scale=1.0">
    <link rel="icon" href="<%= BASE_URL %>favicon.ico">
    <title><%= htmlWebpackPlugin.options.title %></title>
  </head>
  <body>
  <script>
      window._AMapSecurityConfig = {
          securityJsCode:'你的安全密钥',
      };//在这里添加
  </script>
    <noscript>
      <strong>We're sorry but <%= htmlWebpackPlugin.options.title %> doesn't work properly without JavaScript enabled. Please enable it to continue.</strong>
    </noscript>
    <div id="app"></div>
    <!-- built files will be auto injected -->
  </body>
</html>
配置完成了接下来就是完成搜索框的配置
代码如下
const ininMap = () => {
  AMapLoader.load({
    key: 'your key',//api服务key--另外需要在public中使用安全密钥!!!
    version: '1.4.4',// 指定要加载的 JSAPI 的版本,缺省时默认为 1.4.15
    plugins: ['AMap.PlaceSearch', 'AMap.AutoComplete']// 需要使用的的插件列表
  })
      .then((AMap) => {
        map = new AMap.Map('container', {
          resizeEnable: true,
          zoom: 9.5, // 地图显示的缩放级别
          center: [117.2, 31.8]
        })
        AMap.plugin(
            ['AMap.Autocomplete', 'AMap.PlaceSearch', 'AMap.Geocoder'],
            function (
callback: ((this: MediaQueryList, ev: MediaQueryListEvent) => any) | null) {
              const autoOptions = {
                input: 'keyword' // 使用联想输入的input的id
              }
              const autocomplete = new AMap.Autocomplete(autoOptions)
              const placeSearch = new AMap.PlaceSearch({
                map: map
              })
              const geocoder = new AMap.Geocoder({
                radius: 1000,
                extensions: 'all'
              })
              AMap.event.addListener(autocomplete, 'select', function (e) {
                placeSearch.setCity(e.poi.adcode)
                placeSearch.search(e.poi.name, function (status, result) {
                  const pois = result.poiList.pois
                  for (let i = 0; i < pois.length; i++) {
                    if (pois[i].name === e.poi.name) {
                      console.log('搜索结果', pois[i])
                      geocoder.getAddress(
                          [pois[i].location.lng, pois[i].location.lat],
                          function (status, result) {
                            console.log(result)
                            if (status === 'complete' && result.info === 'OK') {
                              form.address = result.regeocode.formattedAddress
                            } else {
                              form.address = ''
                            }
                          }
                      )
                    }
                  }
                })
              })
            }
        )
      })
      .catch((e) => {})
}
页面完整代码如下
<template>
<div class="box">
<div id="container" style="width: 100%;height: 600px;position: relative">
<input
v-model="keyword"
class="keyword"
id="keyword"
placeholder="请输入搜索位置"
style="position: absolute;z-index: 99;"
/>
</div>
</div>
</template>
<script setup lang="ts">
import AMapLoader from "@amap/amap-jsapi-loader";
import { reactive, ref, shallowRef} from 'vue'
const keyword = ref('')
// 存储搜索用的数据
const form: any = reactive({
address: '',
})
let map = shallowRef(null)
const ininMap = () => {
AMapLoader.load({
key: 'your key',//api服务key--另外需要在public中使用安全密钥!!!
version: '1.4.4',// 指定要加载的 JSAPI 的版本,缺省时默认为 1.4.15
plugins: ['AMap.PlaceSearch', 'AMap.AutoComplete']// 需要使用的的插件列表
})
.then((AMap) => {
map = new AMap.Map('container', {
resizeEnable: true,
zoom: 9.5, // 地图显示的缩放级别
center: [117.2, 31.8]
})
AMap.plugin(
['AMap.Autocomplete', 'AMap.PlaceSearch', 'AMap.Geocoder'],
function (callback: ((this: MediaQueryList, ev: MediaQueryListEvent) => any) | null) {
const autoOptions = {
input: 'keyword' // 使用联想输入的input的id
}
const autocomplete = new AMap.Autocomplete(autoOptions)
const placeSearch = new AMap.PlaceSearch({
map: map
})
const geocoder = new AMap.Geocoder({
radius: 1000,
extensions: 'all'
})
AMap.event.addListener(autocomplete, 'select', function (e) {
placeSearch.setCity(e.poi.adcode)
placeSearch.search(e.poi.name, function (status, result) {
const pois = result.poiList.pois
for (let i = 0; i < pois.length; i++) {
if (pois[i].name === e.poi.name) {
console.log('搜索结果', pois[i])
geocoder.getAddress(
[pois[i].location.lng, pois[i].location.lat],
function (status, result) {
console.log(result)
if (status === 'complete' && result.info === 'OK') {
form.address = result.regeocode.formattedAddress
} else {
form.address = ''
}
}
)
}
}
})
})
}
)
})
.catch((e) => {})
}
ininMap()
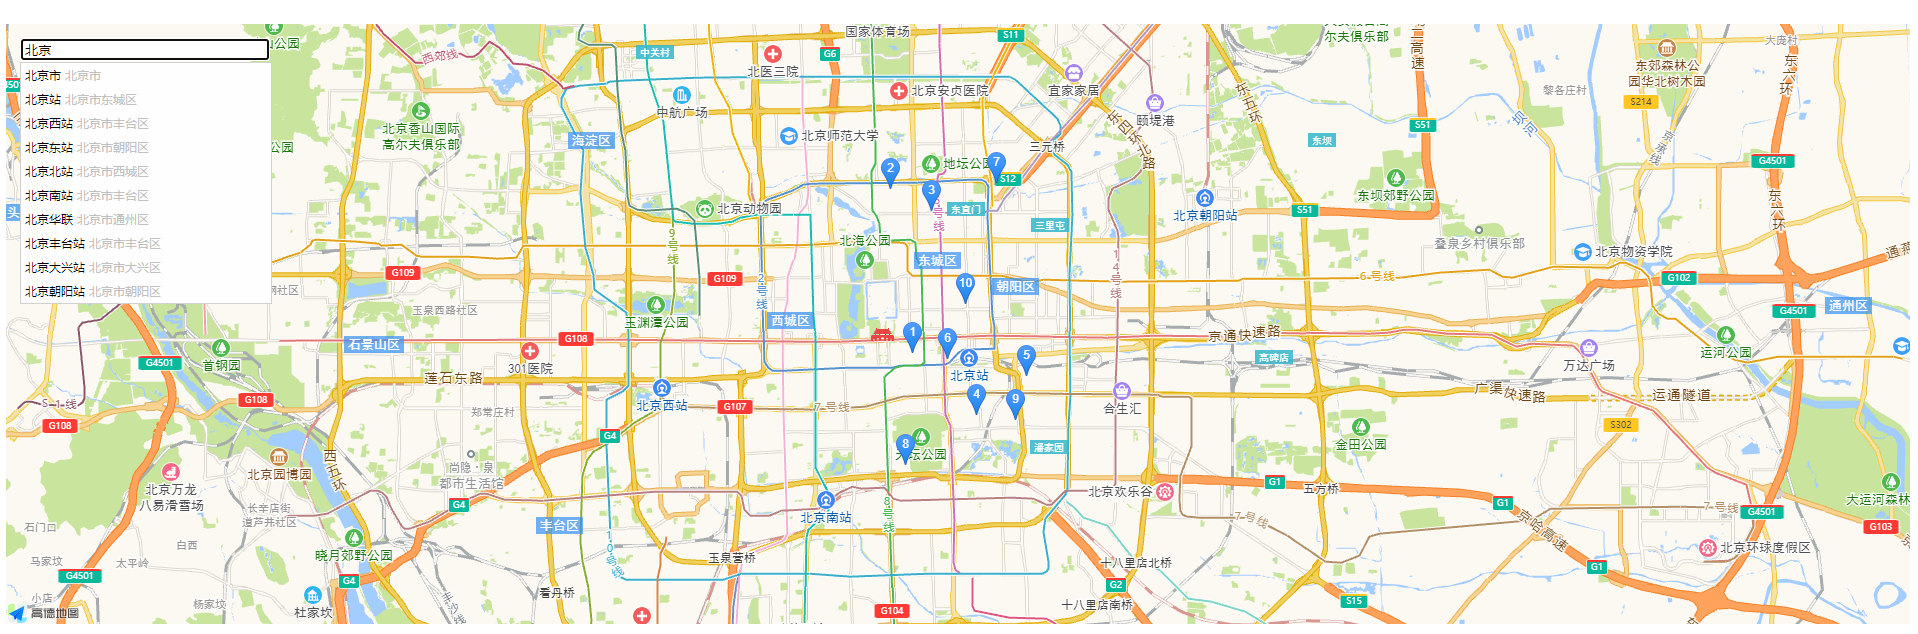
</script>完成效果图


 4008
4008


 到【灌水乐园】发言


