多线程
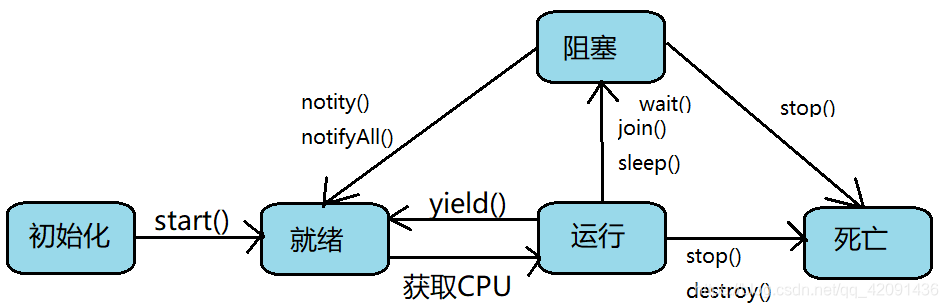
线程的生命周期
- 新建 : (初始状态)调用Thread子类对象的start()方法
- 就绪 : 获取CPU执行权进入就绪状态, 如果失去执行权或调用yield()方法就会到新建状态
- 运行 : 在获取就绪状态时开始运行run()方法, 或线程调用stop()以及出现异常没处理线程结束
- 死亡 : (最终状态)程序结束运行
- 阻塞 : (不是最终状态)线程在执行时调用sleep(long millis)和join()方法以及等待同步锁,wait(),suspend()
线程的同步
- 多个线程执行的不确定引起执行结果的不稳定
- 如我们有三个窗口卖票,票一共是100张,我们使用下边的两种方式来卖票。
继承Thread类的卖票方式
public class Test {
    private static int ticket = 100;

    public static int getTicket() {
        return ticket;
    }

    public static void sellTicket() {
        Test.ticket--;
    }

    public static void main(String[] args) {
        sub sub1 = new sub();
        sub sub2 = new sub();
        sub sub3 = new sub();

        sub1.setName("窗口一");
        sub2.setName("窗口二");
        sub3.setName("窗口三");

        sub1.start();
        sub2.start();
        sub3.start();
    }
}

class sub extends Thread{

    @Override
    public void run() {
        while (true){
            if (Test.getTicket() > 0){
                System.out.println(getName()+"买票,票号为: "+Test.getTicket());
                Test.sellTicket();
            }else {
                break;
            }
        }
    }
}
实现Runnable接口的卖票方式
public class Test1 implements Runnable{
    private int ticket = 100;
    @Override
    public void run() {
        while (true){
            if (ticket > 0){
                System.out.println(Thread.currentThread().getName()+" 买到票了,票号为 :"+ticket);
                ticket--;
            }else {
                break;
            }
        }
    }

    public static void main(String[] args) {
        Test1 test1 = new Test1();

        Thread thread1 = new Thread(test1);
        Thread thread2 = new Thread(test1);
        Thread thread3 = new Thread(test1);
        thread1.start();
        thread2.start();
        thread3.start();
    }
}
上述的两种方式卖票过程中出现了错票和重票的原因
- 当某个线程操作车票的过程中,尚未完成,其他线程也来操作车票
- 如何结果 : 当一个线程a在操作ticket的时候,其他线程不能参与进来,直到线程a操作完ticket时,其他线程才可以操作ticket,过程中就算ticket出现了阻塞,其他线程也需要等到线程a完事儿
如何解决线程中共享数据同步的问题
1.使用synchronized关键字
1.1synchronized同步代码块
synchronized(对象监视器){
}
- 共享数据 : 多个献策很难过共同操作的变量 : 比如卖车票的ticket变量
- 对象监视器(锁) : 任何一个类的对象都可以充当锁(要求多个线程必须要公用一把锁,不能反复的创建锁对象)
继承Thread类的卖票方式采用synchronized同步代码块
class SUB1 extends Thread {
public static void main(String[] args) {
SUB1 sub1 = new SUB1();
SUB1 sub2 = new SUB1();
SUB1 sub3 = new SUB1();
sub1.start();
sub2.start();
sub3.start();
}
private static int ticket = 100;
private static Object o = new Object();
@Override
public void run() {
while (true){
synchronized(Test.class){
if (ticket > 0){
try {
Thread.sleep(100);
} catch (InterruptedException e) {
e.printStackTrace();
}
System.out.println(Thread.currentThread().getName()+" 我拿到的票是 = " + ticket);
ticket--;
}else {
break;
}
}
}
}
}
实现Runnable接口的卖票方式采用synchronized同步代码块
class SUB implements Runnable{
public static void main(String[] args) {
SUB sub = new SUB();
Thread thread1 = new Thread(sub);
thread1.setName("窗口一");
Thread thread2 = new Thread(sub);
thread2.setName("窗口二");
Thread thread3 = new Thread(sub);
thread3.setName("窗口三");
thread1.start();
thread2.start();
thread3.start();
}
private int ticket = 100;
Object o = new Object();
@Override
public void run() {
while (true){
synchronized(Test.class){
if (ticket > 0){
try {
Thread.sleep(100);
} catch (InterruptedException e) {
e.printStackTrace();
}
System.out.println(Thread.currentThread().getName()+" 我拿到的票是 = " + ticket);
ticket--;
}else {
break;
}
}
}
}
}
synchronized同步方法
- 如果操作共享数据的代码完整的声明在一个方法中,我们可以将此方法声明为同步的(synchronized)
- 注意点,如果调用此同步方法的实例化对象有多个卖需要将此对象声明为静态方法
继承Thread类的卖票方式采用synchronized同步方法
public class Test2 {
public static void main(String[] args) {
Sub1Test sub1Test1 = new Sub1Test();
Sub1Test sub1Test2 = new Sub1Test();
Sub1Test sub1Test3 = new Sub1Test();
sub1Test1.start();
sub1Test2.start();
sub1Test3.start();
}
}
class Sub1Test extends Thread{
private static int ticket = 100;
@Override
public void run() {
while (true){
getflag();
}
}
public static synchronized void getflag(){
if (ticket > 0){
try {
Thread.sleep(100);
} catch (InterruptedException e) {
e.printStackTrace();
}
System.out.println(Thread.currentThread().getName()+" ticket = " + ticket);
ticket--;
}
}
}
实现Runnable接口的卖票方式采用synchronized同步方法
public class Test1 {
public static void main(String[] args) {
SubTest subTest = new SubTest();
Thread thread1 = new Thread(subTest);
Thread thread2 = new Thread(subTest);
Thread thread3 = new Thread(subTest);
thread1.start();
thread2.start();
thread3.start();
}
}
class SubTest implements Runnable{
private static int ticket = 100;
@Override
public void run() {
while (true){
getflag();
}
}
public synchronized void getflag(){
if (ticket > 0){
try {
Thread.sleep(100);
} catch (InterruptedException e) {
e.printStackTrace();
}
System.out.println(Thread.currentThread().getName()+" ticket = " + ticket);
ticket--;
}
}
}
2.使用Lock锁 (JDK5.0新增)
synchronized和Lock的相同点和不同点
- synchronized在执行完相应的同步代码后,自动释放对象监视
- Lock需要手动的启动同步lock(),同时结束同步也需要手动的实现unlock()
public class LockTest {
public static void main(String[] args) {
Sub sub = new Sub();
Thread thread1 = new Thread(sub);
Thread thread2 = new Thread(sub);
Thread thread3 = new Thread(sub);
thread1.start();
thread2.start();
thread3.start();
}
}
class Sub implements Runnable{
private int ticket = 100;
private ReentrantLock lock = new ReentrantLock(true);
@Override
public void run() {
while (true){
try{
lock.lock();
if (ticket > 0){
try {
Thread.sleep(100);
} catch (InterruptedException e) {
e.printStackTrace();
}
System.out.println(Thread.currentThread().getName()+" ticket = " + ticket);
ticket--;
}else{
break;
}
}finally {
lock.unlock();
}
}
}
}
懒汉式单例的线程安全解决
class Test{
private Test(){}
private static Test instance = null;
public static Test getInstance1(){
if (instance == null){
synchronized (SingLton.class){
if (instance == null){
instance = new Test();
}
}
}
return instance;
}
public synchronized static Test getInstance2(){
if (instance == null){
instance = new Test();
}
return instance;
}
}
线程的死锁
- 不同的线程分别占用对象需要的同步资源不放弃,都在等待对方放弃自己需要的资源,这样就构成了死锁
- 出现死锁后不会出现异常,也不会报错,我们在开发中要避免死锁
public class DeadThread {
public static void main(String[] args) {
StringBuffer s1 = new StringBuffer();
StringBuffer s2 = new StringBuffer();
new Thread(){
@Override
public void run() {
synchronized (s1){
s1.append("a");
s2.append("1");
try {
Thread.sleep(100);
} catch (InterruptedException e) {
e.printStackTrace();
}
synchronized (s2){
s1.append("b");
s2.append("2");
System.out.println(s1);
System.out.println(s2);
}
}
}
}.start();
new Thread(new Runnable() {
@Override
public void run() {
synchronized (s2){
s1.append("c");
s2.append("3");
try {
Thread.sleep(100);
} catch (InterruptedException e) {
e.printStackTrace();
}
synchronized (s1){
s1.append("d");
s2.append("4");
System.out.println(s1);
System.out.println(s2);
}
}
}
}).start();
}
}
线程之间的通信
- wait()是java.lang.Object的方法 调用wait的线程进入阻塞状态,并且释放对象监视器(我就等了一下啊,尼玛,我锁丢了)
- notify()是java.lang.Object的方法,唤醒一个等待的线程如果有多个就随机唤醒一个等待线程
- notifyAll()是java.lang.Object的方法,是唤醒所有等待线程,具体下一个那个来执行,要显比较其他线程的优先级
- 注意点
1.wait(),notify(),notifyAll()必须定义在同步代码块或者同步方法内部
2.wait(),notify(),notifyAll()必须使用synchronized中的对象监视器来调用,如果使用对象类.class,则可以使用this.来调用方法
public class Comm {
public static void main(String[] args) {
Number number = new Number();
Thread thread1 = new Thread(number);
Thread thread2 = new Thread(number);
thread1.start();
thread2.start();
}
}
class Number implements Runnable {
@Override
public synchronized void run() {
for (int i = 0; i < 10; i++) {
notify();
System.out.println(Thread.currentThread().getName()+" i = " + i);
try {
wait();
} catch (InterruptedException e) {
e.printStackTrace();
}
}
}
}
sleep()和wait()的区别
- 相同点
1.一旦执行方法,都可以使当前对象进入阻塞状态 - 不同点
1.声明位置不同,sleep()声明在Thread类中,wait()声明在Object类中
2.调用的要求不同:sleep()在任何需要的场景下调用 ,wait()必须使用在同步代码块或同步方法中
3.关于是否释放对象监视器: sleep()不会释放对象监视器,而wait()会释放对象监视器
生产者和消费者
public class Test {
public static void main(String[] args) {
Clerk clerk = new Clerk();
Producer p1 = new Producer(clerk);
p1.setName("生产者");
Consumer c1 = new Consumer(clerk);
c1.setName("消费者");
p1.start();
c1.start();
}
}
class Clerk{
private int productCount = 0;
public synchronized void produceProduct() {
if (productCount < 5){
productCount++;
System.out.println(Thread.currentThread().getName()+"开始生产第"+productCount+"个产品!");
notify();
}else{
try {
wait();
} catch (InterruptedException e) {
e.printStackTrace();
}
}
}
public synchronized void comsumeProduct() {
if (productCount > 0){
System.out.println(Thread.currentThread().getName()+"开始消费第"+productCount+"个产品!");
productCount--;
notify();
}else{
try {
wait();
} catch (InterruptedException e) {
e.printStackTrace();
}
}
}
}
class Producer extends Thread{
private Clerk clerk;
public Producer(){}
public Producer(Clerk clerk){
this.clerk = clerk;
}
@Override
public void run() {
System.out.println(Thread.currentThread().getName()+": 开始生产产品");
while (true){
try {
Thread.sleep(100);
} catch (InterruptedException e) {
e.printStackTrace();
}
clerk.produceProduct();
}
}
}
class Consumer extends Thread{
private Clerk clerk;
public Consumer(){}
public Consumer(Clerk clerk){
this.clerk = clerk;
}
@Override
public void run() {
System.out.println(Thread.currentThread().getName()+": 开始消费产品");
while (true){
try {
Thread.sleep(90);
} catch (InterruptedException e) {
e.printStackTrace();
}
clerk.comsumeProduct();
}
}
}
JDK5.0后新增的两种创建多线程方式
1.实现Callable接口
- 如果理解实现Callable接口比实现Runnable创建接口要强大
1.call方法是可以有返回值的,以及抛出异常
2.call支持范型的
public class Test implements Callable {
@Override
public Object call() throws Exception {
int sum = 0;
for (int i = 0; i < 100; i++) {
if (i % 2 == 0){
sum += i;
}
}
return sum;
}
public static void main(String[] args) {
Test test = new Test();
FutureTask futureTask = new FutureTask(test);
new Thread(futureTask).start();
try {
System.out.println(futureTask.get());
} catch (InterruptedException e) {
e.printStackTrace();
} catch (ExecutionException e) {
e.printStackTrace();
}
}
}
2.使用线程池
- 提前创建多个线程线程,放到线程池中,使用时直接获取,用完后放回到池中,可以避免创建销毁,实现反复利用
- 便于线程管理
class ThreadPool implements Runnable{
@Override
public void run() {
for (int i = 0; i < 100; i++) {
System.out.println("i = " + i);
}
}
public static void main(String[] args) {
ThreadPoolExecutor executorService = (ThreadPoolExecutor) Executors.newFixedThreadPool(20);
executorService.execute(new ThreadPool());
executorService.shutdown();
}
}


 6958
6958


 被折叠的 条评论
为什么被折叠?
被折叠的 条评论
为什么被折叠?
 到【灌水乐园】发言


