


 本文详细描述了如何通过图形验证码和短信验证码在移动端实现登录过程,包括前端获取验证码、后端验证和存储机制,以及Kaptcha的使用和SpringBoot集成Redis的示例。
说明:本文介绍如何用图形验证码+短信验证码实现移动端登录思路;
分析
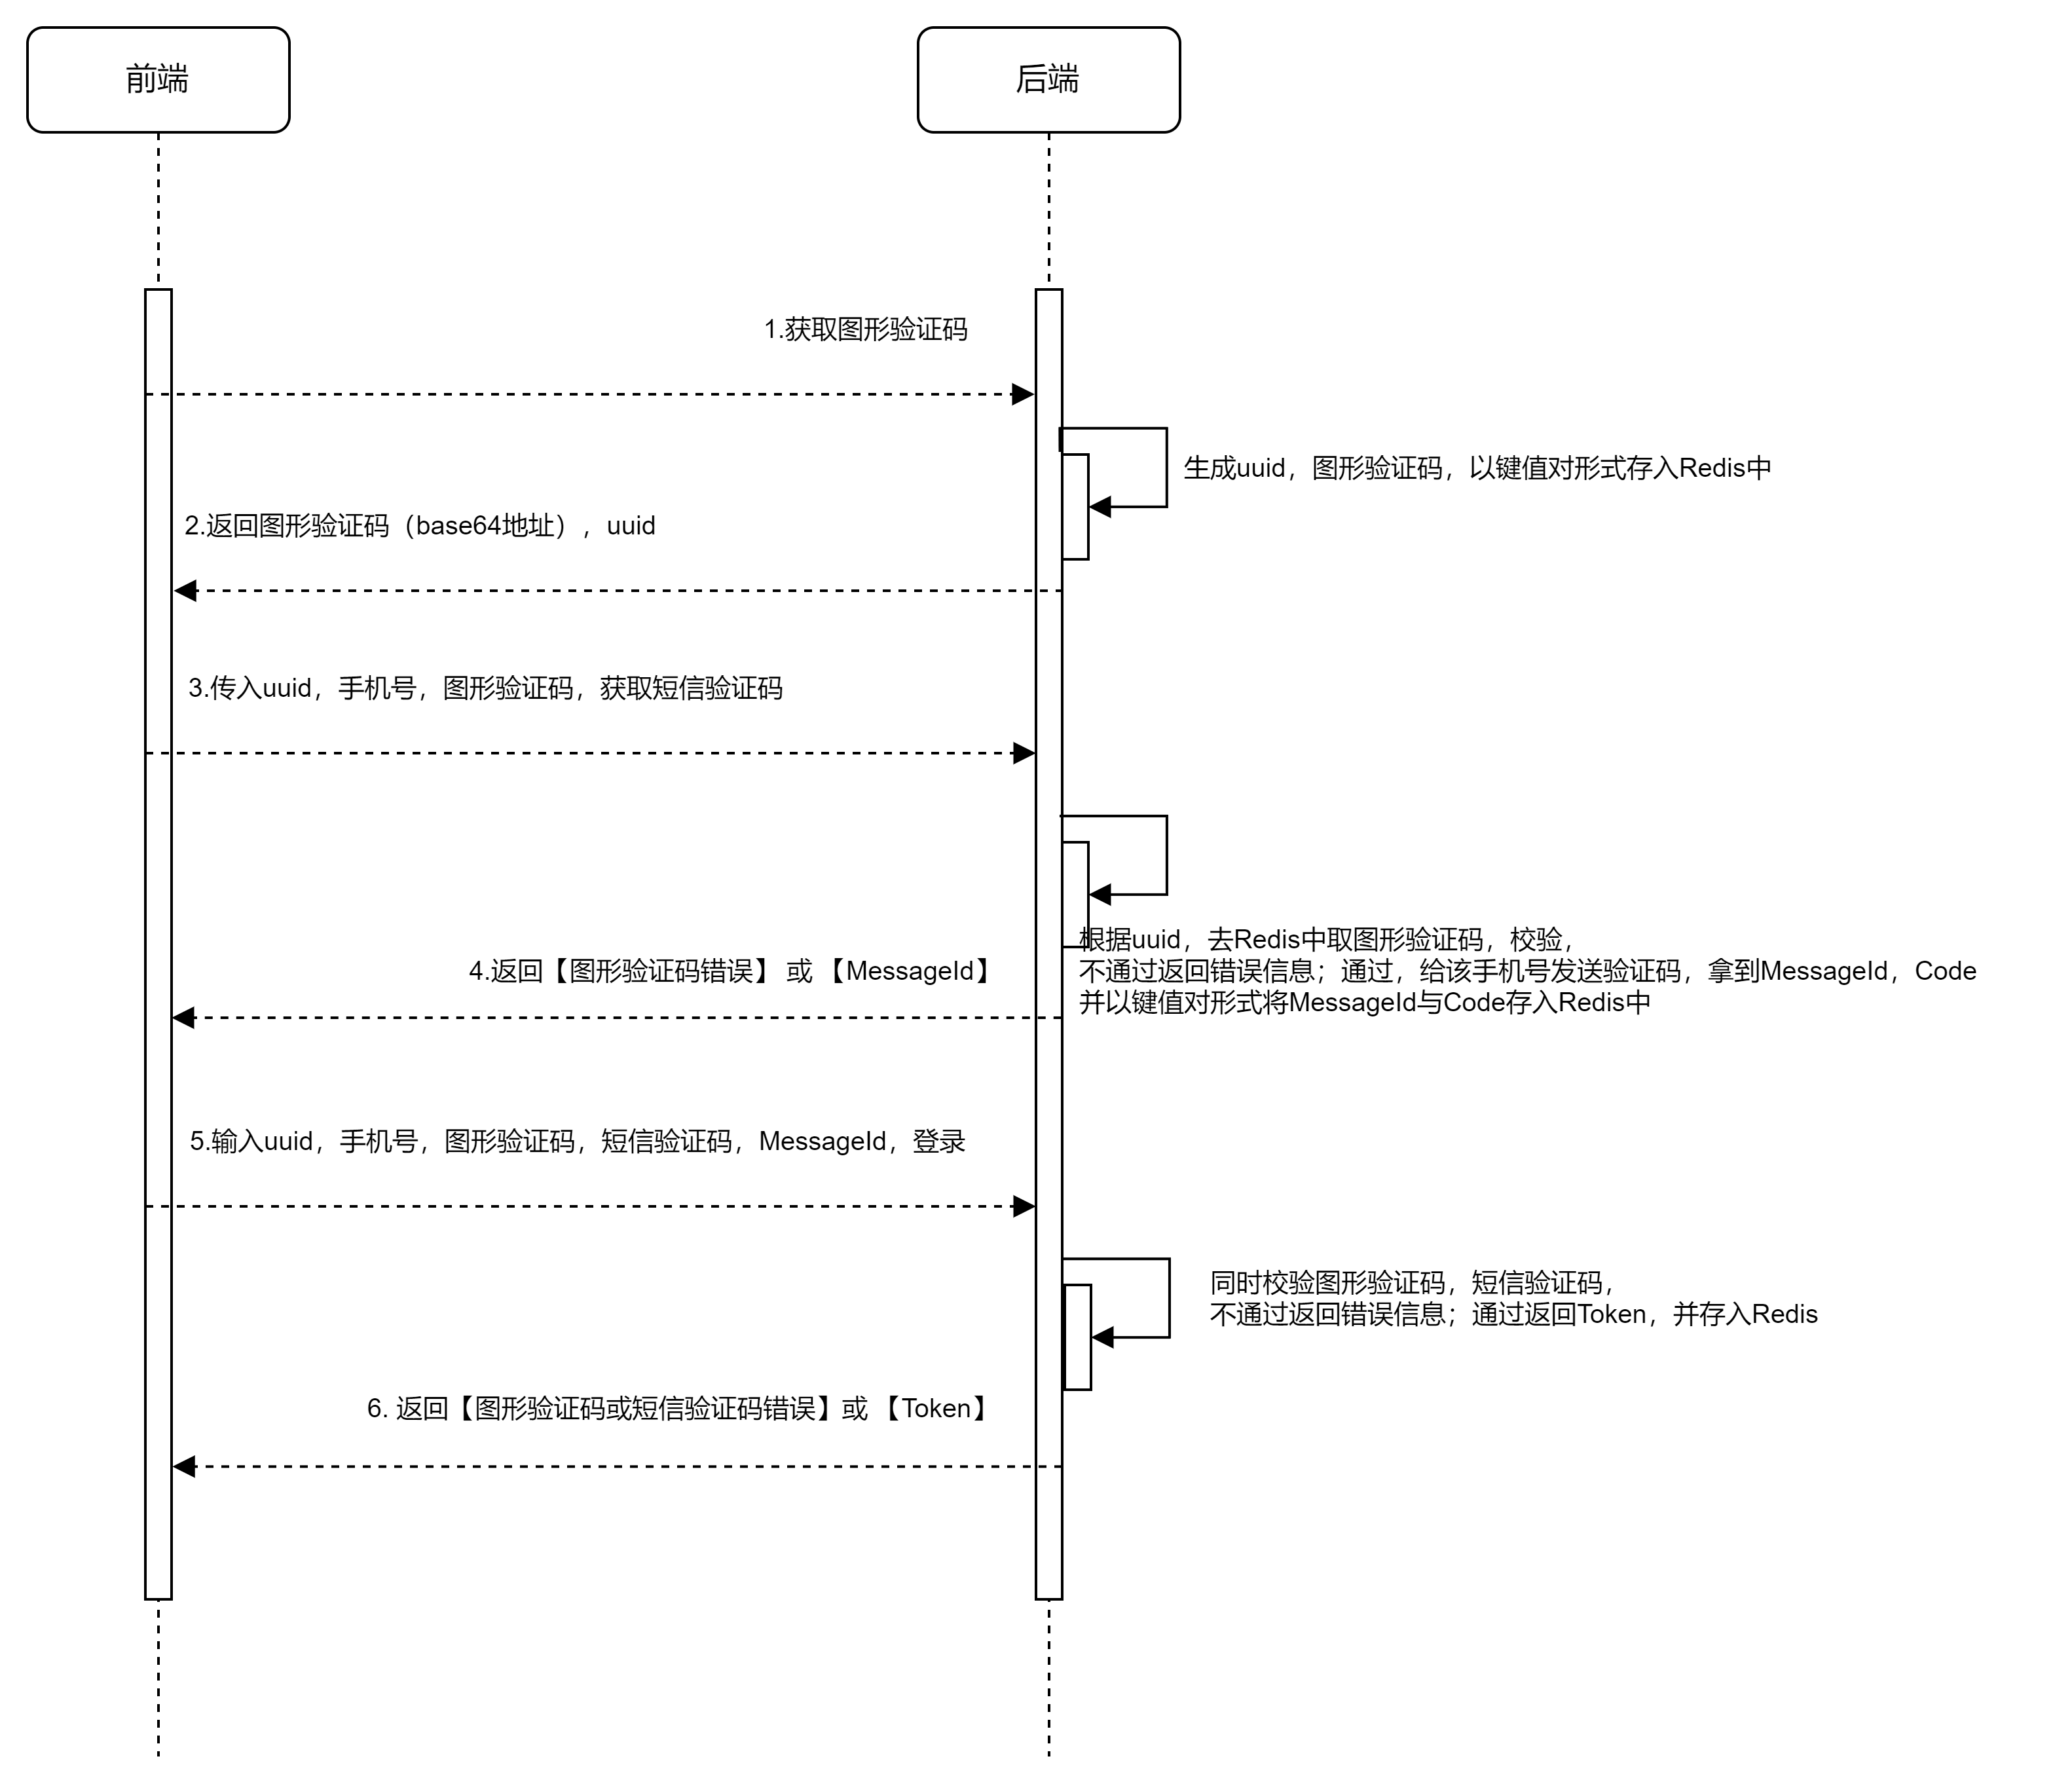
通过手机号+图形验证码+手机验证码实现登录的时序图如下:
说明:
-
(1)用户进入登录界面,出现图形验证码,可点击图形验证码更换图片;
-
(2)后端返回图形验证码的base64地址,加上一个uuid,该uuid为验证码在Redis中存储的Key;
-
(3)用户输入手机号、uuid、图形验证码,获取手机短信验证码;
-
(4)后端根据uuid去Redis中获取图形验证码,与用户输入的进行比较,通过发送短信验证码,同时将短信验证码的MessageId与验证码存入Redis中,不通过返回错误信息;
-
(5)用户输入手机号、uuid、messageId、图形验证码、手机验证码登录;
-
(6)后端根据uuid、messageId去Redis中获取验证码,分别与用户输入的验证码比较,通过登录成功,发Token,不通过返回错误信息;
前端实现
首先,做一个简单的页面,如下:

页面有三个接口,分别是:获取图形验证码,获取短信验证码,登录,代码如下:
<!DOCTYPE html>
<html lang="en">

<head>
    <meta charset="UTF-8">
    <meta http-equiv="X-UA-Compatible" content="IE=edge">
    <meta name="viewport" content="width=device-width, initial-scale=1.0">
    <title>获取验证码</title>

    <script src="js/axios-0.18.0.js"></script>

</head>

<body>
    输入手机号:<input type="text" id="phone">
    <br>
    输入图形验证码:<input type="text" id="img">
    <img id="pic" />
    <input type="button" value="获取图形验证码" onclick="getImg()">
    <br>
    输入短信验证码:<input type="text" id="msg">
    <input type="button" value="获取短信验证码" onclick="getMsg()">
    <br>
    <p></p>
    <input type="button" value="登录" onclick="login()">
</body>
<script>
    // 图形验证码返回的uuid
    let uuid = "";
    // 短信验证码返回的msgId
    let msgId = "";

    function getImg() {
        // 异步交互ajax
        axios.get("http://localhost:8080/getImg")
            .then(response => {
                // 接收响应回来的数据
                console.log(response.data);
                uuid = response.data.uuid;
                document.getElementById("pic").src = 'data:image/jpeg;base64,' + response.data.data;
            })
    }

    function getMsg() {
        // 手机号
        const phone = document.getElementById("phone").value;
        // 图形验证码
        const imgValue = document.getElementById("img").value;

        const data = {
            phone:phone,
            imgValue: imgValue,
            uuid: uuid
        };
        // 发送 POST 请求
        axios.post("http://localhost:8080/getMsg", data)
            .then(response => {
                console.log("请求发送成功:", response.data);
                msgId = response.data.msgId
            })
            .catch(error => {
                console.error("请求发送失败:", error);
            });
    }

    function login() {
        // 手机号
        const phone = document.getElementById("phone").value;
        // 图形验证码
        const imgValue = document.getElementById("img").value;
        // 短信验证码
        const msgValue = document.getElementById("msg").value;

        // 构造登录请求的数据对象
        const loginData = {
            phone: phone,
            imgValue: imgValue,
            msgValue: msgValue,
            uuid: uuid,
            msgId: msgId
        };

        // 发送 POST 请求
        axios.post("http://localhost:8080/login", loginData)
            .then(response => {
                console.log("登录成功:", response.data);
            })
            .catch(error => {
                console.error("登录失败:", error);
            });
    }
</script>

</html>
图像验证码使用使用Kaptcha实现,参考:
后端实现
KaptchConfig类
import com.google.code.kaptcha.impl.DefaultKaptcha;
import com.google.code.kaptcha.util.Config;
import org.springframework.context.annotation.Bean;
import org.springframework.stereotype.Component;

import java.util.Properties;

@Component
public class KaptchConfig {

    @Bean
    public DefaultKaptcha getDefaultKaptcha() {
        // 创建验证码工具
        com.google.code.kaptcha.impl.DefaultKaptcha defaultKaptcha = new com.google.code.kaptcha.impl.DefaultKaptcha();

        // 验证码配置
        Properties properties = new Properties();

        // 图片边框
        properties.setProperty("kaptcha.border", "no");

        // 边框颜色
        properties.setProperty("kaptcha.border.color", "black");

        //边框厚度
        properties.setProperty("kaptcha.border.thickness", "1");

        // 图片宽
        properties.setProperty("kaptcha.image.width", "120");

        // 图片高
        properties.setProperty("kaptcha.image.height", "60");

        //图片实现类
        properties.setProperty("kaptcha.producer.impl", "com.google.code.kaptcha.impl.DefaultKaptcha");

        //文本实现类
        properties.setProperty("kaptcha.textproducer.impl", "com.google.code.kaptcha.text.impl.DefaultTextCreator");

        //文本集合,验证码值从此集合中获取
        properties.setProperty("kaptcha.textproducer.char.string", "0123456789ABCDEFGHIJKLMNOPQRSTUVWXYZ");

        //验证码长度
        properties.setProperty("kaptcha.textproducer.char.length", "4");

        //字体
        properties.setProperty("kaptcha.textproducer.font.names", "宋体");

        //字体颜色
        properties.setProperty("kaptcha.textproducer.font.color", "black");

        //文字间隔
        properties.setProperty("kaptcha.textproducer.char.space", "4");

        //干扰实现类
        properties.setProperty("kaptcha.noise.impl", "com.google.code.kaptcha.impl.DefaultNoise");

        //干扰颜色
        properties.setProperty("kaptcha.noise.color", "blue");

        //干扰图片样式
        properties.setProperty("kaptcha.obscurificator.impl", "com.google.code.kaptcha.impl.WaterRipple");

        //背景实现类
        properties.setProperty("kaptcha.background.impl", "com.google.code.kaptcha.impl.DefaultBackground");

        //背景颜色渐变,结束颜色
        properties.setProperty("kaptcha.background.clear.to", "white");

        //文字渲染器
        properties.setProperty("kaptcha.word.impl", "com.google.code.kaptcha.text.impl.DefaultWordRenderer");

        // 创建验证码配置实例
        Config config = new Config(properties);

        // 验证码工具
        defaultKaptcha.setConfig(config);

        return defaultKaptcha;
    }
}
三个接口实现;
import com.google.code.kaptcha.impl.DefaultKaptcha;
import org.springframework.beans.factory.annotation.Autowired;
import org.springframework.data.redis.core.StringRedisTemplate;
import org.springframework.web.bind.annotation.*;

import javax.annotation.Resource;
import javax.imageio.ImageIO;
import java.awt.image.BufferedImage;
import java.io.ByteArrayOutputStream;
import java.io.IOException;
import java.util.Base64;
import java.util.Map;
import java.util.concurrent.TimeUnit;

@RestController
@CrossOrigin
public class KaptchController {

    @Resource
    DefaultKaptcha defaultKaptcha;

    @Autowired
    private StringRedisTemplate redisTemplate;

    /**
     * 生成图形验证码
     */
    @GetMapping("/getImg")
    public Map getImg() throws IOException {
        // 生成文字验证码
        String imageCode = defaultKaptcha.createText();

        // 生成图片验证码
        ByteArrayOutputStream out = new ByteArrayOutputStream();
        BufferedImage image = defaultKaptcha.createImage(imageCode);
        ImageIO.write(image, "jpg", out);

        // 生成uuid,将uuid作为key,验证码作为value存入redis
        String uuid = java.util.UUID.randomUUID().toString();
        redisTemplate.opsForValue().set(uuid, imageCode, 60, TimeUnit.SECONDS);

        // 对字节组Base64编码
        return Map.of("data", Base64.getEncoder().encodeToString(out.toByteArray()), "uuid", uuid, "imageCode", imageCode);
    }

    /**
     * 生成短信验证码
     */
    @PostMapping("/getMsg")
    public Map getCode(@RequestBody Map<String, String> map) throws IOException {
        // 获取相关参数
        String phone = map.get("phone");
        String uuid = map.get("uuid");
        String imgValue = map.get("imgValue");

        // 根据uuid获取图形验证码
        String imageCode = redisTemplate.opsForValue().get(uuid);

        // 校验手机号是否合法
        if (phone == null || phone.length() != 11) {
            return Map.of("data", "手机号不合法");
        }

        // 图形验证码是否过期
        if (imageCode == null) {
            return Map.of("data", "验证码已过期");
        }

        // 是否输入正确
        if (!imageCode.toUpperCase().equals(imgValue.toUpperCase())) {
            return Map.of("data", "验证码错误");
        }

        // 生成6位数的短信验证码
        String msgCode = String.valueOf((int) ((Math.random() * 9 + 1) * 100000));

        // 生成msgId,将msgId作为key,验证码作为value存入redis
        String msgId = java.util.UUID.randomUUID().toString();
        redisTemplate.opsForValue().set(msgId, msgCode, 60, TimeUnit.SECONDS);

        return Map.of("data", msgCode, "msgId", msgId);
    }

    /**
     * 登录
     */
    @PostMapping("/login")
    public Map login(@RequestBody Map<String, String> map) {
        // 获取相关参数
        String phone = map.get("phone");
        String uuid = map.get("uuid");
        String imgValue = map.get("imgValue");
        String msgId = map.get("msgId");
        String msgValue = map.get("msgValue");

        // 根据uuid、msgId获取图形验证码、短信验证码
        String imageCode = redisTemplate.opsForValue().get(uuid);
        String msgCode = redisTemplate.opsForValue().get(msgId);

        // 校验手机号是否合法
        if (phone == null || phone.length() != 11) {
            return Map.of("data", "手机号不合法");
        }

        // 图形验证码是否过期
        if (imageCode == null) {
            return Map.of("data", "验证码已过期");
        }

        // 是否输入正确
        if (!imageCode.toUpperCase().equals(imgValue.toUpperCase())) {
            return Map.of("data", "验证码错误");
        }

        // 短信验证码是否过期
        if (msgCode == null) {
            return Map.of("data", "验证码已过期");
        }

        // 是否输入正确
        if (!msgCode.equals(msgValue)) {
            return Map.of("data", "验证码错误");
        }

        // 登录成功,删除Redis中的验证码
        redisTemplate.delete(uuid);
        redisTemplate.delete(msgId);

        return Map.of("data", "success");
    }
}
测试
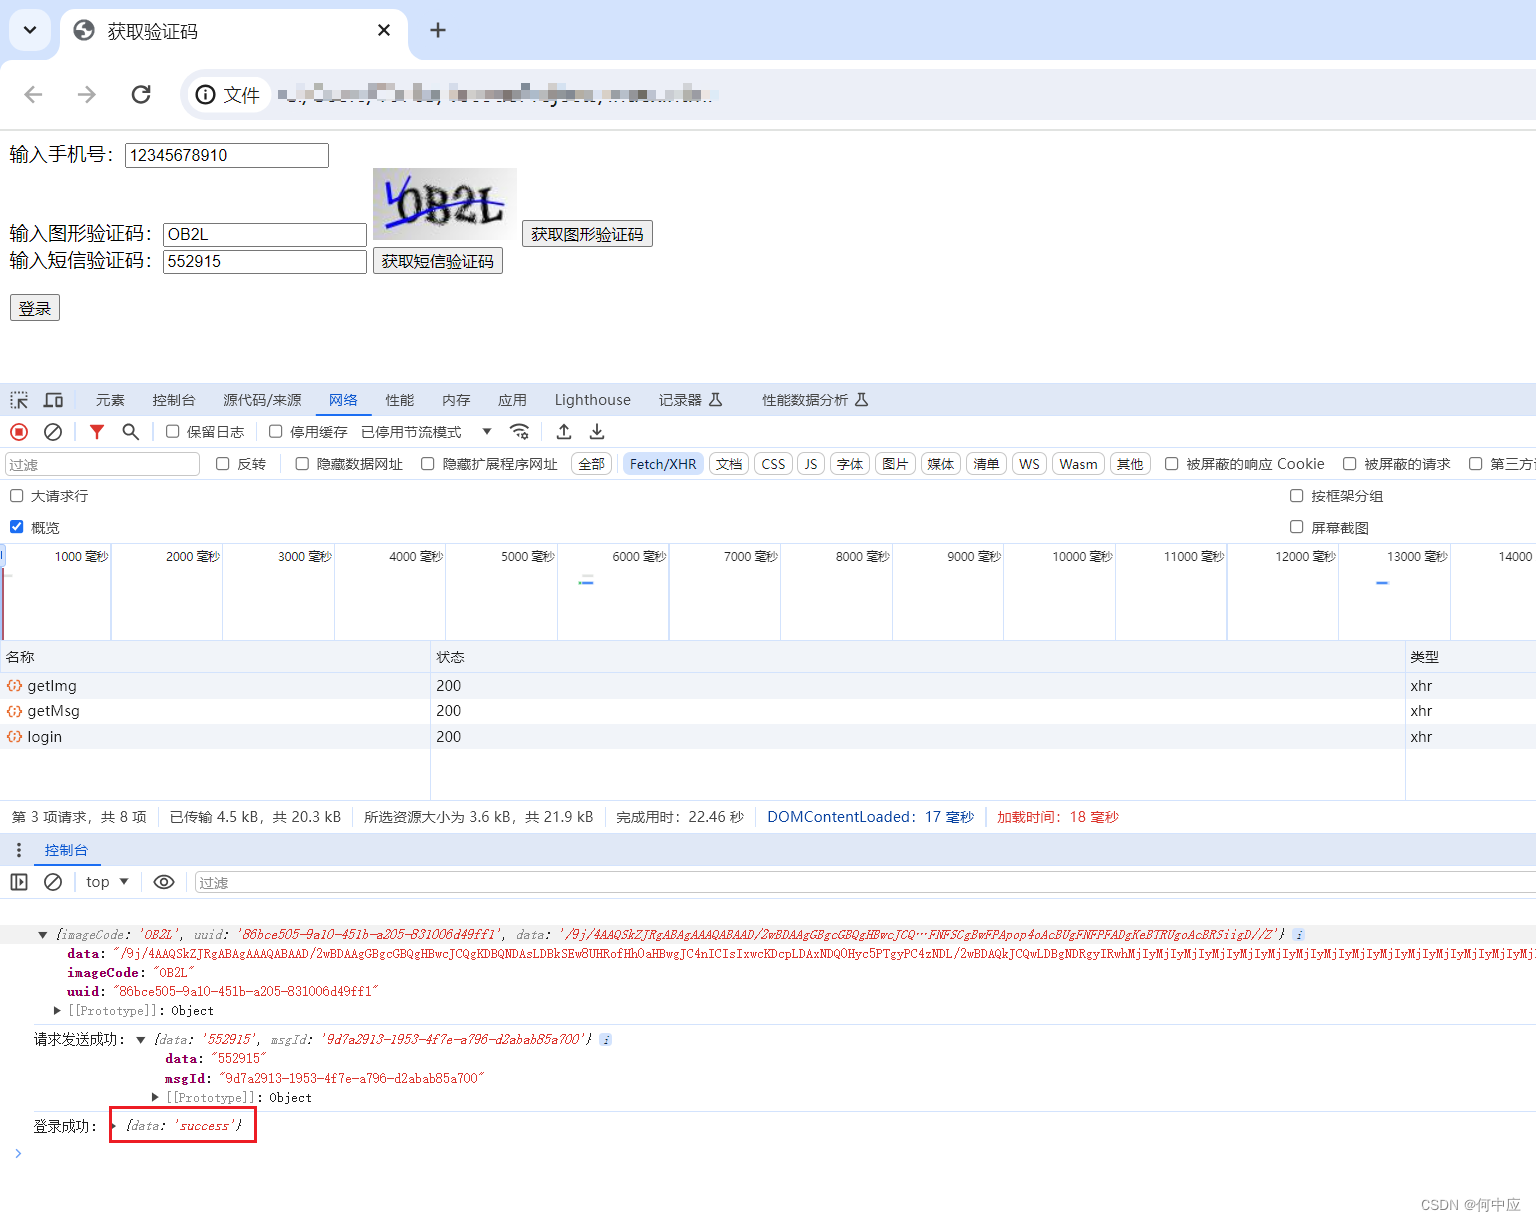
测试正常情况
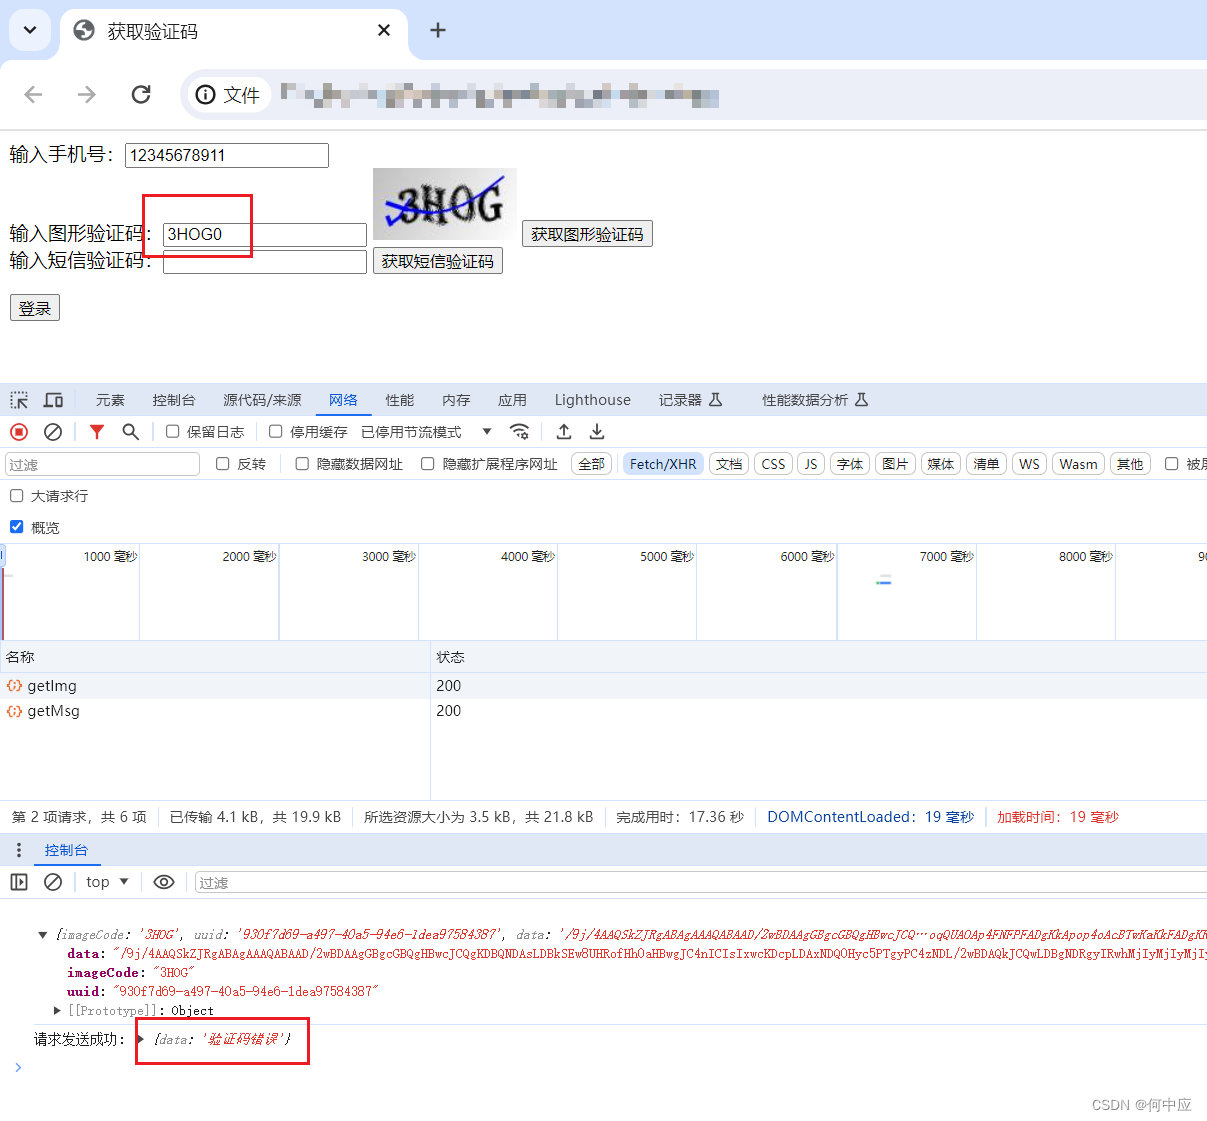
测试图形验证码输入错误的情况
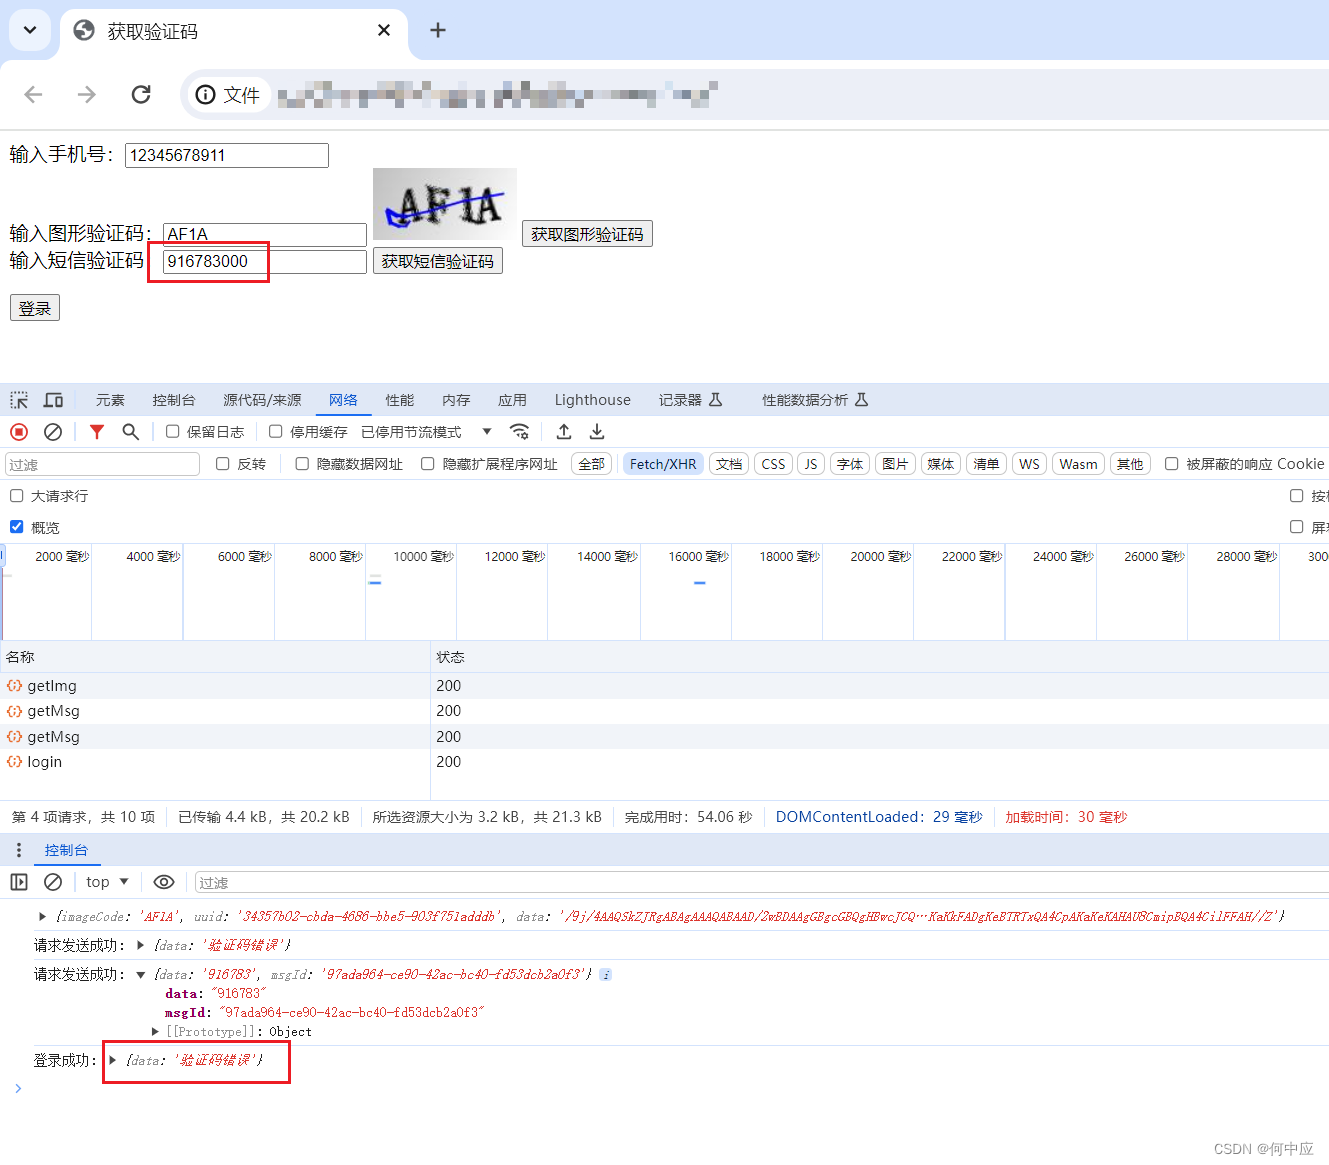
测试短信验证码输入错误的情况(图中“登录成功”为接口访问成功的信息,并非通过了登录校验)
基本实现了,正式情况还需要考虑更严格的手机号校验,手机验证码防频繁点击,手机短信登录第三方API接入,规范验证码在Redis中Key的格式,验证码在Redis中的过期时间等等,这里仅是一个Demo,但上述实现思路是值得考虑的。
总结
本文介绍了移动端双验证码登录的实现,希望能对大家有所启发。


 1408
1408

 被折叠的 条评论
为什么被折叠?
被折叠的 条评论
为什么被折叠?
 到【灌水乐园】发言


