


前端面试套餐
css:元素水平垂直居中得方法有哪些?如果元素不定宽高呢?
在开发中经常遇到这个问题,即让某个元素得内容在水平和垂直方向上都居中,内容不仅限于文字,可能是图片或其他元素
居中是一个非常基础但又非常重要的应用场景,实现居中的方法存在很多,可以将这些方法分成两个大类:
- 居中元素的宽高已知
- 居中元素宽高未知
- 利用定位+margin:auto
- 利用定位+margin:负值
- 利用定位+transform
- table布局
- flex布局
- grid布局
居中元素宽高已知
table布局
<style>
    .father {
        display: table-cell;
        width: 200px;
        height: 200px;
        background: skyblue;
        vertical-align: middle;
        text-align: center;
    }
    .son {
        display: inline-block;
        width: 100px;
        height: 100px;
        background: red;
    }
</style>
<div class="father">
    <div class="son"></div>
</div>
设置父元素为display:table-cell,子元素设置display:inline-block。利用vertical和text-align可以让所有的行内块级元素水平垂直居中
利用定位+margin:负值
绝大多数情况下,设置父元素为相对定位, 子元素移动自身50%实现水平垂直居中
<style>
    .father {
        position: relative;
        width: 200px;
        height: 200px;
        background: skyblue;
    }
    .son {
        position: absolute;
        top: 50%;
        left: 50%;
        margin-left:-50px;
        margin-top:-50px;
        width: 100px;
        height: 100px;
        background: red;
    }
</style>
<div class="father">
    <div class="son"></div>
</div>
居中元素宽高未知
利用定位+margin:auto
<style>
    .father{
        width:500px;
        height:300px;
        border:1px solid #0a3b98;
        position: relative;
    }
    .son{
        width:100px;
        height:40px;
        background: #f0a238;
        position: absolute;
        top:0;
        left:0;
        right:0;
        bottom:0;
        margin:auto;
    }
</style>
<div class="father">
    <div class="son"></div>
</div>
父级设置为相对定位,子级绝对定位,并且四个定位属性都设置为0,那么这时候如果自己没有设置宽高,则会被拉开到和父级一样宽高
这里子元素设置了宽高,所以宽高会按照我们的设置来显示,但是实际上子级的虚拟占位已经撑满了整个父级,这时候再给它一个margin:auto,它就可以上下左右都居中了!
利用定位+transform
<style>
    .father {
        position: relative;
        width: 200px;
        height: 200px;
        background: skyblue;
    }
    .son {
        position: absolute;
        top: 50%;
        left: 50%;
  		transform: translate(-50%,-50%);
        width: 100px;
        height: 100px;
        background: red;
    }
</style>
<div class="father">
    <div class="son"></div>
</div>
translate(-50%, -50%)将会将元素位移自己宽度和高度的-50%
可以说是margin负值的替代方案,并不需要知道自身元素的宽高
flex布局
<style>
    .father {
        display: flex;
        justify-content: center;
        align-items: center;
        width: 200px;
        height: 200px;
        background: skyblue;
    }
    .son {
        width: 100px;
        height: 100px;
        background: red;
    }
</style>
<div class="father">
    <div class="son"></div>
</div>
- display:flex时,表示该容器内部的元素将按照flex进行布局
- align-items:center 表示这些元素将相对于本容器水平居中
- justify-content:center也是同样的道理垂直居中
grid布局
<style>
    .father {
            display: grid;
            align-items:center;
            justify-content: center;
            width: 200px;
            height: 200px;
            background: skyblue;

        }
        .son {
            width: 10px;
            height: 10px;
            border: 1px solid red
        }
</style>
<div class="father">
    <div class="son"></div>
</div>
和flex布局的居中方式相同
js:Javascript中的继承?如何实现继承?
继承时面向对象软件技术中的一个概念
虽然JavaScript并不是真正的面向对象语言,但它天生的灵活性,使应用场景更加丰富
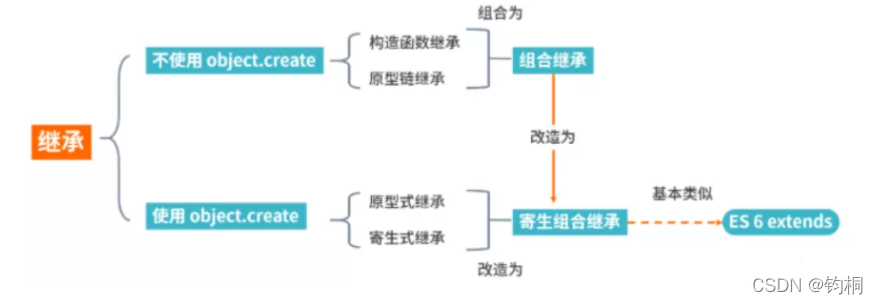
实现方式
原型链继承
简单来说,就是直接指定原型
 function Parent() {
    this.name = 'parent1';
    this.play = [1, 2, 3]
  }
  function Child() {
    this.type = 'child2';
  }
  Child.prototype = new Parent();
  console.log(new Child())
有什么问题呢?
原型对象的内存空间是共享的!
大家的父级都是同一个,乱套了!!!
var s1 = new Child();
var s2 = new Child();
s1.play.push(4);
console.log(s1.play, s2.play); // [1,2,3,4]
构造函数继承(call)
借助 call调用Parent函数
function Parent(){
    this.name = 'parent1';
}
Parent.prototype.getName = function () {
    return this.name;
}
function Child(){
    Parent.call(this);
    this.type = 'child'
}
let child = new Child();
console.log(child);  // 没问题
console.log(child.getName());  // 会报错
可以看到,父类原型对象中一旦存在父类之前自己定义的方法,那么子类将无法继承这些方法
相比第一种原型链继承方式,父类的引用属性不会被共享,优化了第一种继承方式的弊端,但是只能继承父类的实例属性和方法,不能继承原型属性或者方法
组合继承
前面我们讲到两种继承方式,各有优缺点。组合继承则将前两种方式结合起来
function Parent3 () {
    this.name = 'parent3';
    this.play = [1, 2, 3];
}

Parent3.prototype.getName = function () {
    return this.name;
}
function Child3() {
    // 第二次调用 Parent3()
    Parent3.call(this);
    this.type = 'child3';
}

// 第一次调用 Parent3()
Child3.prototype = new Parent3();
// 手动挂上构造器,指向自己的构造函数
Child3.prototype.constructor = Child3;
var s3 = new Child3();
var s4 = new Child3();
s3.play.push(4);
console.log(s3.play, s4.play);  // 不互相影响
console.log(s3.getName()); // 正常输出'parent3'
console.log(s4.getName()); // 正常输出'parent3'
这种方式看起来就没什么问题,方式一和方式二的问题都解决了,但是从上面代码我们也可以看到Parent3 执行了两次,造成了多构造一次的性能开销
原型式继承
这里主要借助Object.create方法实现普通对象的继承
  let parent4 = {
    name: "parent4",
    friends: ["p1", "p2", "p3"],
    getName: function() {
      return this.name;
    }
  };

  let person4 = Object.create(parent4);
  person4.name = "tom";
  person4.friends.push("jerry");

  let person5 = Object.create(parent4);
  person5.friends.push("lucy");

  console.log(person4.name); // tom
  console.log(person4.name === person4.getName()); // true
  console.log(person5.name); // parent4
  console.log(person4.friends); // ["p1", "p2", "p3","jerry","lucy"]
  console.log(person5.friends); // ["p1", "p2", "p3","jerry","lucy"]
这种继承方式的缺点也很明显,因为Object.create方法实现的是浅拷贝,多个实例的引用类型属性指向相同的内存,存在篡改的可能
和原型链继承有些相似
寄生式继承
寄生式继承在上面继承基础上进行优化,利用这个浅拷贝的能力再进行增强,添加一些方法
let parent5 = {
    name: "parent5",
    friends: ["p1", "p2", "p3"],
    getName: function() {
        return this.name;
    }
};

function clone(original) {
    let clone = Object.create(original);
    clone.getFriends = function() {
        return this.friends;
    };
    return clone;
}

let person5 = clone(parent5);

console.log(person5.getName()); // parent5
console.log(person5.getFriends()); // ["p1", "p2", "p3"]
寄生组合式继承
寄生组合式继承,借助解决普通对象的继承问题的Object.create 方法,在几种继承方式的优缺点基础上进行改造,这也是所有继承方式里面相对最优的继承方式
function clone (parent, child) {
    // 这里改用 Object.create 就可以减少组合继承中多进行一次构造的过程
    child.prototype = Object.create(parent.prototype);
    child.prototype.constructor = child;
}

function Parent6() {
    this.name = 'parent6';
    this.play = [1, 2, 3];
}
Parent6.prototype.getName = function () {
    return this.name;
}
function Child6() {
    Parent6.call(this);
    this.friends = 'child5';
}

clone(Parent6, Child6);

Child6.prototype.getFriends = function () {
    return this.friends;
}

let person6 = new Child6();
console.log(person6); //{friends:"child5",name:"child5",play:[1,2,3],__proto__:Parent6}
console.log(person6.getName()); // parent6
console.log(person6.getFriends()); // child5
在ES6中的extends关键字可以直接实现javascript的继承!
利用babel工具进行转换,我们会发现extends实际采用的也是寄生组合继承方式!
es6:你是怎么理解ES6中的Module的?使用场景?
模块,是能够单独命名并独立地完成一定功能的程序语句的集合(即程序代码和数据结构的集合体)
两个基本的特征:外部特征和内部特征
-
外部特征是指模块跟外部环境联系的接口(即其他模块或程序调用该模块的方式,包括有输入输出参数,引用的全局变量)和模块的功能
-
内部特征是指模块的内部环境具有的特点(即该模块的局部数据和程序代码)
-
为什么需要模块化?
- 代码抽象
- 代码封装
- 代码复用
- 依赖管理
-
如果没有模块化,我们的代码会怎样?
- 变量和方法不容易维护,容易污染全局作用域
- 加载资源的方式通过script标签从上到下
- 依赖的环境主观逻辑片中,代码较多就会比较复杂
- 大型项目资源难以维护,特别是多人合作的情况下,资源的引入会让人奔溃
-
JavaScript程序模块化的机制
- CommonJs(node.js早期)
- AMD(require.js)
- CMD(sea.js)
AMD
Asynchronous ModuleDefinition(AMD),异步模块定义,采用异步方式加载模块。所有依赖模块的语句,都定义在一个回调函数中,等到模块加载完成之后,这个回调函数才会运行
代表库为require.js
/** main.js 入口文件/主模块 **/
// 首先用config()指定各模块路径和引用名
require.config({
  baseUrl: "js/lib",
  paths: {
    "jquery": "jquery.min",  //实际路径为js/lib/jquery.min.js
    "underscore": "underscore.min",
  }
});
// 执行基本操作
require(["jquery","underscore"],function($,_){
  // some code here
});
CommonJS
CommonJS是一套JavaScript模块规范,用于服务端
// a.js
module.exports={ foo , bar}

// b.js
const { foo,bar } = require('./a.js')
其特点如下:
- 所有代码都运行在模块作用域,不会污染全局作用域
- 模块是同步加载的,即只有加载完成,才能执行后面的操作
- 模块在首次执行后就会缓存,再次加载只返回缓存结构,如果想要再次执行了,可清楚缓存
- require返回的值是被输出的值的拷贝,模块内部的变化也不会影响这个值
即存在了AMD以及CommonJS机制,ES6的Module又有什么不一样?
ES6在语言标准的层面上,实现了Module,即模块功能,完全可以取代CommonJS和AMD规范,成为浏览器和服务器通用的模块解决方案。
CommonJS和AMD模块,都只能在运行时确定这些东西。比如,CommonJS模块就是对象,输入时必须查找对象属性。
// CommonJS模块
let { stat, exists, readfile } = require('fs');

// 等同于
let _fs = require('fs');
let stat = _fs.stat;
let exists = _fs.exists;
let readfile = _fs.readfile;
ES6设计思想是尽量的静态化,使得编译时就能确定模块的依赖关系,以及输入和输出的变量
// ES6模块
import { stat, exists, readFile } from 'fs';
上述代码,只加载3个方法,其他方法不加载,即 ES6 可以在编译时就完成模块加载
由于编译加载,使得静态分析成为可能。包括现在流行的typeScript也是依靠静态分析实现功能
使用
ES6模块内部自动采用了严格模式,这里就不展开严格模式的限制,毕竟这是ES5之前就已经规定好
模块功能主要由两个命令构成:
- export:用于规定模块的对外接口
// profile.js
export var firstName = 'Michael';
export var lastName = 'Jackson';
export var year = 1958;

或
// 建议使用下面写法,这样能瞬间确定输出了哪些变量
var firstName = 'Michael';
var lastName = 'Jackson';
var year = 1958;

export { firstName, lastName, year };
输出函数或类
export function multiply(x, y) {
  return x * y;
};
通过as可以进行输出变量的重命名
function v1() { ... }
function v2() { ... }

export {
  v1 as streamV1,
  v2 as streamV2,
  v2 as streamLatestVersion
};
- import:用于输入其他模块提供的功能
使用export命令定义了模块的对外接口以后,其他 JS 文件就可以通过import命令加载这个模块
// main.js
import { firstName, lastName, year } from './profile.js';

function setName(element) {
  element.textContent = firstName + ' ' + lastName;
}
同样如果想要输入变量起别名,通过as关键字
import { lastName as surname } from './profile.js';
当加载整个模块的时候,需要用到星号*
// circle.js
export function area(radius) {
  return Math.PI * radius * radius;
}

export function circumference(radius) {
  return 2 * Math.PI * radius;
}

// main.js
import * as circle from './circle';
console.log(circle)   // {area:area,circumference:circumference}
输入的变量都是只读的,不允许修改,但是如果是对象,允许修改属性
import后面我们常接着from关键字,from指定模块文件的位置,可以是相对路径,也可以是绝对路径import { a } from './a';
如果只有一个模块名,需要有配置文件,告诉引擎模块的位置import { myMethod } from 'util';
上面的情况,大家都能看到用户在导入模块的时候,需要知道加载的变量名和函数,否则无法加载
如果不需要知道变量名或函数就完成加载,就要用到export default命令,为模块指定默认输出
// export-default.js
export default function () {
    console.log('foo');
}
// import-default.js
import customName from './export-default';
customName(); // 'foo'
动态加载
允许您仅在需要时动态加载模块,而不必预先加载所有模块,这存在明显的性能优势
这个新功能允许您将import()作为函数调用,将其作为参数传递给模块的路径。它返回一个 promise,它用一个模块对象来实现,让你可以访问该对象的导出
import('/modules/myModule.mjs')
  .then((module) => {
    // Do something with the module.
  });
复合写法
如果在一个模块之中,先输入后输出同一个模块,import语句可以与export语句写在一起
export { foo, bar } from 'my_module';

// 可以简单理解为
import { foo, bar } from 'my_module';
export { foo, bar };
使用场景
如今,ES6模块化已经深入我们日常项目开发中,像vue,react项目搭建项目,组件化开发处处可见,企业是依赖模块化实现
- vue组件
<template>
  <div class="App">
      组件化开发 ---- 模块化
  </div>
</template>

<script>
export default {
  name: 'HelloWorld',
  props: {
    msg: String
  }
}
</script>
- react组件
function App() {
  return (
    <div className="App">
  组件化开发 ---- 模块化
    </div>
  );
}

export default App;
vue:Vue中组件和插件有什么区别?
组件是什么?
组件就是把图形,非图形的各种逻辑均抽象为一个统一的概念(组件)来实现开发的模式,在Vue中每一个.vue文件都可以视为一个组件
组件的优势
- 降低整个系统的耦合度,在保持接口不变的情况下,我们可以替换不同的组件快速完成需求,例如输入款,可以替换为日历,时间,范围等组件作具体的实现
- 调试方式,由于整个系统是通过组件组合起来的,在出现问题的时候,可以用排除法直接移除组件,或者根据报错的组件快速定位问题,之所以能快速定位,是因为每个组件之间低耦合,职责单一,所以逻辑会比分析整个系统要简单
- 提高可维护性,由于每个组件的职责单一,并且组件在系统中是被复用的,所以对代码进行优化可获得系统的整体升级
插件是什么?
插件通常用来为Vue添加全局功能。插件的功能范围没有严格的限制
- 添加全局方法或者属性,如
vue-custom-element - 添加全局资源:指令/过滤器/过渡等。如
vue-touch - 通过全局混入来添加一些组件选项。如
vue-router - 添加 Vue 实例方法,通过把它们添加到
Vue.prototype上实现。 - 一个库,提供自己的 API,同时提供上面提到的一个或多个功能。如
vue-router
区别
- 编写形式
- .vue文件标准格式
<template>
</template>
<script>
export default{
    ...
}
</script>
<style>
</style>
- vue插件的实现应该暴露一个install方法。这个方法的第一个参数是vue构造器,第二个参数是一个可选的选项对象
MyPlugin.install = function (Vue, options) {
  // 1. 添加全局方法或 property
  Vue.myGlobalMethod = function () {
    // 逻辑...
  }

  // 2. 添加全局资源
  Vue.directive('my-directive', {
    bind (el, binding, vnode, oldVnode) {
      // 逻辑...
    }
    ...
  })

  // 3. 注入组件选项
  Vue.mixin({
    created: function () {
      // 逻辑...
    }
    ...
  })

  // 4. 添加实例方法
  Vue.prototype.$myMethod = function (methodOptions) {
    // 逻辑...
  }
}
- 注册形式
- vue组件注册分为
- 全局注册
Vue.component('my-component-name', { /* ... */ })
第一个参数为组件的名称,第二个参数为传入的配置项 - 局部注册
- 全局注册
- vue组件注册分为
const component1 = {...} // 定义一个组件
export default {
 components:{
  component1   // 局部注册
 }
}
- 插件注册
Vue.use(插件名字,{ /* ... */} )
第一个参数为插件的名字,第二个参数是可选择的配置项
注册插件的时候,需要在调用 new Vue() 启动应用之前完成
Vue.use会自动阻止多次注册相同插件,只会注册一次
-
使用场景
-
组件 (Component) 是用来构成你的 App 的业务模块,它的目标是 App.vue
-
插件 (Plugin) 是用来增强你的技术栈的功能模块,它的目标是 Vue 本身
-
简单来说,插件就是指对Vue的功能的增强或补充
-


 460
460


 被折叠的 条评论
为什么被折叠?
被折叠的 条评论
为什么被折叠?
 到【灌水乐园】发言


