


首先,先写一个练手的页面。没有登录注册功能,纯属熟悉一下许久未用的html5代码。。嘤~
这是一个在网页中通过文本框输入或者下拉框选择用户名和密码,然后添加到界面显示的表格中去的页面
参考链接:https://blog.csdn.net/niedongri/article/details/81978284
1.settings.py的templates需要修改,才能显示出templates中的html文件内容
TEMPLATES = [
    {
        'BACKEND': 'django.template.backends.django.DjangoTemplates',
        'DIRS': [os.path.join(BASE_DIR, 'templates')],
        # 修改行'DIRS': [],
        'APP_DIRS': True,
templates需要与模板文件名templates一样
2.配置项目的urls文件,不是app的
这里有三种配置路径的方法,不加注释的是其中一种。
from django.contrib import admin
from django.urls import include, path
from tea1 import views
from django.conf.urls import url


urlpatterns = [
    # path('', include('tea1.urls')),
    # 第二种方法,将views.index路径设在同文件夹的tea1.urls中,然后在这个urls文件中设置路径到tea1.urls
    path('', views.index),
    # 因为有了from tea1 import views,所以可以直接调用('', views.index),就是tea1中的views.py中的index
    path('admin/', admin.site.urls),
    path('index.html', views.index)
    # <form action="index.html" method="post">
   # url(r'^index/', views.index)<form action="/index/" method="post">
 ]
如果用到了path('', include('tea1.urls')),
就需要配置app中的urls文件
from django.urls import path
from . import views

urlpatterns = [
    path('', views.index, name='index'),
]
3.第三步。配置views文件
from django.shortcuts import render
from django.http import HttpResponse


# Create your views here.
# 先定义一个数据列表,

list = [{"name": 'lili', 'password': '0919'}, {'name': 'huahua', 'password': 'youguess'}]


def index(request):
    # 获取前端post过来的用户名和密码
    name = request.POST.get("name", None)
    password = request.POST.get("password", None)

    #把用户和密码组装成字典
    data = {"name":name, "password":password}
    list.append(data)

    return render(request, 'index.html', {'form':list})

# 通过render模块把index.html这个文件返回到前端,并且返回给了前端一个变量form,在写html时可以调用这个form来展示list里的内容
# 最开始的一行代码 return HttpResponse("Hello.world!You're at the tea1 index!")

# render(request, 'archive.html')
4.第四步,在templates文件夹中新建index.html,写如下内容
<!DOCTYPE html>
<html lang="en">
<head>
<meta charset="UTF-8">
<title>Test</title>
</head>
<body>
<form action="index.html" method="post">
<!action文本内容写到index.html中,与path的index.html相呼应!>
{% csrf_token %}
<p>
<label>用户名:</label>
<!下拉框部分!>
<input type="text" list="aa" name="name"/>
<datalist id = "aa">
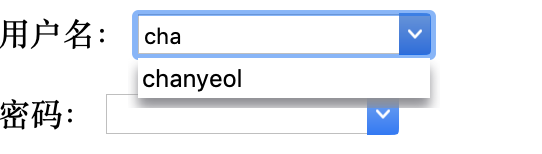
<option value="chanyeol" />
<option value="beakhyun" />
<option value="sehun" />
</datalist>
</p>
<p>
<lable>密码:</lable>
<input type="text" list="bb" name="password"/>
<datalist id = "bb">
<option value="20001127sn" label="SN"/>
<option value="19980506bk" label="BK"/>
<option value="5bzsdixh99" label="SN"/>
</datalist>
</p>
<p>
<input type="submit" value="提交"/>
</p>
</form>
<table border="6", bgcolor="green">
<thead> <!html中的表头内容!>
<tr>
<td>用户名</td>
<td>密码</td>
</tr>
</thead>
{% for line in form %}
<tr>
<td>{{line.name}}</td>
<td>{{line.password}}</td>
</tr>
{% endfor %}
</table>
</body>
</html>5.终端输入python manage.py runserver运行

6.界面如下


下面。配置static路径
1.创建static文件夹,目录如下图:
 注意static文件与template同级
2.设置settings.py文件
文件末尾追加:
STATIC_URL = '/static/'

STATIC_ROOT = os.path.join(BASE_DIR, 'static').replace('\\', '/')

STATICFILES_DIRS = (
    ('css', os.path.join(STATIC_ROOT, 'css').replace('\\', '/')),
    ('images', os.path.join(STATIC_ROOT, 'images').replace('\\', '/')),
    ('font', os.path.join(STATIC_ROOT, 'font').replace('\\', '/')),
)
文件中间处添加:
TEMPLATES = [
    {
        'BACKEND': 'django.template.backends.django.DjangoTemplates',
        'DIRS': [os.path.join(BASE_DIR, 'templates/'),
                 os.path.join(BASE_DIR, 'static').replace('\\', '/')# 添加行
                ],
3.配置urls.py文件
from django.contrib.staticfiles.urls import staticfiles_urlpatterns文件末尾添加:
urlpatterns += staticfiles_urlpatterns()4.然后在html中添加想要插入的静态文件路径就行啦
比如插入一张图的格式,记得static前要加/。
<img src="/static/images/11.jpg"/>


 1968
1968


 被折叠的 条评论
为什么被折叠?
被折叠的 条评论
为什么被折叠?
 到【灌水乐园】发言


