


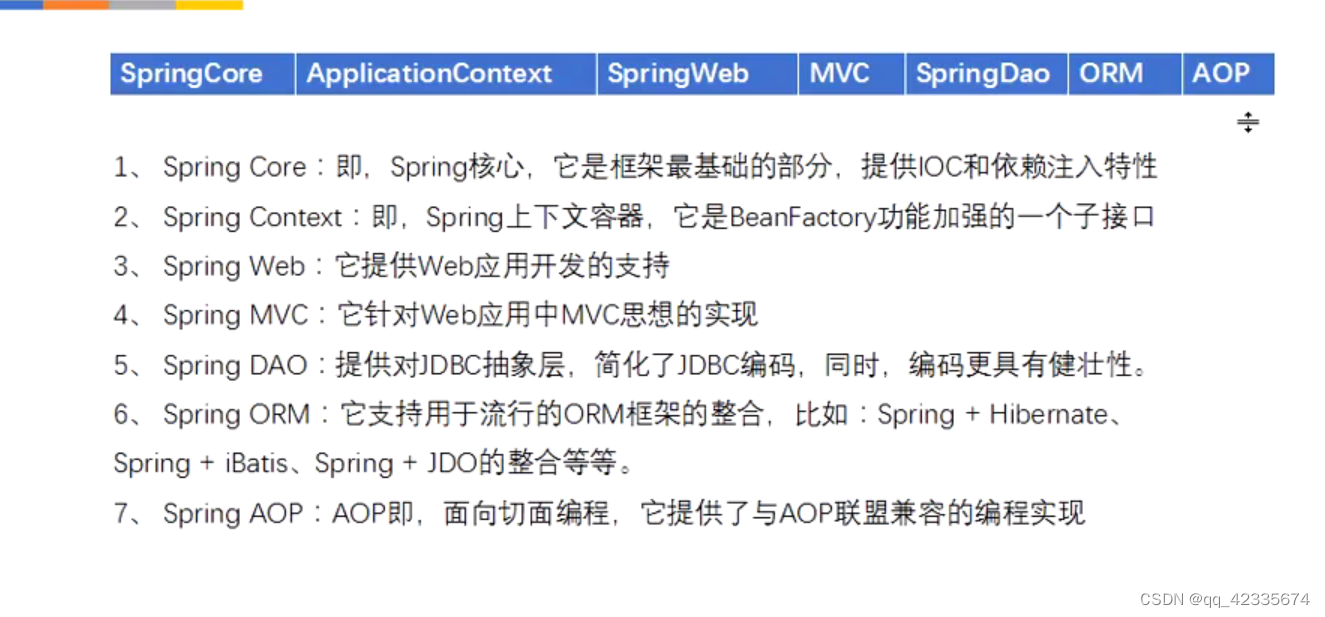
Spring体系架构
七大常用组件
常用组件注解
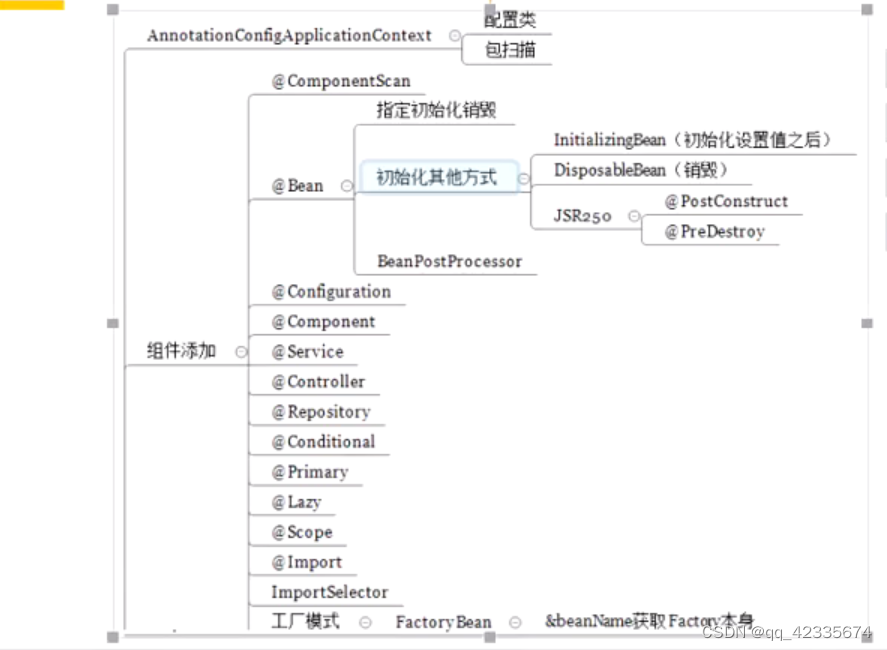
@Bean
通过xml注入bean—已弃用
创建一个Spring的mavne项目后引入依赖
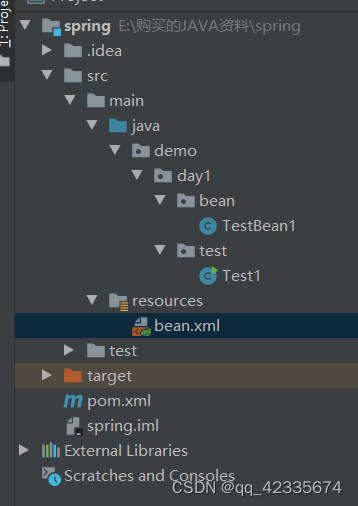
目前结构如下
<?xml version="1.0" encoding="UTF-8"?>
<project xmlns="http://maven.apache.org/POM/4.0.0"
         xmlns:xsi="http://www.w3.org/2001/XMLSchema-instance"
         xsi:schemaLocation="http://maven.apache.org/POM/4.0.0 http://maven.apache.org/xsd/maven-4.0.0.xsd">
    <modelVersion>4.0.0</modelVersion>

    <groupId>com.enjoy</groupId>
    <artifactId>spring</artifactId>
    <version>1.0-SNAPSHOT</version>
    <!--    引入依赖-->
    <dependencies>
        <dependency>
            <groupId>org.springframework</groupId>
            <artifactId>spring-context</artifactId>
            <version>5.0.6.RELEASE</version>
        </dependency>
    </dependencies>
</project>
创建一个测试TestBean1类
package demo.day1.bean;

public class TestBean1 {
    private Integer age;
    private String name;

    public TestBean1() {
    }

    public TestBean1(Integer age, String name) {
        this.age = age;
        this.name = name;
    }

    public Integer getAge() {
        return age;
    }

    public void setAge(Integer age) {
        this.age = age;
    }

    public String getName() {
        return name;
    }

    public void setName(String name) {
        this.name = name;
    }

    @Override
    public String toString() {
        return "TestBean1{" +
                "age=" + age +
                ", name='" + name + '\'' +
                '}';
    }
}
创建bean.xml文件
<?xml version="1.0" encoding="UTF-8"?>
<beans xmlns="http://www.springframework.org/schema/beans"
       xmlns:xsi="http://www.w3.org/2001/XMLSchema-instance"
       xsi:schemaLocation="http://www.springframework.org/schema/beans http://www.springframework.org/schema/beans/spring-beans.xsd">
    <!--注入实体类-->
    <bean id="testBean1" class="demo.day1.bean.TestBean1">
        <!-- 赋值属性-->
        <property name="age" value="25"></property>
        <property name="name" value="ms"></property>
    </bean>
</beans>
写一个main函数用于测试
public class Test1 {
    public static void main(String[] args) {
        //把bean.xml加载到容器
        ApplicationContext applicationContext = new ClassPathXmlApplicationContext("bean.xml");
        //从容器中获取bean
        TestBean1 testBean1 = (TestBean1) applicationContext.getBean("testBean1");
        System.out.println(testBean1.toString());
    }
}
TestBean1{age=25, name='ms'}
这种方式目前早已经不用了,代码太臃肿了,而且很不方便维护。
通过注解注入bean
创建一个MainCofing作为配置类,相当于springboot的appliaction.yml功能。
//@Configuration修饰的类相当于是该类的配置文件类,可以通过其的hashcode进行比较
@Configuration
    public class MainCofing {
    //@Bean给容器中注册一个bean,并且该bean是单实列
    @Bean
    public TestBean1 testBean1(){
        return new TestBean1(26,"ms");
    }
}
继续编写测试类
public class Test2 {
    public static void main(String[] args) {
        //首先把配置文件加入到文件中
        ApplicationContext applicationContext = new AnnotationConfigApplicationContext(MainCofing.class);
        TestBean1 testBean1 = (TestBean1) applicationContext.getBean("testBean1");
        System.out.println(testBean1.toString());
    }
}
TestBean1{age=26, name='ms'}
默认的bean的id和自定义的id
很明显这种写法,相当于上面一种更加方便,但是有一个问题就是上面的bean的id我们是在xml中进行指定的是testBean1,但是在这里面我们并没有指定bean的id,为什么还可以在容器中找到bean呢。
我们把MainCofing里面的方法名称修改下后,在执行下main方法
    @Bean
    public TestBean1 testBeanId(){
        return new TestBean1(26,"ms");
    }
Exception in thread "main" org.springframework.beans.factory.NoSuchBeanDefinitionException: No bean named 'testBean1' available
	at org.springframework.beans.factory.support.DefaultListableBeanFactory.getBeanDefinition(DefaultListableBeanFactory.java:686)
	at org.springframework.beans.factory.support.AbstractBeanFactory.getMergedLocalBeanDefinition(AbstractBeanFactory.java:1210)
	at org.springframework.beans.factory.support.AbstractBeanFactory.doGetBean(AbstractBeanFactory.java:291)
	at org.springframework.beans.factory.support.AbstractBeanFactory.getBean(AbstractBeanFactory.java:199)
	at org.springframework.context.support.AbstractApplicationContext.getBean(AbstractApplicationContext.java:1089)
	at demo.day1.test2.Test2.main(Test2.java:16)
很显然applicationContext.getBean(“testBean1”);在容器中已经找不到我们注册的bean了,说明bean的id已经改变了,这时候我们在从容器中获取bean的时候把bean的id打印出来下
  public static void main(String[] args) {
        //首先把配置文件加入到文件中
        ApplicationContext applicationContext = new AnnotationConfigApplicationContext(MainCofing.class);
        //由于我们未指定TestBean1的id,通过testBean1依然可以获取到bean,接下来打印下将bena加入到容器后,默认生成的id
        String[] beanNamesForType = applicationContext.getBeanNamesForType(TestBean1.class);
        for (String s : beanNamesForType) {
            System.out.println(s);
        }
        TestBean1 testBean1 = (TestBean1) applicationContext.getBean("testBean1");
        System.out.println(testBean1.toString());

    }
testBeanId
根据观察结果,很明显发现bean的id,是根据MainCofing类的方法名称决定的。如果我们需要自定义bean的id该怎么做呢?很简单,只需要@Bean(name = “abcBean”)即可完成一个bean的id名称定义,这时候容器中加载的不在是方法名。
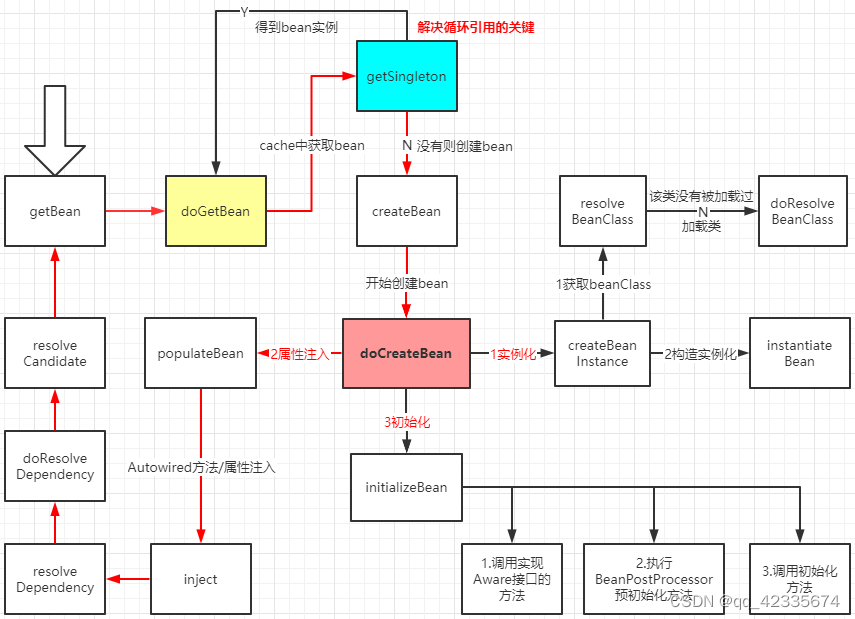
Bean的生命周期
初始化与销毁
方式1
通过@Bean注解里面的initMethod和destroyMethod两个方法来控制。@Bean(value = “bikeBean”,initMethod = “init”,destroyMethod = “destroy”)
public class BikeBean {
    public BikeBean() {
        System.out.println("bikeBean的构造方法");
    }
    public void init(){
        System.out.println("bikeBean正在初始化....");
    }
    public void destroy(){
        System.out.println("bikeBean正在销毁.......");
    }
}
@Configuration
public class BeanLifeConfig {
    //initMethod初始化方法,destroyMethod销毁的方法
    @Bean(value = "bikeBean",initMethod = "init",destroyMethod = "destroy")
    public BikeBean bikeBean(){
        return new BikeBean();
    }
}
    @Test
    public void beanLifeTest(){
        //将配置文件加入到容器
        AnnotationConfigApplicationContext applicationContext = new AnnotationConfigApplicationContext(BeanLifeConfig.class);
        System.out.println("ioc容器创建完成。。。。");
        //关闭容器
        applicationContext.close();
    }
bikeBean的构造方法
bikeBean正在初始化....
ioc容器创建完成。。。。
信息: Closing org.springframework.context.annotation.AnnotationConfigApplicationContext@2eda0940: startup date [Thu May 05 19:42:38 CST 2022]; root of context hierarchy
bikeBean正在销毁.......
方式2
类实现 InitializingBean, DisposableBean接口,重写方法
@Component
public class Train implements InitializingBean, DisposableBean {
    public Train() {
        System.out.println("Train在初始化......");
    }
    //bean属性组装完成时候,调用
    @Override
    public void afterPropertiesSet() throws Exception {
        System.out.println("Train在被创建......");
    }
    //bean销毁调用
    @Override
    public void destroy() throws Exception {
        System.out.println("Train在销毁......");
    }
}
//扫描包下的所有组件
@ComponentScan("demo.day1.beanlife")
@Configuration
public class BeanLifeConfig {
    //initMethod初始化方法,destroyMethod销毁的方法
    @Scope("prototype")
    @Bean(value = "bikeBean",initMethod = "init",destroyMethod = "destroy")
    public BikeBean bikeBean(){
        return new BikeBean();
    }
}
Train在初始化......
Train在被创建......
ioc容器创建完成。。。。
五月 06, 2022 7:35:05 下午 org.springframework.context.support.AbstractApplicationContext doClose
信息: Closing org.springframework.context.annotation.AnnotationConfigApplicationContext@2eda0940: startup date [Fri May 06 19:35:05 CST 2022]; root of context hierarchy
//多实例下,bikeBean不被使用,是不会被创建实列的
Train在销毁......
方式3
通过jrs250注解方式构建初始化和销毁。
@Component
public class JsrBean {
    public JsrBean() {
        System.out.println("JsrBean正在被创建。。。");
    }
    //该注解相当于将方法名定义成初始化方法
    @PostConstruct
    public void inits(){
        System.out.println("JsrBean在初始化.....");
    }
    //该注解相当于将方法变成销毁方法
    @PreDestroy
    public void destroy(){
        System.out.println("JsrBean被消耗。....");
    }
}
BeanPostProcessor
初始化Bean的前置与后置处理
就是Bean正在init的时候,通过前置和后置进行了个加强处理。可以自己自定义处理方式。
@Component
public class ProcessBean implements BeanPostProcessor {
    //初始化前处理
    @Override
    public Object postProcessBeforeInitialization(Object bean, String beanName) throws BeansException {
        System.out.println("初始化前处理:"+beanName);
        return bean;
    }

    @Override
    public Object postProcessAfterInitialization(Object bean, String beanName) throws BeansException {
        System.out.println("初始化后处理:"+beanName);
        return bean;
    }
}
初始化前处理:jsrBean
JsrBean在初始化.....
初始化后处理:jsrBean
获取Ioc容器
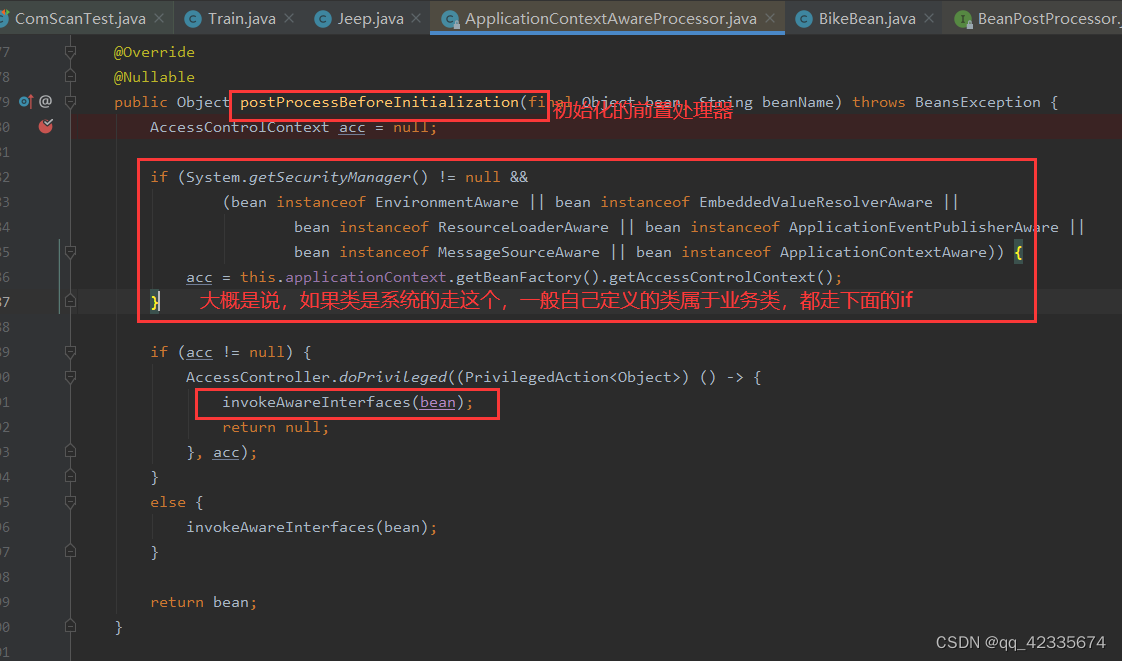
类实现ApplicationContextAware接口。
@Component
public class Jeep implements ApplicationContextAware {
    @Override
    public void setApplicationContext(ApplicationContext applicationContext) throws BeansException {
    	//可以将bean取出来操作后在放进ioc
        System.out.println("获取到容器");
    }
}
在 System.out.println(“获取到容器”);上打上断点跟进去看下。

@ComponentScan
基本使用
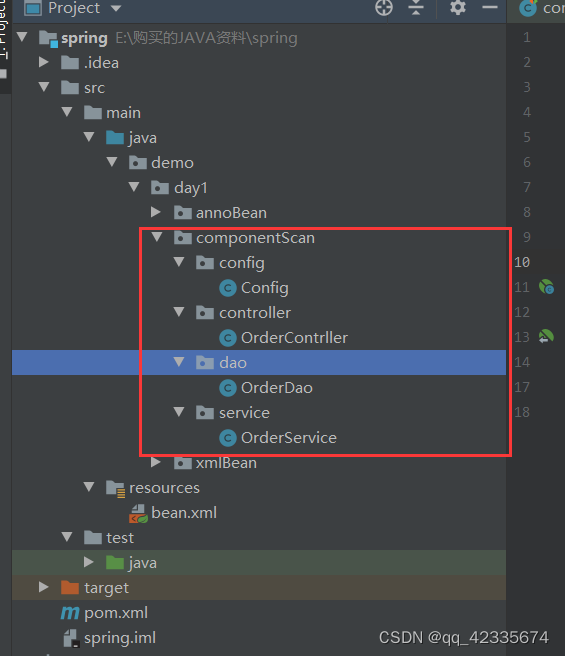
作用:扫描目录下所有的组件,并且加入到容器中。该方法一般在配置类中使用与@Configuration 类一起使用,或者在springboot的启动类使用。创建如下的目录结构,控制层加上@Controller注解,dao、service加上@Component注解。
在conig中写上如下代码,和引入junit测试依赖
@Configuration
//扫描目录下所有的组件
public class Config {
    //@Bean给容器中注册一个bean,自定义bean的id为abcBean
    @Bean(name = "abcBean")
    public TestBean1 testBeanId(){
        return new TestBean1(26,"ms");
    }
}
  <!--测试用例-->
        <dependency>
            <groupId>junit</groupId>
            <artifactId>junit</artifactId>
            <version>4.12</version>
            <scope>test</scope>
        </dependency>
//componentScan包下的测试
public class ComScanTest {
    @Test
    public void testScan1(){
        //将配置文件加入到容器
        ApplicationContext applicationContext = new AnnotationConfigApplicationContext(Config.class);
        //打印容器中所有的组件
        String[] names   = applicationContext.getBeanDefinitionNames();
        for (String name : names) {
            System.out.println(name);
        }
    }
}
//输出两个组件
config
abcBean
加上 @ComponentScan注解
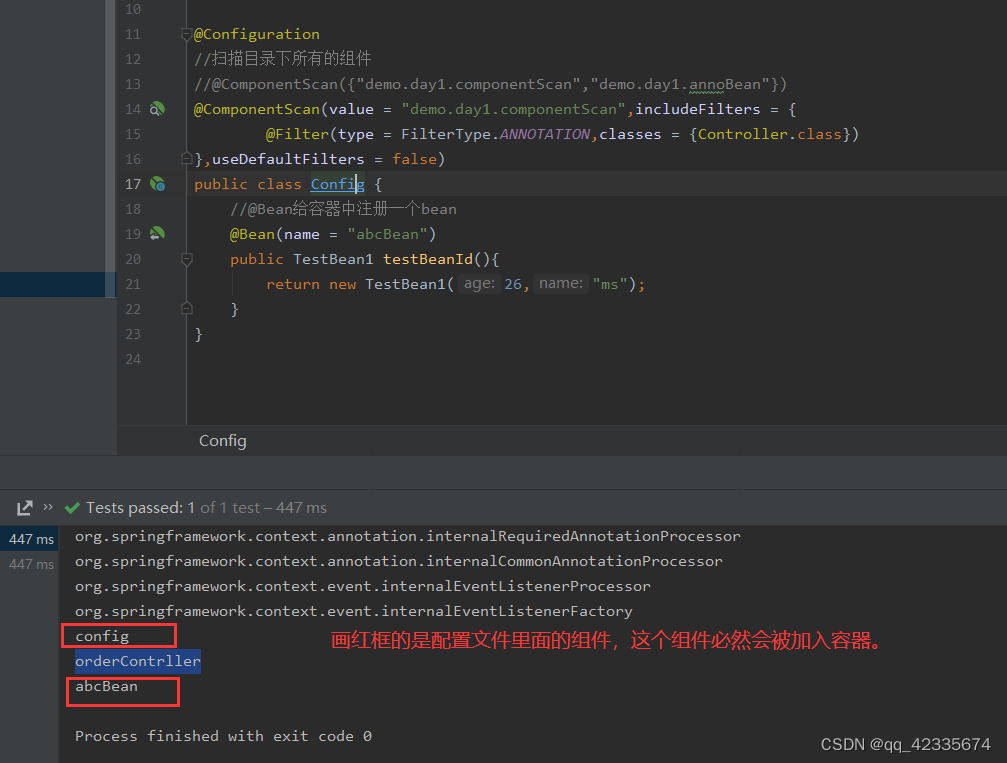
@Configuration
//扫描目录下所有的组件
@ComponentScan(value = "demo.day1.componentScan")
public class Config {
    //@Bean给容器中注册一个bean
    @Bean(name = "abcBean")
    public TestBean1 testBeanId(){
        return new TestBean1(26,"ms");
    }
}
//这时候把所有的组件全部扫描出来了
config
orderContrller
orderDao
orderService
abcBean
源码简单解析
value和basePackages
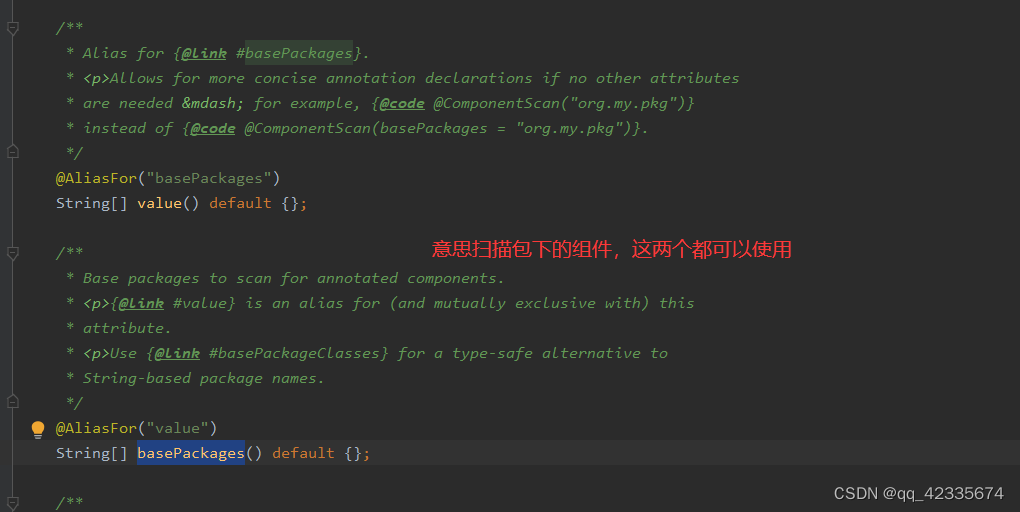
这两个使用效果是等价的都可以对包下的组件进行扫描,并且加入到容器中。
比如扫描A、B两个包下的组件可以有如下写法
@ComponentScan(value = {"demo.day1.componentScan","demo.day1.annoBean"})
//或者
@ComponentScan(basePackages = {"demo.day1.componentScan","demo.day1.annoBean"})
//或者更简单写法
@ComponentScan({"demo.day1.componentScan","demo.day1.annoBean"})
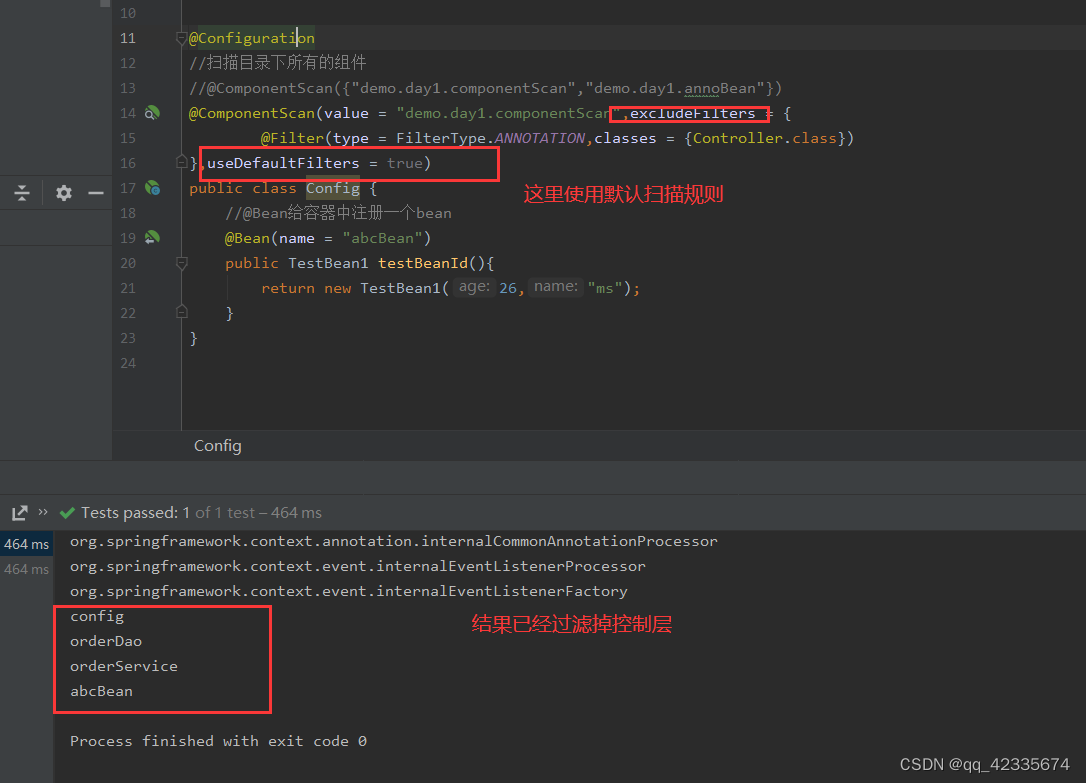
useDefaultFilters
默认的扫描规则,默认值为useDefaultFilters = true。意思是说,会主动检测启用@Component 、@Repository 、 @Service或@Controller注释的类。如果自定义过滤器的话,比如包含哪些类型的注解useDefaultFilters = false。
includeFilters
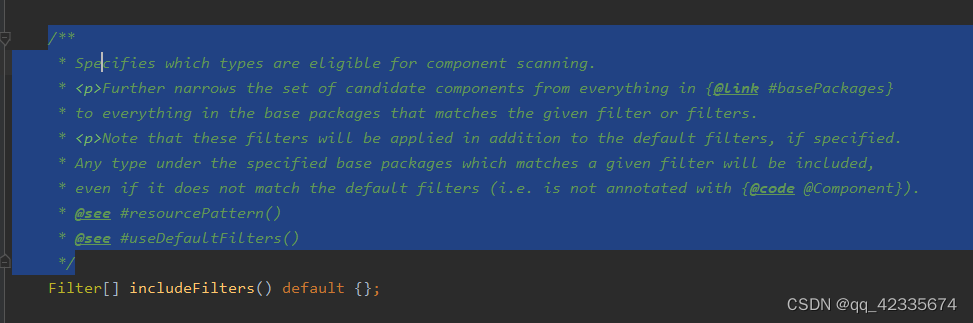
进一步将候选组件集从basePackages中的所有内容缩小到与给定过滤器或过滤器匹配的基本包中的所有内容。比如我现在只需要扫描某个包下的@Controller注解修饰的组件。其他都过滤掉。
excludeFilters
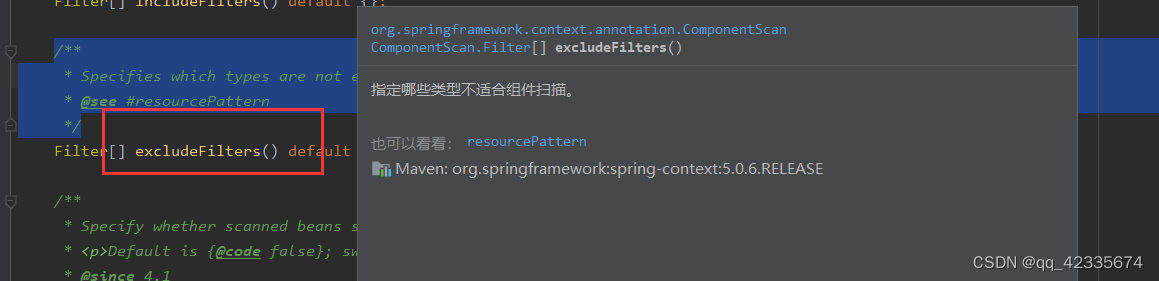
与includeFilters相反,这是用于排除指定组件,不将其加入到容器中
自定义扫描规则
实现TypeFilter接口,重写match方法
/*
* 自定义扫描规则。
* */
public class JamesTypeFilter implements TypeFilter {
    /*
    * metadataReader:读取当前正在扫描的信息
    * metadataReaderFactory:可以获取其他类的任何信息
    * 返回false表示不将组件加入容器,true加入
    * */
    @Override
    public boolean match(MetadataReader metadataReader, MetadataReaderFactory metadataReaderFactory) throws IOException {
        //获取当前类注解的信息
        AnnotationMetadata annotationMetadata = metadataReader.getAnnotationMetadata();
        //获取当前正在扫描的类信息
        ClassMetadata classMetadata = metadataReader.getClassMetadata();
        //获取当前类的路径
        Resource resource = metadataReader.getResource();
        //获取类相关的信息'
        String className = classMetadata.getClassName();
        System.out.println("----->"+className);
        return false;
    }
}
@ComponentScan(value = "demo.day1.componentScan",includeFilters = {
        @Filter(type = FilterType.CUSTOM,classes = {JamesTypeFilter.class})
},useDefaultFilters = false)

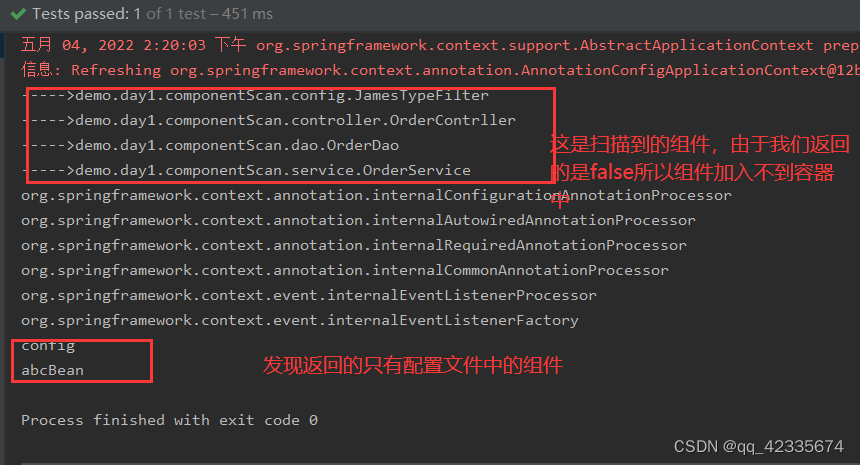
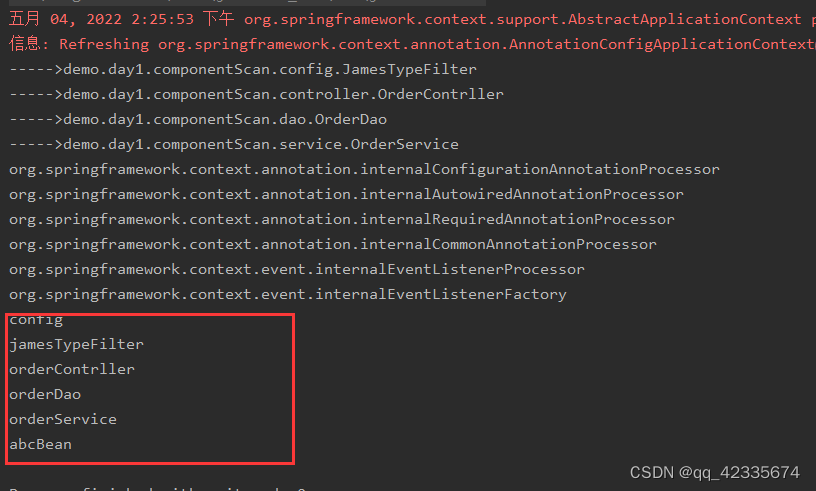
上面没有执行过滤规则,除了配置类的组件外,其他组件都不可以加入到容器。那下面执行过滤规则。
@Override
    public boolean match(MetadataReader metadataReader, MetadataReaderFactory metadataReaderFactory) throws IOException {
        //获取当前类注解的信息
        AnnotationMetadata annotationMetadata = metadataReader.getAnnotationMetadata();
        //获取当前正在扫描的类信息
        ClassMetadata classMetadata = metadataReader.getClassMetadata();
        //获取当前类的路径
        Resource resource = metadataReader.getResource();
        //获取类相关的信息'
        String className = classMetadata.getClassName();
        System.out.println("----->"+className);
        //执行过滤规则
        if (className.contains("er")){
            return true;
        }
        return false;
    }
@Scope
@Bean修饰的bean是单实例。 而@Scope既可以修饰单实例,也可以修饰多实例
源码解析
	/**
	 * Specifies the name of the scope to use for the annotated component/bean.
	 * <p>Defaults to an empty string ({@code ""}) which implies
	 * {@link ConfigurableBeanFactory#SCOPE_SINGLETON SCOPE_SINGLETON}.
	 * @since 4.2
	 * @see ConfigurableBeanFactory#SCOPE_PROTOTYPE
	 * @see ConfigurableBeanFactory#SCOPE_SINGLETON
	 * @see org.springframework.web.context.WebApplicationContext#SCOPE_REQUEST //不常用
	 * @see org.springframework.web.context.WebApplicationContext#SCOPE_SESSION //不常用
	 * @see #value
	 */
	@AliasFor("value")
	String scopeName() default "";
解析上面的参数
singleton:单实列(默认),IOC容器启动的时候会调用方法创建对象并将对象放入到容器中,以后每次用到对象直接从容器中拿。
prototype:多实例对象,IOC容器启动的时候不会去创建对象,只会在使用到bean的时候会去创建一个对象。
创建多实例
@Configuration
public class ScopeConfig {
    @Scope("prototype")
    @Bean(value = "testBean")
    public TestBean1 testBean(){
        return new TestBean1();
    }
}
/*
    * 测试@Scope注解
    * */
    @Test
    public void scopeTest(){
        ApplicationContext applicationContext = new AnnotationConfigApplicationContext(ScopeConfig.class);
        //打印容器中所有的组件
        String[] names   = applicationContext.getBeanDefinitionNames();
        for (String name : names) {
            System.out.println(name);
        }
        //获取实例
        TestBean1 bean1  = (TestBean1) applicationContext.getBean("testBean");
        TestBean1 bean2  = (TestBean1) applicationContext.getBean("testBean");
        System.out.println(bean1 == bean2);
    }
scopeConfig
testBean
false//说明获取两个对象不是同一个实例
@Lazy
类似于赖加载一样,只有在需要的时候,才会去创建,这里也是,默认不会在ioc容器启动的时候去创建对象,只有在我需要用到时候,才会去创建对象
无延迟创建Bean
@Configuration
public class Lazyonfig {
    @Bean(value = "testBean")
    public TestBean1 testBean(){
        System.out.println("testBean加入到ioc容器中....");
        return new TestBean1();
    }
}
  @Test
    public void lazyTest(){
        ApplicationContext applicationContext = new AnnotationConfigApplicationContext(Lazyonfig.class);
        System.out.println("ioc容器创建完成....");
        //TestBean1 bean1  = (TestBean1) applicationContext.getBean("testBean");
    }
testBean加入到ioc容器中....
ioc容器创建完成....
上面代码很简单,就是在ioc初始化完成后,就已经将bean创建完成。
延迟创建Bean
@Configuration
public class Lazyonfig {
    @Lazy
    @Bean(value = "testBean")
    public TestBean1 testBean(){
        System.out.println("testBean加入到ioc容器中....");
        return new TestBean1();
    }
 @Test
    public void lazyTest(){
        ApplicationContext applicationContext = new AnnotationConfigApplicationContext(Lazyonfig.class);
        System.out.println("ioc容器创建完成....");
        //下面获取实例时候,已经用到bean,这时候会将bean加入到ioc容器中创建bean
        TestBean1 bean1  = (TestBean1) applicationContext.getBean("testBean");
    }
ioc容器创建完成....
testBean加入到ioc容器中....
通过输出结果与无延迟创建bean很明显发现,延迟创建的时候,bean只有在被用到时候才会加入到ioc容器中。
@Conditional
根据条件选择性的注册bean。比如现在需要注册A、B、C三个Bean,但是有一个要求就是在windows系统下只需要注册A、B两个Bean,在linux系统下注册C的Bean。
源码解析
@Target({ElementType.TYPE, ElementType.METHOD})
@Retention(RetentionPolicy.RUNTIME)
@Documented
public @interface Conditional {

	/**
	 * 就是说,如果想使用@Conditional注解,进行选择性的注册Bean,就必须创建一个新类实现Condition接口。
	 */
	Class<? extends Condition>[] value();

}
选择性的注册Bean
条件为windows的环境变量
/*
* 实现Condition接口,重写matches方法,实现bean的选择性注册,也就是在注册前进行一个拦截。
* */
public class WinCondition implements Condition {

    /*
    * ConditionContext:判断条件可以使用的上下文
    * AnnotatedTypeMetadata:注解的信息
    * */
    @Override
    public boolean matches(ConditionContext context, AnnotatedTypeMetadata metadata) {
        //从ioc获取bean
        ConfigurableListableBeanFactory beanFactory = context.getBeanFactory();
        //获取当前系统的环境变量
        Environment environment = context.getEnvironment();
        String property = environment.getProperty("os.name");
        //如果该系统是windows允许该bean注册
        if (property.contains("Windows")){
            return true;
        }
        return false;
    }
}
条件为Linux的环境变量
public class LinuxCondition implements Condition {
    @Override
    public boolean matches(ConditionContext context, AnnotatedTypeMetadata metadata) {
        //从ioc获取bean
        ConfigurableListableBeanFactory beanFactory = context.getBeanFactory();
        //获取当前系统的环境变量
        Environment environment = context.getEnvironment();
        String property = environment.getProperty("os.name");
        //如果该系统是windows允许该bean注册
        if (property.contains("Linux")){
            return true;
        }
        return false;
    }
}
@Configuration
public class ConditionConfig {
    //@Bean给容器中注册一个bean
    @Bean(name = "bean1")
    public TestBean1 bean1(){
        System.out.println("将bean1加入到ioc容器中.....");
        return new TestBean1(26,"bean1");
    }
    @Conditional(LinuxCondition.class)
    @Bean(name = "bean2")
    public TestBean1 bean2(){
        System.out.println("如果是Linux系统环境下,将bean2加入到ioc容器中.....");
        return new TestBean1(26,"bean2");
    }
    @Conditional(WinCondition.class)
    @Bean(name = "bean3")
    public TestBean1 bean3(){
        System.out.println("如果是Windows系统环境下,将bean3加入到ioc容器中.....");
        return new TestBean1(26,"bean3");
    }
}
    @Test
    public void conditionTest(){
        ApplicationContext applicationContext  = new AnnotationConfigApplicationContext(ConditionConfig.class);
        System.out.println("ioc容器创建完成......");
    }
将bean1加入到ioc容器中.....
如果是Windows系统环境下,将bean3加入到ioc容器中.....
ioc容器创建完成......
根据输出结果发现bean2只有在linux环境下才会注册到ioc容器中。
@Import
1.带有@Configuration的配置类
2.ImportSelector 的实现
3.ImportBeanDefinitionRegistrar 的实现
注解注册
如下图,随便写上两个类Dog和Cat
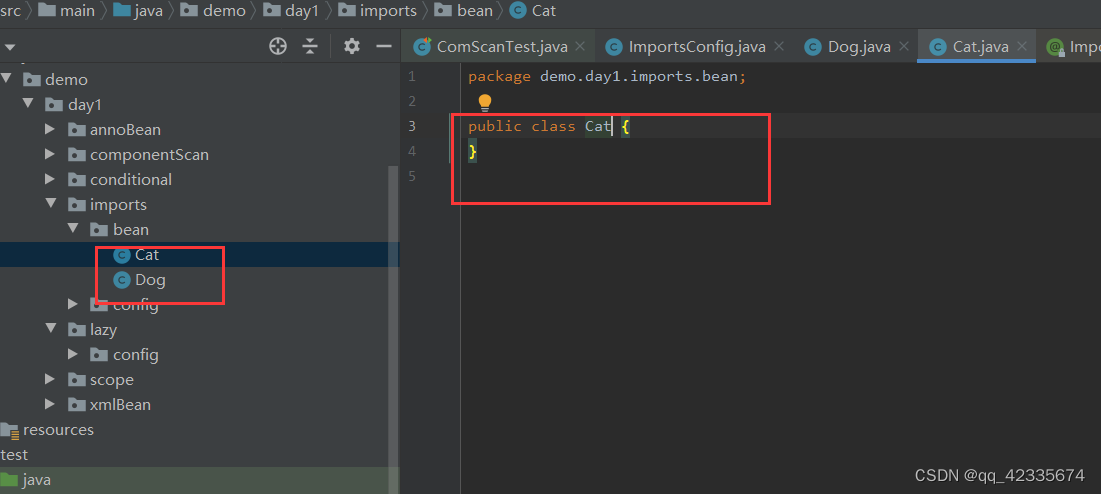
@Configuration
@Import(value = {Dog.class, Cat.class})
public class ImportsConfig {
    @Bean(value = "testBean")
    public TestBean1 testBean(){
        System.out.println("testBean加入到ioc容器中....");
        return new TestBean1();
    }
}
  @Test
    public void importTest(){
        //将配置文件加入到容器
        ApplicationContext applicationContext = new AnnotationConfigApplicationContext(ImportsConfig.class);
        //打印容器中所有的组件
        String[] names   = applicationContext.getBeanDefinitionNames();
        for (String name : names) {
            System.out.println(name);
        }
    }
importsConfig
demo.day1.imports.bean.Dog
demo.day1.imports.bean.Cat
testBean
观察输出结果,Dog和Cat都已经注入到ioc容器中,并且Dog和Cat打印的是全类名。
实现ImportSelector接口注册
先定义一个类实现ImportSelector接口
public class ImportSelectors implements ImportSelector {
    @Override
    public String[] selectImports(AnnotationMetadata importingClassMetadata) {
        //将需要注册的bean加入到ioc
        return new String[]{"demo.day1.imports.bean.Dog","demo.day1.imports.bean.Cat"};
    }
}
@Configuration
@Import(value = {ImportSelectors.class})
public class ImportsConfig {
    @Bean(value = "testBean")
    public TestBean1 testBean(){
        System.out.println("testBean加入到ioc容器中....");
        return new TestBean1();
    }
}
importsConfig
demo.day1.imports.bean.Dog
demo.day1.imports.bean.Cat
testBean
ImportBeanDefinitionRegistrar
public class ImportBeanDefinitionRegistrars implements ImportBeanDefinitionRegistrar {
    @Override
    public void registerBeanDefinitions(AnnotationMetadata importingClassMetadata, BeanDefinitionRegistry registry) {
        RootBeanDefinition dogRoot = new RootBeanDefinition(Dog.class);
        RootBeanDefinition catRoot = new RootBeanDefinition(Cat.class);
        registry.registerBeanDefinition("dog", dogRoot);
        registry.registerBeanDefinition("cat", catRoot);
    }
}
@Value
给字段赋值
public class ValueBean {
    @Value("ms")
    private String name;
    @Value("#{20-2}")
    private Integer gae;

    public String getName() {
        return name;
    }

    public void setName(String name) {
        this.name = name;
    }

    public Integer getGae() {
        return gae;
    }

    public void setGae(Integer gae) {
        this.gae = gae;
    }

    @Override
    public String toString() {
        return "ValueBean{" +
                "name='" + name + '\'' +
                ", gae=" + gae +
                '}';
    }
}
@Configuration
public class ValueConfig {
    @Bean("valueBean")
    public ValueBean valueBean(){
        return new ValueBean();
    }
}
 @Test
    public void valueBeanTest(){
        //将配置文件加入到容器
        AnnotationConfigApplicationContext applicationContext = new AnnotationConfigApplicationContext(ValueBean.class);
        System.out.println("ioc容器创建完成。。。。");
        ValueBean valueBean = applicationContext.getBean("valueBean", ValueBean.class);
        System.out.println(valueBean);
        applicationContext.close();
    }
ioc容器创建完成。。。。
ValueBean{name='ms', gae=18}
读取配置文件
.properties或者.yml文件配置好,然后使用,@Value(“${字段}”)
自动装配
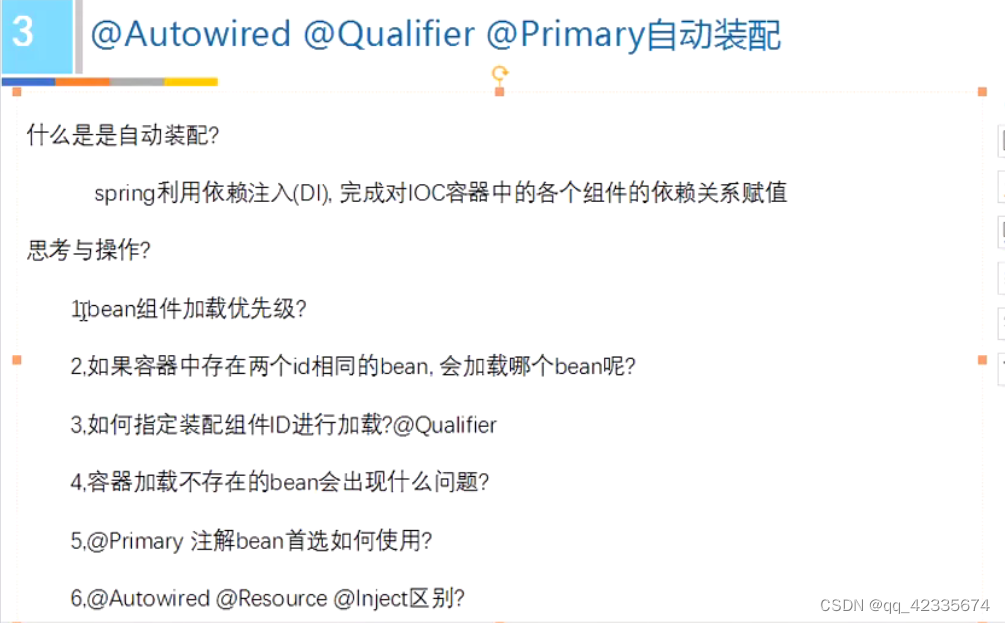
@Autowired
简称自动注入Bean,该Bean是从ioc容器中获取的。但是有一个问题就是如果这个Bean在ioc容器中存在两个实列,它不知道该注入哪个Bean的实列,会报错。下面复现下。
//该注解通过扫描包时候已经将组件加入到ioc容器中
@Service
public class AutoService {

}
@Controller
public class AutoController {
    @Autowired
    private AutoService service;
}
@Configuration
@ComponentScan("demo.day1.auto")
public class AutoConfig {
	//AutoService 注入ioc,这时候ioc相当于有两个AutoBean 实列
    @Bean("autoService2")
    public AutoService autoService(){
        return new AutoService();
    }
}
 @Test
    public void autoTest(){
        //启动容器
        AnnotationConfigApplicationContext applicationContext = new AnnotationConfigApplicationContext(AutoConfig.class);
        System.out.println("ioc容器创建完成。。。。");
        for (String beanDefinitionName : applicationContext.getBeanDefinitionNames()) {
            System.out.println(beanDefinitionName);
        }
        applicationContext.close();
    }
Caused by: org.springframework.beans.factory.NoUniqueBeanDefinitionException: No qualifying bean of type 'demo.day1.auto.AutoBean' available: expected single matching bean but found 2: autoBean,autobean1
@Qualifier
针对于上面出现的情况,可以用 @Qualifier来指定装配的是哪个Bean。比如 @Qualifier(“autoService2”)
@Controller
public class AutoController {
	//指定获取的是配置文件那个实例bean
    @Qualifier("autoService2")
    @Autowired
    private AutoService service;
}
@Primary
当一个类存在多个实例时候指定优先级
   //这里又注入一个实列名叫autoService2加入的ioc容器,s
    @Primary //这个注解表示ioc存在多个实例时候,该实列是首选的的意思,
    @Bean("autoService2")
    public AutoService autoService(){
        return new AutoService();
    }
面试
ioc单实例和多实例
单实例:在ico容器被创建的时候,bean就已经被创建了。
多实例:仅当bean被使用的时候才会被创建。
FactoryBean与BeanFactory
FactoryBean:把java中需要实列化的bean注册到ioc容器
BeanFactory:从容器中获取到需要使用的bean
注册Bean的方式
1.通过@Bean直接注册
2.通过包扫描和组件的注解(@CommentSacn、@Component…)
3.通过@Import方式
a.@Import(要导入到容器的类.class)
b.实现ImportSelector接口,返回需要导入到容器组件的全类名的数组


 495
495


 被折叠的 条评论
为什么被折叠?
被折叠的 条评论
为什么被折叠?
 到【灌水乐园】发言


