


2.学习redis缓存
2.1缓存机制的说明:

2.2缓存机制的原理说明
缓存机制:
缓存中的数据一定是数据库中的数据,使用主要目的是降低用户访问物理设备的频次
如果数据库的记录更新,则缓存应该同步更新
1.缓存的数据结构 K-V结构进行数据保存
2.开发语言的选择 C语言程序
3.缓存数据的运行环境在内存中,断电即擦除,将内存数据进行持久化操作
4.如果要不停的添加缓存记录,肯定会造成内存溢出,定期优化缓存机制
1).LRU算法 2). LFU算法 3).Random算法 4).TTL算法
5.缓存也需要实现高可用机制 , 实现搭建缓存集群
2.3Redis介绍
2.3.1官网介绍

效率:读:11.2万次/秒 写:8.6万次/秒 平均:10万次/秒
口诀:1-5-8
知识扩展
1.数据库:
关系型数据库:mysql数据库/oracle数据库 2维表 行/列
非关系型数据库: mongodb/hbase /redis 1维表 kye1=value1,key2=value2,key3={id:1,name="tomcat",age=18}
中间件:
50万次/秒 吞吐量

2.4redis安装
2.4.1上传安装包

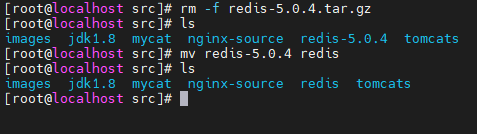
2.4.2解压redis删除多于的
说明:tar -xvf redis-5.4.tar.gz 解压完成后删除压缩包,改名
2.4.3安装redis
说明:在redis根目录中执行如下命令
1.make 编译
2.make install 安装

2.4.4服务器命令
1.启动 redis-server redis.conf
2.进入客户端 redis-cli -p 6379 exit/ctrl+c 退出

3.关闭redis服务 redis-cli -p 6379 shutdown
修改redis配置文件
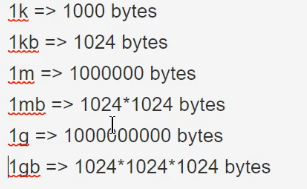
进制换算

2.redis入门案例
2.1导入jar包
<!--spring整合redis -->
        <dependency>
            <groupId>redis.clients</groupId>
            <artifactId>jedis</artifactId>
        </dependency>
        <dependency>
            <groupId>org.springframework.data</groupId>
            <artifactId>spring-data-redis</artifactId>
        </dependency>
2.2客户端操作string类型
package com.jt.test;

import org.junit.jupiter.api.Test;
import org.springframework.boot.test.context.SpringBootTest;
import redis.clients.jedis.Jedis;
import redis.clients.jedis.params.SetParams;

//@SpringBootTest //目的:动态获取spring容器中的数据
public class TestRedis {

    /**
     * 主要目的测试程序远程操作Redis是否有效
     * 配置redis服务:
     *      1.redis需要关闭IP绑定模式
     *      2.redis关闭保护模式
     *      3.redis最好开启后端运行
     *
     * 完成redis客户端操作
     */
    @Test
    public void test01() throws InterruptedException {
        //1.测试链接
        Jedis jedis = new Jedis("192.168.126.129",6379);
        jedis.set("a", "动态获取redis中的数据");
        System.out.println(jedis.get("a"));

        //2.测试数据是否存在
        if(jedis.exists("a")){
            jedis.set("a", "修改数据");
        }else{
            jedis.set("a", "新增数据");
        }

        //3.删除redis
        jedis.del("a");

        //4.清空所有的数据
        jedis.flushDB();
        jedis.flushAll();

        //5.为数据添加超时时间
        jedis.set("b", "设定超时时间");
        jedis.expire("b", 10);
        Thread.sleep(2000);
        System.out.println(jedis.ttl("b"));
    }

    //原子性
    @Test
    public void test02(){
        Jedis jedis = new Jedis("192.168.126.129", 6379);
        jedis.set("c", "测试redis");
        //需求1: 如果数据不存在时,才会为数据赋值.
        jedis.setnx("d","测试setnx方法");
        System.out.println(jedis.get("d"));

        //需求2: 需要为数据添加超时时间,同时满足原子性的要求
                //jedis.set("s", "为数据添加超时时间");
                //有时程序中断了,下列的方法将不会执行.
                //jedis.expire("s", 20);
                //System.out.println(jedis.ttl("s"));
        //为数据添加超时时间
        jedis.setex("s", 20, "为数据添加超时111");
        System.out.println("获取超时时间:"+jedis.ttl("s"));
    }

    /**
     *  需求: 如果数据存在才修改,并且为数据添加超时时间,满足原子性要求
     *  SetParams:
     *          XX: 数据存在时赋值.
     *          NX: 数据不存在时赋值
     *          EX: 添加超时时间单位秒
     *          PX: 添加超时时间单位毫秒
     */
    @Test
    public void test03(){
        Jedis jedis = new Jedis("192.168.126.129", 6379);
        jedis.flushAll();
        SetParams setParams = new SetParams();
        setParams.xx().ex(20);
        jedis.set("a", "测试方法",setParams);
        System.out.println(jedis.get("a"));
    }
}
关于list集合说明
1.3.1关于队列的应用场景
秒杀场景:马上过年了,店铺周年店庆,苹果12proMax 12000 1元秒杀? 提前预付活动费 10块 如果秒杀不成功7天之内退还

入门案例测试
@Test
    public void testList(){
        Jedis jedis = new Jedis("192.168.126.129",6379);
        jedis.lpush("list", "1","2","3");
        System.out.println(jedis.rpop("list")); //队列
    }
关于事务控制
 //弱事务控制
    @Test
    public void testTx(){
        Jedis jedis = new Jedis("192.168.126.129",6379);
        Transaction transaction = jedis.multi();  //开启事务
        try {
            transaction.set("k", "k");
            transaction.set("c", "c");
            transaction.exec();
        }catch (Exception e){
            e.printStackTrace();
            transaction.discard();
        }
    }
2.springBoot整合Redis
2.1编辑Pro配置文件

2.2编辑redis配置类

2.3编写redis测试类

3JSON转化工具API
package com.jt.test;

import com.fasterxml.jackson.core.JsonProcessingException;
import com.fasterxml.jackson.databind.ObjectMapper;
import com.jt.pojo.ItemDesc;
import org.junit.jupiter.api.Test;

import java.util.ArrayList;
import java.util.Date;
import java.util.List;

public class TestObjectMapper {
    @Test
    public void test01() throws JsonProcessingException {
        ObjectMapper objectMapper=new ObjectMapper();
        ItemDesc itemDesc=new ItemDesc();
        //将对象转化为JSON 调用的是对象get方法获取属性/属性的值
        itemDesc.setItemId(1000L).setItemDesc("对象与jSON转化")
                .setCreated(new Date()).setUpdated(new Date());
        String json=objectMapper.writeValueAsString(itemDesc);
        System.out.println(json);
        //将JSON串中转化对象 调用的是对象的set方法为对象属性赋值
        ItemDesc itemDesc1=objectMapper.readValue(json,ItemDesc.class);
        System.out.println(itemDesc1.getItemDesc());

    }

    @Test
    public void test02() throws JsonProcessingException {
        ObjectMapper objectMapper=new ObjectMapper();
        ItemDesc itemDesc=new ItemDesc();
        //将对象转化为JSON 调用的是对象get方法获取属性/属性的值
        itemDesc.setItemId(1000L).setItemDesc("对象与jSON转化")
                .setCreated(new Date()).setUpdated(new Date());
        ItemDesc itemDesc2=new ItemDesc();
        itemDesc2.setItemId(1000L).setItemDesc("对象与jSON转化2")
                .setCreated(new Date()).setUpdated(new Date());

        List<ItemDesc> list2=new ArrayList<>();
        list2.add(itemDesc);
        list2.add(itemDesc2);
        String json=objectMapper.writeValueAsString(list2);
        System.out.println(json);
        //将JSON串中转化对象 调用的是对象的set方法为对象属性赋值
        List list=objectMapper.readValue(json,list2.getClass());
        System.out.println(list);

    }
}
封装工具API
package com.jt.util;

import com.fasterxml.jackson.core.JsonProcessingException;
import com.fasterxml.jackson.databind.ObjectMapper;

/**
 * 该工具类的主要功能是实现对象与JSON串的互相转化
 * 1.对象转为JSON
 * 2.JSON转化为对象
 */
public class ObjectMapperUtil {
    private static final ObjectMapper MAPPER=new ObjectMapper();
    //1.对象转化为JSON
    public static  String toJSON(Object object){
        try {
            return MAPPER.writeValueAsString(object);
        }catch (JsonProcessingException e){
            e.printStackTrace();
            throw  new RuntimeException(e);
        }
    }


    //2.将JSON转化为对象 要求用户传递什么类型的参数就返回什么对象
    public static <T> T toObj(String json,Class<T> target){
        try {
            return MAPPER.readValue(json, target);
        }catch (JsonProcessingException e){
            e.printStackTrace();
            throw  new RuntimeException(e);
        }
    }
}
业务说明
商品分类信息每次展开封闭的节点。都需要查询数据库,这样的效率并不高,可以使用redis缓存来提升效率
流程:
1.用户第一次查询先查询缓存
2.缓存中没有数据(这就是第一次查询),查询数据库,将数据库记录保存到缓存中即可
3.缓存中有记录直接通过缓存获取数据之后返回即可
   /**
     * 实现商品分类的缓存操作
     * 原理说明:
     * 1.定义存取redis中的key   “业务的名称+标识符”  ITEMCAT_PARENT::0
     * 2.通过key可以获取redis中的记录
     * 3.空   查询数据库 将返回值结果保存到缓存中
     * 4.非空  直接将缓存获取之后,返回给用户即可
     *
     */
    @Autowired
    private Jedis jedis;
    @Override
    public List<EasyUITree> findItemCatCache(Long parentId) {
        String key="ITEMCAT_PARENTID::"+parentId;
        List treeList=new ArrayList();
        if(jedis.exists(key)){
            //如果存在则直接返回
            String json=jedis.get(key);
          treeList=  ObjectMapperUtil.toObj(json, treeList.getClass());
            System.out.println("查询redis缓存");
        }else {
            //如果不存在则查询数据库
            treeList=findItemCatList(parentId);
            //将数据保存到缓存中
               //将java对象转化为JSON串存到缓存中
            String json=ObjectMapperUtil.toJSON(treeList);
            jedis.set(key,json);
            System.out.println("查询数据库");
        }
        return treeList;
    }
利用AOP实现商品分类缓存
为什么使用AOP
问题一:如果将代码直接写死,那么代码不具有通用性
问题2:代码冗余,代码的耦合性高
AOP:面向切面编程
AOP作用:在不修改原有的方法的条件下,对原有的方法进行扩展
关于AOP复习
公式:AOP=切入点表达式+通知方法
常见的通知方法:
1.before 目标方法执行之前执行
2.afterThrowing 目标方法执行之后 抛出异常执行
3.afterReturing 目标方法执行之后 返回结果是执行
4.after 目标方法执行之后执行
5.around 环绕通知功能最为强大 可以控制目标方法的执行 在目标方法执行前后都要执行
常见切入点表达式:
1.bean(bean的id) 按bean匹配!什么是bean? -----spring容器管理的对象就叫bean 粗粒度
2.within(包名.类名)按照包路径匹配 其中可以使用通配符*代替
within("com.jt.service") 位于com.jt.service中的包得所有的类都会匹配 粗粒度
3.execution(返回值类型 包名.类名.方法名(参数列表)) 匹配的是方法参数级别 细粒度
execution(*com.jt.service.*.*(..)) 解释:返回值类型任意 在com.jt.service的包路径的任意类的任意方法的任意参数
execution(*com.jt.service.userService.add*(..))
4.@annotation(包名.注解名称) 按照注解匹配 常用的切入点表达式
关于AOP的案例
package com.jt.aop;

import org.aspectj.lang.JoinPoint;
import org.aspectj.lang.annotation.Aspect;
import org.aspectj.lang.annotation.Before;
import org.aspectj.lang.annotation.Pointcut;
import org.springframework.stereotype.Component;

import java.util.Arrays;

@Component//组件   将类交给spring容器管理
@Aspect//表示我是一个切面
public class RedisAOP {
    //公式aop=切入点表达式+通知方法
   //表达式一 @Pointcut("bean(itemCateServiceImpl)")
  //表达式二  @Pointcut("within(com.jt.service.*)")
   //表达式三
    @Pointcut("execution(* com.jt.service..*.*(..))")
    public void pointCut(){
    }
    //如何获取,目标对象的相关参数????
    //注意这里只能用JoinPoint  因为ProceedingJoinPoint is only supported for around advice
    //也就是说ProceedingJoinPoint只能用于环绕通知
    @Before("pointCut()")
    public void befor(JoinPoint joinPoint){//连接点
        Object target=joinPoint.getTarget();//获取目标对象
        Object[] args=joinPoint.getArgs();//获取方法参数
        String className=joinPoint.getSignature().getDeclaringTypeName();//获取类名称
        String methodName=joinPoint.getSignature().getName();//获取方法名称
        System.out.println("目标对象"+target);
        System.out.println("方法参数"+ Arrays.toString(args));
        System.out.println("类名称"+className);
        System.out.println("方法名称"+methodName);
        System.out.println("我是前置通知!!!!!!!");
    }
}


 288
288


 被折叠的 条评论
为什么被折叠?
被折叠的 条评论
为什么被折叠?
 到【灌水乐园】发言


