


学好路更宽,钱多少加班。 ——小马哥
简介
大家好,我是小马哥成千上万粉丝中的一员!2019年8月有幸在叩丁狼教育举办的猿圈活动中知道有这么一位大咖,从此结下了不解之缘!此系列在多次学习极客时间《小马哥讲Spring AOP 编程思想》基础上形成的个人一些总结。希望能帮助各位小伙伴, 祝小伙伴早日学有所成。
Spring AOP XML 标签基本使用
<?xml version="1.0" encoding="UTF-8"?>
<beans xmlns="http://www.springframework.org/schema/beans"
       xmlns:aop="http://www.springframework.org/schema/aop"
       xmlns:xsi="http://www.w3.org/2001/XMLSchema-instance"
       xsi:schemaLocation="http://www.springframework.org/schema/beans
        https://www.springframework.org/schema/beans/spring-beans.xsd
        http://www.springframework.org/schema/aop
        https://www.springframework.org/schema/aop/spring-aop.xsd">

   <!-- 开启 AspectJ 注解解析 -->
    <aop:aspectj-autoproxy proxy-target-class="true" expose-proxy="true"/>
    <!-- 基于 AspectJ 表达式语法的 AOP 配置 -->
    <aop:config expose-proxy="true" proxy-target-class="false">
        <!-- 配置切点,只支持 AspectJ 表达式语法 -->
        <aop:pointcut id="outerAnyPublishMethod" expression="execution(public * *(..))"/>
        <aop:advisor advice-ref="echoServiceMethodInterceptor" order="11" pointcut-ref="outerAnyPublishMethod"/>
        <aop:aspect id="AspectXml" ref="aspectXml" order="20">
             <!-- Introduction -->
            <aop:declare-parents types-matching="com.wenhai.spring.aop.features.*"
                                 implement-interface="com.wenhai.spring.aop.features.service.EchoService"
                                 delegate-ref="echoService"/>
            <!-- 配置切点,只支持 AspectJ 表达式语法 -->
            <aop:pointcut id="innerAnyPublishMethod" expression="execution(public * *(..))"/>
            <!-- 前置通知 -->
            <aop:before method="beforeAnyPublicMethod" pointcut-ref="outerAnyPublishMethod"/>
            <!-- 后置通知 -->
            <aop:after-returning method="afterReturningAnyPublicMethod" pointcut-ref="innerAnyPublishMethod"/>
            <!-- 异常通知 -->
            <aop:after-throwing method="afterThrowingAnyPublicMethod" pointcut-ref="innerAnyPublishMethod"/>
            <!-- 最终通知 -->
            <aop:after method="afterAnyPublicMethod" pointcut-ref="innerAnyPublishMethod"/>
            <!-- 环绕通知 -->
            <aop:around method="aroundAnyPublicMethod" pointcut-ref="outerAnyPublishMethod"/>
            <!-- 环绕通知 -->
            <aop:around method="aroundAnyPublicMethod" pointcut="execution(public * *(..))"/>
        </aop:aspect>
    </aop:config>

    <!-- 切面 bean -->
    <bean name="aspectXml" class="com.wenhai.spring.aop.features.aspect.AspectXmlConfiguration"/>
<bean name="echoService" class="com.wenhai.spring.aop.features.service.DefaultEchoServiceImpl"/>

    <bean name="echoServiceMethodInterceptor" class="com.wenhai.spring.aop.features.interceptor.EchoServiceMethodInterceptor"/>

    <bean name="echoProxyFactoryBean" class="org.springframework.aop.framework.ProxyFactoryBean">
        <property name="targetName" value="echoService"/>
        <property name="interceptorNames" value="echoServiceMethodInterceptor"/>
    </bean>
</beans>
自定义 Spring XML 配置文件标签步骤
除了 Spring IoC XML 配置文件提供的
<import/>、<alias />、<beans/>、<description/>标签之外的标签都是属性自定义标签
- 自定义 xsd 约束文件,并在
spring.schemas(参见 Spring Jar 包下面的 META-INF 目录下的 spring.schemas 配置文件)中配置 xsd 文件的位置。 - 继承
NamespaceHandlerSupport并实现init()方法,注册标签解析器(XML 元素命名空间处理器 ) - 在
spring.handlers(参见 Spring Jar 包下面的 META-INF 目录下的 spring.handlers 配置文件)中配置命名空间对应的处理器
解析 Spring AOP XML 配置文件的标签
打开 Maven 中 spring-aop Jar 包,可以在 META-INF 目录下找到对应的
spring.handlers中AopNamespaceHandler这个类,就是处理标签的主要入口。
@Override
public void init() {
	// 处理 <aop:config/> 标签
	registerBeanDefinitionParser("config", new ConfigBeanDefinitionParser());
	// 处理 <aop:aspectj-autoproxy/> 标签
	registerBeanDefinitionParser("aspectj-autoproxy", new AspectJAutoProxyBeanDefinitionParser());
	// 处理 <aop:scoped-proxy/> 标签
	registerBeanDefinitionDecorator("scoped-proxy", new ScopedProxyBeanDefinitionDecorator());

	// 2.0 XSD 中的标签,在 2.5 版本已经移除
	registerBeanDefinitionParser("spring-configured", new SpringConfiguredBeanDefinitionParser());
}
解析 <aop:aspectj-autoproxy/> 标签
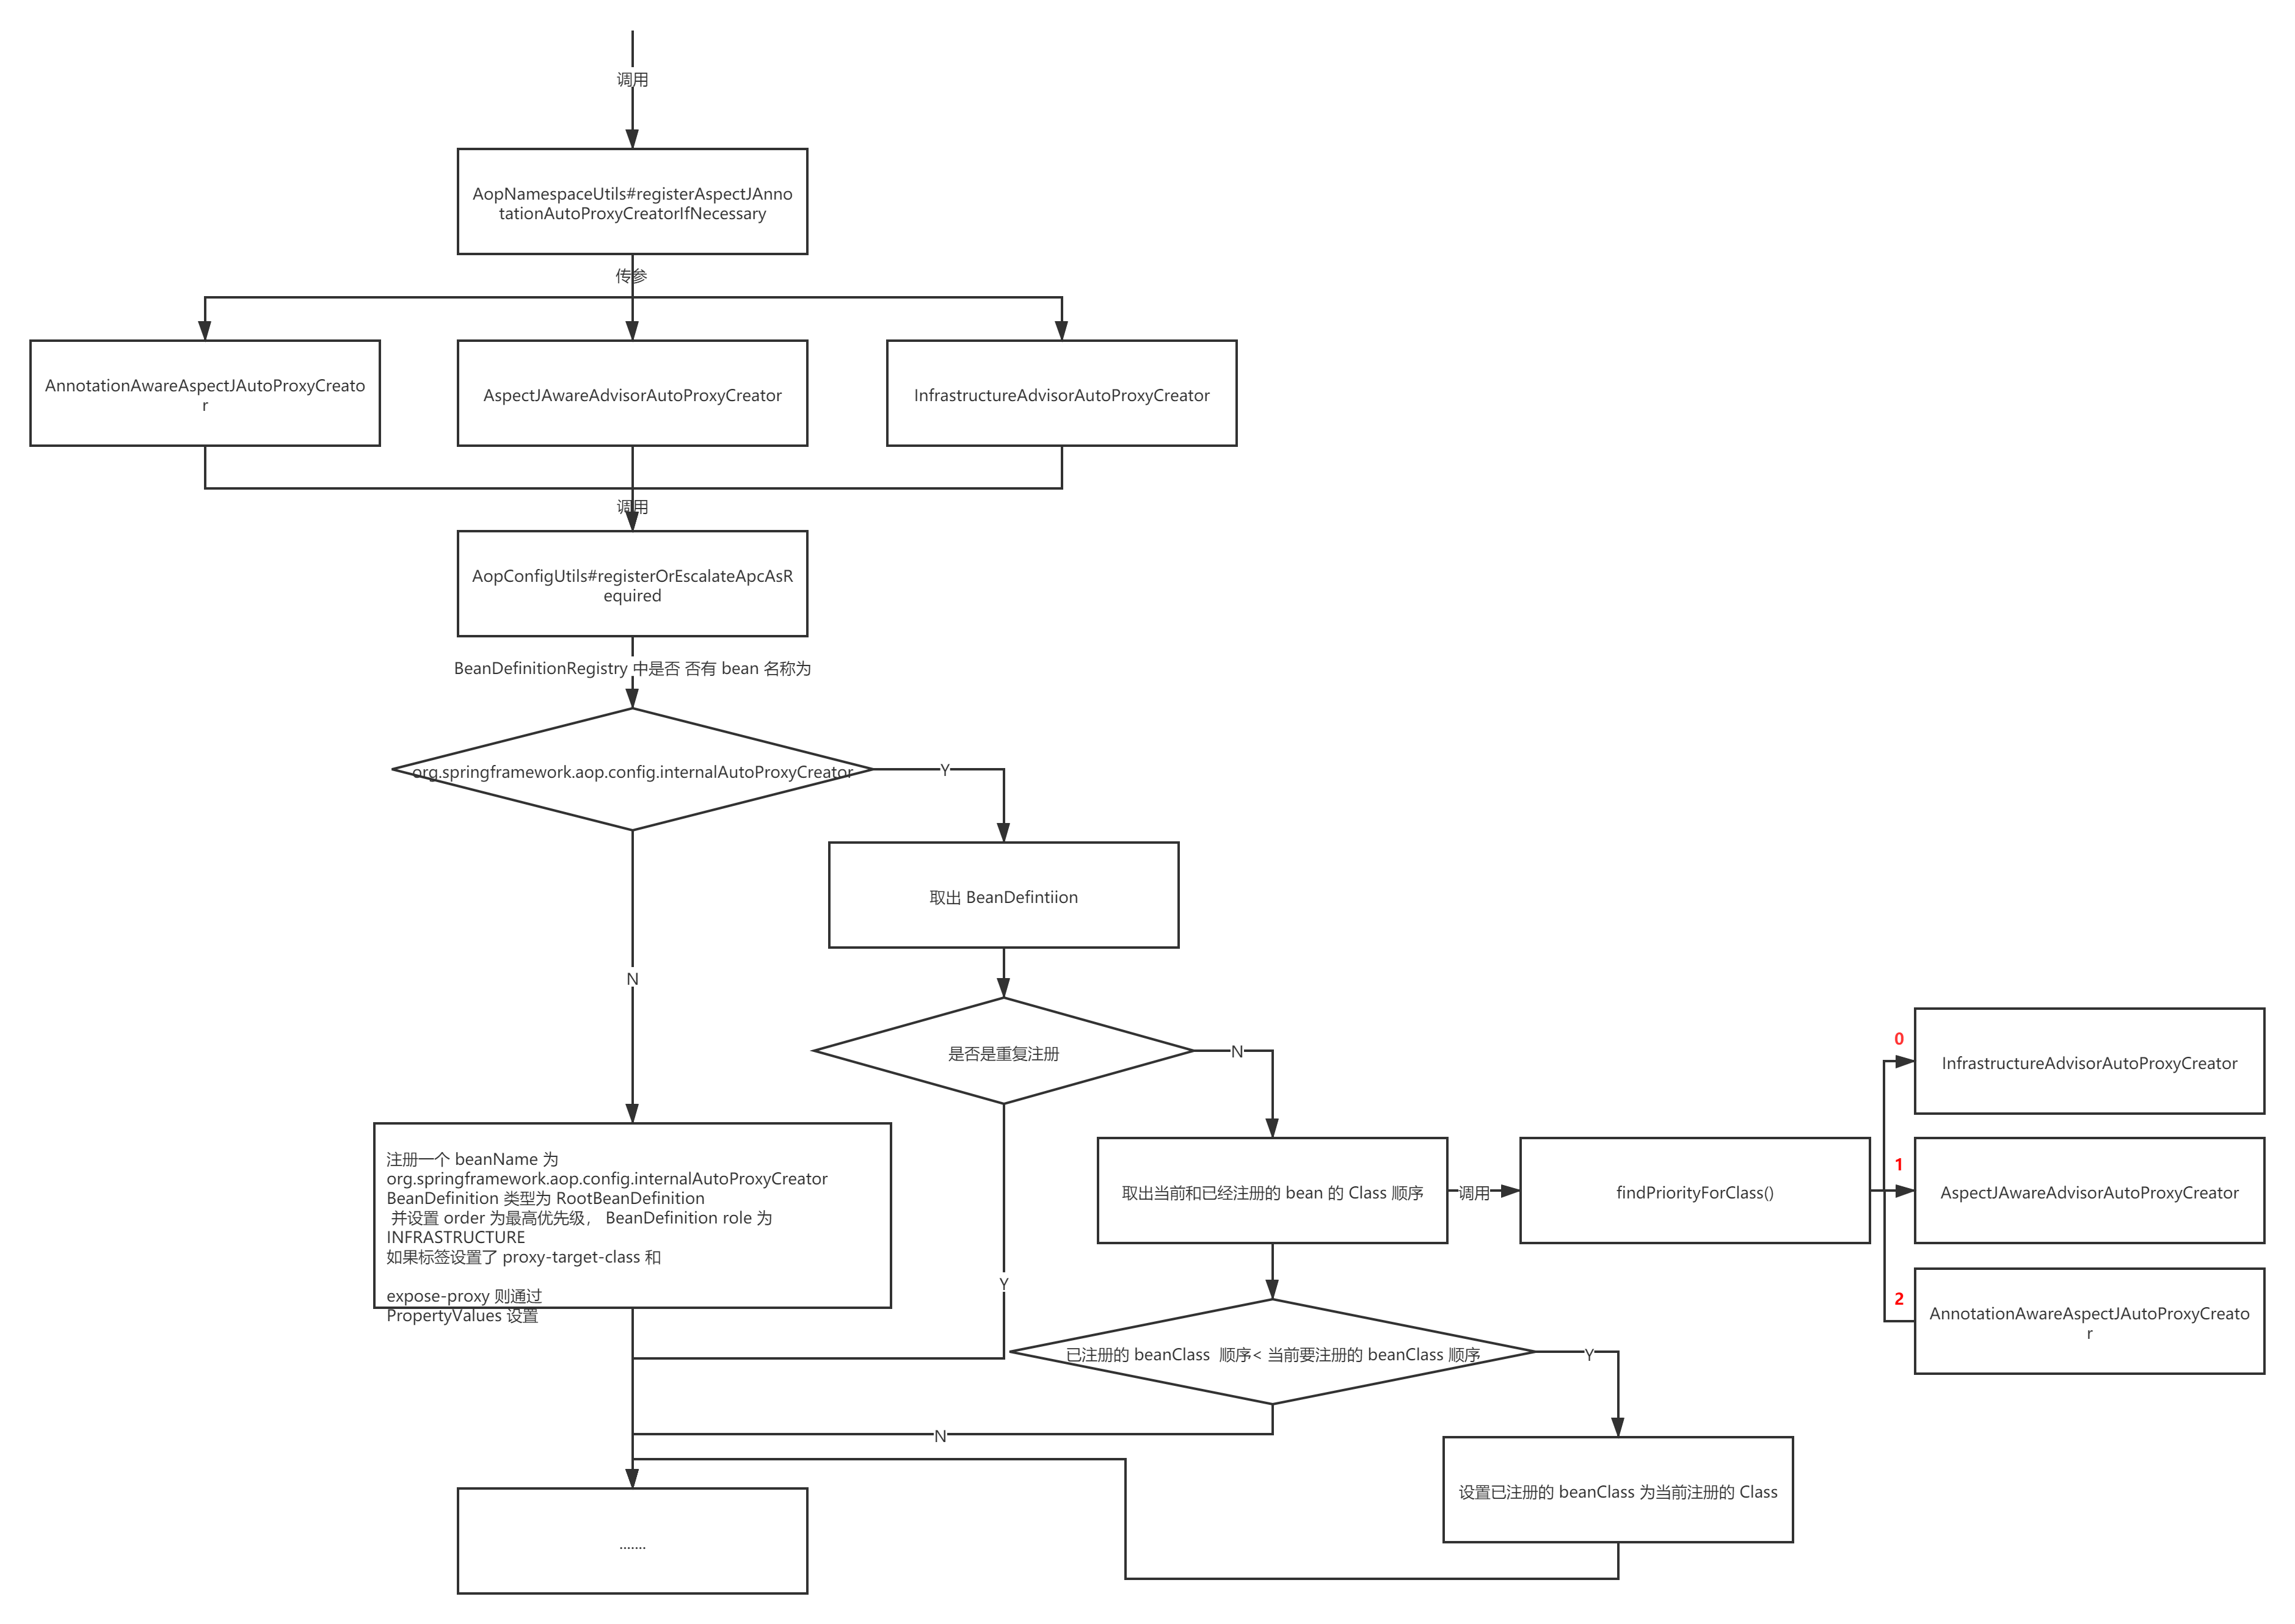
由 AspectJAutoProxyBeanDefinitionParser#parse 方法进行解析
public BeanDefinition parse(Element element, ParserContext parserContext) {

	// 通过 BeanDefinitionRegistry 注册一个
	// bean 名称为 org.springframework.aop.config.internalAutoProxyCreator
	// bean 类为 AnnotationAwareAspectJAutoProxyCreator
	// BeanDefinition 类型的  RootBeanDefinition,
	// 并设置 order 为最高优先级, BeanDefinition role 为 INFRASTRUCTURE
	// 如果标签设置了 proxy-target-class 和  expose-proxy 则通过 PropertyValues 设置
	AopNamespaceUtils.registerAspectJAnnotationAutoProxyCreatorIfNecessary(parserContext, element);
	extendBeanDefinition(element, parserContext);
	return null;
}
具体流程如图:参数是 AnnotationAwareAspectJAutoProxyCreator

解析 <aop:config /> 标签
由
ConfigBeanDefinitionParser#parse()方法进行解析
public BeanDefinition parse(Element element, ParserContext parserContext) {
	// 根据标签名 aop:config 新建一个 CompositeComponentDefinition 实例,然后放入双端队列头部
	CompositeComponentDefinition compositeDef =
			new CompositeComponentDefinition(element.getTagName(), parserContext.extractSource(element));
	parserContext.pushContainingComponent(compositeDef);
	// 通过 BeanDefinitionRegistry 注册一个
	// bean 名称为 org.springframework.aop.config.internalAutoProxyCreator
	// bean 类为 AspectJAwareAdvisorAutoProxyCreator
	// BeanDefinition 类型的 BeanComponentDefinition 的 RootBeanDefinition,
	// 并设置 order 为最高优先级, BeanDefinition role 为 INFRASTRUCTURE
	// 如果标签设置了 proxy-target-class 和  expose-proxy 则通过 PropertyValues 设置
	configureAutoProxyCreator(parserContext, element);

	List<Element> childElts = DomUtils.getChildElements(element);
	for (Element elt: childElts) {
		String localName = parserContext.getDelegate().getLocalName(elt);
		if (POINTCUT.equals(localName)) {
			// 解析子标签 <aop:pointcut/>
			parsePointcut(elt, parserContext);
		}
		else if (ADVISOR.equals(localName)) {
			// 解析子标签 <aop:advisor/>
			parseAdvisor(elt, parserContext);
		}
		else if (ASPECT.equals(localName)) {
			// 解析子标签 <aop:aspect/>
			parseAspect(elt, parserContext);
		}
	}

	parserContext.popAndRegisterContainingComponent();
	return null;
}
注册 <aop:config /> 标签流程如下图,参数为 AspectJAwareAdvisorAutoProxyCreator
解析 <aop:config /> 子标签
解析 <aop:pointcut/> 标签
private AbstractBeanDefinition parsePointcut(Element pointcutElement, ParserContext parserContext) {
	// 获取 pointcut 标签里面的 id 元素属性值值
	String id = pointcutElement.getAttribute(ID);
	// 获取 pointcut 标签里面的 expression 元素属性值值
	String expression = pointcutElement.getAttribute(EXPRESSION);

	AbstractBeanDefinition pointcutDefinition = null;

	try {
		// 入栈(在 config 标签里面,解析时候入栈,解析完出栈)
		this.parseState.push(new PointcutEntry(id));
		// 定义一个 RootBeanDefinition,beanClass 为 AspectJExpressionPointcut
		// bean 作用域为原型,是合成 bean,添加 expression 属性。
		pointcutDefinition = createPointcutDefinition(expression);
		// 设置来源
		pointcutDefinition.setSource(parserContext.extractSource(pointcutElement));
		// 注册 beanDefinition,如果 pointcut 标签设置了 id 属性,beanName 就是指定 id 的值,
		// 否则由 BeanNameGenerator 生成
		String pointcutBeanName = id;
		if (StringUtils.hasText(pointcutBeanName)) {
			parserContext.getRegistry().registerBeanDefinition(pointcutBeanName, pointcutDefinition);
		}
		else {
			pointcutBeanName = parserContext.getReaderContext().registerWithGeneratedName(pointcutDefinition);
		}
		// 嵌套设置(config 标签是父标签)
		parserContext.registerComponent(
				new PointcutComponentDefinition(pointcutBeanName, pointcutDefinition, expression));
	}
	finally {
		// 出栈
		this.parseState.pop();
	}

	return pointcutDefinition;
}
总结
解析 pointcut 标签就是往 BeanDefinitonRegistry 注册一个 RootBeanDefinitiion(不需要再经过合并阶段),并设置了 beanDefinition 中的 beanName 为 pointcut 标签 id 属性值、beanClass 为AspectJExpressionPointcut、 scope 为 prototype、synthetic 为 true,beanDefinition 中添加了 expression 属性。
解析 <aop:advisor/> 标签
private void parseAdvisor(Element advisorElement, ParserContext parserContext) {
	// 定义一个 RootBeanDefinition,beanClass 为 DefaultBeanFactoryPointcutAdvisor
	// 添加属性名 adviceBeanName 属性值为 RuntimeBeanNameReference( 标签里面的 advice-ref 属性值   <aop:advisor advice-ref=/>)
	// 如果 <aop:advisor/> 设置了 order 属性,则 添加属性名 order 属性值为 order 属性值
	AbstractBeanDefinition advisorDef = createAdvisorBeanDefinition(advisorElement, parserContext);
	String id = advisorElement.getAttribute(ID);

	try {
		this.parseState.push(new AdvisorEntry(id));
		String advisorBeanName = id;
		// 注册 beanDefinition,如果 advisor 标签设置了 id 属性,beanName 就是指定 id 的值,
		// 否则由 BeanNameGenerator 生成
		if (StringUtils.hasText(advisorBeanName)) {
			parserContext.getRegistry().registerBeanDefinition(advisorBeanName, advisorDef);
		}
		else {
			advisorBeanName = parserContext.getReaderContext().registerWithGeneratedName(advisorDef);
		}
		// 解析关联的 pointcut,如果标签 advisor 里面关联的 pointcut
		// 则会 定义一个 RootBeanDefinition,beanClass 为 AspectJExpressionPointcut
		// bean 作用域为原型,是合成 bean,添加 expression 属性。
		// 如果关联的是 pointcut-ref 获取里面的属性值
		Object pointcut = parsePointcutProperty(advisorElement, parserContext);
		// 添加属性,属性名为: pointcut,属性值根据 advisor 里面的标签值不同
		// 如果是 pointcut 则添加属性值类型是 BeanDefinition
		// 如果是 pointcut-ref 则添加属性值类型是 RuntimeBeanReference
		if (pointcut instanceof BeanDefinition) {
			advisorDef.getPropertyValues().add(POINTCUT, pointcut);
			parserContext.registerComponent(
					new AdvisorComponentDefinition(advisorBeanName, advisorDef, (BeanDefinition) pointcut));
		}
		else if (pointcut instanceof String) {
			advisorDef.getPropertyValues().add(POINTCUT, new RuntimeBeanReference((String) pointcut));
			parserContext.registerComponent(
					new AdvisorComponentDefinition(advisorBeanName, advisorDef));
		}
	}
	finally {
		this.parseState.pop();
	}
}
总结
解析 advisor 标签就是往 BeanDefinitonRegistry 注册一个 RootBeanDefinitiion(不需要再经过合并阶段),并设置了 beanDefinition 中的 beanName 为 advisor 标签 id 属性值(或根据 BeanNameGenerator 自动生成)、beanClass 为 DefaultBeanFactoryPointcutAdvisor,beanDefinition 中添加了 adviceBeanName 或者 order 属性和 pointcut 属性。
解析 <aop:aspect/> 标签
<aop:aspect id="AspectXml" ref="aspectXml" order="20">
     <!-- Introduction -->
     <aop:declare-parents types-matching="com.wenhai.spring.aop.features.*"
                          implement-interface="com.wenhai.spring.aop.features.service.EchoService"
                          delegate-ref="echoService"/>

     <!-- 配置切点,只支持 AspectJ 表达式语法 -->
     <aop:pointcut id="innerAnyPublishMethod" expression="execution(public * *(..))"/>
     <!-- 前置通知 -->
     <aop:before method="beforeAnyPublicMethod" pointcut-ref="outerAnyPublishMethod"/>
     <!-- 后置通知 -->
     <aop:after-returning method="afterReturningAnyPublicMethod" pointcut-ref="innerAnyPublishMethod"/>
     <!-- 异常通知 -->
     <aop:after-throwing method="afterThrowingAnyPublicMethod" pointcut-ref="innerAnyPublishMethod"/>
     <!-- 最终通知 -->
     <aop:after method="afterAnyPublicMethod" pointcut-ref="innerAnyPublishMethod"/>
     <!-- 环绕通知 -->
     <aop:around method="aroundAnyPublicMethod" pointcut-ref="outerAnyPublishMethod"/>
     <!-- 环绕通知 -->
     <aop:around method="aroundAnyPublicMethod" pointcut="execution(public * *(..))"/>
 </aop:aspect>
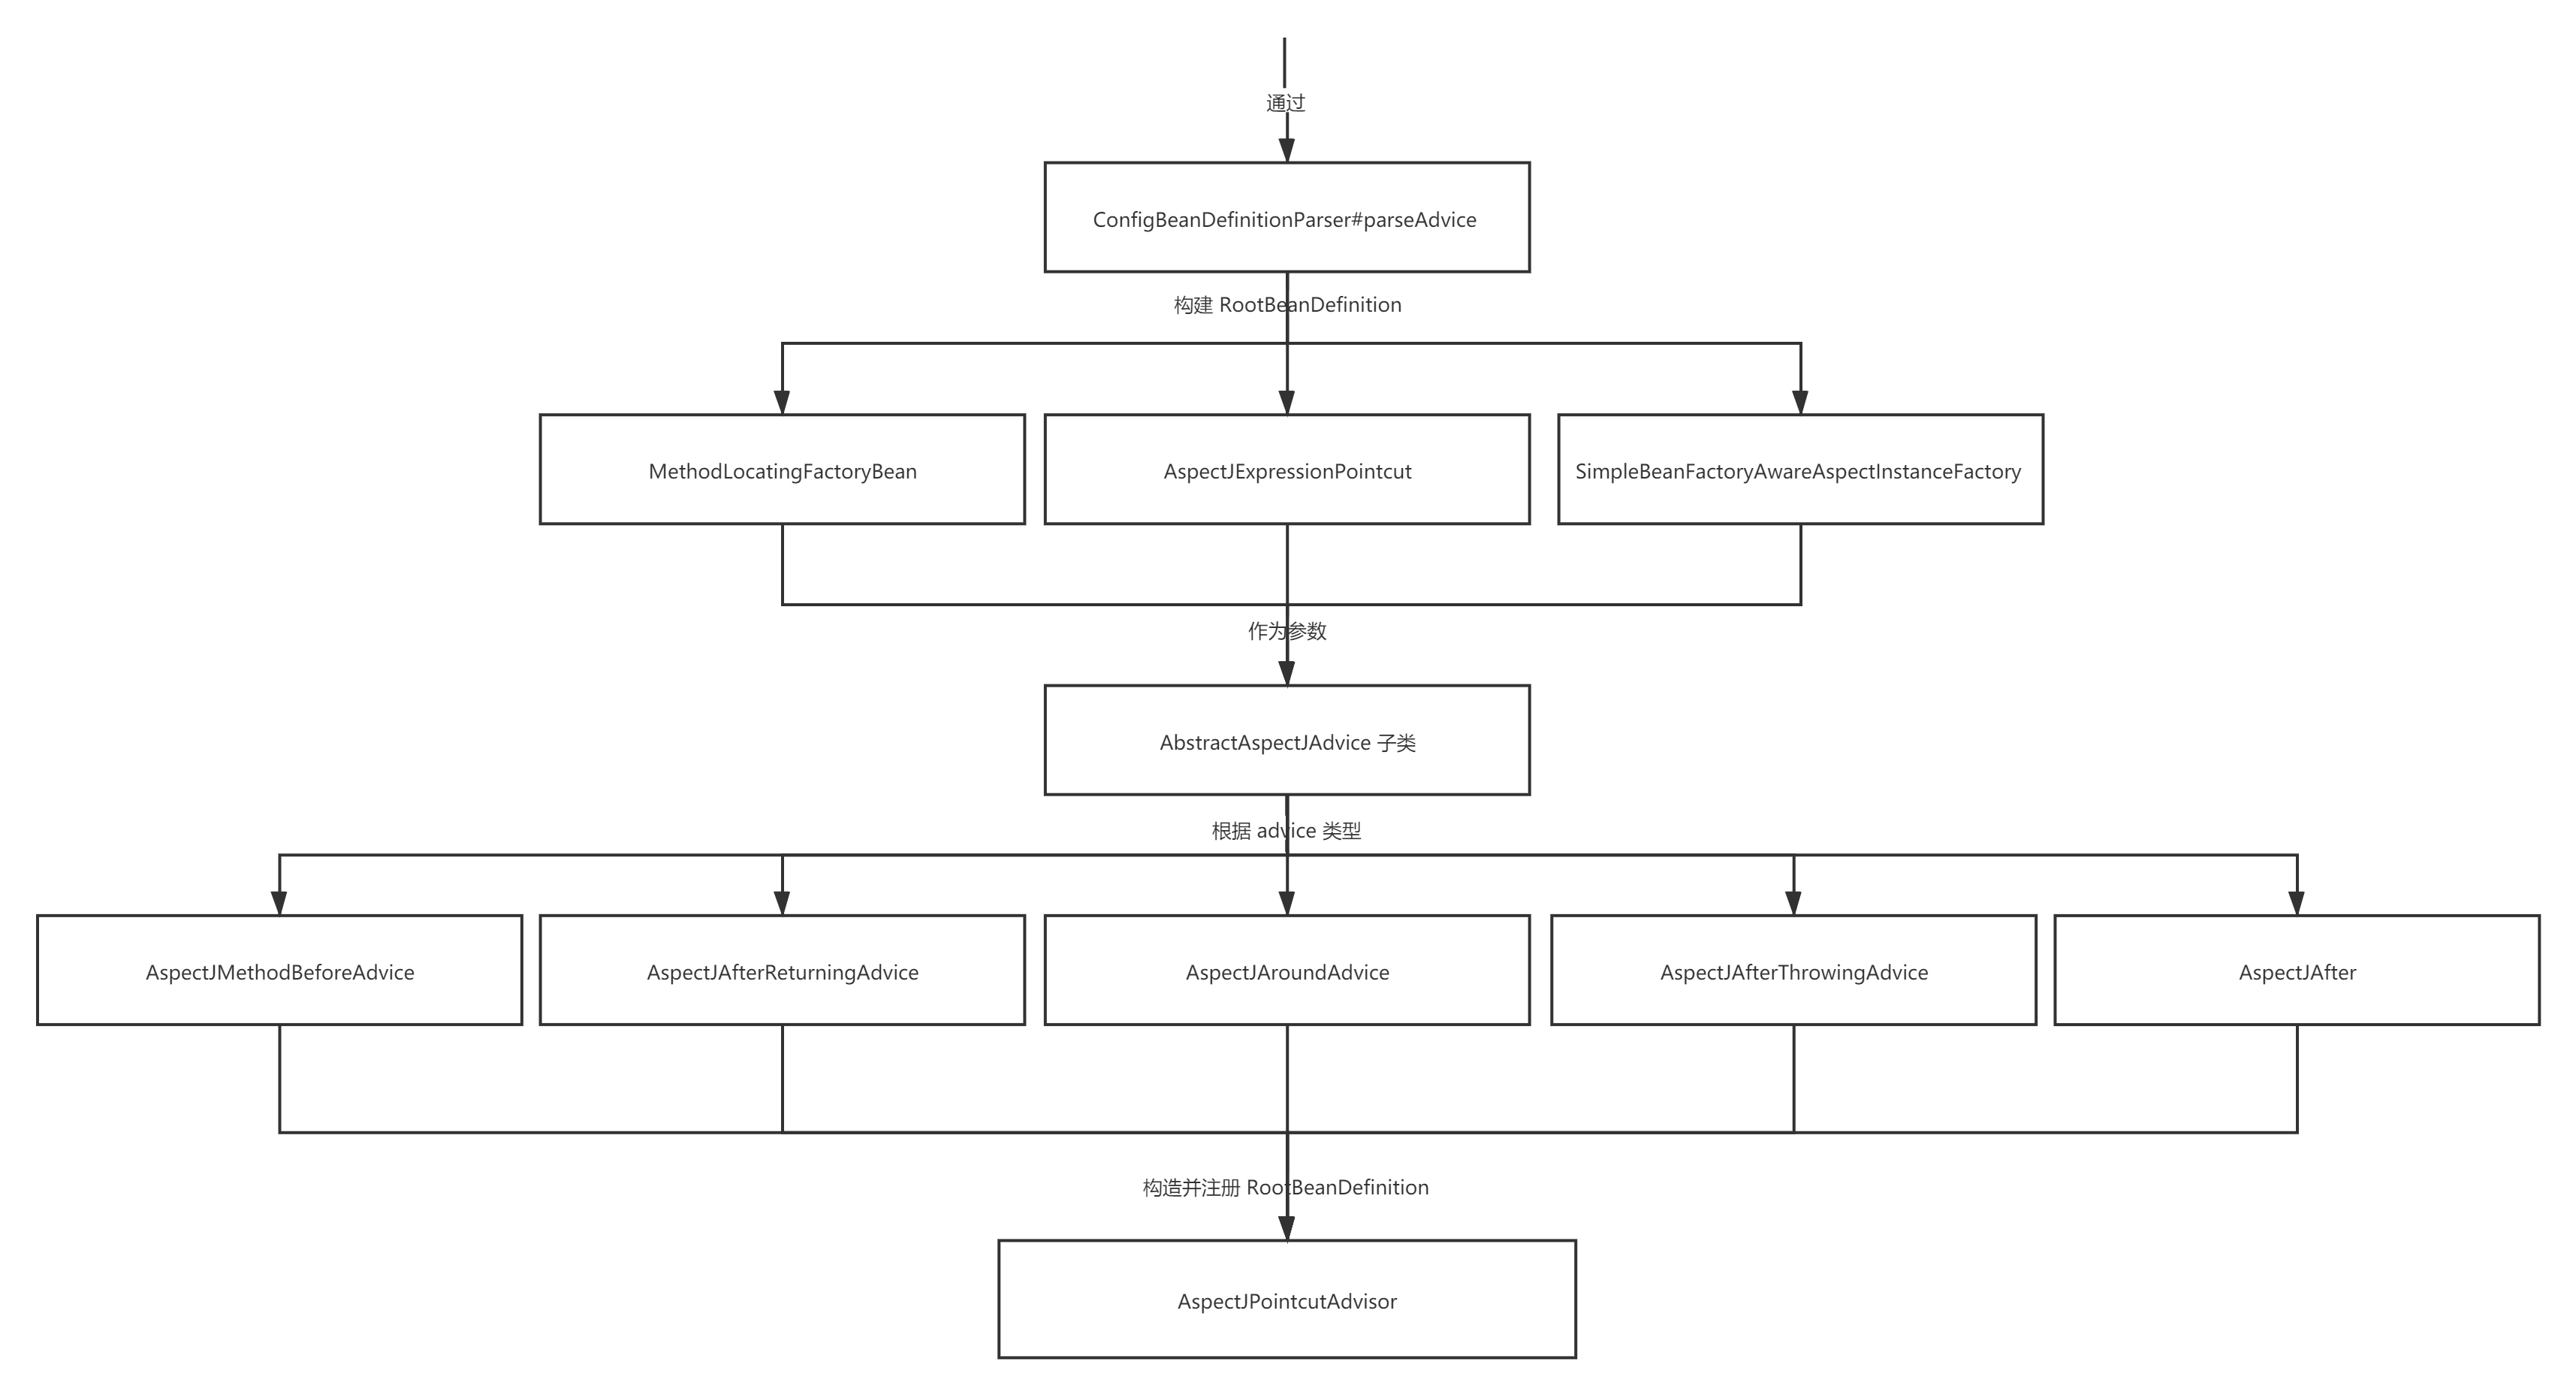
private void parseAspect(Element aspectElement, ParserContext parserContext) {
	 // 对着上面 xml 配置
	 // 获取 aspect 标签 id 属性值
	String aspectId = aspectElement.getAttribute(ID);
	// 获取 aspect 标签 ref 属性值(切面类)
	String aspectName = aspectElement.getAttribute(REF);

	try {
		this.parseState.push(new AspectEntry(aspectId, aspectName));
		List<BeanDefinition> beanDefinitions = new ArrayList<>();
		List<BeanReference> beanReferences = new ArrayList<>();
		// aspect 子标签 declare-parents
		List<Element> declareParents = DomUtils.getChildElementsByTagName(aspectElement, DECLARE_PARENTS);
		for (int i = METHOD_INDEX; i < declareParents.size(); i++) {
			Element declareParentsElement = declareParents.get(i);
			// 根据 declare-parents 标签中的 types-matching、implement-interface、default-impl 或者 delegate-ref
			// 构建一个 DeclareParentsAdvisor类的 RootBeanDefition
			beanDefinitions.add(parseDeclareParents(declareParentsElement, parserContext));
		}

		// 解析 advice 子标签
		NodeList nodeList = aspectElement.getChildNodes();
		// 控制 aspect-ref 属性。
		boolean adviceFoundAlready = false;
		for (int i = 0; i < nodeList.getLength(); i++) {
			Node node = nodeList.item(i);
			// 判断子标签是不是 advice 类型
			if (isAdviceNode(node, parserContext)) {
				if (!adviceFoundAlready) {
					adviceFoundAlready = true;
					if (!StringUtils.hasText(aspectName)) {
						parserContext.getReaderContext().error(
								"<aspect> tag needs aspect bean reference via 'ref' attribute when declaring advices.",
								aspectElement, this.parseState.snapshot());
						return;
					}
					// 添加 apsect-ref 中引用的 aspect 类的 RuntimeBeanReference
					beanReferences.add(new RuntimeBeanReference(aspectName));
				}
				// 构建 AspectJPointcutAdvisor 类的 RootBeanDefinition(详情见下流程图)
				// AspectJPointcutAdvisor 构造器是 AspectJPointcutAdvisor 类
				// 所以解析 advice 标签就是构造 AspectJPointcutAdvisor 类的 BeanDefinition
				AbstractBeanDefinition advisorDefinition = parseAdvice(
						aspectName, i, aspectElement, (Element) node, parserContext, beanDefinitions, beanReferences);
				beanDefinitions.add(advisorDefinition);
			}
		}
		// 构建一个 AspectComponentDefinition 对象然后入队
		AspectComponentDefinition aspectComponentDefinition = createAspectComponentDefinition(
				aspectElement, aspectId, beanDefinitions, beanReferences, parserContext);
		parserContext.pushContainingComponent(aspectComponentDefinition);

		List<Element> pointcuts = DomUtils.getChildElementsByTagName(aspectElement, POINTCUT);
		for (Element pointcutElement : pointcuts) {
			// 解析 pointcut 子标签,与上述 pointcut 标签解析过程一样
			parsePointcut(pointcutElement, parserContext);
		}

		parserContext.popAndRegisterContainingComponent();
	}
	finally {
		this.parseState.pop();
	}
}
总结
解析 aspect 标签就是往 BeanDefinitonRegistry 注册各类 RootBeanDefinitiion(不需要再经过合并阶段)。根据 adivce 标签的类型以及标签属性不同转换不同的 AbstractAspectJAdvice 子类,然后进行属性填充。最后封装成 AspectJPointcutAdvisor 类型的 RootBeanDefinition 注册到容器里。


 342
342


 被折叠的 条评论
为什么被折叠?
被折叠的 条评论
为什么被折叠?
 到【灌水乐园】发言


