


 本文详细介绍如何在SpringBoot框架中整合SSM(Spring+SpringMVC+MyBatis),包括搭建步骤、配置过程及常见错误解决方法,适用于初学者快速上手。
搭建SpringBoot整合ssm框架
使用工具:idea jdk:1.8
步骤一:通过spring Initializr创建springboot
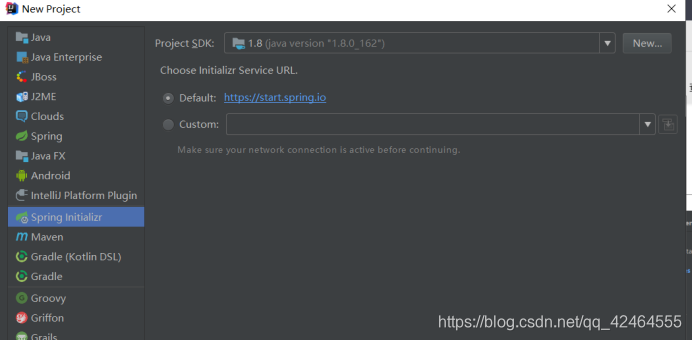
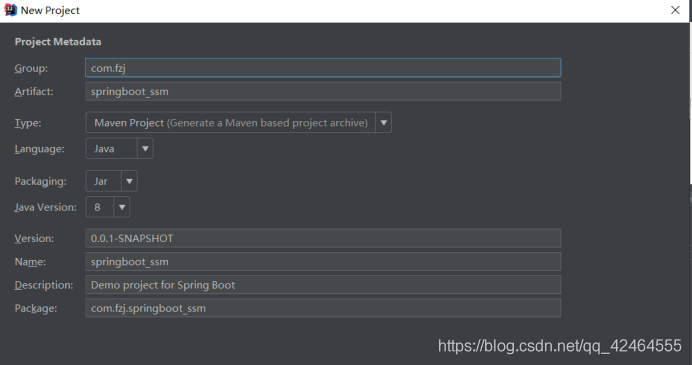
点击net下一步。
选择web、Template Engines、SQL的选项见下图右侧
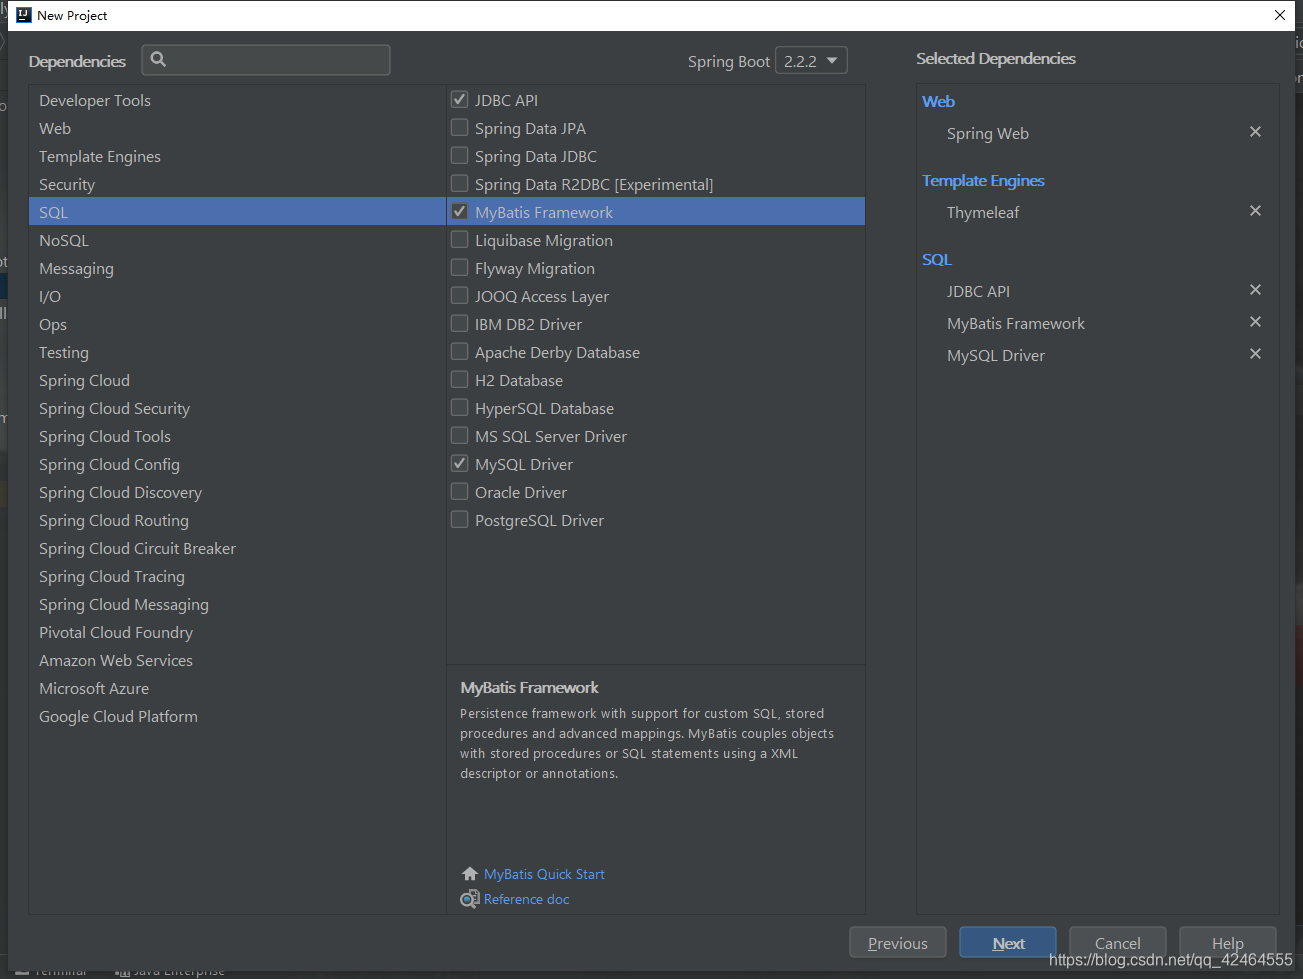
点击Net完成配置,如下图:
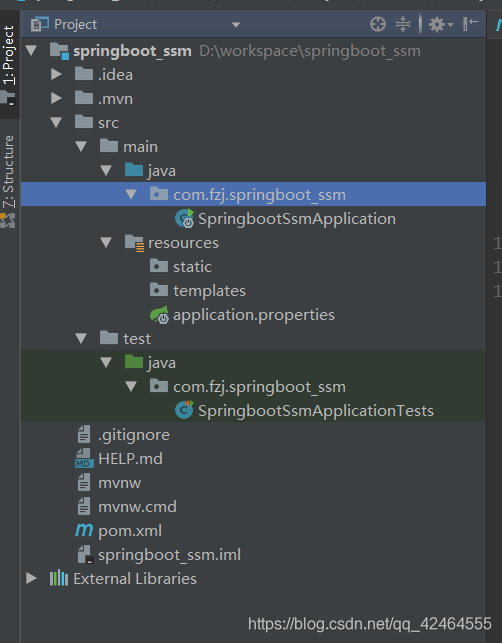
步骤二:sources包下默认配置文件application.properties,可以根据个人喜好删除application.properties后,更改application.yml配置文件
填写yml配置(主要与数据库相关并且与端口相关的)
spring:
  datasource:
    driver-class-name: com.mysql.cj.jdbc.Driver
    url: jdbc:mysql://localhost:3306/mysql_test?useUnicode=true&characterEncoding=UTF-8&autoReconnect=true&failOverReadOnly=false&serverTimezone=UTC
    username: root
    password: root

server:
  port: 8070
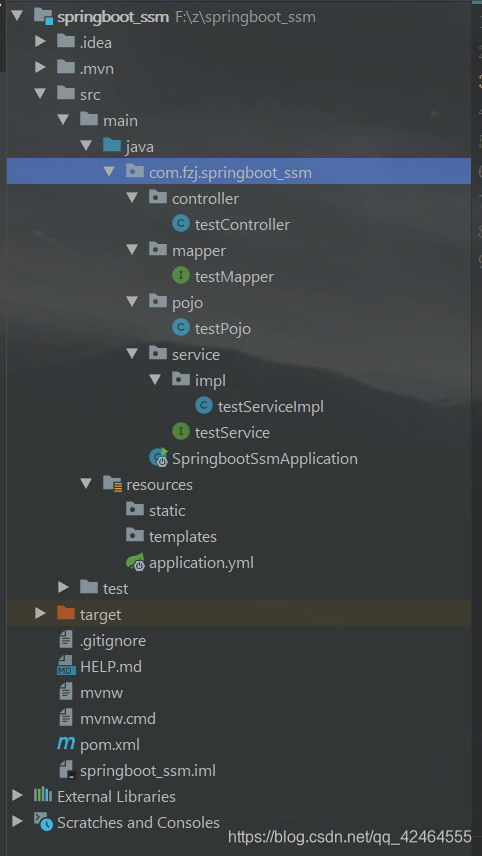
步骤三:分别在com.fzj.springboot_ssm文件下创建controller、service、mapper三层架构。编写相关的接口和实现类,以及实体类。如下图。
3.1:controller类
package com.fzj.springboot_ssm.controller;

import com.fzj.springboot_ssm.pojo.testPojo;
import com.fzj.springboot_ssm.service.testService;
import org.springframework.beans.factory.annotation.Autowired;
import org.springframework.stereotype.Controller;
import org.springframework.web.bind.annotation.RequestMapping;
import org.springframework.web.bind.annotation.ResponseBody;
import org.springframework.web.bind.annotation.RestController;

import java.util.List;

@Controller
@RequestMapping("/test_info")
public class testController {

    @Autowired
    public testService testService;
    @RequestMapping("/findAll")
    @ResponseBody
    public List<testPojo> findAll() throws Exception{
        List<testPojo> testPojos=testService.findll();
        return testPojos;
    }
}
3.2:service层没有业务逻辑,直接写接口和相应实现类调用方法即可。
package com.fzj.springboot_ssm.service;

import com.fzj.springboot_ssm.pojo.testPojo;

import java.util.List;

public interface testService {
    public List<testPojo> findll() throws Exception;
}
service实现类:
package com.fzj.springboot_ssm.service.impl;

import com.fzj.springboot_ssm.mapper.testMapper;
import com.fzj.springboot_ssm.pojo.testPojo;
import com.fzj.springboot_ssm.service.testService;
import org.springframework.beans.factory.annotation.Autowired;
import org.springframework.stereotype.Service;

import java.util.List;

@Service
public class testServiceImpl implements testService {
    @Autowired
    public testMapper testMapper;

    @Override
    public List<testPojo> findll() throws Exception {
        return testMapper.findAll();
    }
}
3.3:mapper层接口:
package com.fzj.springboot_ssm.mapper;

import com.fzj.springboot_ssm.pojo.testPojo;
import org.apache.ibatis.annotations.Select;

import java.util.List;

public interface testMapper {

    @Select("select * from user")
    List<testPojo> findAll() throws Exception;
}
3.4:实体类,pojo类:
package com.fzj.springboot_ssm.pojo;

public class testPojo {
    private Integer id;
    private String username;
    private String password;

    public Integer getId() {
        return id;
    }

    public void setId(Integer id) {
        this.id = id;
    }

    public String getUsername() {
        return username;
    }

    public void setUsername(String username) {
        this.username = username;
    }

    public String getPassword() {
        return password;
    }

    public void setPassword(String password) {
        this.password = password;
    }
}
步骤四:最后一把尤其关键,需要在springbooot启动类添加注解,否则springboot扫描不到mapper包
package com.fzj.springboot_ssm;

import org.mybatis.spring.annotation.MapperScan;
import org.springframework.boot.SpringApplication;
import org.springframework.boot.autoconfigure.SpringBootApplication;

@MapperScan("com.fzj.springboot_ssm.mapper")
@SpringBootApplication
public class SpringbootSsmApplication {

    public static void main(String[] args) {
        SpringApplication.run(SpringbootSsmApplication.class, args);
    }

}
步骤五:到此项目已经配置完成!
点击IDEA绿色小三角形,运行项目!浏览器输入访问:127.0.0.1:8070/test_info/findAll
以下是我在整合中遇到的错误:仅供借鉴!
注意:
有时候启动的时候可能会报错,但是一定要耐心看清报的错误,
查看mysql服务是否正常开启
查看URL是不是少配置,会不会有时区的问题;
会不会是数据库回收了连接,系统的缓冲池不知道继续使用被回收的缓冲池导致的
查看会不会是配置的mysql驱动包的版本太低
错误代码:原因,mysql的驱动包太低
MySQLNonTransientConnectionException: Could not create connction to database server无法创建数据
错误代码:
org.thymeleaf.exceptions.TemplateInputException: Error resolving template "xxx/xxx", template might not exist or might not be accessible by any of the configured Template Resolvers
	at org.thymeleaf.engine.TemplateManager.resolveTemplate(TemplateManager.java:865) ~[thymeleaf-3.0.2.RELEASE.jar:3.0.2.RELEASE]
	at org.thymeleaf.engine.TemplateManager.parseAndProcess(TemplateManager.java:608) ~[thymeleaf-3.0.2.RELEASE.jar:3.0.2.RELEASE]
	at org.thymeleaf.TemplateEngine.process(TemplateEngine.java:1087) [thymeleaf-3.0.2.RELEASE.jar:3.0.2.RELEASE]
	at org.thymeleaf.TemplateEngine.process(TemplateEngine.java:1061) [thymeleaf-3.0.2.RELEASE.jar:3.0.2.RELEASE]
遇到原因:在controller层请求处理完了返回时,没有使用@ResponseBody而返回了非json格式
这种情况下返回的数据thymeleaf模板无法解析,直接报错。
解决方案:可以在你所请求的方法上面加一个@ResponseBody即可。
或者:将@Controller换成@RestController,不过需要注意有没有其他的方法返回了html页面,会导致返回的不是页面而是字符串
借鉴地址:https://www.cnblogs.com/No2-explorer/p/10993934.html。感谢!!


 1万+
1万+

 被折叠的 条评论
为什么被折叠?
被折叠的 条评论
为什么被折叠?
 到【灌水乐园】发言


