


一,今日大纲
Auto Mapping
单表实现
(
别名方式
)
<resultMap>
实现单表配置
单个对象关联查询
(N+1,
外连接
)
集合对象关联查询
注解开发
MyBatis
运行原理
二,Mybatis实现多表查询
1.Mybatis
实现多表查询方式
1.1
业务装配
.
对两个表编写单表查询语句
,
在业务
(Service)
把查询
的两个结果进行关联
.
1.2
使用
Auto Mapping
特性
,
在实现两表联合查询时通过别名完成
映射
.
1.3
使用
MyBatis
的
<resultMap>
标签进行实现
.
2.
多表查询时
,
类中包含另一个类的对象的分类
2.1
单个对象
2.2
集合对象
.
三.resultMap 标签
1. <resultMap>
标签写在
mapper.xml
中
,
由程序员控制
SQL
查询结果与实体类的映射关系
.
1.1
默认
MyBatis
使用
Auto Mapping
特性
.
2.
使用
<resultMap>
标签时
,<select>
标签不写
resultType
属性
,
而是使
用
resultMap
属性引用
<resultMap>
标签
.
3.
使用
resultMap
实现单表映射关系
3.1 mapper.xml
代码
<resultMap type="teacher" id="mymap">
    <!-- 主键使用 id 标签配置映射关系 -->
    <id column="id" property="id1" />
    <!-- 其他列使用 result 标签配置映射关系 -->
     <result column="name" property="name1"/>
</resultMap>

<select id="selAll" resultMap="mymap">
       select * from teacher
</select>
4.
使用
resultMap
实现关联单个对象
(N+1
方式
)
4.1 N+1
查询方式
,
先查询出某个表的全部信息
,
根据这个表的信息
查询另一个表的信息
.
4.2
与业务装配的区别
:
4.2.1
在
service
里面写的代码
,
由
mybatis
完成装配
4.3
实现步骤
:
4.3.1
在
Student
实现类中包含了一个
Teacher
对象
public class Student {
private int id;
 private String name;
 private int age;
 private int tid;
private Teacher teacher;
4.3.3
在
StudentMapper
中
4.3.3.1 <association>
装配一个对象时使用
4.3.3.2 property:
对象在类中的属性名
4.3.3.3 select:
通过哪个查询查询出这个对象的信息
4.3.3.4 column:
把当前表的哪个列的值做为参数传递给另
一个查询
4.3.3.5
大前提使用
N+1
方式
.
时如果列名和属性名相同可
以不配置
,
使用
Automapping
特性
.
但是
mybatis
默认只会给列
专配一次
<resultMap type="student" id="stuMap">
      <id property="id" column="id"/>
      <result property="name" column="name"/>
      <result property="age" column="age"/>
      <result property="tid" column="tid"/>
       <!-- 如果关联一个对象 -->
      <association property="teacher" select="com.bjsxt.mapper.TeacherMapper.selById" column="tid">
      </association>
</resultMap>
 <select id="selAll" resultMap="stuMap">
          select * from student
</select>
4.3.3.6 把上面代码简化成
<resultMap type="student" id="stuMap">
       <result column="tid" property="tid"/>
      <!-- 如果关联一个对象 -->
       <association property="teacher" select="com.bjsxt.mapper.TeacherMapper.selById" column="tid">
       </association>
</resultMap>
<select id="selAll" resultMap="stuMap">
     select * from student
 </select>
5.
使用
resultMap
实现关联单个对象
(
联合查询方式
)
5.1
只需要编写一个
SQL,
在
StudentMapper
中添加下面效果
5.1.1 <association/>
只要专配一个对象就用这个标签
5.1.2
此时把
<association/>
小的
<resultMap>
看待
5.1.3 javaType
属性
:<association/>
专配完后返回一个什么类型
的对象
.
取值是一个类
(
或类的别名
)
<resultMap type="Student" id="stuMap1">
        <id column="sid" property="id"/>
        <result column="sname" property="name"/>
        <result column="age" property="age"/>
        <result column="tid" property="tid"/>
       <association property="teacher"  javaType="Teacher" >
             <id column="tid" property="id"/>
             <result column="tname" property="name"/>
 </association>
 </resultMap>
 <select id="selAll1" resultMap="stuMap1">
            select s.id sid,s.name sname,age age,t.id tid,t.name tname
                FROM student s left outer join teacher t on s.tid=t.id
 </select>
6.N+1
方式和联合查询方式对比
6.1 N+1:
需求不确定时
.
6.2
联合查询
:
需求中确定查询时两个表一定都查询
.
7.N+1
名称由来
7.1
举例
:
学生中有
3
条数据
7.2需求
:
查询所有学生信息级授课老师信息
7.3需要执行的
SQL
命令
7.3.1查询全部学生信息
:select * from
学生
7.3.2执行
3
遍
select * from
老师
where id=
学生的外键
7.4
使用多条
SQl
命令查询两表数据时
,
如果希望把需要的数据都
查询出来
,
需要执行
N+1
条
SQl
才能把所有数据库查询出来
.
7.5
缺点
:
7.5.1
效率低
7.6
优点
:
7.6.1
如果有的时候不需要查询学生是同时查询老师
.
只需要
执行一个
select * from student;
7.7
适用场景
:
有的时候需要查询学生同时查询老师
,
有的时候只
需要查询学生
.
7.8
如果解决
N+1
查询带来的效率低的问题
7.8.1
默认带的前提
:
每次都是两个都查询
.
7.8.2使用两表联合查询
三.使用<resultMap>查询关联集合对象(N+1)
1.
在
Teacher
中添加
List<Student>
public class Teacher {
 private int id;
private String name;
private List<Student> list;
2.
在
StudentMapper.xml
中添加通过
tid
查询
<select id="selByTid" parameterType="int" resultType="student">
       select * from student where tid=#{0}
</select>
3.
在
TeacherMapper.xml
中添加查询全部
3.1 <collection/>
当属性是集合类型时使用的标签
<resultMap type="teacher" id="mymap">
       <id column="id" property="id"/>
       <result column="name" property="name"/>
       <collection property="list" select="com.bjsxt.mapper.StudentMapper.selByTid" column="id">
       </collection>
</resultMap> <select id="selAll" resultMap="mymap">
       select * from teacher
</select>四.使用<resultMap>实现加载集合数据(联合查询方式)
1.
在
teacherMapper.xml
中添加
1.1 mybatis
可以通过主键判断对象是否被加载过
.
1.2
不需要担心创建重复
Teacher
<resultMap type="teacher" id="mymap1">
        <id column="tid" property="id"/>
        <result column="tname" property="name"/>
        <collection property="list" ofType="student" >
              <id column="sid" property="id"/>
             <result column="sname" property="name"/>
             <result column="age" property="age"/>
             <result column="tid" property="tid"/>
        </collection>
 </resultMap>
<select id="selAll1" resultMap="mymap1">
       select t.id tid,t.name tname,s.id sid,s.name sname,age,tid
         from teacher t LEFT JOIN student s on t.id=s.tid;
</select>五.使用 Auto Mapping 结合别名实现多表查询
5.1只能使用多表联合查询方式
.
5.2要求
:
查询出的列别和属性名相同
.
5.3实现方式
5.3.1 .
在
SQL
是关键字符
,
两侧添加反单引号
<select id="selAll" resultType="student">
       select t.id `teacher.id`,t.name `teacher.name`,
              s.id id,s.name name,age,tid
              from student s LEFT JOIN teacher t on t.id=s.tid
</select>六.MyBatis 注解
1. 注解
:
为了简化配置文件
.
2.
Mybatis
的注解简化
mapper.xml
文件
.
2.1
如果涉及动态
SQL
依然使用
mapper.xml
3.mapper.xml
和注解可以共存
.
4.使用注解时
mybatis.xml
中
<mappers>
使用
4.1 <package/>
4.2 <mapper class=””/>
5.
使用注解实现
<resultMap>
功能
5.1
以
N+1
举例
5.2
在
StudentMapper
接口添加查询
@Select("select * from student where tid=#{0}")
List<Student> selByTid(int tid);
5.3
在
TeacherMapper
接口添加
5.3.1 @Results()
相当于
<resultMap>
5.3.2 @Result()
相当于
<id/>
或
<result/>
5.3.2.1 @Result(id=true)
相当与
<id/>
5.3.3 @Many()
相当于
<collection/>
5.3.4 @One()
相当于
<association/>
@Results(value={
            @Result(id=true,property="id",column="id"),
            @Result(property="name",column="name"),
            @Result(property="list",column="id",
            many=@Many(select="com.bjsxt.mapper.StudentMapper.selByTid")) })
@Select("select * from teacher")
List<Teacher> selTeacher();七.运行原理
1.运行过程中涉及到的类
1.1 Resources MyBatis
中
IO
流的工具类
1.1
加载配置文件
1.2 SqlSessionFactoryBuilder()
构建器
1.2.1
作用
:
创建
SqlSessionFactory
接口的实现类
1.3 XMLConfigBuilder MyBatis
全局配置文件内容构建器类
1.3.1
作用负责读取流内容并转换为
JAVA
代码
.
1.4 Configuration
封装了全局配置文件所有配置信息
.
1.4.1
全局配置文件内容存放在
Configuration
中
1.5 DefaultSqlSessionFactory
是
SqlSessionFactory
接口的实现类
1.6 Transaction
事务类
1.6.1
每一个
SqlSession
会带有一个
Transaction
对象
.
1.7 TransactionFactory
事务工厂
1.7.1
负责生产
Transaction
1.8 Executor MyBatis
执行器
1.8.1
作用
:
负责执行
SQL
命令
1.8.2相当于
JDBC
中
statement
对象
(
或
PreparedStatement
或
CallableStatement)
1.8.3默认的执行器
SimpleExcutor
1.8.4批量操作
BatchExcutor
1.8.5
通过
openSession(
参数控制
)
1.9 DefaultSqlSession
是
SqlSession
接口的实现类
1.10 ExceptionFactory MyBatis
中异常工厂
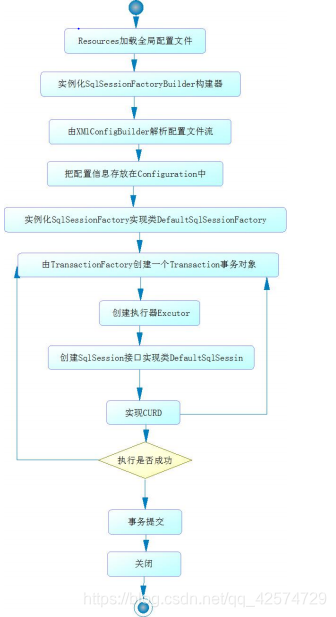
3.
文字解释
在
MyBatis
运行开始时需要先通过
Resources
加载全局配置文件
.
下面
需要实例化
SqlSessionFactoryBuilder
构建器
.
帮助
SqlSessionFactory
接
口实现类
DefaultSqlSessionFactory.
在实例化
DefaultSqlSessionFactory
之前需要先创建
XmlConfigBuilder
解析全局配置文件流
,
并把解析结果存放在
Configuration
中
.
之后把
Configuratin
传递给
DefaultSqlSessionFactory.
到此
SqlSessionFactory
工
厂创建成功
.
由
SqlSessionFactory
工厂创建
SqlSession.
每次创建
SqlSession
时
,
都需要由
TransactionFactory
创建
Transaction
对象
,
同时还需要创建
SqlSession
的执行器
Excutor,
最后实例化
DefaultSqlSession,
传递给
SqlSession
接口
.
根据项目需求使用
SqlSession
接口中的
API
完成具体的事务操作
.
如果事务执行失败
,
需要进行
rollback
回滚事务
.
如果事务执行成功提交给数据库
.
关闭
SqlSession
到此就是
MyBatis
的运行原理
.(
面试官说的
.)


 被折叠的 条评论
为什么被折叠?
被折叠的 条评论
为什么被折叠?
 到【灌水乐园】发言


