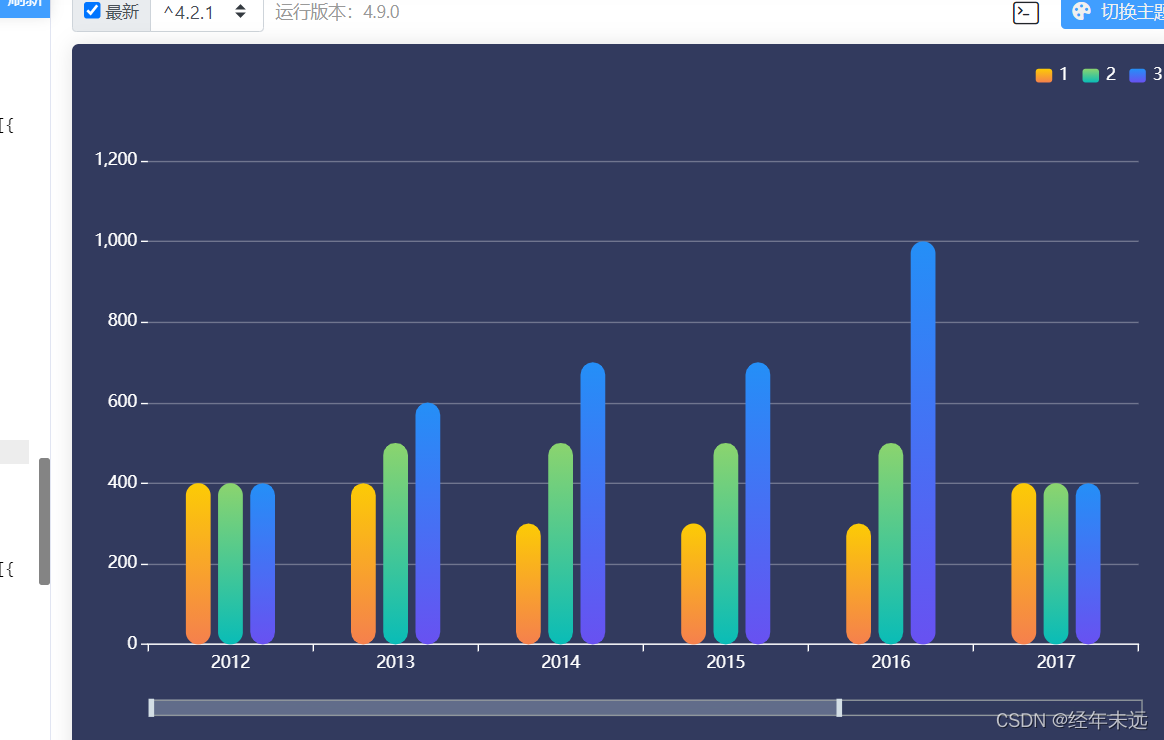
echarts实现多条柱状图并且自动播放

在这里插入图片描述

 var option = {
     backgroundColor:'#323a5e',
        tooltip: {
          trigger: 'axis',
          axisPointer: { // 坐标轴指示器,坐标轴触发有效
            type: 'shadow' // 默认为直线,可选为:'line' | 'shadow'
          }
        },
        grid: {
          left: '2%',
          right: '4%',
          bottom: '14%',
          top:'16%',
          containLabel: true
        },
         legend: {
        data: ['1', '2', '3'],
        right: 10,
        top:12,
        textStyle: {
            color: "#fff"
        },
        itemWidth: 12,
        itemHeight: 10,
        // itemGap: 35
    },
        xAxis: {
          type: 'category',
          data: ['2012','2013','2014','2015','2016','2017','2018','2019'],
          axisLine: {
            lineStyle: {
              color: 'white'

            }
          },
          axisLabel: {
            // interval: 0,
            // rotate: 40,
            textStyle: {
              fontFamily: 'Microsoft YaHei'
            }
          },
        },

        yAxis: {
          type: 'value',
          max:'1200',
          axisLine: {
            show: false,
            lineStyle: {
              color: 'white'
            }
          },
          splitLine: {
            show: true,
            lineStyle: {
              color: 'rgba(255,255,255,0.3)'
            }
          },
          axisLabel: {}
        },
        "dataZoom": [{
          "show": true,
          "height": 12,
          "xAxisIndex": [
            0
          ],
          bottom:'8%',
          "start": 10,
          "end": 90,
          handleIcon: 'path://M306.1,413c0,2.2-1.8,4-4,4h-59.8c-2.2,0-4-1.8-4-4V200.8c0-2.2,1.8-4,4-4h59.8c2.2,0,4,1.8,4,4V413z',
          handleSize: '110%',
          handleStyle:{
            color:"#d3dee5",

          },
          textStyle:{
            color:"#fff"},
          borderColor:"#90979c"
        }, {
          "type": "inside",
          "show": true,
          "height": 15,
          "start": 1,
          "end": 35
        }],
        series: [{
          name: '1',
          type: 'bar',
          barWidth: '15%',
          itemStyle: {
            normal: {
                color: new echarts.graphic.LinearGradient(0, 0, 0, 1, [{
                    offset: 0,
                    color: '#fccb05'
                }, {
                    offset: 1,
                    color: '#f5804d'
                }]),
                barBorderRadius: 12,
            },
          },
          data: [400, 400, 300, 300, 300, 400, 400, 400, 300]
        },
        {
          name: '2',
          type: 'bar',
          barWidth: '15%',
          itemStyle: {
            normal: {
                color: new echarts.graphic.LinearGradient(0, 0, 0, 1, [{
                    offset: 0,
                    color: '#8bd46e'
                }, {
                    offset: 1,
                    color: '#09bcb7'
                }]),
                barBorderRadius: 11,
            }
            
          },
          data: [400, 500, 500, 500, 500, 400,400, 500, 500]
        },
        {
          name: '3',
          type: 'bar',
          barWidth: '15%',
          itemStyle: {
            normal: {
                color: new echarts.graphic.LinearGradient(0, 0, 0, 1, [{
                    offset: 0,
                    color: '#248ff7'
                }, {
                    offset: 1,
                    color: '#6851f1'
                }]),
            barBorderRadius: 11,
            }
          },
          data: [400, 600, 700, 700, 1000, 400, 400, 600, 700]
        }]
      };

      var app = {
        currentIndex: -1,
      };
      setInterval(function () {
        var dataLen = option.series[0].data.length;

        // 取消之前高亮的图形
        myChart.dispatchAction({
          type: 'downplay',
          seriesIndex: 0,
          dataIndex: app.currentIndex
        });
        app.currentIndex = (app.currentIndex + 1) % dataLen;
        //console.log(app.currentIndex);
        // 高亮当前图形
        myChart.dispatchAction({
          type: 'highlight',
          seriesIndex: 0,
          dataIndex: app.currentIndex,
        });
        // 显示 tooltip
        myChart.dispatchAction({
          type: 'showTip',
          seriesIndex: 0,
          dataIndex: app.currentIndex
        });


      }, 1000);
  • 0
    点赞
  • 3
    收藏
    觉得还不错? 一键收藏
  • 0
    评论
首先,我们需要准备数据。假设我们有以下数据: ```javascript var data = { // 柱状图数据 barData: [ { name: 'A', value: [120, 132, 101, 134, 90, 230, 210] }, { name: 'B', value: [220, 182, 191, 234, 290, 330, 310] }, { name: 'C', value: [150, 232, 201, 154, 190, 330, 410] }, { name: 'D', value: [320, 332, 301, 334, 390, 330, 320] } ], // 折线图数据 lineData: [ { name: 'A', value: [220, 182, 191, 234, 290, 330, 310] }, { name: 'B', value: [120, 132, 101, 134, 90, 230, 210] }, { name: 'C', value: [320, 332, 301, 334, 390, 330, 320] }, { name: 'D', value: [150, 232, 201, 154, 190, 330, 410] } ] }; ``` 接下来,我们可以使用 ECharts 来画出多条柱状图多条折线图。 ```javascript // 初始化 ECharts 实例 var myChart = echarts.init(document.getElementById('myChart')); // 配置项 var option = { // 图例 legend: { data: ['柱状图1', '柱状图2', '柱状图3', '柱状图4', '折线图1', '折线图2', '折线图3', '折线图4'] }, // x轴数据 xAxis: { type: 'category', data: ['周一', '周二', '周三', '周四', '周五', '周六', '周日'] }, // y轴数据 yAxis: { type: 'value' }, // 柱状图数据 series: [ { name: '柱状图1', type: 'bar', data: data.barData[0].value }, { name: '柱状图2', type: 'bar', data: data.barData[1].value }, { name: '柱状图3', type: 'bar', data: data.barData[2].value }, { name: '柱状图4', type: 'bar', data: data.barData[3].value }, // 折线图数据 { name: '折线图1', type: 'line', data: data.lineData[0].value }, { name: '折线图2', type: 'line', data: data.lineData[1].value }, { name: '折线图3', type: 'line', data: data.lineData[2].value }, { name: '折线图4', type: 'line', data: data.lineData[3].value } ] }; // 使用刚指定的配置项和数据显示图表。 myChart.setOption(option); ``` 这段代码会生成一个图例,其中包括了 4 条柱状图和 4 条折线图。x 轴的数据是固定的,为一周的天数,y 轴为数值轴。series 中分别配置了柱状图和折线图的数据。

“相关推荐”对你有帮助么?

  • 非常没帮助
  • 没帮助
  • 一般
  • 有帮助
  • 非常有帮助
提交
评论
添加红包

请填写红包祝福语或标题

红包个数最小为10个

红包金额最低5元

当前余额3.43前往充值 >
需支付:10.00
成就一亿技术人!
领取后你会自动成为博主和红包主的粉丝 规则
hope_wisdom
发出的红包
实付
使用余额支付
点击重新获取
扫码支付
钱包余额 0

抵扣说明:

1.余额是钱包充值的虚拟货币,按照1:1的比例进行支付金额的抵扣。
2.余额无法直接购买下载,可以购买VIP、付费专栏及课程。

余额充值