


springmvc源码之启动流程
一. 说明
源码基于Springboot2.2.1分析,并且围绕DispatchServlet相关进行分析,其余关于spring的未做探讨。
参考资料:《看透 Spring mvc:源代码分析与实践》韩路彪
二. 启动流程
2.1 综述
SpringMvc的核心类是DispatchServlet,可以说web应用的整个流程都是围绕DispatchServlet展开的。而springmvc又是依赖于spring 的一个子容器,spring为springmvc提供了便捷的对bean的操作以及其他的一些支持。
SpringMvc整个启动流程,其实就是配置DispatchServlet,并交给spring管理的流程。结合servlet的特性以及springboot的自动配置,我们分析一下SpringMvc的启动流程。
2.2 HttpServletBean
HttpServletBean是直接继承自HttpServlet的类,同时也实现了EnvironmentCapable, EnvironmentAware,可以使用spring容器的一些功能。
tomcat在启动时,会依次调用容器中servlet的init方法进行初始化。``HttpServletBean`的初始化方法如下:
@Override
	public final void init() throws ServletException {

		// Set bean properties from init parameters.
		PropertyValues pvs = new ServletConfigPropertyValues(getServletConfig(), this.requiredProperties);
		if (!pvs.isEmpty()) {
			//...
		}

		// Let subclasses do whatever initialization they like.
		initServletBean();
	}
这里主要做了两步:
- 将servlet的所有初始化参数设置到DispatchServlet中
- 调用FrameworkServlet的initServletBean();
在springboot中,由于使用了servlet3.0中自动装配servlet的特性,因此这里的PropertyValues并没有初始化参数,如果我们自定义一些初始化参数,这里是可以看到的。
2.3 FrameworkServlet
FrameworkServlet是HttpServletBean的子类,进一步在initServletBean()中进行初始化
protected final void initServletBean() throws ServletException {
		getServletContext().log("Initializing Spring " + getClass().getSimpleName() + " '" + getServletName() + "'");
		try {
			this.webApplicationContext = initWebApplicationContext();
			initFrameworkServlet();
		}
		catch (ServletException | RuntimeException ex) {
			logger.error("Context initialization failed", ex);
			throw ex;
		}
	}
这里主要是初始化了web容器,initFrameworkServlet方法是模板方法,目前暂未使用。
核心方法是initWebApplicationContext,在这里面,主要做了以下3步:
- 获取Spring的根容器
- 设置webApplicationContext,并根据情况调用onRefresh方法
- 把webApplicationContext设置到servletContext中
protected WebApplicationContext initWebApplicationContext() {
		WebApplicationContext rootContext =
				WebApplicationContextUtils.getWebApplicationContext(getServletContext());
		WebApplicationContext wac = null;

		if (this.webApplicationContext != null) {
			// A context instance was injected at construction time -> use it
			wac = this.webApplicationContext;
			if (wac instanceof ConfigurableWebApplicationContext) {
				ConfigurableWebApplicationContext cwac = (ConfigurableWebApplicationContext) wac;
				if (!cwac.isActive()) {
					if (cwac.getParent() == null) {
						cwac.setParent(rootContext);
					}
					configureAndRefreshWebApplicationContext(cwac);
				}
			}
		}
		if (wac == null) {
			wac = findWebApplicationContext();
		}
		if (wac == null) {
			wac = createWebApplicationContext(rootContext);
		}

		if (!this.refreshEventReceived) {
			synchronized (this.onRefreshMonitor) {
        	//实际调用走了这里
				onRefresh(wac);
			}
		}

		if (this.publishContext) {
			// Publish the context as a servlet context attribute.
			String attrName = getServletContextAttributeName();
			getServletContext().setAttribute(attrName, wac);
		}

		return wac;
	}
这里有三种启动方式,由于springboot基于servlet3.0使用了全注解开发,因此这里的web容器是AnnotationConfigServletWebServerApplicationContext类型,使用了第一种启动方式
Servlet3.0之后可以在程序中使用ServletContext.addServlet方式注册Servlet,这时就可以在新建FrameworkServlet和其子类的时候通过构成方法传递已经准备好的webApplicationContext
publishContext是是否绑定web容器到servletContext的标志,默认情况下为true。
onRefresh(wac)被子类DispatchServlet重写,该方法是用来初始化DispathServlet的九大组件,也是整个功能实现的核心。
2.4 DispatchServlet
DispatchServlet的启动主要是初始化九大组件。
protected void onRefresh(ApplicationContext context) {
		initStrategies(context);
	}

	/**
	 * Initialize the strategy objects that this servlet uses.
	 * <p>May be overridden in subclasses in order to initialize further strategy objects.
	 */
	protected void initStrategies(ApplicationContext context) {
		initMultipartResolver(context);
		initLocaleResolver(context);
		initThemeResolver(context);
		initHandlerMappings(context);
		initHandlerAdapters(context);
		initHandlerExceptionResolvers(context);
		initRequestToViewNameTranslator(context);
		initViewResolvers(context);
		initFlashMapManager(context);
	}
以HandlerMapping为例,看下组件是如何被初始化的
private void initHandlerMappings(ApplicationContext context) {
		this.handlerMappings = null;

		if (this.detectAllHandlerMappings) {
			// Find all HandlerMappings in the ApplicationContext, including ancestor contexts.
			Map<String, HandlerMapping> matchingBeans =
					BeanFactoryUtils.beansOfTypeIncludingAncestors(context, HandlerMapping.class, true, false);
			if (!matchingBeans.isEmpty()) {
				this.handlerMappings = new ArrayList<>(matchingBeans.values());
				// We keep HandlerMappings in sorted order.
				AnnotationAwareOrderComparator.sort(this.handlerMappings);
			}
		}
		else {
			try {
				HandlerMapping hm = context.getBean(HANDLER_MAPPING_BEAN_NAME, HandlerMapping.class);
				this.handlerMappings = Collections.singletonList(hm);
			}
			catch (NoSuchBeanDefinitionException ex) {
				// Ignore, we'll add a default HandlerMapping later.
			}
		}

		if (this.handlerMappings == null) {
			this.handlerMappings = getDefaultStrategies(context, HandlerMapping.class);
		}
	}
通过BeanFactoryUtils找出web容器和父容器(即Spring容器)中所有HandlerMapping类型的bean,然后注入到属性handlerMappings中,最后对所有的HandlerMapping进行排序,这也是Order生效的原因。
我们可以自定义HandlerMapping,同时实现Order接口,提高或降低使用优先级,在日常开发中,我们使用的是
RequestMappingHandlerMapping。
2.5 springboot配置DispatchServlet
springboot和传统的mvc不同,之前我们还要自己在web.xml中配置DispatchServlet,如下:
<servlet>
		<servlet-name>spring-web</servlet-name>
		<servlet-class>org.springframework.web.servlet.DispatcherServlet</servlet-class>
		<init-param>
			<param-name>contextConfigLocation</param-name>
			<param-value>classpath:/spring-web-servlet.xml</param-value>
		</init-param>
		<load-on-startup>1</load-on-startup>
	</servlet>
这样,才能把DispatchServlet注入到ServletContext中。
而在springboot自动配置中,就不需要使用这样的方式了,看看springboot是如何把DispatchServlet添加到servlet中的。
springboot实现此功能的核心是ServletContextInitializer,与ServletContainerInitializer不同,后者是由servlet容器主导的,扫描所有该接口的实现类,属于tomcat的生命周期;前者是由spring容器主导的,扫描实现了该接口的类,属于spring的生命周期
@FunctionalInterface
public interface ServletContextInitializer {

	/**
	 * Configure the given {@link ServletContext} with any servlets, filters, listeners
	 * context-params and attributes necessary for initialization.
	 * @param servletContext the {@code ServletContext} to initialize
	 * @throws ServletException if any call against the given {@code ServletContext}
	 * throws a {@code ServletException}
	 */
	void onStartup(ServletContext servletContext) throws ServletException;

}
-
DispatcherServletAutoConfiguration
这个自动配置类向容器中注入了
DispatcherServlet和DispatcherServletRegistrationBean后者正是实现了
ServletContextInitializer接口的注册类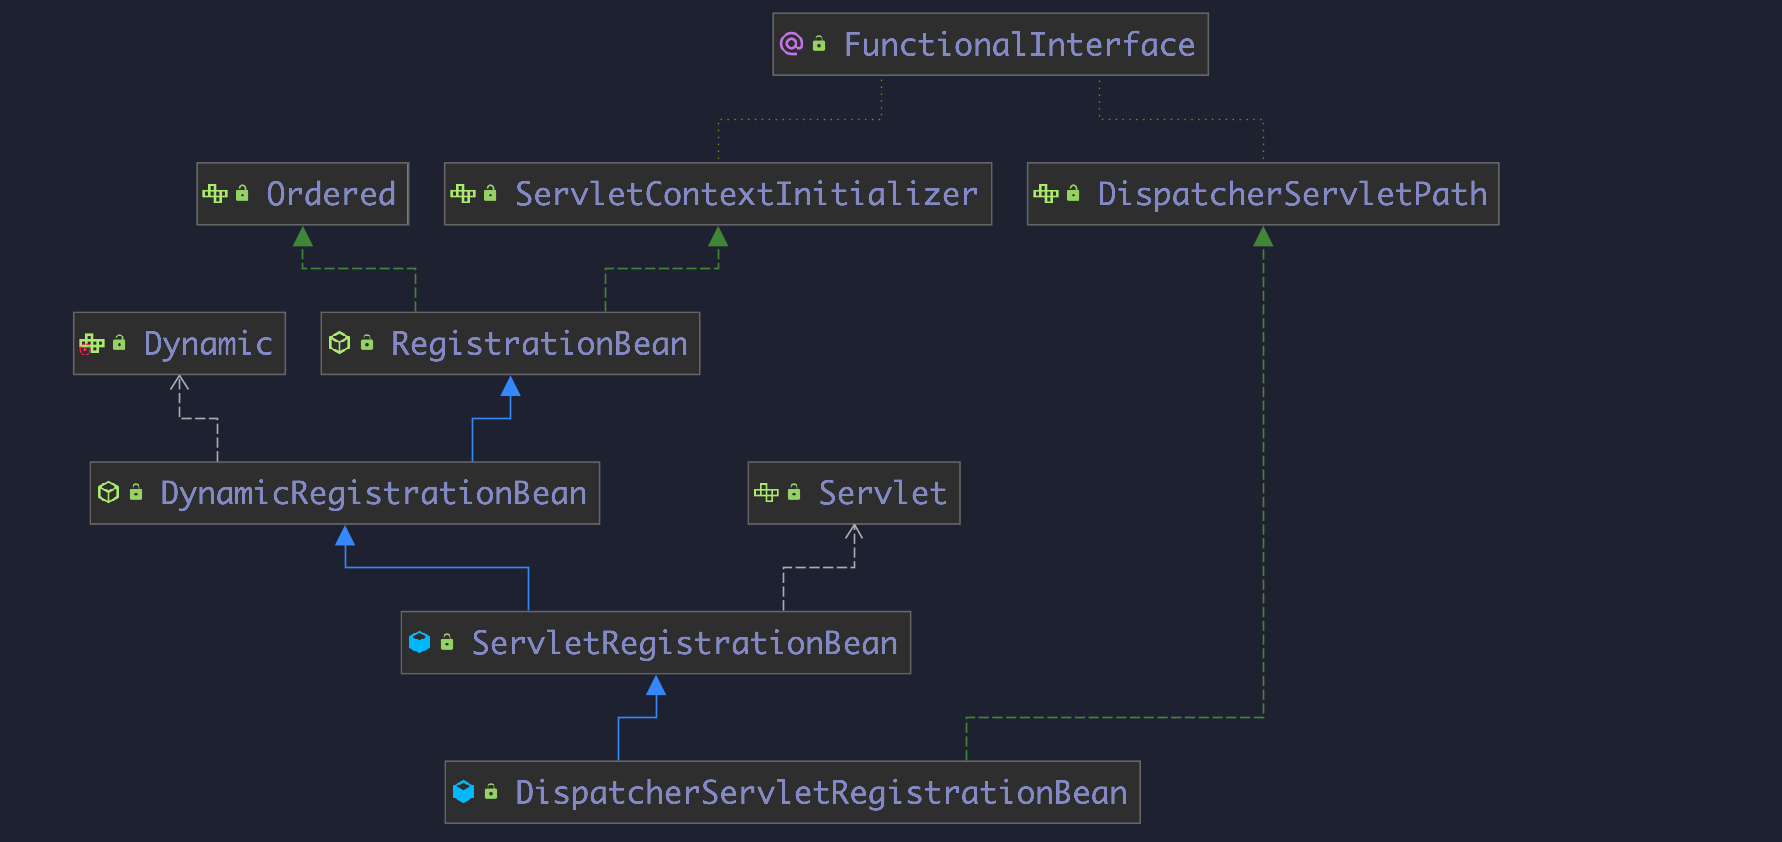
springboot在启动时,会自动调用ServletContextInitializer的onStartup方法,完成一系列注入
-
RegistrationBean
@Override public final void onStartup(ServletContext servletContext) throws ServletException { String description = getDescription(); if (!isEnabled()) { logger.info(StringUtils.capitalize(description) + " was not registered (disabled)"); return; } register(description, servletContext); } -
DynamicRegistrationBean
@Override protected final void register(String description, ServletContext servletContext) { D registration = addRegistration(description, servletContext); if (registration == null) { logger.info(StringUtils.capitalize(description) + " was not registered (possibly already registered?)"); return; } configure(registration); } -
ServletRegistrationBean
@Override
	protected ServletRegistration.Dynamic addRegistration(String description, ServletContext servletContext) {
		String name = getServletName();
		return servletContext.addServlet(name, this.servlet);
	}
经过上面一系列流程,最终将DispatchServlet注入到ServletContext中,使其生效。
至于springboot是在什么时候调用这个接口的,日后再说
2.6 总结
在springboot中,关于mvc的一系列启动流程如下所述
- springboot向容器中注入
DispatchServlet和DispatcherServletRegistrationBean - 在扫描所有实现了
ServletContextInitializer的类时,扫描到了DispatcherServletRegistrationBean,调用其onStartUp()方法,将DispatchServlet添加到Servlet容器,即tomcat中 - tomcat启动后调用
Servlet的init()方法,最终到HttpServletBean - 在
HttpServletBean中实现了注入初始化参数,然后依次调用子类 - 在
FrameworkServelt中完成了webApplicationContext的注入(到ServletContext中),然后调用onRefresh - 在
DispatchServlet中完成了九大组件的初始化,整个mvc启动完成
三. 使用技巧
3.1 ServletRegistrationBean
通过Springboot给我们提供的ServletRegistrationBean,可以很方便的注入我们自己的servlet
 @Bean
    public ServletRegistrationBean<MyServlet> myServlet() {
        ServletRegistrationBean<MyServlet> bean = new ServletRegistrationBean<>(new MyServlet(), "/servlet");
        Map<String, String> initParams = new HashMap<>();
        initParams.put("name", "mhn");
        bean.setInitParameters(initParams);
        return bean;
    }
public class MyServlet extends HttpServlet {

    @Override
    protected void doGet(HttpServletRequest req, HttpServletResponse resp) throws ServletException, IOException {
        resp.setContentType("text/html;charset=utf-8");
        resp.setCharacterEncoding("utf-8");
        resp.getWriter().println("大家好");
    }
}
如上,就快速的添加一个servlet到Tomcat中
servlet3.0还提供了注解
@WebServlet实现相同的功能


 1118
1118


 被折叠的 条评论
为什么被折叠?
被折叠的 条评论
为什么被折叠?
 到【灌水乐园】发言


