


文章目录
最近被SpringSecurity搞傻了,不服气的我决定深入理解
它的整个执行流程需要从,身份认证开始,
纵观整个SpringSecurity,身份认证要从一个叫AbstractAuthenticationProcessingFilter的抽象类说起,好戏开场了。。。。。。。🐤🐤🐤🐤🐤🐤🐤🐤🐤🐤
AbstractAuthenticationProcessingFilter
基于浏览器http的身份验证请求抽象处理器,里面规定了身份认证的过程!
UsernamePasswordAuthenticationFilter是继承了AbstractAuthenticationProcessingFilter

所以要说UsernamePasswordAuthenticationFilter,它两个是分不开的。
1.UsernamePasswordAuthenticationFilter的创建
可以看到UsernamePasswordAuthenticationFilter有两个构造器:

它默认使用的是哪一个呢?
我在AbstractAuthenticationProcessingFilter的构造器上打上了断点:(springboot启动初始化时就会创建这些过滤器)
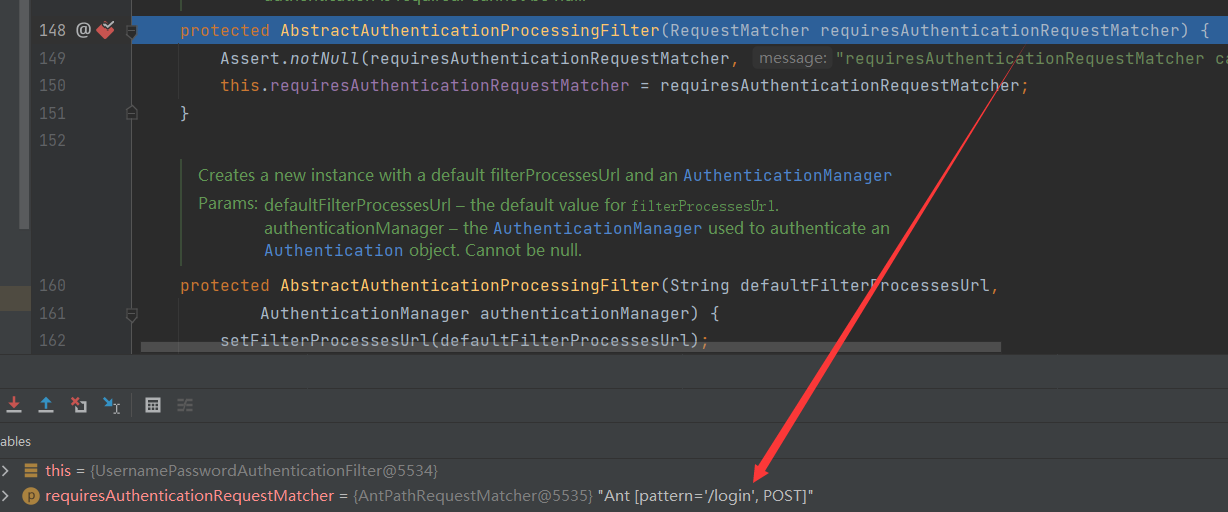
可以看到执行的是第一个构造,一个参数的:
🏳️🌈🏳️🌈🏳️🌈🏳️🌈🏳️🌈🏳️🌈🏳️🌈🏳️🌈小结一下:
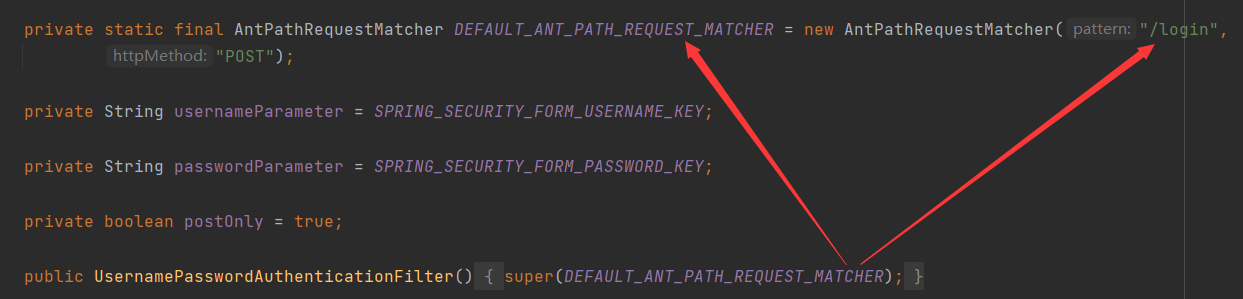
UsernamePasswordAuthenticationFilter,spring容器初始化时就会创建,并且默认使用的是请求匹配器为"/login"(即Spring Security的登录请求),"post"方式的构造器
2.attemptAuthentication()方法
这个方法是执行真正的身份认证的,在AbstractAuthenticationProcessingFilter中定义,子类必须实现这个方法!
public abstract Authentication attemptAuthentication(HttpServletRequest request, HttpServletResponse response)
			throws AuthenticationException, IOException, ServletException;
如果验证成功,应该返回一个验证用户的令牌;否则返回null并抛出AuthenticationException异常
让我们看看UsernamePasswordAuthenticationFilter中是如何实现的:
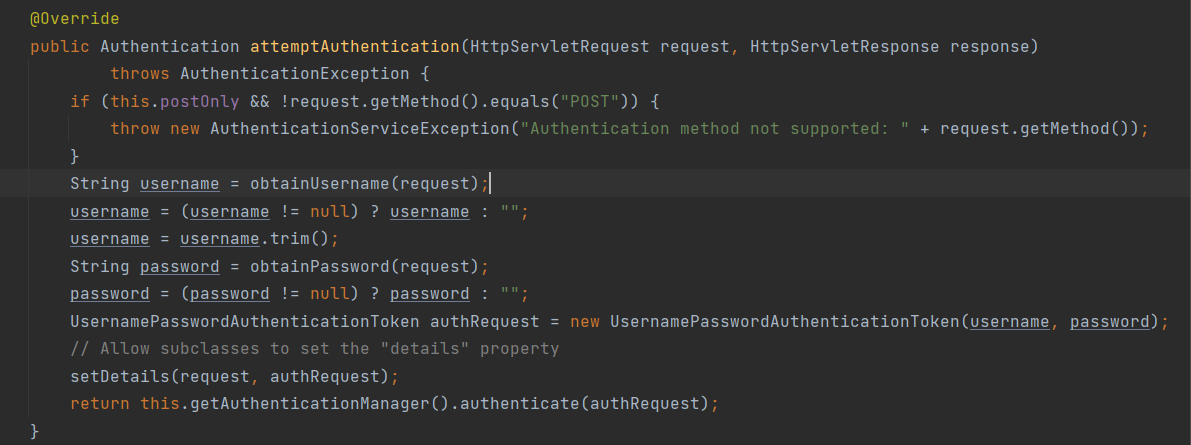
首先,它验证了请求方法是不是post,(这个postOnly是它设置的一个变量,值是true),不是post就会抛出异常-------认证的方法不被支持
String username = obtainUsername(request); //从请求中拿到用户名
obtainUsername()如下😱,还是看看吧:

可以看到在对用户名密码判断空后,就用用户输入的密码用户名生成要认证的token了:

下面我们就去看看这个UsernamePasswordAuthenticationToken是什么妖魔:
它有两个构造器:

和
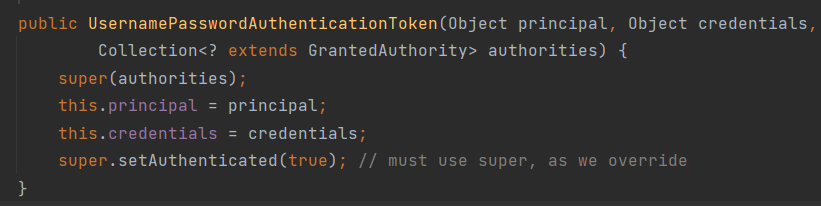
可以注意到我们传入的username在security中叫principal
password在security中叫credentials;这是有必要知道的!
还有就是Authentication:它是接口,UsernamePasswordAuthenticationToken就是其实现类之一
第一个构造器,在代码中可以任意使用,因为它被设置为是不可信的
第二个构造函数供AuthenticationManager或者AuthenticationProvider的实现类使用,传入实现类就能生成可信的token
但是我们上面的代码不是调用的第一个构造函数吗?那应该生成的token是不可信的啊?别急,经过我不懈的追,终于找到了答案,它会在一系列判断操作之后,认为你身份没问题时,会重新调一次,而这次使用的就是第二个构造。
不要试图使用UsernamePasswordAuthenticationToken的setAuthenticated方法将它设置为true:

可以看到其父类(AbstractAuthenticationToken)的setAuthenticated方法才是真正设置可不可信的,而第一个构造方法使用的是UsernamePasswordAuthenticationToken重写过后的setAuthenticated,本质是调用super.setAuthenticated(false);
整个认证过程梳理:
1. 一号选手UsernamePasswordAuthenticationFilter
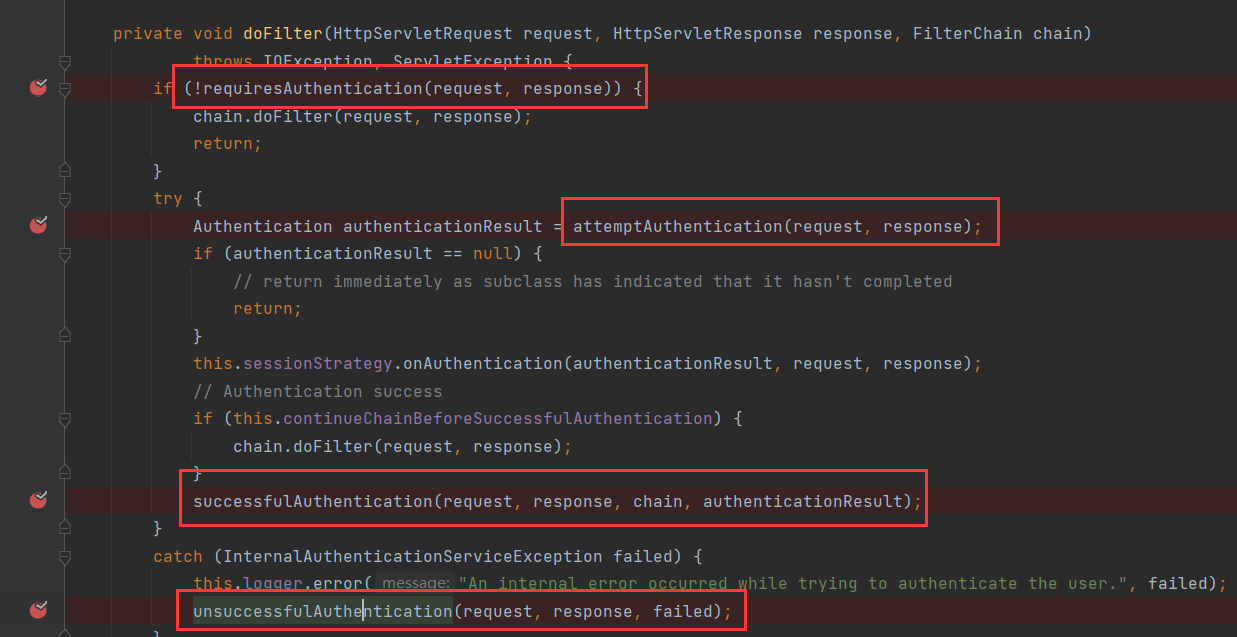
登录请求首先会来到这个过滤器,既然是过滤器,当然是执行 doFilter方法嘛。因为其父类AbstractAuthenticationProcessingFilter已经定义好了doFilter方法,只能看父类:(关键处我都打了断点)
先看部分:

首先要执行的就是requiresAuthentication(request, response)方法,它有什么作用呢?点开看看

原来就是匹配你是不是我要的登录请求,前面我们说过,UsernamePasswordAuthenticationFilter默认使用的构造器就是把一个请求匹配器(姑且这么叫吧)😆,只匹配"/login"的post请求
匹配完成之后,就该执行attemptAuthentication(request, response)方法了

前面我们说过,这个方法必须被子类实现,它的作用就是完成身份验证,点进去看看:

getAuthenticationManager()是获取AuthenticationManager的实现类ProviderManager;
2.二号选手ProviderManager
authenticate(authRequest)方法就是验证身份的入口方法,需要将生成的验证令牌传进去,一系列验证之后,如果验证成功会把令牌中的Authenticated属性设置为true,前面我们说过,它被设置为false。
最后那行代码就很简单了:::执行ProviderManager的authenticate方法,点进去看看:(代码有点长)
@Override
	public Authentication authenticate(Authentication authentication) throws AuthenticationException {
		Class<? extends Authentication> toTest = authentication.getClass();
		AuthenticationException lastException = null;
		AuthenticationException parentException = null;
		Authentication result = null;
		Authentication parentResult = null;
		int currentPosition = 0;
		int size = this.providers.size();
		for (AuthenticationProvider provider : getProviders()) {
			if (!provider.supports(toTest)) {
				continue;
			}
			if (logger.isTraceEnabled()) {
				logger.trace(LogMessage.format("Authenticating request with %s (%d/%d)",
						provider.getClass().getSimpleName(), ++currentPosition, size));
			}
			try {
				result = provider.authenticate(authentication);
				if (result != null) {
					copyDetails(authentication, result);
					break;
				}
			}
			catch (AccountStatusException | InternalAuthenticationServiceException ex) {
				prepareException(ex, authentication);
				// SEC-546: Avoid polling additional providers if auth failure is due to
				// invalid account status
				throw ex;
			}
			catch (AuthenticationException ex) {
				lastException = ex;
			}
		}
		if (result == null && this.parent != null) {
			// Allow the parent to try.
			try {
				parentResult = this.parent.authenticate(authentication);
				result = parentResult;
			}
			catch (ProviderNotFoundException ex) {
				// ignore as we will throw below if no other exception occurred prior to
				// calling parent and the parent
				// may throw ProviderNotFound even though a provider in the child already
				// handled the request
			}
			catch (AuthenticationException ex) {
				parentException = ex;
				lastException = ex;
			}
		}
		if (result != null) {
			if (this.eraseCredentialsAfterAuthentication && (result instanceof CredentialsContainer)) {
				// Authentication is complete. Remove credentials and other secret data
				// from authentication
				((CredentialsContainer) result).eraseCredentials();
			}
			// If the parent AuthenticationManager was attempted and successful then it
			// will publish an AuthenticationSuccessEvent
			// This check prevents a duplicate AuthenticationSuccessEvent if the parent
			// AuthenticationManager already published it
			if (parentResult == null) {
				this.eventPublisher.publishAuthenticationSuccess(result);
			}

			return result;
		}

		// Parent was null, or didn't authenticate (or throw an exception).
		if (lastException == null) {
			lastException = new ProviderNotFoundException(this.messages.getMessage("ProviderManager.providerNotFound",
					new Object[] { toTest.getName() }, "No AuthenticationProvider found for {0}"));
		}
		// If the parent AuthenticationManager was attempted and failed then it will
		// publish an AbstractAuthenticationFailureEvent
		// This check prevents a duplicate AbstractAuthenticationFailureEvent if the
		// parent AuthenticationManager already published it
		if (parentException == null) {
			prepareException(lastException, authentication);
		}
		throw lastException;
	}
没事,看我这,
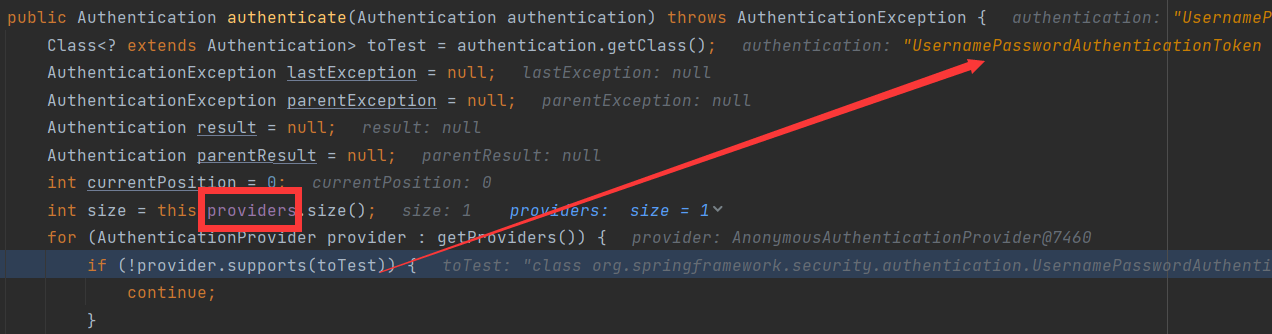
首先,我们看看providers是个啥

是一个元素类型为AuthenticationProvider的列表,并且默认是个空列表,是在实例化ProviderManager是给其赋值的,
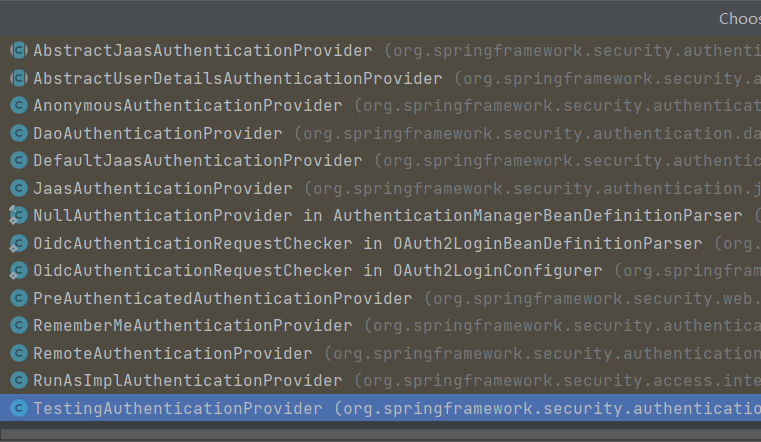
接下来我们再看看AuthenticationProvider(顾名思义,验证的提供者),它是一个接口,下面是它的实现类:
下面这行代码就是在匹配那个验证提供类可以验证toTest:

上上上张图,toTest已经标注了,就是传进来的令牌类型,这里是UsernamePassworduthenticationToken,
好了,我们还需要弄明白一个东西,supports方法是干嘛的?
我就直接说了吧,supports方法是用来判断该对象表示的类或接口是否与指定的类参数表示的类或接口相同,或者是其超类或超接口(一个叫isAssignableFrom的本地方法判断的)。如果是,则返回true;否则返回false
所以这个循环的作用就很明显了,匹配到能够验证令牌的验证提供类:
其原文翻译如下:
尝试对传递的身份验证对象进行身份验证。

将连续尝试AuthenticationProvider列表,直到AuthenticationProvider指示它能够验证传递的身份验证对象的类型。然后将尝试使用该AuthenticationProvider进行身份验证。

如果多个AuthenticationProvider支持传递的身份验证对象,则第一个能够成功身份验证该身份验证对象的身份验证提供程序将确定结果,并覆盖早期支持AuthenticationProviders引发的任何可能的AuthenticationException。成功验证后,将不会尝试后续的AuthenticationProviders。如果任何支持AuthenticationProvider的身份验证均未成功,则最后引发的AuthenticationException将被重试。
经过循环得到:DaoAuthenticationProvider能够验证UsernamePassworduthenticationToken类型的验证信息token,
3.三号选手DaoAuthenticationProvider(主力部队)
说明: >>>不同的自定义配置会可能会使用不同的验证提供类,用户名密码验证是使用的DaoAuthenticationProvider,如果你使用的是其它验证方式请应变一下。。。
DaoAuthenticationProvider会做很多的验证,可以说它是真正的验证执行者!
下面就会进入到DaoAuthenticationProvider的authenticate方法(这里就是真正的验证了),由于这个方法在父类AbstractUserDetailsAuthenticationProvider中已被实现,它只是继承,所以我们就在父类中查看:
@Override
	public Authentication authenticate(Authentication authentication) throws AuthenticationException {
		Assert.isInstanceOf(UsernamePasswordAuthenticationToken.class, authentication,
				() -> this.messages.getMessage("AbstractUserDetailsAuthenticationProvider.onlySupports",
						"Only UsernamePasswordAuthenticationToken is supported"));
		String username = determineUsername(authentication);
		boolean cacheWasUsed = true;
		UserDetails user = this.userCache.getUserFromCache(username);
		if (user == null) {
			cacheWasUsed = false;
			try {
				user = retrieveUser(username, (UsernamePasswordAuthenticationToken) authentication);
			}
			catch (UsernameNotFoundException ex) {
				this.logger.debug("Failed to find user '" + username + "'");
				if (!this.hideUserNotFoundExceptions) {
					throw ex;
				}
				throw new BadCredentialsException(this.messages
						.getMessage("AbstractUserDetailsAuthenticationProvider.badCredentials", "Bad credentials"));
			}
			Assert.notNull(user, "retrieveUser returned null - a violation of the interface contract");
		}
		try {
			this.preAuthenticationChecks.check(user);
			additionalAuthenticationChecks(user, (UsernamePasswordAuthenticationToken) authentication);
		}
		catch (AuthenticationException ex) {
			if (!cacheWasUsed) {
				throw ex;
			}
			// There was a problem, so try again after checking
			// we're using latest data (i.e. not from the cache)
			cacheWasUsed = false;
			user = retrieveUser(username, (UsernamePasswordAuthenticationToken) authentication);
			this.preAuthenticationChecks.check(user);
			additionalAuthenticationChecks(user, (UsernamePasswordAuthenticationToken) authentication);
		}
		this.postAuthenticationChecks.check(user);
		if (!cacheWasUsed) {
			this.userCache.putUserInCache(user);
		}
		Object principalToReturn = user;
		if (this.forcePrincipalAsString) {
			principalToReturn = user.getUsername();
		}
		return createSuccessAuthentication(principalToReturn, authentication, user);
	}
这里我们就略看,重点:

点开retrieveUser:
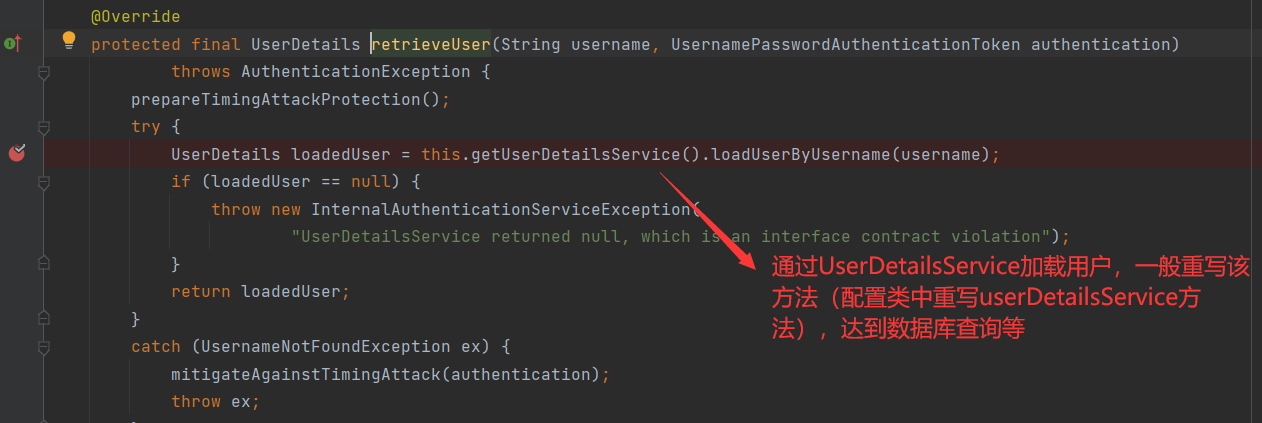

到这里用户就已经查到了,接下来就是检查:

顾名思义:额外的检查,这个类用户可自定义,其代码如下:
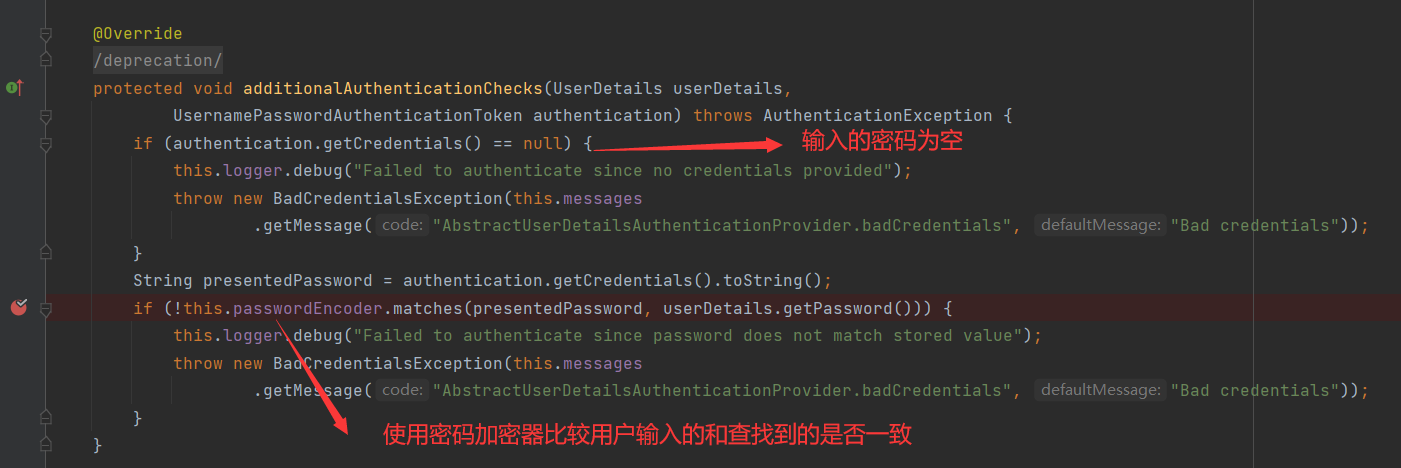
注意:passwordEncoder,是在创建DaoAuthenticationProvider时设置的,其默认使用的是BCryptPasswordEncoder(就不贴源码了,有兴趣的同学可以追一追),这是可以自定义的配置类中配置即可,比如我这里是使用的这个NoOpPasswordEncoder,是直接比较字符串:如下图

接着往下走,这两个检查对应:


先看看DefaultPreAuthenticationChecks类要验证什么内容:
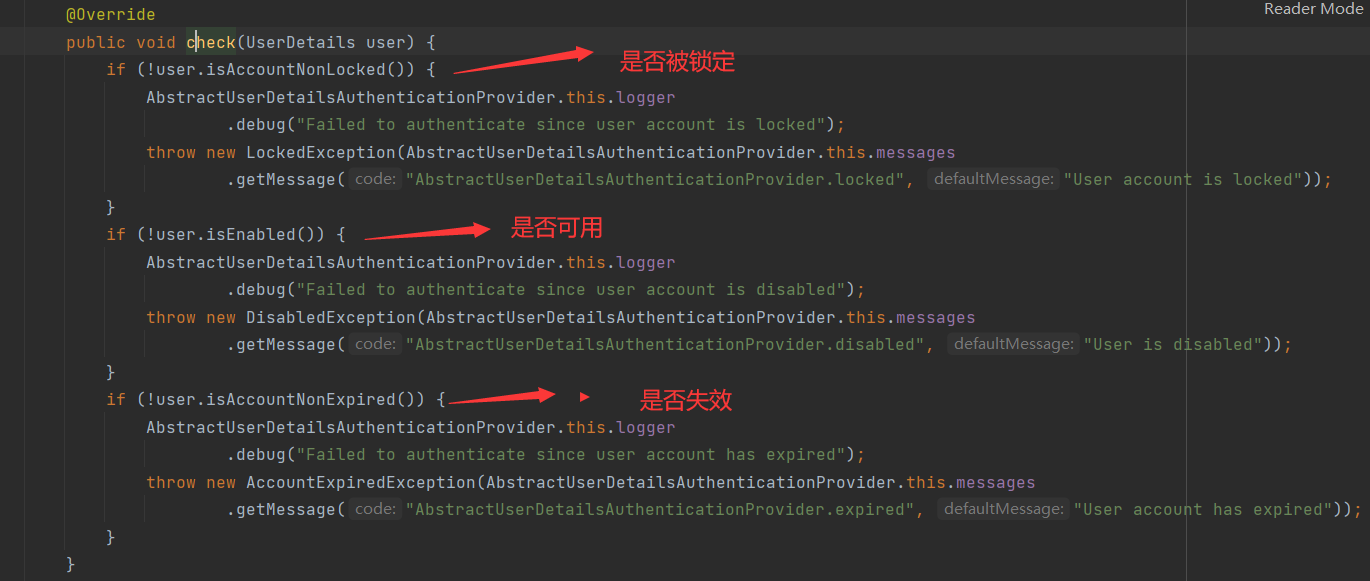
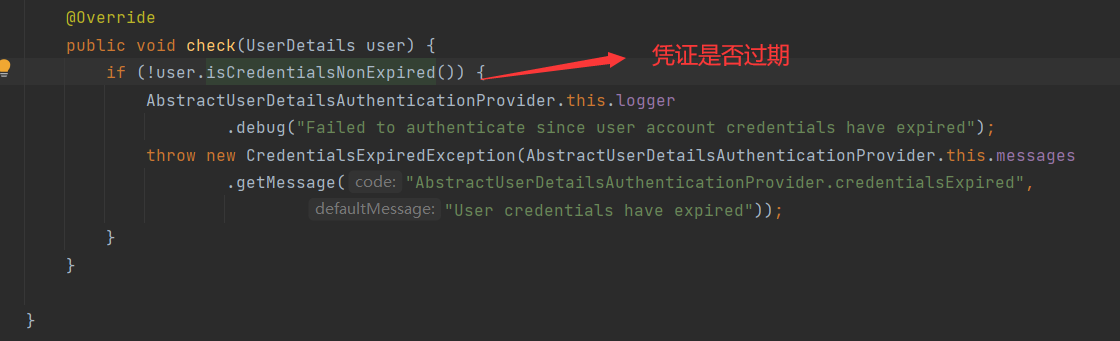
再看看DefaultPostAuthenticationChecks
如果验证都通过了会把这个用户的验证信息保存到缓存

最后,执行身份验证成功的方法:


这个令牌构造器,是会将Authenticated设置为true的
再往下其实也没什么了:
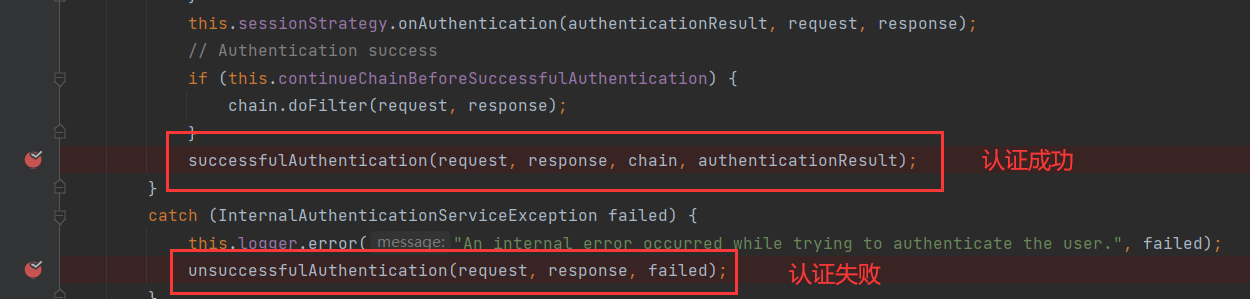
后续成功或者失败的操作好像大都和配置相关了,比如remberMe啊、成功处理啊、包括上图的sessionStrategy,大家有兴趣可以自行研究一下,在此不做深追了👵头发没了都

4.四号选手SecurityContextPersistenceFilter
差点忘了。。。。
其主要代码:
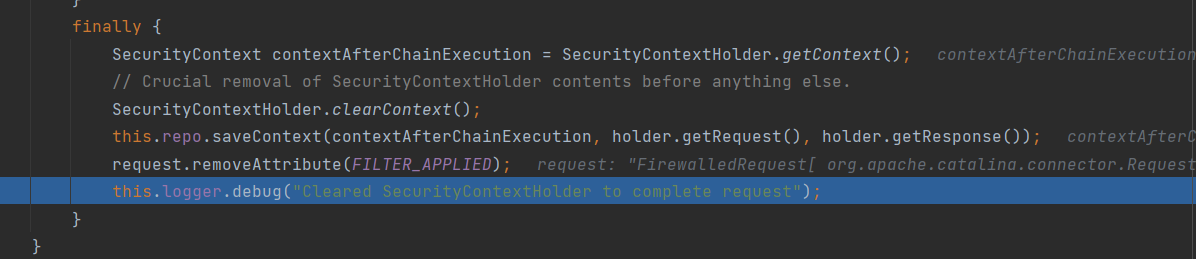
其大概意思,在我的理解:先从security上下文持有者(SecurityContextHolder)那里拿到内容,然后清空持有者的内容,并将取出的内容保存到security上下文仓库中(SecurityContextRepository)。
在请求之前从配置的SecurityContextRepository获得的信息填充SecurityContextHolder,并在请求完成并清除上下文持有者后将其存储回存储库。(官方解释)
总结:我画了个图,希望能帮助理解
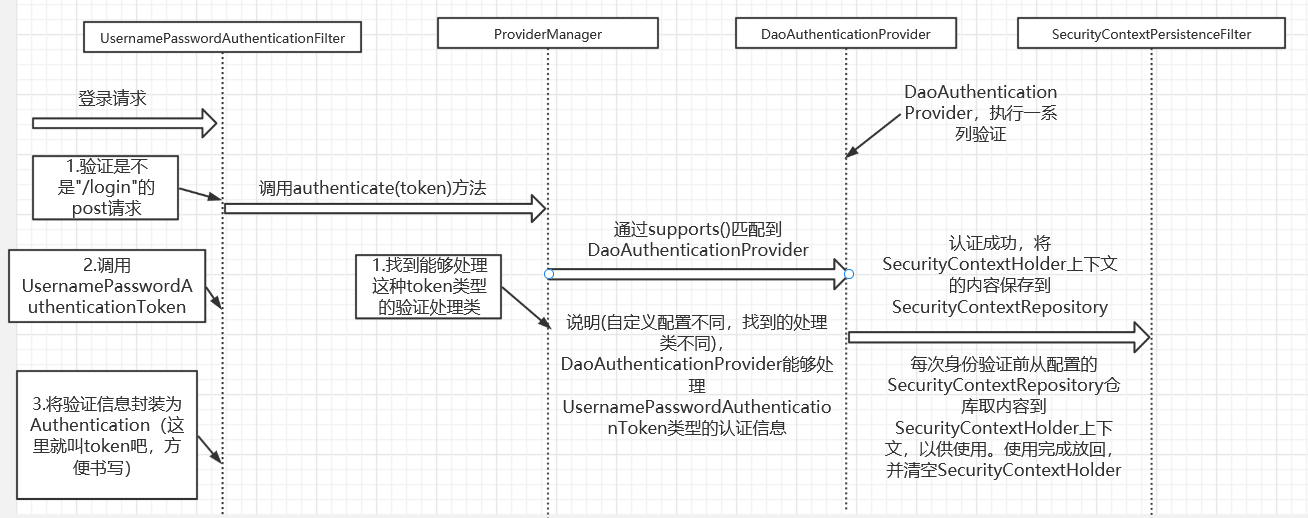
这是比较粗略的(很多比较重要的类都没有写到),下面我把这个过程中主要的调用关系以图的形式展示出来:

因为好几个重要的方法都是在其父类就写好了的,比如AbstractAuthenticationProcessingFilter里就定义了整个认证的流程,它是认证的总管!!
,子类只是继承有,并且父类中是只读的,大概是安全起见。
这样调试就比较麻烦了,跳来跳去的。。。。。。。。。。。
好了,以上就是SpringSecurity的认证过程详解了,希望对你有帮助。
作者对其理解不是很深,也是气不过没学懂它才写下这篇博客。难免会出现错误,希望您能指正!!!🌂🌂🌂🌂🌂🌂🌂🌂🌂🌂🌂🌂🌂,终于写完了。


 1万+
1万+


 被折叠的 条评论
为什么被折叠?
被折叠的 条评论
为什么被折叠?
 到【灌水乐园】发言


