


element-ui表格操作栏fixed且宽度自适应
由于近期给公司的项目开发页面的按钮权限控制,目前这功能已经完事了,所以在此做个总结,希望能给看到此篇文章的小伙伴一些帮助和思路
权限控制这个一般后台管理系统肯定是都有的,只不过有的是只细化到导航栏菜单的权限控制,有的需要精确到页面上每一个按钮。
只要是后台管理系统,少不了用户管理,角色管理,菜单管理等功能
而要想实现前端菜单页面以及按钮的权限控制,则这三项功能就得搭配使用
正文开始
首先需要5张数据库表,sys_user(用户表),sys_role(角色表),sys_menu(菜单表),sys_user_role(用户角色关联表),sys_role_menu(角色菜单关联表)
正因为有了需要每个用户可能只能看到不同菜单或按钮等需求,所以才需要权限控制,而最好的方式就是让角色绑定菜单,用户绑定角色,而不是用户直接绑定菜单,这样角色方便给每个用户账号复用其拥有的菜单权限
sys_menu菜单表的结构可以根据自己的需求以及实现方式来定,我这里提供我两种前端权限控制的实现方式
- 前端写死路由结构,每个路由里面带一个值唯一的permissionKey属性,然后后端接口返回permissionKey集合,通过这个集合来过滤掉的路由完成权限控制,缺点是难以精确到按钮,不能动态改菜单的图标和名称,这种方案就可以把菜单表设计的简单一点,只要至少有一个菜单名称和permissionKey字段对应就ok
- 后端返回所有的路由数据,这种方案的菜单表需要以下字段
菜单名称,菜单标识,类型,访问路径,组件路径,图标,排序,是否隐藏,是否启用等字段,类型是用来判断某条数据是按钮还是菜单页面还是目录,是否隐藏用来判断是否显示在导航菜单里面,比如一些详情页面就不需要显示在导航菜单里,但是需要被后端返回。
因为需要细化到页面按钮的控制,所以我选的是第二种方案,这种方案挺方便的,可以动态修改菜单名称图标,访问路径,组件地址,顺序,是否启用等等。
在前端请求到所有的路由数据后(我推荐后端返回平铺的数据,而不是有层级关系的),在前端写递归去构建路由树,并且我们也需要把组件地址的字符串路径真正的导入组件,构建成如下面所示的路由数据结构
const route = {
				name:'systemManager',
				path:'/systemManager'
				component:一个vue组件实例,
				meta:{
					title:'系统管理',
					isHide:false,//是否隐藏
					buttons:[],//用来存放当前路由页面上所拥有的按钮的标识
					icon:'el-icon-menu',//菜单图标
					keepAlive:false,//是否使用keepAlive缓存页面,这个公司项目没有用多标签切换已经打开的多个页面,所以我没用
				},
				children:[]//子路由
			  }
值得注意的是如果一个路由里面有子路由,那么这个路由的组件里面一定有些<router-view :key='route.path'/>标签
这样子路由才能显示出来,不然白屏
以下是我写的代码
ForRouter.vue组件 用来显示子路由的组件
<template>
  <router-view/>
</template>

<script>
export default {
  name: "ForRouter"
}
</script>
_import_development.js 用来根据组件路径动态导入组件的
module.exports = file => require('@/' + file + '.vue').default
_import_production.js 用来根据组件路径动态导入组件的
module.exports = file => () => import('@/' + file + '.vue')
然后是生成路由树的工具类,这里我分了两个generateRoutes和generateMenuTree ,前者用来生成路由树,后者用来生成导航菜单树
import ForRouter from "@/layout/ForRouter";
const _import = require('@/utils/_import_' + process.env.NODE_ENV)
const _import_common = require('@/utils/_import_common_' + process.env.NODE_ENV)
import {error404, Main} from '@/common'

export const generateRoutes = (routes) => {
  let allParentNode = []
  const allChildNode = []
  const allButtons = []

  routes.forEach(route => {
    if (route.parentId === 0) {
      allParentNode.push(route)
    } else if (route.menuType === 1) {
      allButtons.push(route)
    } else {
      allChildNode.push(route)
    }
  })
  //筛选出所有非顶级node
  //筛选出所有按钮
  allParentNode = allParentNode.map(node => {
    const newNode = {
      path: node.path, name: node.name
    }
    if (node.redirect && node.redirect !== '') {
      newNode.redirect = node.redirect
    }
    newNode.meta = {
      icon: node.icon, title: node.title, hide: node.hide, menuType: node.menuType, iconType: node.iconType
    }
    if (node.component && node.component !== '') {
      try {
        newNode.component = _import(node.component)
        // eslint-disable-next-line no-empty
      } catch (e) {
        newNode.component = Main
      }
    }
    newNode.children = getChildren(node.id, allChildNode, allButtons)
    return newNode
  })
  return allParentNode
}

const getChildren = (parentId, allChildNode, allButtons) => {
  let childNode = allChildNode.filter(node => node.parentId === parentId)
  const newChildNode = []
  childNode.forEach(node => {
    const newNode = {
      path: node.path, name: node.name, sortValue: node.sortValue
    }
    const meta = {
      icon: node.icon, title: node.title, hide: node.hide, menuType: node.menuType, iconType: node.iconType
    }
    //0:菜单,1:按钮,2:目录
    if (node.menuType === 2) {
      newNode.children = getChildren(node.id, allChildNode, allButtons)
      if (node.component && node.component !== '') {
        try {
          newNode.component = _import_common(node.component)
          // eslint-disable-next-line no-empty
        } catch (e) {
          newNode.component = ForRouter
        }
      }
    } else if (node.menuType === 0) {
      if (node.redirect && node.redirect !== '') {
        newNode.redirect = node.redirect
      }
      try {
        newNode.component = _import(node.component)
      } catch (e) {
        console.log(e)
        newNode.component = error404
      }
      meta.buttons = allButtons.filter(button => button.parentId === node.id).map(item => item.name)
    }
    newNode.meta = meta
    newChildNode.push(newNode)
  })
  newChildNode.sort((a, b) => a.sortValue - b.sortValue)
  return newChildNode
}

export const generateMenuTree = (menus, skipBtn) => {
  let allParentMenu = []
  const allChildMenu = []

  menus.forEach(route => {
    if (skipBtn) {
      if (route.parentId === 0) {
        allParentMenu.push(route)
      } else if (route.menuType !== 1) {
        allChildMenu.push(route)
      }
    } else {
      if (route.parentId === 0) {
        allParentMenu.push(route)
      } else {
        allChildMenu.push(route)
      }
    }
  })
  allParentMenu.forEach(menu => {
    const child = getChildrenMenu(menu.id, allChildMenu)
    if (child && child.length > 0) {
      child.sort((a, b) => a.sortValue - b.sortValue)
      menu.children = child
    }
  })
  return allParentMenu
}

const getChildrenMenu = (parentId, allChildMenu) => {
  let childNode = allChildMenu.filter(node => node.parentId === parentId)
  childNode.forEach(menu => {
    const child = getChildrenMenu(menu.id, allChildMenu)
    if (child && child.length > 0) {
      child.sort((a, b) => a.sortValue - b.sortValue)
      menu.children = child
    }
  })
  return childNode
}
然后是vuex的代码,routePermission.js 用来请求后端路由数据,然后调用上面生成路由树的工具类生成路由树,然后保存到vuex里面,然其他地方也能访问到路由数据
import {system} from "@/api/system";
import {generateRoutes} from "@/utils";

const routePermission = {
  state: {
    myRoutes: [],
  },
   mutations: {
    setRoutes(state, routes) {
      state.myRoutes = routes
    },
     removeRoutes(state, routes) {
      state.myRoutes = []
    },
  },
   actions: {
    fetchRoutes({commit}, data) {
      let allRoutes
      return new Promise((resolve) => {
        system.listMenuRefRoles().then(res => {
          let hasRoute = false
          if (res.status === 200) {
            hasRoute = res.data.length > 0
            if (!hasRoute) {
              allRoutes = [{
                path: '/', redirect: '/401', hidden: true, children: [], meta: {title: '无权限访问', hide: true}
              }]
            } else {
              allRoutes = generateRoutes(res.data)
            }
            // 动态添加可访问路由表
            commit('setRoutes', allRoutes)
          }
          resolve({status: res.status, hasRoute: hasRoute})
        })
      })
    }, removeRoutes({commit}, data) {
      commit('removeRoutes')
    }
  }
}
export default routePermission
然后是拦截路由,permission.js 在每次进入路由时,判断如果vuex里面没有路由信息则重新拉一次,有的话直接进入路由,当前中间包括了一些鉴权,比如没有登录直接跳到登录页面,访问不存在的路由跳到404页面等等
import router from './router'
import store from './store'
import NProgress from 'nprogress' // Progress 进度条
import 'nprogress/nprogress.css' // Progress 进度条样式

const whiteList = ['/login', '/404', '/401'] // 不重定向白名单
router.beforeEach((to, from, next) => {
  NProgress.start()
  const token = sessionStorage.getItem("access_token");
  if (token) {
    if (to.path === '/login') {
      document.title = to.meta.title
      next({path: '/home'})
      NProgress.done() // if current page is dashboard will not trigger	afterEach hook, so manually handle it
    } else {
      if (to.meta.title) {
        document.title = to.meta.title
      } else {
        document.title = '加载中...'
      }
      if (store.getters.myRoutes.length === 0) {
        store.dispatch('fetchRoutes').then(({status, hasRoute}) => { // 生成可访问的路由表
          if (status === 400) {
            next({
              path: '/login', replace: true
            })
          } else if (status === 200 && hasRoute) {
            router.addRoutes(store.getters.myRoutes)
            if (router.getMatchedComponents({path: to.path}).length === 0) {
              next({path: '/404'})
            } else {
              next({...to, replace: true})
            }
          } else {
            next({
              path: '/401', replace: true
            })
          }
        })
      } else {
        if (router.getMatchedComponents({path: to.path}).length === 0) {
          next({path: '/404'})
        } else {
          next()
        }
      }
    }
  } else {
    if (whiteList.indexOf(to.path) !== -1) {
      if (to.path === '/login') {
        document.title = to.meta.title
      } else if (to.path) {
        document.title = to.meta.title
      }
      next()
    } else {
      document.title = '登陆'
      next('/login')
      NProgress.done()
    }
  }
})

router.afterEach(() => {
  NProgress.done() // 结束Progress
})
最后是判断是否有按钮权限的工具类,可以随便放在一个工具类的js里面
export const hasPerm = (route, ...btnCode) => {
  const buttons = route.meta.buttons
  let i = 0
  btnCode.forEach(item => {
    if (buttons.includes(item)) {
      i++
    }
  })
  return i > 0
}
在main.js引入并将其挂载到vue的原型链上
import {hasPerm} from "@/permission";
Vue.prototype.$hasPerm = hasPerm
然后新建一个ts声明文件,让我们在页面上使用的使用能自动提示出来
import Vue from "vue";
import type {Route} from "vue-router/types/router";

export {}; // 这句不能删,删除了报错
declare module 'vue/types/vue' {
  interface Vue {
    $hasPerm: (route: Route, ...btnCode: string) => boolean
  }
}


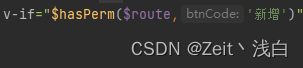
需要将当前路由传进去是因为我们的页面上的按钮集合是放在当前路由的meta里面的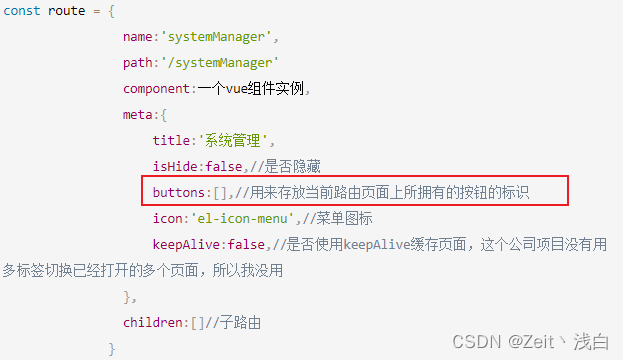 这样每个路由都有它自己拥有的按钮集合btnCode就是菜单标识字段,如果懒得每个按钮都加个英文标识,那就直接写中文标识也是一样的
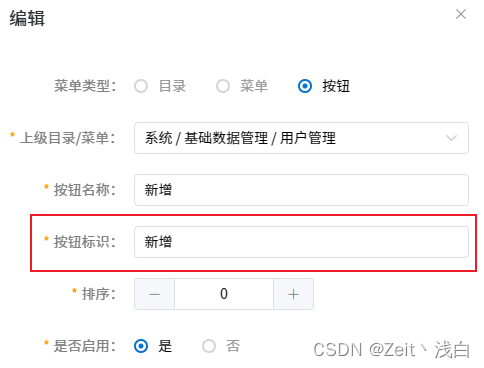
这样我们页面上也改一下
这样一个菜单权限控制+页面按钮权限控制就完成了。


 被折叠的 条评论
为什么被折叠?
被折叠的 条评论
为什么被折叠?
 到【灌水乐园】发言


