


说明
本篇文章介绍 MongoDB 二进制安装的步骤,整个过程还是比较简单。
1. 下载安装包
进入 MongoDB 官网,获取安装包的下载链接:
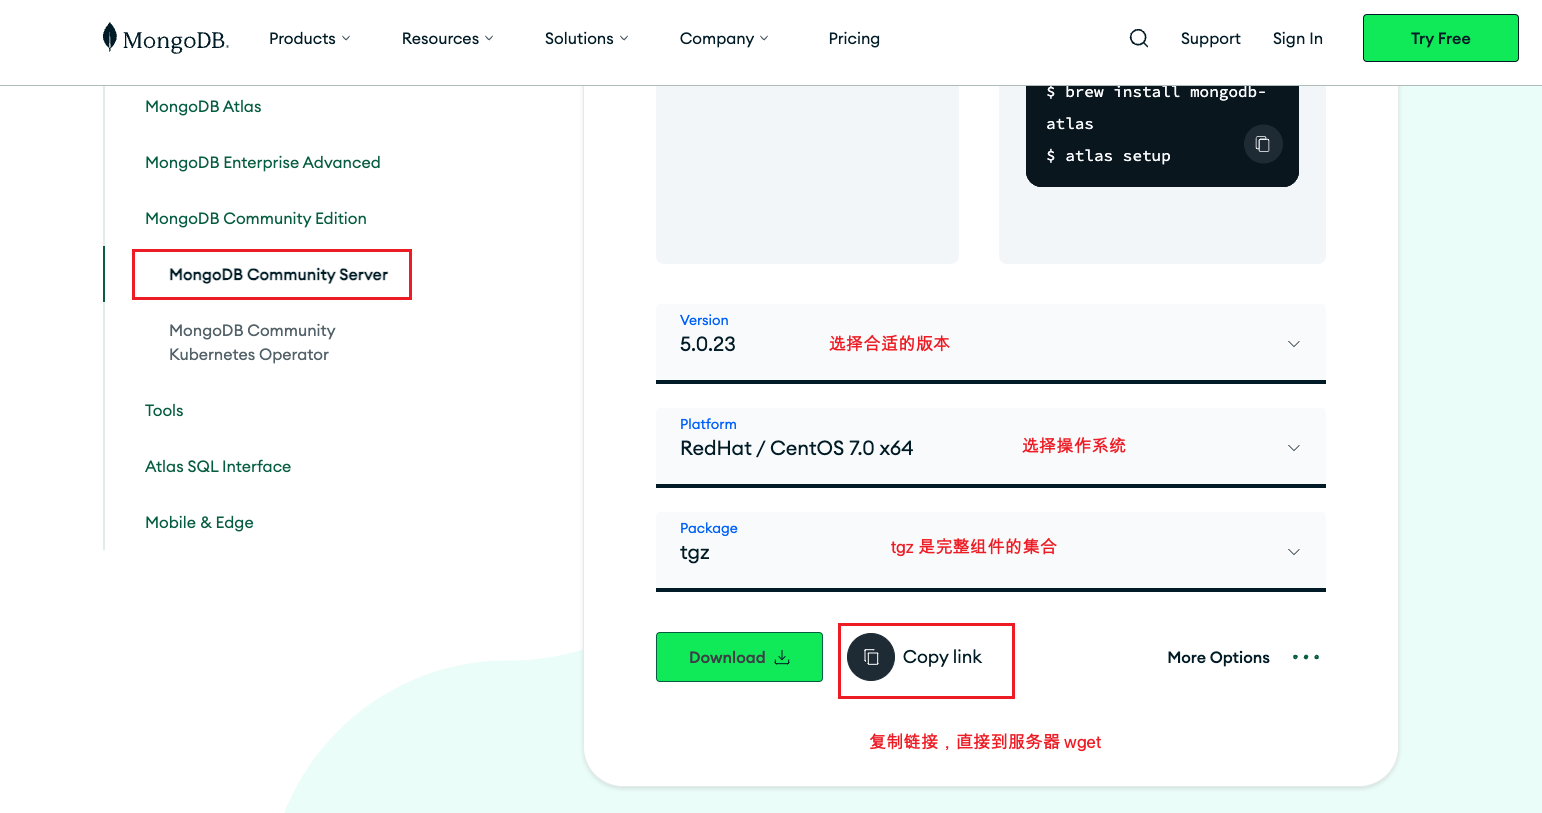
以下载 5.0.23 版本为例:
wget https://fastdl.mongodb.org/linux/mongodb-linux-x86_64-rhel70-5.0.23.tgz
2. 安装数据库
解压缩包:
tar -zxvf mongodb-linux-x86_64-rhel70-5.0.23.tgz
drwxr-xr-x 2 root root 70 12月 19 10:21 bin
-rw-r–r-- 1 root root 30608 11月 20 23:29 LICENSE-Community.txt
-rw-r–r-- 1 root root 16726 11月 20 23:29 MPL-2
-rw-r–r-- 1 root root 1977 11月 20 23:29 README
-rw-r–r-- 1 root root 77913 11月 20 23:29 THIRD-PARTY-NOTICES
mv mongodb-linux-x86_64-rhel70-5.0.23 /usr/local/mongodb
创建配置文件:
touch /usr/local/mongodb/mongod.conf
创建数据目录:
mkdir -p /data/mongodb/{data,logs,run}
创建 mongod 用户:
groupadd mongod
useradd -g mongod -s /sbin/nologin -r mongod
修改文件属组:
chown -R mongod:mongod /usr/local/mongodb/
chown -R mongod:mongod /data/mongodb/
配置环境变量:
echo "export PATH=\$PATH:/usr/local/mongodb/bin" >> /etc/profile
source /etc/profile
写入配置文件:
vi /usr/local/mongodb/mongod.conf
# where to write logging data.
systemLog:
  destination: file
  logAppend: true
  path: /data/mongodb/logs/mongod.log
# Where and how to store data.
storage:
  dbPath: /data/mongodb/data
  journal:
    enabled: true

# how the process runs
processManagement:
  fork: true  # fork and run in background
  pidFilePath: /data/mongodb/run/mongod.pid  # location of pidfile

# network interfaces
net:
  port: 27017
  bindIp: 0.0.0.0  # Enter 0.0.0.0,:: to bind to all IPv4 and IPv6 addresses or, alternatively, use the net.bindIpAll setting.
  maxIncomingConnections: 2000 # 最大连接数
security:
  authorization: enabled
启动 MongoDB:
PS:可以不用启动,直接配置 systemctl : )
/usr/local/mongodb/bin/mongod -f /usr/local/mongodb/mongod.conf
about to fork child process, waiting until server is ready for connections.
forked process: 28580
child process started successfully, parent exiting
关闭 MongoDB:
/usr/local/mongodb/bin/mongod -f /usr/local/mongodb/mongod.conf --shutdown
交互客户端中关闭 MongoDB:
use admin
db.shutdownServer()
3. 配置 systemctl
配置前需要把刚启动的 MongoDB 手动关闭掉,否则测试会报错。
vi /usr/lib/systemd/system/mongod.service
将下面内容,写入 mongod.service 中。
[Unit]
Description=MongoDB Database Server
Documentation=https://docs.mongodb.org/manual
After=network-online.target
Wants=network-online.target


[Service]
User=mongod
Group=mongod
Environment="OPTIONS=-f /usr/local/mongodb/mongod.conf"
ExecStart=/usr/local/mongodb/bin/mongod $OPTIONS
PermissionsStartOnly=true
PIDFile=/data/mongodb/run/mongod.pid
Type=forking
# file size
LimitFSIZE=infinity
# cpu time
LimitCPU=infinity
# virtual memory size
LimitAS=infinity
# open files
LimitNOFILE=64000
# processes/threads
LimitNPROC=64000
# locked memory
LimitMEMLOCK=infinity
# total threads (user+kernel)
TasksMax=infinity
TasksAccounting=false
# Recommended limits for mongod as specified in
# https://docs.mongodb.com/manual/reference/ulimit/#recommended-ulimit-settings


[Install]
WantedBy=multi-user.target
重新加载配置:
systemctl daemon-reload
# 启动
systemctl start mongod
# 查看状态
systemctl status mongod
# 设置开机自启
systemctl enable mongod
PS:如果使用 systemctl 启动失败,通常是目录授权问题,或者是未删除
mongod.lock找到它并删除再重试。
4. 创建 root 用户
配置文件中开启了授权,所以进入 MongoDB 后需要先创建 root 高权限账号。
use admin
db.createUser ( {user: "root",pwd: "admin123",roles: [{role: "root", db: "admin"}]})


 1725
1725


 被折叠的 条评论
为什么被折叠?
被折叠的 条评论
为什么被折叠?
 到【灌水乐园】发言


