


👉微信小程序第一节 —— 自定义顶部、底部导航栏以及获取胶囊体位置信息。
一、前言
📖📖📖书接上回 ,dai ga hou啊!我是 😘😘😘是江迪呀。在进行微信小程序开发中,组件是我们经常使用到的东西,它作为一个独立的模块封装了一些具有特定功能的元素、属性、方法和事件,一次定义可以被反复使用,大大提高了开发效率。微信小程序官方也定义了很多组件如:scroll-view、view等。我们也可以自定义,下面让我来浅谈下自定义组件以及常见用法。
二、微信小程序的组件
1.组件是啥以及作用?
1.1 组件
组件相当于一个独立的模块,一次定义随处可以使用。就像机器零件一样,它们都有着独特的功能和属性,可以根据需要组合使用,构建出一个完整的机器。每个零件都是独立的,可以单独使用,也可以与其他零件组合使用。
1.2 优点
- 提高代码复用性,减少代码量。
- 提高开发效率。
- 提高代码结构的清晰度和维护性。
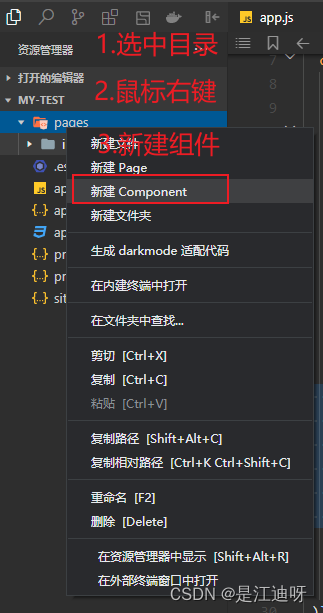
2.组件的创建和使用?
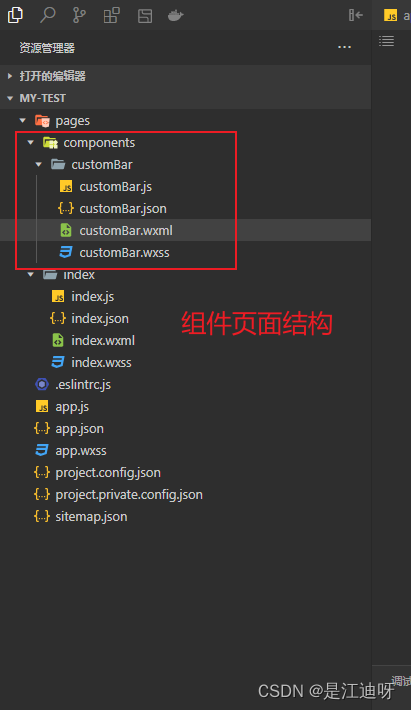
2.1 创建组件
下面以创建一个顶部导航组件为例来说明一下如何创建组件:
组件wxml代码:
<view style="height: {{customBar}}px;background-color:green;text-align: center;"></view>
组件js代码:
const app = getApp()
Component({
  /**
   * 组件的属性列表
   */
  properties: {

  },

  /**
   * 组件的初始数据
   */
  data: {
    screenHeight: app.globalData.screenHeight,
    statusBarHeight: app.globalData.statusBarHeight,
    customBar: app.globalData.CustomBar,
    tabBar: app.globalData.tabBarHeight,
    tabBarHeight: app.globalData.tabBarHeight
  },

  /**
   * 组件的方法列表
   */
  methods: {

  }
})
- 组件的方法是定义在
methods中的。 properties是组件属性,用于接收页面传参。
关于顶部导航位置信息的获取,请阅读我上一篇文章:自定义顶部、底部导航栏以及获取胶囊体位置信息。
customBar组件json文件:
这是关键就是将component属性设置为true,这是组件的标志。
{
  "component": true,
  "usingComponents": {}
}
2.2 使用组件
我们只需要在指定页面的.json文件中引入组件即可,下面在index中引入组件。
index.json代码:
{
  "usingComponents": {
    "customBar":"../components/customBar/customBar"
  }
}
index.wxml代码:
标签的名称和在.json文件中引入的保持一致。
<customBar></customBar>
效果:

3.组件的生命周期
执行顺序为created、attached、ready、moved 、detached。可以用于完成组件的初始化、更新和销毁等操作。而 error 阶段则是用于捕获和处理组件发生错误的情况。
3.1 created
组件实例被创建时触发,此时组件的属性和数据都已经初始化完成,但组件尚未渲染到页面中。
3.2 attached(常用)
组件实例被添加到页面中时触发,此时组件已经渲染到页面中,可以获取到页面的 DOM 节点,但还未进入生命周期函数。
3.3 ready
组件渲染完成时触发,此时组件已经进入生命周期函数,可以进行一些组件的初始化操作。
3.4 moved
组件实例被移动到新的节点时触发。
3.5 detached
组件实例被从页面中移除时触发,此时组件已经销毁,但可以重新被添加到页面中。
3.6 error
组件发生错误时触发,此时可以捕获并处理组件的错误信息。
4.组件常见用法
4.1 组件调用页面方法
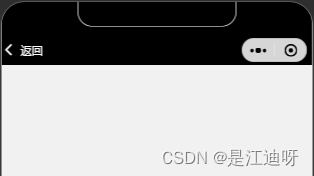
在一些场景中会需要在触发组件中方法后,调用页面的方法。我们只需要在组件总定义一个triggerEvent方法,然后绑定到页面中的方法即可实现。比如:顶部导航常常在左上角会有返回按钮,当按钮点击时需要触发页面的方法返回上级页面。如下面代码所示:
组件wxml代码:
<view style="height: {{customBar}}px;width: {{screenWidth}}px;background-color:black;position: fixed;">
    <view class="opertaion" style="top: {{capsuleTop}}px;height: {{capsuleHeight}}px;width:100px;position: fixed;display: flex;">
      <view class="cuIcon-back" style="color: rgb(255, 255, 255);font-size: 18px;display: flex;align-items: center;flex: 1;" bindtap="backPage"> </view>
      <view style="display: flex;align-items: center;flex:3;color: white;" bindtap="backPage">返回</view>
    </view>
</view>
效果:
组件js代码:
const app = getApp()
Component({
  properties: {
  },
  data: {
    customBar: app.globalData.CustomBar,
    capsuleTop: app.globalData.capsuleTop,
    capsuleHeight: app.globalData.capsuleHeight,
    capsuleWidth: app.globalData.capsuleWidth,
    screenWidth: app.globalData.screenWidth,
    showTitle:true,
  },
  methods: {
    //返回上级页面
    backPage(){
      //value是传递的参数
      this.triggerEvent('backEvent',{value:1})
    }
  }
})
引入页面wxml代码:
<customBar bind:backEvent="backPage"></customBar>
引入页面js代码:
// index.js
const app = getApp()
Page({
  data: {},
  backPage(value){
    console.log(value)
    wx.navigateBack({
      delta:value.detail.value
    })
  }
})
4.2 页面调用组件方法
页面调用组件中的方法也是在很多场景中出现的。一般常用的调用组件的方法是给组件一个id,然后通过id获取该组件元素,进而可以调用组件中的方法。下面是一个引入页面控制组件中页面标题显隐的例子:
页面wxml代码:
<!--给组件一个id customBar -->
<customBar id="customBar" bind:backEvent="backPage"></customBar>
<button style="position: relative; top: 500px;" bindtap="hideTitle">隐去标题</button>
页面js代码:
通过id获取组件元素
// index.js
const app = getApp()
Page({
  data: {
    screenHeight: app.globalData.screenHeight,
    statusBarHeight: app.globalData.statusBarHeight,
    customBar: app.globalData.CustomBar,
    tabBar: app.globalData.tabBarHeight,
    tabBarHeight: app.globalData.tabBarHeight
  },
  //隐藏组件中的标题
  hideTitle(){
    let customerBarComponent = this.selectComponent("#customBar")
    customerBarComponent.setShowTitle();
  }
})
组件js文件:
在组件中添加执行隐藏标题的方法
const app = getApp()
Component({
  properties: {},
  data: {
    customBar: app.globalData.CustomBar,
    capsuleTop: app.globalData.capsuleTop,
    capsuleHeight: app.globalData.capsuleHeight,
    capsuleWidth: app.globalData.capsuleWidth,
    screenWidth: app.globalData.screenWidth,
    showTitle:true,
  },
  methods: {
    //执行隐藏组件标题
    setShowTitle(value){
      this.setData({
        showTitle:false
      })
    }
  }
})
4.3 页面给组件传参
拿自定义顶部导航的例子来说,首页不需要返回按钮,而二级页面则需要,但是总不能定义两个组件一个用于首页一个用于二级页面吧,这样的话组件就是失去了高复用的优点,也就没什么意义了。想要组件能够接收页面传过来的参数,需要在组件的properties:{}中定义对应的参数。
下面是给组件传参控制返回按钮显隐的例子:
组件wxml代码:
<view style="height: {{customBar}}px;width: {{screenWidth}}px;background-color:black;position: fixed;">
    <view class="opertaion" style="top: {{capsuleTop}}px;height: {{capsuleHeight}}px;width: {{screenWidth-capsuleWidth}}px;position: fixed;display: flex;">
      <view class="cuIcon-back" wx:if="{{showBack}}" style="color: rgb(255, 255, 255);font-size: 18px;display: flex;align-items: center;flex: 1;" bindtap="backPage"> </view>
      <view wx:if="{{showBack}}" style="display: flex;align-items: center;flex:4;color: white;" bindtap="backPage">返回</view>
</view>
组件js代码:
这里的关键就是在properties中定义传参类型。
const app = getApp()
Component({
  properties: {
  	//定义参数
    showBack:{
      type:Boolean,
      value:true
    }
  },
  data: {
    customBar: app.globalData.CustomBar,
    capsuleTop: app.globalData.capsuleTop,
    capsuleHeight: app.globalData.capsuleHeight,
    capsuleWidth: app.globalData.capsuleWidth,
    screenWidth: app.globalData.screenWidth,
    showTitle:true,
  },
  methods: {
    //返回上级页面
    backPage(){
      this.triggerEvent('backEvent',{value:1})
    },
    setShowTitle(value){
      this.setData({
        showTitle:false
      })
    }
  }
})
我们还可以定义observer方法来实现对传参监听。如下所示:
//定义参数
    showBack:{
      type:Boolean,
      value:true,
      observer: function(newValue){
      	console.log("页面传值:",newValue)
      }
    }
页面wxml代码:
使用组件中定义的showBack参数:
<customBar id="customBar" bind:backEvent="backPage" showBack="{{true}}"></customBar>
<button style="position: relative; top: 500px;" bindtap="hideTitle">隐去标题</button>
这里有一点需要注意,如果传递的参数类型是布尔类型需要使用{{}}进行包裹,否则无法正常的接收!


 1万+
1万+


 被折叠的 条评论
为什么被折叠?
被折叠的 条评论
为什么被折叠?
 到【灌水乐园】发言


