


JDBC和JPA的对比
-
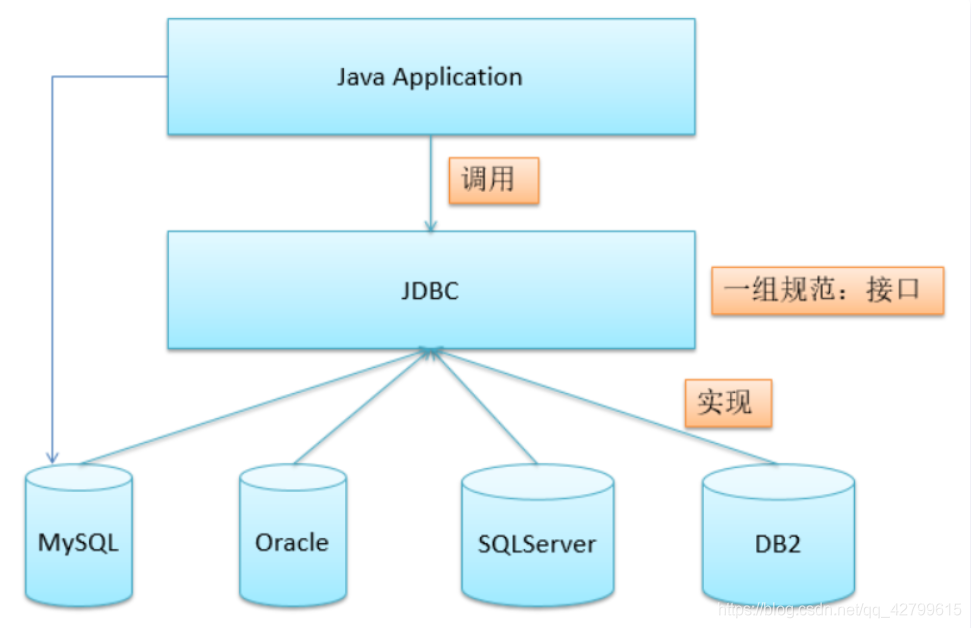
JDBC(Java Database Connectivity)提供一种接口,它是由各种数据库厂商提供类和接口组成的数据库驱动,为多种数据库提供统一访问。我们使用数据库时只需要调用JDBC接口就行了。
JDBC的用途:与数据库建立连接、发送 操作数据库的语句并处理结果。
JDBC示意图
-
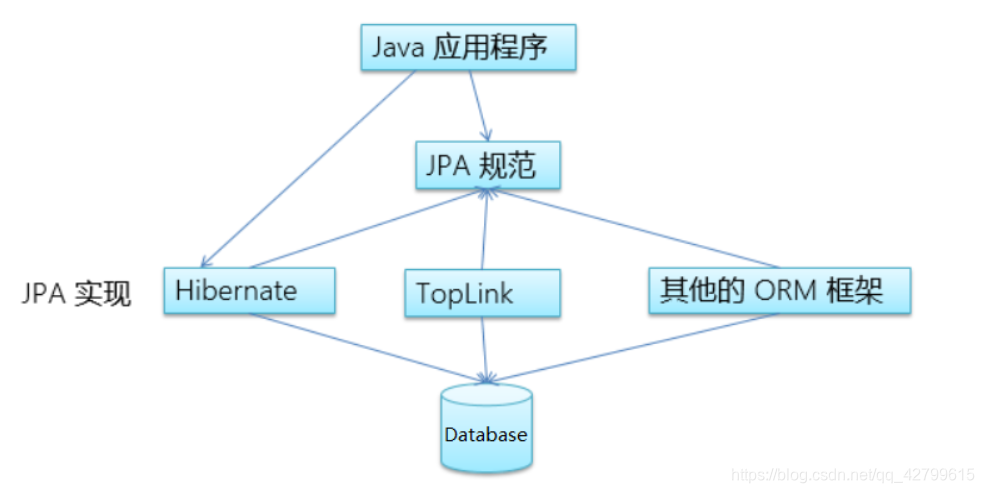
JPA(Java Peisitence API)是Java持久层API。它是对java应用程序访问ORM(对象关系映射)框架的规范。为了我们能用相同的方法使用各种ORM框架。
JPA用途:简化现有Java EE和Java SE应用开发工作;整合ORM技术。
使用JPA只需要创建实体(这和创建一个POJO(Plain Ordinary Java Object)简单的Java对象一样简单),用@entity进行注解。在Spring Data JPA中,定义一个简单的接口,用于把对象持久化到数据库的仓库。
常见ORM框架:Hibernate。由于MyBatis需要手写SQL,所以不完全属于ORM框架,而Hibernate则完全不需要手写SQL。
JPA示意图
不同点:
-
使用的sql语言不同:
JDBC使用的是基于关系型数据库的标准SQL语言;
JPA通过面向对象而非面向数据库的查询语言查询数据,避免程序的SQL语句紧密耦合。
-
操作的对象不同:
JDBC操作的是数据,将数据通过SQL语句直接传送到数据库中执行:
JPA操作的是持久化对象,由底层持久化对象的数据更新到数据库中。
-
数据状态不同:
JDBC操作的数据是“瞬时”的,变量的值无法与数据库中的值保持一致;
JPA操作的数据时可持久的,即持久化对象的数据属性的值是可以跟数据库中的值保持一致的。
Spring Boot中使用JDBC读取和写入数据
Spring对JDBC的支持主要在于JdbcTemplate类
JdbcTemplate类中主要有如下方法
-
batchUpdate(...)//批量更新 -
execute(...)//执行SQL语句 -
query(...)//查询并返回相应值 -
queryForList(...)//查询并返回一个List -
queryForObject(...)//查询并返回一个Object -
queryForMap(...)//查询并返回一个Map -
queryForRowSet(...)//查询并返回一个RowSet -
update(...)//执行一条插入或更新语句
使用JdbcTemplate查询数据库的例子
JdbcTemplate中的queryForObject(String sql, RowMapper<T> rowMapper, @Nullable Object... args)方法是将查询得到的结果映射为一个Object。
public Ingredient findById(String id) {
    return jdbc.queryForObject(
        "select id, name, type from Ingredient where id=?",
        this::mapRowToIngredient, id);
}

//mapRowToIngredient方法,ResultSet是查询返回的结果集
private Ingredient mapRowToIngredient(ResultSet rs, int rowNum)
    throws SQLException {
    return new Ingredient(
        rs.getString("id"),
        rs.getString("name"),
        Ingredient.Type.valueOf(rs.getString("type")));
}

/****************************	等效于	 ************************************/
public Ingredient findById(String id) {
    return jdbc.queryForObject(
        "select id, name, type from Ingredient where id=?",
        new RowMapper<Ingredient>() {
            public Ingredient mapRow(ResultSet rs, int rowNum)
                throws SQLException {
                return new Ingredient(
                    rs.getString("id"),
                    rs.getString("name"),
                    Ingredient.Type.valueOf(rs.getString("type")));
            };
        }, id);
}
findById方法中调用的queryForObject方法中需要传入一个RowMapper的实例
@Override
@Nullable
public <T> T queryForObject(String sql, RowMapper<T> rowMapper, @Nullable Object... args) throws DataAccessException {
    List<T> results = query(sql, args, new RowMapperResultSetExtractor<>(rowMapper, 1));
    return DataAccessUtils.nullableSingleResult(results);
}
RowMapper<T>接口中只有一个T mapRow(ResultSet rs, int rowNum) throws SQLException抽象方法。需要一个子类来继承RowMapper并实现mapRow方法。如果使用Lambda,则只需要传入相应所需执行的代码。
@FunctionalInterface
public interface RowMapper<T> {

	@Nullable
	T mapRow(ResultSet rs, int rowNum) throws SQLException;
}
-
ResultSet是查询数据库所返回的结果集。 -
mapRow方法是将查询所得到数据库的一行映射为一个对象,也就是将ResultSet的第一行映射为一个Object。
对Lambda表达式不熟悉的可以移步我的另一篇博文:
Java中Lambda对比匿名内部类
使用JdbcTemplate的步骤
调整对象
一般来说,为了将对象持久化到数据库中需要增加id和createdTime字段,id一般都设置为自增,由数据库自动生成。同时需要为每个实体类增加get,set方法。如果使用了Lombok,只需要添加@Data注解,就会在运行时自动为对象增加上get和set方法,从而避免了手写get和set方法时的繁琐。
import java.util.Date;
import java.util.List;

import lombok.Data;

@Data
public class Taco {

  private Long id;
  private Date createdAt;
  ...
}
导入依赖
首先需要Jdbc的依赖
<dependency>
    <groupId>org.springframework.boot</groupId>
    <artifactId>spring-boot-starter-jdbc</artifactId>
</dependency>
然后需要配置数据库
如下给出了H2数据库和MySQL的配置示例
配置H2数据库
<dependency>
    <groupId>com.h2database</groupId>
    <artifactId>h2</artifactId>
    <scope>runtime</scope>
</dependency>
<!-- 引入spring-boot-devtools的目的是在运行时可以访问H2数据库 -->
<dependency>
    <groupId>org.springframework.boot</groupId>
    <artifactId>spring-boot-devtools</artifactId>
    <scope>runtime</scope>
</dependency>
如果需要初始化数据库,特别是H2数据库。
可以在resourse文件夹下新建两个sql文件:schema.sql和data.sql
-
scheaml.sql中的SQL用于初始化数据库,比如创建表。 -
data.sql中的SQL语句用来插入数据
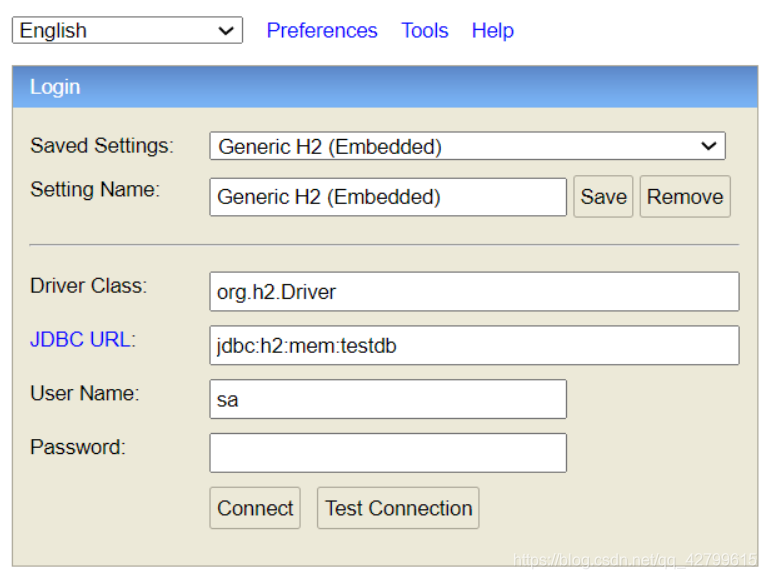
默认的访问地址如下:
http://localhost:8080/h2-console/
默认的JDBC的连接为:jdbc:h2:mem:testdb,默认的用户名为sa,密码为空
Spring Boot控制台打印的日志显示了连接H2数据库的JDBC URL。

H2数据库访问页面
配置MySQL
mysql-connector得根据数据库的版本来选择,8.0的数据库就得选择版本为8或者以上的mysql-connector。
<dependency>
    <groupId>mysql</groupId>
    <artifactId>mysql-connector-java</artifactId>
    <version>8.0.22</version>
</dependency>
然后在application.properties中配置连接相关的信息
spring.datasource.driver-class-name=com.mysql.jdbc.Driver
spring.datasource.url=jdbc:mysql://localhost:3306/test
spring.datasource.username=root
spring.datasource.password=123456
定义JDBC Repository
比如有一个Ingredient的对象对应着数据库中Ingredient的表,其属性分别对应着数据库中(id, name, type)这几个字段。我们需要定义如下方法:
- 从数据中查询所有的Ingredient的信息,并将其保存到一个Ingredient的集合中
- 根据id查询单个Ingredient
- 保存Ingredient对象到数据库中
首先需要定义IngredientRepository的interface
package tacos.data;
import tacos.Ingredient;

public interface IngredientRepository {

  Iterable<Ingredient> findAll();

  Ingredient findById(String id);

  Ingredient save(Ingredient ingredient);

}
然后需要使用JdbcTemplate来具体实现这个接口
package tacos.data;

import java.sql.ResultSet;
import java.sql.SQLException;

import org.springframework.beans.factory.annotation.Autowired;
import org.springframework.jdbc.core.JdbcTemplate;
import org.springframework.jdbc.core.RowMapper;
import org.springframework.stereotype.Repository;

import tacos.Ingredient;

@Repository//为JdbcIngredientRepository定义了@Repository以后,Spring扫描到这个类时,就会将其初始化为Spring上下文中的一个Bean
public class JdbcIngredientRepository implements IngredientRepository {

  private JdbcTemplate jdbc;

  //只要我们在pom.xml中导入JDBC的依赖,Spring Boot就会为我们自动配置一个JdbcTemplate的Bean,
  //我们只需要将这个Bean注入到我们的代码中
  @Autowired
  public JdbcIngredientRepository(JdbcTemplate jdbc) {
    this.jdbc = jdbc;
  }

  @Override
  public Iterable<Ingredient> findAll() {
    return jdbc.query("select id, name, type from Ingredient",
        this::mapRowToIngredient);
  }

  @Override
  public Ingredient findById(String id) {
    return jdbc.queryForObject(
        "select id, name, type from Ingredient where id=?",
        this::mapRowToIngredient, id);
  }

  @Override
  public Ingredient save(Ingredient ingredient) {
    jdbc.update(
        "insert into Ingredient (id, name, type) values (?, ?, ?)",
        ingredient.getId(),
        ingredient.getName(),
        ingredient.getType().toString());
    return ingredient;
  }

  private Ingredient mapRowToIngredient(ResultSet rs, int rowNum)
      throws SQLException {
    return new Ingredient(
        rs.getString("id"),
        rs.getString("name"),
        Ingredient.Type.valueOf(rs.getString("type")));
  }
}
在Controller中注入和使用repository
package tacos.web;

import java.util.ArrayList;
import java.util.List;
import java.util.stream.Collectors;

import org.springframework.beans.factory.annotation.Autowired;
import org.springframework.stereotype.Controller;
import org.springframework.ui.Model;
import org.springframework.validation.Errors;
import org.springframework.web.bind.annotation.GetMapping;
import org.springframework.web.bind.annotation.ModelAttribute;
import org.springframework.web.bind.annotation.PostMapping;
import org.springframework.web.bind.annotation.RequestMapping;
import org.springframework.web.bind.annotation.SessionAttributes;

import tacos.Ingredient;
import tacos.Ingredient.Type;
import tacos.data.IngredientRepository;

@Controller
@RequestMapping("/design")
@SessionAttributes("order")
public class DesignTacoController {

  private final IngredientRepository ingredientRepo;

  //IngredientRepository使用了@Repository注解,IngredientRepository的Bean就会被注册到Spring的上下文中,因此这里只需注入即可
  @Autowired
  public DesignTacoController(IngredientRepository ingredientRepo) {
    this.ingredientRepo = ingredientRepo;
  }

  @GetMapping
  public String showDesignForm(Model model) {
    List<Ingredient> ingredients = new ArrayList<>();
    ingredientRepo.findAll().forEach(i -> ingredients.add(i));

    Type[] types = Ingredient.Type.values();
    for (Type type : types) {
      model.addAttribute(type.toString().toLowerCase(),
          filterByType(ingredients, type));
    }
    return "design";
  }

  private List<Ingredient> filterByType(List<Ingredient> ingredients, Type type) {
    return ingredients
              .stream()
              .filter(x -> x.getType().equals(type))
              .collect(Collectors.toList());
  }
}
初始化表
在使用数据库中相应的表之前,得先创建数据库,或许还要初始化一些数据。
这时候可以在resourse文件夹下新建两个sql文件:schema.sql和data.sql。
scheaml.sql中的SQL用于初始化数据库,比如创建表。data.sql中的SQL语句用来插入数据
schemal.sql
create table if not exists Ingredient (
  id varchar(4) not null,
  name varchar(25) not null,
  type varchar(10) not null
);

create table if not exists Taco (
  id identity,
  name varchar(50) not null,
  createdAt timestamp not null
);

create table if not exists Taco_Ingredients (
  taco bigint not null,
  ingredient varchar(50) not null
);

alter table Taco_Ingredients
    add foreign key (taco) references Taco(id);
alter table Taco_Ingredients
    add foreign key (ingredient) references Ingredient(id);

create table if not exists Taco_Order (
	id identity,
	deliveryName varchar(50) not null,
	deliveryStreet varchar(50) not null,
	deliveryCity varchar(50) not null,
	deliveryState varchar(50) not null,
	deliveryZip varchar(50) not null,
	ccNumber varchar(50) not null,
	ccExpiration varchar(50) not null,
	ccCVV varchar(50) not null,
    placedAt timestamp not null
);

create table if not exists Taco_Order_Tacos (
	tacoOrder bigint not null,
	taco bigint not null
);

alter table Taco_Order_Tacos
    add foreign key (tacoOrder) references Taco_Order(id);
alter table Taco_Order_Tacos
    add foreign key (taco) references Taco(id);
data.sql
delete from Taco_Order_Tacos;
delete from Taco_Ingredients;
delete from Taco;
delete from Taco_Order;

delete from Ingredient;
insert into Ingredient (id, name, type)
                values ('FLTO', 'Flour Tortilla', 'WRAP');
insert into Ingredient (id, name, type)
                values ('COTO', 'Corn Tortilla', 'WRAP');
insert into Ingredient (id, name, type)
                values ('GRBF', 'Ground Beef', 'PROTEIN');
insert into Ingredient (id, name, type)
                values ('CARN', 'Carnitas', 'PROTEIN');
insert into Ingredient (id, name, type)
                values ('TMTO', 'Diced Tomatoes', 'VEGGIES');
insert into Ingredient (id, name, type)
                values ('LETC', 'Lettuce', 'VEGGIES');
insert into Ingredient (id, name, type)
                values ('CHED', 'Cheddar', 'CHEESE');
insert into Ingredient (id, name, type)
                values ('JACK', 'Monterrey Jack', 'CHEESE');
insert into Ingredient (id, name, type)
                values ('SLSA', 'Salsa', 'SAUCE');
insert into Ingredient (id, name, type)
                values ('SRCR', 'Sour Cream', 'SAUCE');
SimpleJdbcInsert对比JdbcTemplate
到此JdbcTemplate的基本使用就到此结束,下面将介绍SimpleJdbcInsert。对比JdbcTemplate,它的功能更强大些,插入数据也更加方便
插入一行数据可以直接使用JdbcTemplate中的update方法。
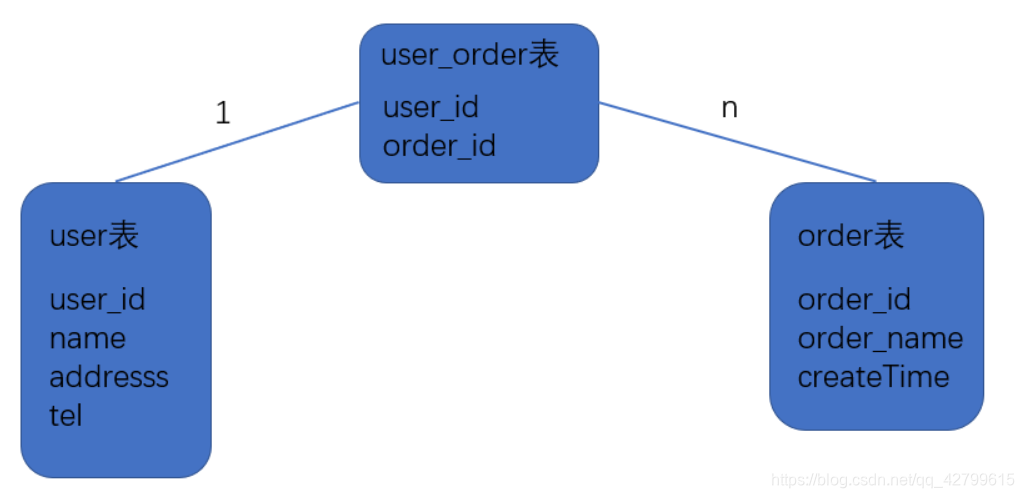
但是考虑到多表关联的情况,使用JdbcTemplate就有些麻烦:
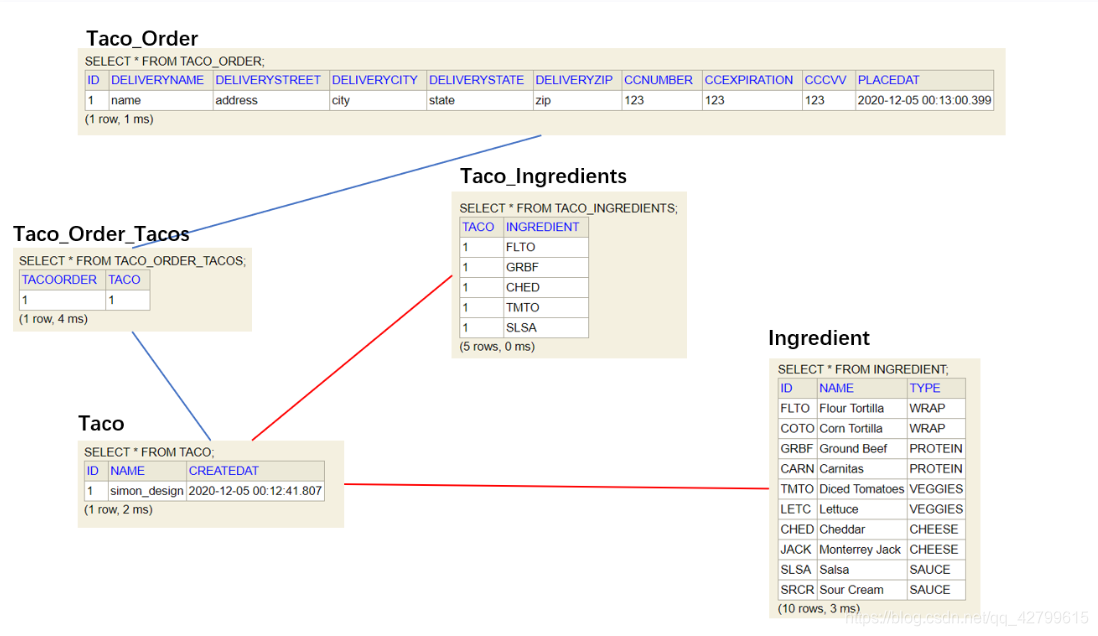
如下所示:有三张表,一个用户可以创建多个订单,所以user_order表中一个user可以对应多条order。
我们在创建订单的时候,除了需要将该订单插入order表中,还需要将order_id插入到user_order表中。通常来说id字段都是自增的,我们只需要往order表中插入order_name以及createTime就会自动为该记录生成一个order_id。插入成功以后,我们需要取出该记录的order_id,与user_id一起插入到user_order表中。
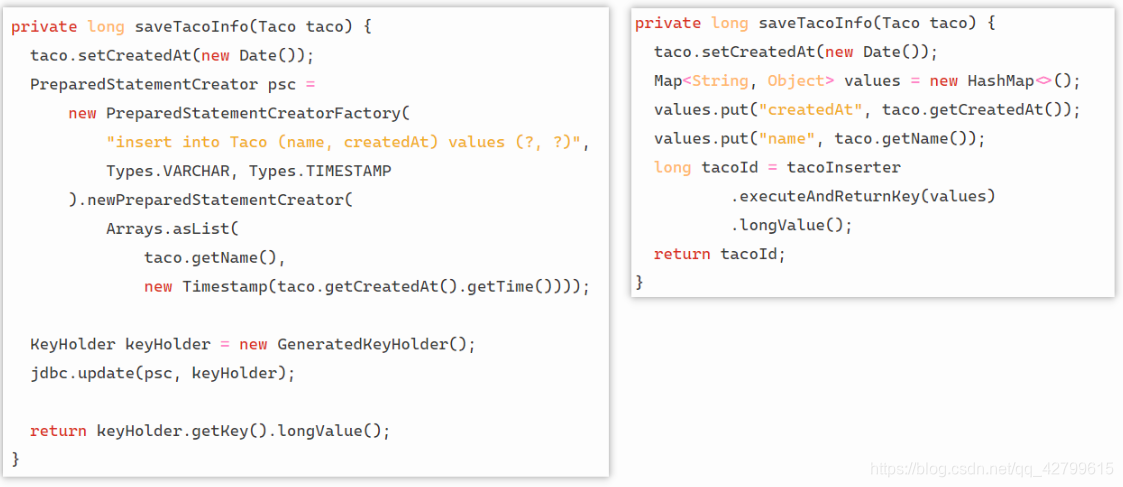
对比两段代码来看看在实现方法上两者的差别
代码中相应的表的字段以及相互关系如下:
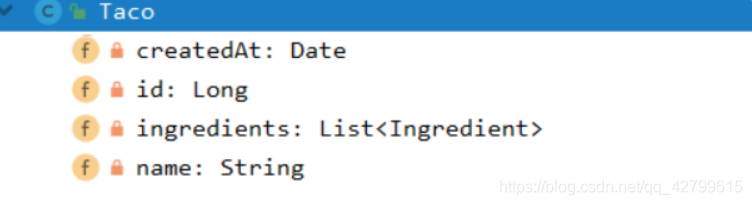
Taco对应Java对象有如下属性:
如下代码的作用都是分别将order中的信息分别插入到Taco表和Taco_Ingredients表表
使用JdbcTemplate进行插入
package tacos.data;

import java.sql.Timestamp;
import java.sql.Types;
import java.util.Arrays;
import java.util.Date;

import org.springframework.jdbc.core.JdbcTemplate;
import org.springframework.jdbc.core.PreparedStatementCreator;
import org.springframework.jdbc.core.PreparedStatementCreatorFactory;
import org.springframework.jdbc.support.GeneratedKeyHolder;
import org.springframework.jdbc.support.KeyHolder;
import org.springframework.stereotype.Repository;

import tacos.Ingredient;
import tacos.Taco;

@Repository
public class JdbcTacoRepository implements TacoRepository {

  private JdbcTemplate jdbc;

  public JdbcTacoRepository(JdbcTemplate jdbc) {
    this.jdbc = jdbc;
  }

  @Override
  public Taco save(Taco taco) {
    long tacoId = saveTacoInfo(taco);
    taco.setId(tacoId);
    for (Ingredient ingredient : taco.getIngredients()) {
      saveIngredientToTaco(ingredient, tacoId);
    }

    return taco;
  }

  private long saveTacoInfo(Taco taco) {
    taco.setCreatedAt(new Date());
    PreparedStatementCreator psc =
        new PreparedStatementCreatorFactory(
            "insert into Taco (name, createdAt) values (?, ?)",
            Types.VARCHAR, Types.TIMESTAMP
        ).newPreparedStatementCreator(
            Arrays.asList(
                taco.getName(),
                new Timestamp(taco.getCreatedAt().getTime())));

    KeyHolder keyHolder = new GeneratedKeyHolder();
    jdbc.update(psc, keyHolder);

    return keyHolder.getKey().longValue();
  }

  private void saveIngredientToTaco(
          Ingredient ingredient, long tacoId) {
    jdbc.update(
        "insert into Taco_Ingredients (taco, ingredient) " +
        "values (?, ?)",
        tacoId, ingredient.getId());
  }
}
使用SimpleJdbcInsert进行插入
package tacos.data;

import org.springframework.beans.factory.annotation.Autowired;
import org.springframework.jdbc.core.JdbcTemplate;
import org.springframework.jdbc.core.PreparedStatementCreator;
import org.springframework.jdbc.core.PreparedStatementCreatorFactory;
import org.springframework.jdbc.core.simple.SimpleJdbcInsert;

import org.springframework.stereotype.Repository;
import tacos.Ingredient;
import tacos.Taco;

import java.util.Date;
import java.util.HashMap;
import java.util.Map;

@Repository
public class JdbcTacoRepository implements TacoRepository {

  private SimpleJdbcInsert tacoInserter;
  private SimpleJdbcInsert tacoIngredientsInserter;

  @Autowired
  public JdbcTacoRepository(JdbcTemplate jdbc) {
    this.tacoInserter = new SimpleJdbcInsert(jdbc)
            .withTableName("Taco")
            .usingGeneratedKeyColumns("id");
    this.tacoIngredientsInserter = new SimpleJdbcInsert(jdbc)
            .withTableName("Taco_Ingredients");
  }

  @Override
  public Taco save(Taco taco) {
    long tacoId = saveTacoInfo(taco);
    taco.setId(tacoId);
    for (Ingredient ingredient : taco.getIngredients()) {
      saveIngredientToTaco(ingredient, tacoId);
    }
    return taco;
  }

  private void saveIngredientToTaco(Ingredient ingredient, long tacoId) {
    Map<String, Object> values = new HashMap<>();
    values.put("taco", tacoId);
    values.put("ingredient", ingredient.getId());
    tacoIngredientsInserter.execute(values);
  }

  private long saveTacoInfo(Taco taco) {
    taco.setCreatedAt(new Date());
    Map<String, Object> values = new HashMap<>();
    values.put("createdAt", taco.getCreatedAt());
    values.put("name", taco.getName());
    long tacoId = tacoInserter
            .executeAndReturnKey(values)
            .longValue();
    return tacoId;
  }
}
对比SimpleJdbcInsert和JdbcTemplate的使用
左边是使用JdbcTemplate。为了得到插入数据以后生成的tacoId。需要使用PreparedStatementCreator和keyHolder。相比之下,SimpleJdbcInsert的代码则要简洁很多。
Spring Boot中使用JPA读取和写入数据
对于非关系型数据库,可以参考我的另一篇文章:
Spring Boot中使用MongoDB,使用 Repository以及使用MongoTemplate
使用步骤
以使用JPA连接MySQL5.7为例
导入依赖
<!-- 开启JPA支持 -->
<dependency>
	<groupId>org.springframework.boot</groupId>
	<artifactId>spring-boot-starter-data-jpa</artifactId>
</dependency>

<!-- 连接MySQL所必备的,注意根据MySQL版本的不同选择不同版本的connector  -->
<dependency>
	<groupId>mysql</groupId>
	<artifactId>mysql-connector-java</artifactId>
	<version>5.1.47</version>
</dependency>

<dependency>
	<groupId>org.projectlombok</groupId>
	<artifactId>lombok</artifactId>
</dependency>
在配置文件中进行配置
在application.properties中进行如下配置
spring.jpa.hibernate.ddl-auto=update
spring.jpa.properties.hibernate.show_sql=true
spring.jpa.properties.hibernate.format_sql=true

#my_test对应着对应着需要使用的数据库名称
spring.datasource.url=jdbc:mysql://localhost:3306/my_test?useSSL=false
spring.datasource.username=root
spring.datasource.password=123456
spring.datasource.driver-class-name=com.mysql.jdbc.Driver
需要注意:spring.jpa.hibernate.ddl-auto这个属性是必须配置的,它指定了表结构的自动生成的策略。
spring.jpa.hibernate.ddl-auto有如下属性值可选。create和create-drop要慎用。
- ddl-auto=create :每次运行该程序,没有表格会新建表格,表内有数据会清空;
- ddl-auto=create-drop :每次程序结束的时候会清空表
- ddl-auto=update : 每次运行程序,没有表格会新建表格,表内有数据不会清空,只会更新
- ddl-auto=validate : 运行程序会校验数据与数据库的字段类型是否相同,不同会报错。
定义实体Model
与JDBC不同的是,使用JPA。表结构都不需要自己去定义,会在运行的过程中自动根据定义的实体类生成相应的表结构。
package tacos.ingredients;

import javax.persistence.Entity;
import javax.persistence.Id;

import lombok.AccessLevel;
import lombok.Data;
import lombok.NoArgsConstructor;
import lombok.RequiredArgsConstructor;
//@Table这个注解可以用来指定需要生成的表名,如果没有指定,则默认生成的表名是类名的首字母小写
//@Table(name = "T_Ingredient")
@Data
@RequiredArgsConstructor
@NoArgsConstructor(access=AccessLevel.PRIVATE, force=true)
@Entity//定义为一个实体,Spring Boot会自定为其生成对应的表结构
public class Ingredient {

  @Id
  private final String id;
  private final String name;
  private final Type type;

  public static enum Type {
    WRAP, PROTEIN, VEGGIES, CHEESE, SAUCE
  }
}
声明Repository接口
只需声明相应的接口,不需要去实现。
除了去继承CrudRepository<T, ID>以外还可以去继承PagingAndSortingRepository<T, ID>和JpaRepository<T, ID>。
package tacos.ingredients;

import org.springframework.data.repository.CrudRepository;
import org.springframework.web.bind.annotation.CrossOrigin;

@CrossOrigin(origins="*")
public interface IngredientRepository
         extends CrudRepository<Ingredient, String> {

}
开启注解支持
在启动类上使用@EnableJpaRepositories开启注解支持
package tacos.ingredients;

import org.springframework.boot.SpringApplication;
import org.springframework.boot.autoconfigure.SpringBootApplication;
import org.springframework.cloud.netflix.hystrix.EnableHystrix;
import org.springframework.data.jpa.repository.config.EnableJpaRepositories;

@SpringBootApplication
@EnableJpaRepositories
public class IngredientServiceApplication {

	public static void main(String[] args) {
		SpringApplication.run(IngredientServiceApplication.class, args);
	}
}
开始使用
package tacos.ingredients;

import java.net.URI;
import java.util.Optional;

import org.springframework.beans.factory.annotation.Autowired;
import org.springframework.http.HttpHeaders;
import org.springframework.http.HttpStatus;
import org.springframework.http.ResponseEntity;
import org.springframework.web.bind.annotation.CrossOrigin;
import org.springframework.web.bind.annotation.DeleteMapping;
import org.springframework.web.bind.annotation.GetMapping;
import org.springframework.web.bind.annotation.PathVariable;
import org.springframework.web.bind.annotation.PostMapping;
import org.springframework.web.bind.annotation.PutMapping;
import org.springframework.web.bind.annotation.RequestBody;
import org.springframework.web.bind.annotation.RequestMapping;
import org.springframework.web.bind.annotation.RestController;

@RestController
@RequestMapping(path="/ingredients", produces="application/json")
@CrossOrigin(origins="*")
public class IngredientController {

  private IngredientRepository repo;

  @Autowired//注入IngredientRepository的Bean
  public IngredientController(IngredientRepository repo) {
    this.repo = repo;
  }

  @GetMapping
  public Iterable<Ingredient> allIngredients() {
  	//查询数据库中所有记录
    return repo.findAll();
  }

  @GetMapping("/{id}")
  public Optional<Ingredient> byId(@PathVariable String id) {
    //查询id进行查询
    return repo.findById(id);
  }

  @PutMapping("/{id}")
  public void updateIngredient(@PathVariable String id, @RequestBody Ingredient ingredient) {
    if (!ingredient.getId().equals(id)) {
      throw new IllegalStateException("Given ingredient's ID doesn't match the ID in the path.");
    }
    //往数据库中插入数据
    repo.save(ingredient);
  }

  @PostMapping
  public ResponseEntity<Ingredient> postIngredient(@RequestBody Ingredient ingredient) {
    Ingredient saved = repo.save(ingredient);
    HttpHeaders headers = new HttpHeaders();
    headers.setLocation(URI.create("http://localhost:8080/ingredients/" + ingredient.getId()));
    return new ResponseEntity<>(saved, headers, HttpStatus.CREATED);
  }

  @DeleteMapping("/{id}")
  public void deleteIngredient(@PathVariable String id) {
    //根据id删除数据库中的记录
    repo.deleteById(id);
  }

}
查看数据库可以发现里面生成了两张表,原本这是一个空的数据库。
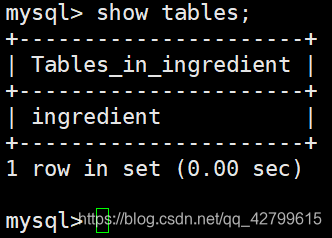
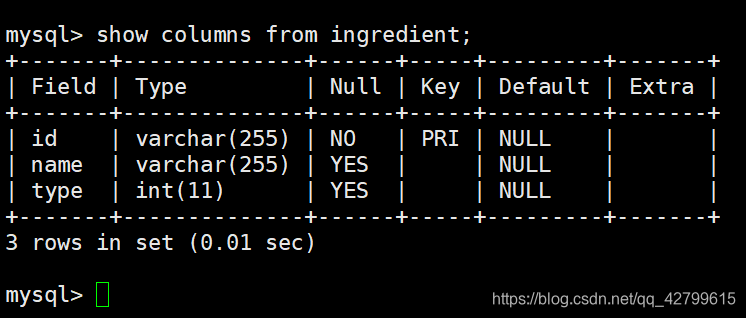
查看ingredient表的字段,发现其与Ingredient类一致。
参考
- 《Spring实战 第5版》
- JPA 与 JDBC 的区别和基本用法


 1618
1618

 被折叠的 条评论
为什么被折叠?
被折叠的 条评论
为什么被折叠?
 到【灌水乐园】发言


