


1.nginx概述
文章目录
1.1nginx简介
1.nginx(“engine x”)是一个高性能的静态HTTP和反向代理服务器,也是一个IMAP/POP3/SMTP代理服务器.
2.第一个公开版本0.1.0发布于2014年10月4日.
3.其将源代码以类BSD许可证的形式发布,因他的稳定性,丰富的功能集、示例配置文件和低系统资源的消耗而闻名
4、官方测试nginx能够支撑5万并发链接,并且cpu、内存等资源消耗却非常低,运行非常稳定
5、2011年6月1日,nginx 1.0.4发布。apache httpd
6、Nginx是一款轻量级的Web 服务器/反向代理服务器及电子邮件(IMAP/POP3)代理服务器,并在一个BSD-like 协议下发行。由俄罗斯的程序设计师Igor Sysoev所开发,其特点是占有内存少,并发能力强,事实上nginx的并发能力确实在同类型的网页服务器中表现较好,中国大陆使用nginx网站用户有:新浪、网易、腾讯等。
1.2nginx对比apache的优缺点
- 优点:
1、轻量级,同样起web 服务,比apache 占用更少的内存及资源
2、抗并发,nginx 处理请求是异步非阻塞的,而apache 则是阻塞型的,在高并发下nginx 能保持低资源低消耗高性能 NIO netty NIO
3、高度模块化的设计,编写模块相对简单
4、社区活跃,各种高性能模块出品迅速 - 缺点:
1、rewrite ,比nginx 的rewrite 强大
2、模块超多,基本想到的都可以找到
3、少bug ,nginx 的bug 相对较多
4、Nginx 配置简洁, Apache 复杂
5、最核心的区别在于apache是同步多进程模型,一个连接对应一个进程;nginx是异步的,多个连接(万级别)可以对应一个进程
1.3Tengine介绍
tengine官网:http://tengine.taobao.org/
Tengine是由淘宝网发起的Web服务器项目。它在Nginx的基础上,针对大访问量网站的需求,添加了很多高级功能和特性。Tengine的性能和稳定性已经在大型的网站如淘宝网,天猫商城等得到了很好的检验。它的最终目标是打造一个高效、稳定、安全、易用的Web平台。
从2011年12月开始,Tengine成为一个开源项目,Tengine团队在积极地开发和维护着它。Tengine团队的核心成员来自于淘宝、搜狗等互联网企业。Tengine是社区合作的成果,我们欢迎大家参与其中,贡献自己的力量。
tengine和nginx性能测试:
1.Tengine相比Nginx默认配置,提升200%的处理能力。
2.Tengine相比Nginx优化配置,提升60%的处理能力。
tengine更详细参数解释详见:
1.4 nginx的安装
详见<<手把手教你搭建nginx反向代理服务器>>
1.5nginx的工作模型
- Master-Worker模式
1、Nginx 在启动后,会有一个 master 进程和多个相互独立的 worker 进程。
2、Master接收来自外界的信号,向各worker进程发送信号,每个进程都有可能来处理这个连接。
3、Master进程能监控Worker进程的运行状态,当 worker 进程退出后(异常情况下),会自动启动新的 worker 进程。
- accept_mutex
由于所有子进程都继承了父进程的sockfd,那么当连接进来时,所有子进程都将收到通知并“争着”与它建立连接,这就叫“惊群现象”。大量的进程被激活又挂起,只有一个进程可以accept() 到这个连接,这当然会消耗系统资源。Nginx 提供了一个accept_mutex加在accept上的一把共享锁。即每个worker进程在执行accept之前都需要先获取锁,获取不到就放弃执行accept()。有了这把锁之后,同一时刻,就只会有一个进程去accpet(),这样就不会有惊群问题了。
当一个worker进程在accept()这个连接之后,就开始读取请求,解析请求,处理请求,产生数据后,再返回给客户端,最后才断开连接,完成一个完整的请求。一个请求,完全由worker进程来处理,而且只能在一个worker进程中处理。 - 为什么使用进程不使用线程?
1、节省锁带来的开销。每个worker进程都是独立的进程,不共享资源,不需要加锁。同时在编程以及问题查上时,也会方便很多。
2、独立进程,减少风险。采用独立的进程,可以让互相之间不会影响,一个进程退出后,其它进程还在工作,服务不会中断,master进程则很快重新启动新的worker进程。当然,worker进程的也能发生意外退出。 - 如何处理并发请求?
每进来一个request,会有一个worker进程去处理。但不是全程的处理,处理到什么程度呢?处理到可能发生阻塞的地方,比如向上游(后端)服务器转发request,并等待请求返回。那么,这个处理的worker不会这么傻等着,他会在发送完请求后,注册一个事件:“如果upstream返回了,告诉我一声,我再接着干”。于是他就休息去了。此时,如果再有request 进来,他就可以很快再按这种方式处理。而一旦上游服务器返回了,就会触发这个事件,worker才会来接手,这个request才会接着往下走。由于web server的工作性质决定了每个request的大部份生命都是在网络传输中,实际上花费在server机器上的时间片不多,这就是几个进程就能解决高并发的秘密所在。
1.6nginx参数详解
- nginx.conf配置文件
#---全局块开始----
#user  nobody;
worker_processes  1;
#error_log  logs/error.log;
#error_log  logs/error.log  notice;
#error_log  logs/error.log  info;
#pid        logs/nginx.pid;
#----全局块结束----
#====events块开始====
events {
    worker_connections  1024;
}
#====events块结束====
#****http块开始****
http {
include mime.types;
default_type application/octet-stream;
#log_format main '$remote_addr - $remote_user [$time_local] "$request" '
# '$status $body_bytes_sent "$http_referer" '
# '"$http_user_agent" "$http_x_forwarded_for"';
#access_log logs/access.log main;
sendfile on;
#tcp_nopush on;
#keepalive_timeout 0;
keepalive_timeout 65;
#gzip on;
server {
listen 80;
server_name localhost;
#charset koi8-r;
#access_log logs/host.access.log main;
location / {
root html;
index index.html index.htm;
}
#error_page 404 /404.html;
# redirect server error pages to the static page /50x.html
error_page 500 502 503 504 /50x.html;
location = /50x.html {
root html;
}
# proxy the PHP scripts to Apache listening on 127.0.0.1:80
#location ~ \.php$ {
# proxy_pass http://127.0.0.1;
#}
# pass the PHP scripts to FastCGI server listening on 127.0.0.1:9000
#
#location ~ \.php$ {
# root html;
# fastcgi_pass 127.0.0.1:9000;
# fastcgi_index index.php;
# fastcgi_param SCRIPT_FILENAME /scripts$fastcgi_script_name;
# include fastcgi_params;
#}
# deny access to .htaccess files, if Apache's document root
# concurs with nginx's one
#
#location ~ /\.ht {
# deny all;
#}
}
# another virtual host using mix of IP-, name-, and port-based configuration
#
#server {
# listen 8000;
# listen somename:8080;
# server_name somename alias another.alias;
# location / {
# root html;
# index index.html index.htm;
# }
#}
# HTTPS server
#
#server {
# listen 443 ssl;
# server_name localhost;
# ssl_certificate cert.pem;
# ssl_certificate_key cert.key;
# ssl_session_cache shared:SSL:1m;
# ssl_session_timeout 5m;
# ssl_ciphers HIGH:!aNULL:!MD5;
# ssl_prefer_server_ciphers on;
# location / {
# root html;
# index index.html index.htm;
# }
#}
}
#****http块结束****
nginx由三部分组成:
- 第一部分:全局块
从配置文件开始到events之间的内容,主要会设置一些影响nginx服务器整体运行的配置命令。主要包括配置运行Nginx服务器的用户(组)、允许生成的worker process数,进程PID存放路径、日志存放路径和类型以及配置文件的引入等。
#user nobody;
worker_processes 1;
#error_log logs/error.log;
#error_log logs/error.log notice;
#error_log logs/error.log info;
#pid logs/nginx.pid;
worker_processes是Nginx服务器并发处理服务的关键配置,值越大,可以支持的并发处理量也越多,但是会受到硬件、软件等设备的制约。
error_log配置nginx日志文件的全路径名
pid配置进程PID存放路径
- 第二部分:events块
events {
worker_connections 1024;
}
events块涉及的指令主要影响Nginx服务器与用户的网络连接,常用的设置包括是否开启对多work process下的网络连接进行序列化,是否允许同时接受多个网络连接,选取哪种事件驱动模型来处理连接请求,每个work process可以同时支持的最大连接数等。
上述的例子表示每个work process支持的最大连接数为1024。这部分的配置对Nginx的性能影响比较大,在实际中应该灵活配置。
- 第三部分:HTTP块{}
这是Nginx服务器配置中最频繁的部分,代理、缓存和日志定义等绝大多数功能和第三方模块的配置都在这里。需要注意的是:http块也可以包括http全局块、server块
- 1.http全局块
http全局块配置的指令包括文件引入、MIME-TYPE定义、连接超时时间、单链接请求数上限等。
http {
include mime.types;
default_type application/octet-stream;
#log_format main '$remote_addr - $remote_user [$time_local] "$request" '
# '$status $body_bytes_sent "$http_referer" '
# '"$http_user_agent" "$http_x_forwarded_for"';
#access_log logs/access.log main;
sendfile on;
#tcp_nopush on;
#keepalive_timeout 0;
keepalive_timeout 65;#连接超时时间
#gzip on;#是否启动压缩
server {
......
}
}
- 2.server块
这块和虚拟主机有密切关系,虚拟主机从用户角度看,和一台独立的硬件主机是完全一样的,该技术的产生是为了节省互联网服务器硬件成本。
每个http块可以包括多个server块,而每个server块就相当于一个虚拟主机。而每个server块也分为全局server块,以及可以同时包含多个location块。
#gzip on;
server {
listen 80;#监听的端口号
server_name localhost;#监听的域名
#charset koi8-r;
#access_log logs/host.access.log main;
location / { #路径中包含 /
root html;
index index.html index.htm;
}
#error_page 404 /404.html;
# redirect server error pages to the static page /50x.html
error_page 500 502 503 504 /50x.html;
location = /50x.html {
root html;
}
# proxy the PHP scripts to Apache listening on 127.0.0.1:80
#location ~ \.php$ {
# proxy_pass http://127.0.0.1;
#}
# pass the PHP scripts to FastCGI server listening on 127.0.0.1:9000
#
#location ~ \.php$ {
# root html;
# fastcgi_pass 127.0.0.1:9000;
# fastcgi_index index.php;
# fastcgi_param SCRIPT_FILENAME /scripts$fastcgi_script_name;
# include fastcgi_params;
#}
# deny access to .htaccess files, if Apache's document root
# concurs with nginx's one
#
#location ~ /\.ht {
# deny all;
#}
}
- 2.1 全局server块
最常见的配置是本虚拟主机的监听配置和本虚拟主机的名称或IP配置。 - 2.2 location块
一个server块可以配置多个location块。
这块的主要作用是基于Nginx服务器接受到的请求字符串(例如 server_name/uri-string),对虚拟主机名称(也可以是IP别名)之外的字符串(列如 前面的/uri-string)进行匹配,对特定的请求进行处理。地址定向、数据缓存和应答控制等功能,还有许多第三方模块的配置也在这里进行。
1.6.1 工作模式与连接上限
#user  nobody;
worker_processes  1;
events {
use epoll;
worker_connections 1024;
}
- 1.用户与工作进程
#user  nobody;
worker_processes  1;
[root@nginx1 conf]# ps aux |grep nginx
root       1170  0.0  0.0  22568   680 ?        Ss   09:14   0:00 nginx: master process /opt/nginx/sbin/nginx -c /opt/nginx/conf/nginx.conf
nobody     1171  0.0  0.1  23020  1288 ?        S    09:14   0:00 nginx: worker process
root       1174  0.0  0.0 103264   876 pts/0    S+   09:14   0:00 grep nginx
[root@nginx1 conf]# ps aux |grep nginx
root       1170  0.0  0.0  22568   680 ?        Ss   09:14   0:00 nginx: master process /opt/nginx/sbin/nginx -c /opt/nginx/conf/nginx.conf
nobody     1171  0.0  0.1  23020  1288 ?        S    09:14   0:00 nginx: worker process
 [root@nginx1 conf]# id nobody
uid=99(nobody) gid=99(nobody) groups=99(nobody)
[root@nginx1 conf]# cat /etc/passwd
root:x:0:0:root:/root:/bin/bash
……
nobody:x:99:99:Nobody:/:/sbin/nologin
- use epoll;
参考事件模型,use [ kqueue | rtsig | epoll | /dev/poll | select | poll ]; epoll模型是Linux 2.6以上版本内核中的高性能网络I/O模型,如果跑在FreeBSD上面,就用kqueue模型。 - worker_connections 1024;
单个后台worker process进程的最大并发链接数。
并发总数是 worker_processes 和 worker_connections 的乘积
即 max_clients = worker_processes * worker_connections
在设置了反向代理的情况下,max_clients=(worker_processes * worker_connections) / 4
为什么上面反向代理要除以4,应该说是一个经验值
根据以上条件,正常情况下的Nginx Server可以应付的最大连接数为:4 * 8000 = 32000
#worker_connections 值的设置跟物理内存大小有关
#因为并发受IO约束,max_clients的值须小于系统可以打开的最大文件数
系统可以打开的最大文件数和内存大小成正比,一般1GB内存的机器上可以打开的文件数大约是10万左右
# 我们来看看360M内存的VPS可以打开的文件句柄数是多少:
# $ cat /proc/sys/fs/file-max
# 输出 34336
# 32000 < 34336,即并发连接总数小于系统可以打开的文件句柄总数,这样就在操作系统可以承受的范围之内
# worker_connections 的值需根据 worker_processes 进程数目和系统可以打开的最大文件总数进行适当地进行设置
# 使得并发总数小于操作系统可以打开的最大文件数目
# 其实质也就是根据主机的物理CPU和内存进行配置
# 当然,理论上的并发总数可能会和实际有所偏差,因为主机还有其他的工作进程需要消耗系统资源。
# ulimit -SHn 65535 设置可以打开的文件数量
1.6.2 开启零拷贝
sendfile实际上是 Linux2.0+以后的推出的一个系统调用,web服务器可以通过调整自身的配置来决定是否利用 sendfile这个系统调用。先来看一下不用sendfile的传统网络传输过程:
read(file,tmp_buf, len);
write(socket,tmp_buf, len);
硬盘 >> kernel buffer >> user buffer>> kernel socket buffer >>协议栈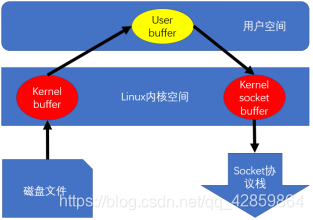
一个基于socket的服务,首先读硬盘数据,然后写数据到socket 来完成网络传输的。上面2行用代码解释了这一点,不过上面2行简单的代码掩盖了底层的很多操作。来看看底层是怎么执行上面2行代码的:
1、系统调用 read()产生一个上下文切换:从 user mode 切换到 kernel mode,然后 DMA 执行拷贝,把文件数据从硬盘读到一个 kernel buffer 里。
2、数据从kernel buffer拷贝到user buffer,然后系统调用 read() 返回,这时又产生一个上下文切换:从kernel mode 切换到 user mode。
3、 系统调用write()产生一个上下文切换:从 user mode切换到 kernel mode,然后把步骤2读到 user buffer的数据拷贝到 kernel buffer(数据第2次拷贝到 kernel buffer),不过这次是个不同的 kernel buffer,这个 buffer和 socket相关联。
4、系统调用 write()返回,产生一个上下文切换:从 kernel mode 切换到 user mode ,然后 DMA 从 kernel buffer拷贝数据到协议栈。
上面4个步骤有4次上下文切换,有4次拷贝,我们发现如果能减少切换次数和拷贝次数将会有效提升性能。在kernel2.0+ 版本中,系统调用 sendfile() 就是用来简化上面步骤提升性能的。sendfile() 不但能减少切换次数而且还能减少拷贝次数。
再来看一下用 sendfile()来进行网络传输的过程:
sendfile(socket,file, len);
硬盘 >> kernel buffer (快速拷贝到kernelsocket buffer) >>协议栈
1、 系统调用sendfile()通过 DMA把硬盘数据拷贝到 kernel buffer,然后数据被 kernel直接拷贝到另外一个与 socket相关的 kernel buffer。这里没有 user mode和 kernel mode之间的切换,在 kernel中直接完成了从一个 buffer到另一个 buffer的拷贝。
2、DMA 把数据从 kernelbuffer 直接拷贝给协议栈,没有切换,也不需要数据从 user mode 拷贝到 kernel mode,因为数据就在 kernel 里。
简单说,sendfile是个比 read 和 write 更高性能的系统接口, 不过需要注意的是,sendfile 是将 in_fd 的内容发送到 out_fd 。而 in_fd 不能是 socket , 也就是只能文件句柄。 所以当 Nginx 是一个静态文件服务器的时候,开启 SENDFILE 配置项能大大提高 Nginx 的性能。 但是当 Nginx 是作为一个反向代理来使用的时候,SENDFILE 则没什么用了,因为 Nginx 是反向代理的时候。 in_fd 就不是文件句柄而是 socket,此时就不符合 sendfile 函数的参数要求了。
1.6.3 keepalive_timeout

测试时改为0,便于看出负载切换的效果,部署到生产前进行优化来提高效率。
1.6.4 是否启用压缩
压缩可以有效减少文件的大小,有利于网络传输。
1.6.5 autoindex
autoindex on;
#开启目录列表访问,合适下载服务器,默认关闭。
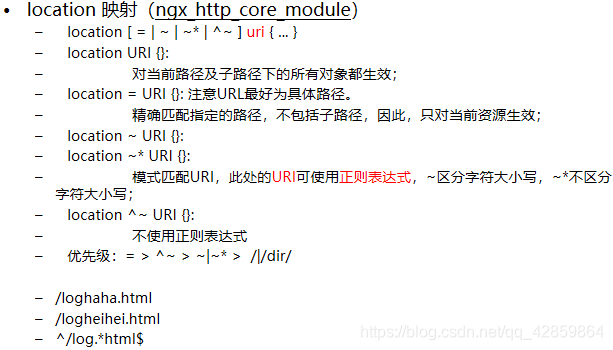
1.6.6 location(重点)
参考该篇文章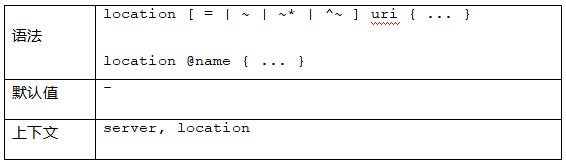
让我们用一个例子解释上面的说法:
location = / {                 //有=号的话精确匹配,没有=,则最大匹配
    [ configuration A ]
}

location / {
    [ configuration B ]
}

location /documents/ {
    [ configuration C ]
}

location ^~ /images/ {
    [ configuration D ]
}

location ~* \.(gif|jpg|jpeg)$ {
    [ configuration E ]
}
请求“/”匹配配置A,
请求“/index.html”匹配配置B,
请求“/documents/document.html”匹配配置C,
请求“/images/1.gif”匹配配置D,
请求“/documents/1.jpg”匹配配置E。
- Nginx配置解析 /loghaha.html
- Nginx配置解析
location配置规则
Directives with the = prefix that match the query exactly. If found, searching stops.
All remaining directives with conventional strings, longest match first. If this match used the ^~ prefix, searching stops.
Regular expressions, in order of definition in the configuration file.
If #3 yielded a match, that result is used. Else the match from #2 is used.
=前缀的指令严格匹配这个查询。如果找到,停止搜索。
所有剩下的常规字符串,最长的匹配。如果这个匹配使用^〜前缀,搜索停止。
正则表达式,在配置文件中定义的顺序。
如果第3条规则产生匹配的话,结果被使用。否则,如同从第2条规则被使用
location 的执行逻辑跟 location 的编辑顺序无关。矫正:这句话不全对,“普通 location ”的匹配规则是“最大前缀”,因此“普通 location ”的确与 location 编辑顺序无关;
但是“正则 location ”的匹配规则是“顺序匹配,且只要匹配到第一个就停止后面的匹配”;
“普通location ”与“正则 location ”之间的匹配顺序是?先匹配普通 location ,再“考虑”匹配正则 location 。
注意这里的“考虑”是“可能”的意思,也就是说匹配完“普通 location ”后,有的时候需要继续匹配“正则 location ”,有的时候则不需要继续匹配“正则 location ”。两种情况下,不需要继续匹配正则 location :
( 1 )当普通 location 前面指定了“ ^~ ”,特别告诉 Nginx 本条普通 location 一旦匹配上,则不需要继续正则匹配;
( 2 )当普通location 恰好严格匹配上,不是最大前缀匹配,则不再继续匹配正则
loghaha.html
l: logha
l: ^~ loghah
l: loghaha.html
l: =loghaha.html
l: ^logh.*html$
l: ^logha.*html$
nginx 收到请求头:判定ip,port,hosts决定server
nginx location匹配:用客户端的uri匹配location的uri
先普通
顺序无关
最大前缀
匹配规则简单
打断:
^~
完全匹配
再正则
不完全匹配
正则特殊性:一条URI可以和多条location匹配上
有顺序的
先匹配先应用,即时退出匹配
请求头
host:决策server负责处理
uri:决策location
反向代理:proxy_pass ip:port[uri];
1.修改nginx.conf配置文件
    server {
       listen  80;
       server_name www.wucw.com;
       access_log   logs/myfmt.log  myfmt;
       location / {
           root /mnt;
           autoindex on;
       }
       location /ooxx {
          proxy_pass http://192.168.20.102/;#带上/访问该url对应的首页,
#不带/ 访问http://192.168.20.102/ooxx
       }
    }

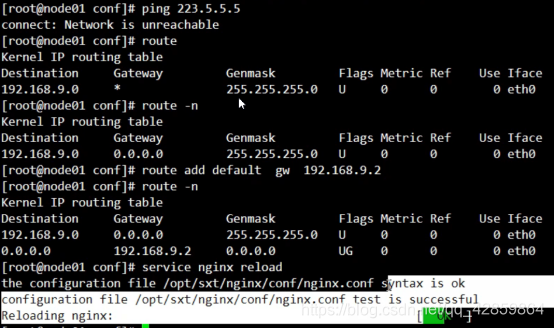
2.重新加载nginx
[root@nginx1 conf]# !ser
3.访问测试
http://www.wucw.com/ooxx
4.修改nginx.conf
 location /ooxx {
          proxy_pass http://www.baidu.com/;
       }
5.重启nginx
[root@nginx1 conf]# !ser
如果重启没有问题,直接跳步骤7.
如果出现下图所示的错误:
找不到域名,也就是访问不到域名解析服务器。
解决办法:
7.访问测试http://www.wucw.com/ooxx
 虽然访问到了百度,但是确实通过重定向的方式,以后发生的事情和我们的服务器就没有半毛钱关系了。
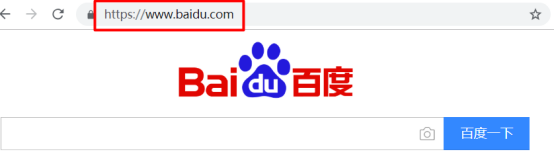
优化配置nginx.conf:
#尽量在服务器端跳转,不要在客户端跳转
proxy_pass https://www.baidu.com/;
重启nginx,再次测试,地址栏没有重定向,但是当我们查询(比如:ssd)时出现

修改nginx.conf
       location /ooxx {
          proxy_pass http://www.baidu.com/;
       }
location ~* /s.* {
          proxy_pass https://www.baidu.com;
       }
- Bug https protocol requires SSL support in
[root@nginx1 conf]# service nginx reload
nginx: [emerg] https protocol requires SSL support in /opt/nginx/conf/nginx.conf:45
nginx: configuration file /opt/nginx/conf/nginx.conf test failed
当初编译的时候没有启用SSL支持,在配置反向代理到 https的网站时,编辑配置文件报错,无法启动nginx。
解决办法:先将nginx.conf备份/root/目录下,删除/opt/nginx和/opt/apps/
nginx-1.16.1,然后在解压一份,最后编译安装。
[root@nginx1 nginx-1.16.1]# ./configure --prefix=/opt/nginx --with-http_ssl_module
[root@nginx1 nginx-1.16.1]# make && make install
[root@nginx1 nginx-1.16.1]# cd /opt/nginx/conf/
[root@nginx1 conf]# cp /root/nginx.conf  ./
cp: overwrite `./nginx.conf'? yes
[root@nginx1 conf]# service nginx reload
nginx: the configuration file /opt/nginx/conf/nginx.conf syntax is ok
nginx: configuration file /opt/nginx/conf/nginx.conf test is successful
Reloading nginx:
然后再访问http://www.wucw.com/ooxx
1.7 nginx调优
- worker_processes 的设置
打开 nginx.conf 配置文件,可以看到 worker_processes 的默认值为 1。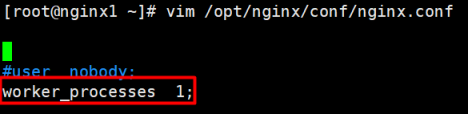
worker_processes,工作进程,用于指定 Nginx 的工作进程数量。该值应该设置为多少合适呢?其数值一般设置为 CPU 内核数量,或内核数量的整数倍。注意,现代的 CPU 一般都是多核的,即一块 CPU 中包含多个内核。若当前系统具有 2 块 CPU,而每块 CPU 中包含 2 个内核,那么,worker_processes 的值一般可以设置为 4 或 8。当然,也可以设置为 2。
不过需要注意,该值不仅仅取决于 CPU 内核数量,还与硬盘数量及负载均衡模式相关。
在不确定时可以指定其值为 auto。 - worker_cpu_affinity 的设置
为了进一步提高系统性能,我们会将 worker 进程与具体的内核进行绑定。该绑定操作是通过 worker_cpu_affinity 属性进行设置的。affinity,密切关系。不过,若指定 worker_processes 的值为 auto,则无法设置 worker_cpu_affinity。
该设置是通过二进制进行的。每个内核使用一个二进制位表示,0 代表内核关闭,1 代表内核开启。也就是说,有几个内核,就需要使用几个二进制位。下面通过几个例子来增进对 worker_processes 与 worker_cpu_affinity 的理解。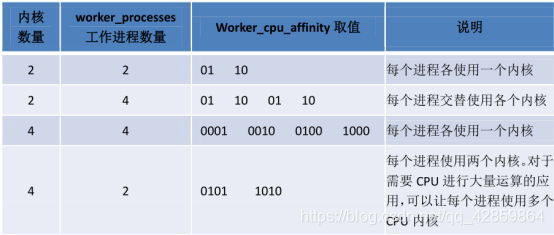


 8657
8657


 被折叠的 条评论
为什么被折叠?
被折叠的 条评论
为什么被折叠?
 到【灌水乐园】发言


