


pex部署的前置要求
1.rhel7主机
2.开启主机图形
3.配置网络可用
4.关闭vmware dhcp功能
本教程逐步完成网络接口配置、创建本地YUM源以及搭建PXE(Preboot Execution Environment)服务的全过程。这些步骤适用于在Red Hat Enterprise Linux 7.9系统中配置网络和实现PXE服务器的搭建。
1. 配置网络接口
配置网络接口
[root@localhost network-scripts]# vim /etc/sysconfig/network-scripts/ifcfg-ens33
配置文件内容如下:
TYPE=Ethernet
PROXY_METHOD=none
BROWSER_ONLY=no
BOOTPROTO=none
DEFROUTE=yes
IPV4_FAILURE_FATAL=no
IPV6INIT=yes
IPV6_AUTOCONF=yes
IPV6_DEFROUTE=yes
IPV6_FAILURE_FATAL=no
IPV6_ADDR_GEN_MODE=stable-privacy
NAME=ens33
UUID=2cf256b1-7898-4ab0-9b3b-aaf09af3d193
DEVICE=ens33
ONBOOT=yes
IPADDR1=172.25.254.100
NETMASK1=255.255.255.0
DNS1=114.114.114.114
GATEWAY1=172.25.254.2
保存文件后,重新加载网络配置并激活连接:
[root@localhost network-scripts]# nmcli connection reload
[root@localhost network-scripts]# nmcli connection up ens33
当你看到类似“连接已成功激活”的信息时,表示网络配置已经生效。
2. 创建本地YUM源
步骤1:创建本地挂载目录
mkdir /rhel7
步骤2:将挂载命令写入启动脚本
echo "mount /dev/cdrom /rhel7" >> /etc/rc.d/rc.local
chmod +x /etc/rc.d/rc.local
步骤3:创建本地YUM源配置文件
cat > /etc/yum.repos.d/rhel7.repo << EOF
[REHL7]
name=RHEL7
baseurl=file:///rhel7/
gpgcheck=0
EOF
这样,就完成了本地YUM源的配置。
配置完成后,禁用并屏蔽firewalld服务:
[root@localhost yum.repos.d]# systemctl disable firewalld
[root@localhost yum.repos.d]# systemctl mask firewalld
3. 配置Kickstart文件
安装Kickstart配置工具并启动:
[root@localhost ~]# yum install system-config-kickstart -y
[root@localhost ~]# system-config-kickstart


在这里插入图片描述

编辑Kickstart配置文件:
[root@localhost ~]# vim ks.cfg
添加文件内容如下:
part / --fstype="xfs" --grow --size=1

%packages
@base
httpd
%end
%post
4. 安装并配置TFTP和HTTP服务器
安装并启动TFTP服务器:
[root@localhost ~]# yum install syslinux -y
[root@localhost ~]# systemctl enable --now tftp
安装并启动HTTP服务器:
[root@localhost ~]# yum install -y httpd
[root@localhost ~]# ln -s /rhel7/ /var/www/html/
[root@localhost ~]# cp ks.cfg /var/www/html/
[root@localhost ~]# systemctl enable --now httpd
查看apache页面搭建是否成功 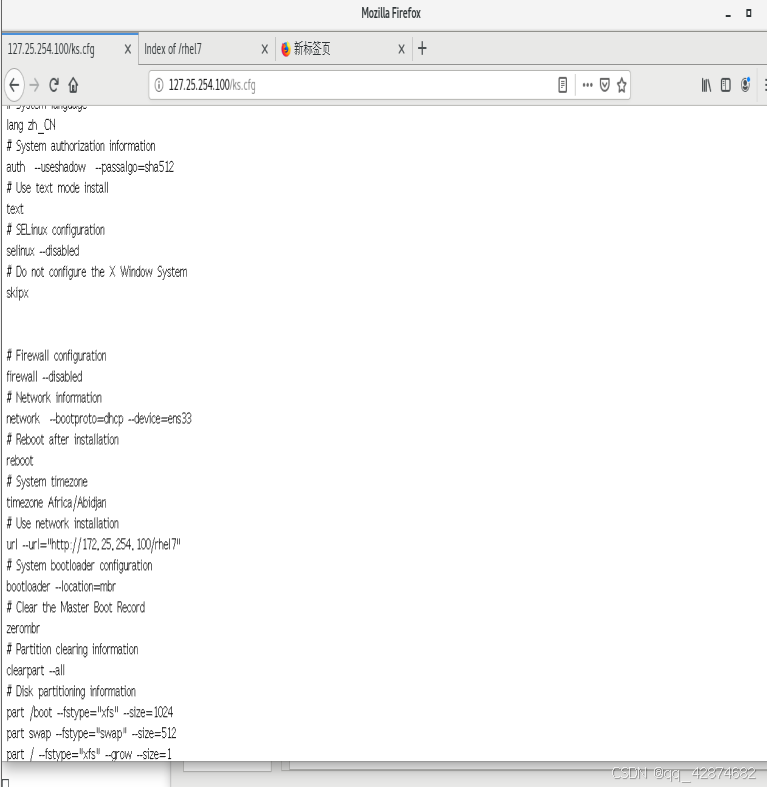

实验:镜像主机使用KS.CFG安装脚本
使用TAB键输入ks=http://自己的IP地址/ks.cfg

按住ENTER键,开始自动化安装系统

5. 安装并配置DHCP服务器
安装DHCP服务器:
[root@localhost ~]# yum install dhcp -y
复制示例配置文件:
[root@localhost ~]# \cp -f /usr/share/doc/dhcp*/dhcpd.conf.example /etc/dhcp/dhcpd.conf
编辑DHCP配置文件:
[root@localhost ~]# vim /etc/dhcp/dhcpd.conf
添加以下内容:
option domain-name "example.org";
option domain-name-servers 114.114.114.114;
log-facility local7;

subnet 172.25.254.0 netmask 255.255.255.0 {
  range 172.25.254.30 172.25.254.40;
  option routers 172.25.254.2;
  next-server 172.25.254.100;
  filename "pxelinux.0";
}
启动DHCP服务:
[root@localhost ~]# systemctl enable --now dhcpd
6. 配置PXE引导文件
安装并配置TFTP和PXE引导文件:
[root@localhost ~]# yum install tftp-server.x86_64 -y
[root@localhost ~]# systemctl enable --now tftp
[root@localhost ~]# cp /rhel7/isolinux/* /var/lib/tftpboot/
[root@localhost ~]# cp /usr/share/syslinux/pxelinux.0 /var/lib/tftpboot/
[root@localhost ~]# cd /var/lib/tftpboot/
[root@localhost tftpboot]# mkdir pxelinux.cfg
[root@localhost tftpboot]# cp isolinux.cfg pxelinux.cfg/default
编辑PXE引导配置文件:
[root@localhost tftpboot]# vim /var/lib/tftpboot/pxelinux.cfg/default
添加以下内容:
label linux
  menu label ^Install Red Hat Enterprise Linux 7.9
  kernel vmlinuz
  append initrd=initrd.img repo=http://172.25.254.100/rhel7 ks=http://172.25.254.100/ks.cfg quiet

label check
  menu label Test this ^media & install Red Hat Enterprise Linux 7.9
  menu default
  kernel vmlinuz
  append initrd=initrd.img inst.stage2=hd:LABEL=RHEL-7.9\x20Server.x86_64 rd.live.check quiet
重新启动DHCP服务以应用新配置:
[root@localhost tftpboot]# systemctl restart dhcpd
测试
新建一台虚拟机
进入系统BIOS选择网卡启动

方向键 左键


 1万+
1万+

 被折叠的 条评论
为什么被折叠?
被折叠的 条评论
为什么被折叠?
 到【灌水乐园】发言


