


 本文详细记录了在编译Ambari2.8.0和Bigtop过程中遇到的环境配置、依赖安装、R语言和nodejs的安装,以及解决Toomanyfileswithunapprovedlicense等错误的步骤。最终因某些组件编译失败,作者提供了简化版的编译包。
记录一次编译ambari2.8.0与bigtop遇到的问题,ambari的官方文档链接:https://cwiki.apache.org/confluence/display/AMBARI/Installation+Guide+for+Ambari+2.8.0
ambari源码包地址:https://github.com/apache/bigtop/tree/branch-3.2
下载完源码包后先传到服务器中
在编译源码包前先安装环境
安装依赖防止报错
yum install -y python-devel
yum install fuse
yum install ant
安装R语言和对应包,不然编译sparkr的时候会报错
#先执行命令安装EPEL仓库
yum install epel-release
#再安装R语言
yum install R

#进入R语言环境安装以下包
install.packages(“knitr”)
install.packages(“rmarkdown”)
install.packages(“e1071”)
install.packages(“testthat”)
安装 setuptools:
yum install -y wget
wget https://pypi.python.org/packages/2.7/s/setuptools/setuptools-0.6c11-py2.7.egg#md5=fe1f997bc722265116870bc7919059ea
sh setuptools-0.6c11-py2.7.egg
安装 nodejs 环境
sudo yum install epel-release -y
sudo yum install nodejs -y
安装npm
sudo yum install npm
升级nodejs
sudo npm install n -g
sudo n stable
检查npm和nodejs是否安装成功
node -v
npm -v
编译之前需要先安装maven(安装的版本需要3.6.3以上不然编译spark会报错),maven仓库建议用华为的镜像maven仓库
<mirror>
		<id>huaweicloud</id>
		<mirrorOf>*</mirrorOf>
		<name>华为云公共仓库</name>
		<url>https://mirrors.huaweicloud.com/repository/maven/</url>
</mirror>
编译ambari2.8.0源码
```powershell
cd apache-ambari-2.8.0-src
mvn clean install rpm:rpm -DskipTests -Drat.skip=true
编译完成后
从 ambari-server/target/rpm/ambari-server/RPMS/noarch/ 安装rpm包:yum install ambari-server*.rpm
安装完后,依次执行以下命令
先在mysql中建立ambari数据库和ambari的mysql用户
#创建数据库

mysql -uroot  -pabcd1234 -e "create database ambari;create database hive;"

#创建用户并授权

mysql -uroot  -pabcd1234 -e "use ambari; create user 'ambari'@'%' identified by 'ambari123' ;GRANT ALL PRIVILEGES on *.* To 'ambari'@'%' IDENTIFIED BY 'ambari123'; FLUSH PRIVILEGES;"

mysql -uroot  -pabcd1234 -e "use hive; create user 'hive'@'%' identified by 'ambari123' ;GRANT ALL PRIVILEGES on *.* To 'hive'@'%' IDENTIFIED BY 'ambari123'; FLUSH PRIVILEGES;"
ambari安装命令
ambari-server setup
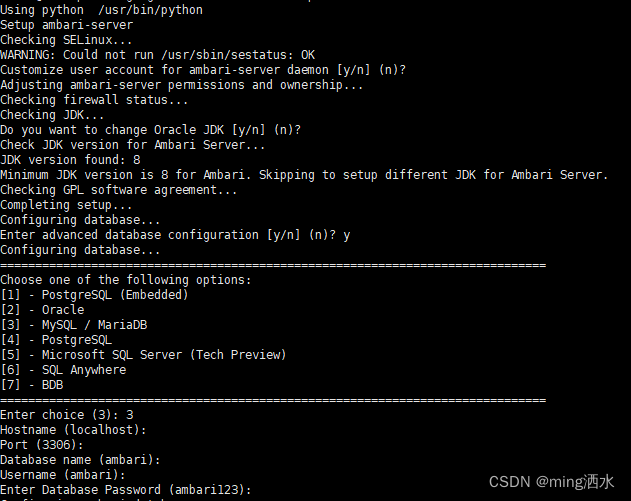
按照他的英文一步步走,最后需要输入mysql-connector-java的jar包地址
安装完后在mysql的ambari数据库中运行Ambari-DDL-MySQL-CREATE.sql这一sql文件
/var/lib/ambari-server/resources/Ambari-DDL-MySQL-CREATE.sql
启动命令:ambari-server start
在每一台主机上都安装这个
从 ambari-agent/target/rpm/ambari-agent/RPMS/x86_64/ 复制 rpm 包并运行:yum install ambari-agent*.rpm
编辑
/etc/ambari-agent/ambari.ini
确保 [server] 部分下的主机名指向实际的 Ambari Server 主机,而不是“localhost”
然后运行命令:ambari-agent start
编辑
/etc/profile.d/my.sh
这个my.sh文件是自建的不是系统自带的
在my.sh文件里填入
export buildNumber=2.8.0.0.0    #声明ambari的版本,如果不填这个ambari-agent脚本会启动失败,每台安装ambari-agent的机器都要声明
编译ambari-metrics源码
#git克隆ambari-metrics
git clone https://github.com/apache/ambari-metrics.git

#进入ambari-metrics根目录
cd ambari-metrics

#切换到3.0分支
git checkout -b branch-3.0 origin/branch-3.0

#提前下载编译时需要的4个tar包--有利于编译加速
wget http://repo.bigtop.apache.org.s3.amazonaws.com/bigtop-stack-binary/3.2.0/centos-7/x86_64/hbase-2.4.13-bin.tar.gz
wget http://repo.bigtop.apache.org.s3.amazonaws.com/bigtop-stack-binary/3.2.0/centos-7/x86_64/hadoop-3.3.4.tar.gz
wget https://dl.grafana.com/oss/release/grafana-9.3.2.linux-amd64.tar.gz
wget http://repo.bigtop.apache.org.s3.amazonaws.com/bigtop-stack-binary/3.2.0/centos-7/x86_64/phoenix-hbase-2.4-5.1.2-bin.tar.gz

#修改ambari-metrics/pom.xml文件,将以上4个tar包的url修改成刚才下载好的本地路径
   <hbase.tar>file://{下载路径}/hbase-2.4.13-bin.tar.gz</hbase.tar>
   <hadoop.tar>file://{下载路径}/hadoop-3.3.4.tar.gz</hadoop.tar>
   <grafana.tar>file://{下载路径}/grafana-9.3.2.linux-amd64.tar.gz</grafana.tar>
   <phoenix.tar>file://{下载路径}/phoenix-hbase-2.4-5.1.2-bin.tar.gz</phoenix.tar>

#编译
mvn clean install -DskipTests -Dbuild-rpm
编译bigtop源码
#git克隆bigtop源代码
git clone https://github.com/apache/bigtop.git
#进入bigtop根目录
cd bigtop
#切换到3.2分支
git checkout -b branch-3.2 origin/branch-3.2
#修改bigtop/bigtop.bom配置 有两处要修改
#1.修改镜像源为国内镜像源 103、104行
APACHE_MIRROR = "https://repo.huaweicloud.com/apache"
APACHE_ARCHIVE = "https://mirrors.aliyun.com/apache"
#2.解开bigtop-select组件的注释 删除273、281行
#安装组件编译所需的依赖
#1.hadoop依赖
yum -y install fuse-devel cmake cmake3 lzo-devel openssl-devel protobuf* cyrus-*
cp /usr/bin/cmake3 /usr/bin/cmake
#2.zookeeper依赖
yum -y install cppunit-devel
#3.spark依赖
yum -y install R* harfbuzz-devel fribidi-devel libcurl-devel libxml2-devel freetype-devel libpng-devel libtiff-devel libjpeg-turbo-devel pandoc* libgit2-devel
Rscript -e "install.packages(c('knitr', 'rmarkdown', 'devtools', 'testthat', 'e1071', 'survival'), repos='http://mirrors.tuna.tsinghua.edu.cn/CRAN/')"
#修改部分组件源代码
#1.先下载
./gradlew tez-download zeppelin-download flink-download
#2.进入下载目录
cd dl
#3.解压这3个tar
tar -zxvf flink-1.15.3.tar.gz
tar -zxvf apache-tez-0.10.1-src.tar.gz
tar -zxvf zeppelin-0.10.1.tar.gz
#4.修改flink
vi flink-1.15.0/flink-runtime-web/pom.xml
在275行 nodeVersion改为v12.22.1
在276行 npmVersion改为6.14.12
#5.修改tez
vi apache-tez-0.10.1-src/tez-ui/pom.xml
在37行 allow-root-build改为--allow-root=true
#6.修改zeppelin
vi zeppelin-0.10.1/pom.xml
在209行plugin.gitcommitid.useNativeGit改为true
vi zeppelin-0.10.1/spark/pom.xml
在50行spark.src.download.url改为https://repo.huaweicloud.com/apache/spark/${spark.archive}/${spark.archive}.tgz
在53行spark.bin.download.url改为https://repo.huaweicloud.com/apache/spark/${spark.archive}/${spark.archive}-bin-without-hadoop.tgz
vi zeppelin-0.10.1/rlang/pom.xml
在41行spark.src.download.url改为https://repo.huaweicloud.com/apache/spark/${spark.archive}/${spark.archive}.tgz
在44行spark.bin.download.url改为https://repo.huaweicloud.com/apache/spark/${spark.archive}/${spark.archive}-bin-without-hadoop.tgz
vi zeppelin-0.10.1/flink/flink-scala-parent/pom.xml
在45行flink.bin.download.url改为https://repo.huaweicloud.com/apache/flink/flink-${flink.version}/flink-${flink.version}-bin-scala_${flink.scala.binary.version}.tgz
#7.重新打包这3个tar
tar -zcvf flink-1.15.3.tar.gz flink-1.15.3
tar -zcvf apache-tez-0.10.1-src.tar.gz apache-tez-0.10.1-src
tar -zcvf zeppelin-0.10.1.tar.gz zeppelin-0.10.1
#回到bigtop根目录
cd ../
#编译
./gradlew allclean bigtop-groovy-pkg bigtop-jsvc-pkg bigtop-select-pkg bigtop-utils-pkg flink-pkg hadoop-pkg hbase-pkg hive-pkg kafka-pkg solr-pkg spark-pkg tez-pkg zeppelin-pkg zookeeper-pkg -Dbuildwithdeps=true -PparentDir=/usr/bigtop -PpkgSuffix
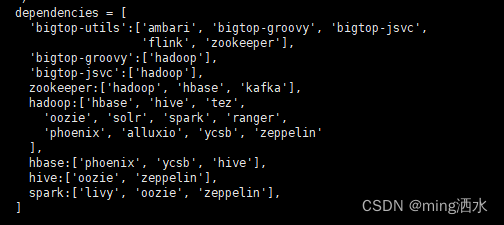
#注意这个allclean意味着清楚全部已编译好的rpm包,如果是中途失败的将allclean改为clean。然后这个-Dbuildwithdeps=true意思是安装一些组件的时候会先安装他的依赖包具体可以进bigtop.bom里看注释。当你有些组件的rpm包已经编译好了的话可以将这个命令去掉
依赖关系如图所示,编译flink的时候会先编译bigtop-utils的rpm包
在对bigtop进行编译的过程中可能会出现jar包下不下来的情况如:
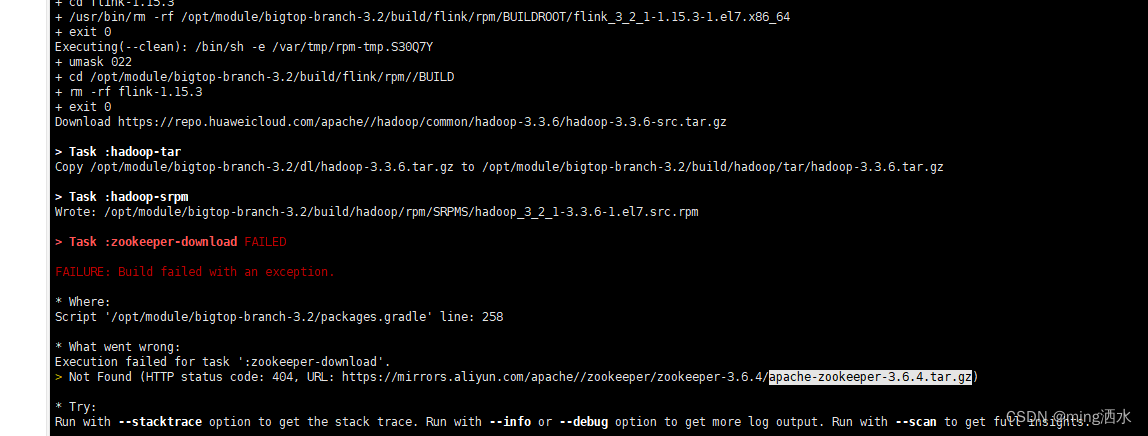
这里出现的是zookeeper3.6.4在阿里云镜像中下载不下来,我查看了下是阿里云镜像中没有这个jar包了,这时候我们就需要手动下载了。
可以上zookeeper的官网下载这个jar包:
https://archive.apache.org/dist/zookeeper/zookeeper-3.6.4/
下载完后将jar包放在bigtop-3.2.0/dl文件夹里
由于solr也是在镜像地址是下载不到的,也需要去apache下载并放到本地,solr下载地址https://dlcdn.apache.org/lucene/solr/8.11.2/ 。
全部编译完毕后就可以生成镜像了
#创建ambari-metrics文件夹
mkdir -p bigtop-3.2.0/output/ambari-metrics
#将ambari-metrics的rpm包复制进去
cp apache-ambari-metrics-3.0.0-src/ambari-metrics-assembly/target/rpm/ambari-metrics-collector/RPMS/x86_64/ambari-metrics-collector-*.rpm bigtop-3.2.0/output/ambari-metrics/
cp apache-ambari-metrics-3.0.0-src/ambari-metrics-assembly/target/rpm/ambari-metrics-grafana/RPMS/x86_64/ambari-metrics-grafana-*.rpm bigtop-3.2.0/output/ambari-metrics/
cp apache-ambari-metrics-3.0.0-src/ambari-metrics-assembly/target/rpm/ambari-metrics-hadoop-sink/RPMS/x86_64/ambari-metrics-hadoop-sink-*.rpm bigtop-3.2.0/output/ambari-metrics/
cp apache-ambari-metrics-3.0.0-src/ambari-metrics-assembly/target/rpm/ambari-metrics-monitor/RPMS/x86_64/ambari-metrics-monitor-*.rpm bigtop-3.2.0/output/ambari-metrics/
#制作镜像源
cd bigtop-3.2.0/output/
createrepo .
#然后将镜像源放到http环境,这个需要先安装apache http
mv repodata /var/www/html/
在编译过程中可能会遇到的异常:
1、Too many files with unapproved license
Too many files with unapproved license: 1 See RAT report in: /opt/module/apache-ambari-2.8.0-src/target/rat.txt -> [Help 1]
解决方案:
mvn 命令后加上参数 -Drat.skip 来绕过文件许可:mvn clean install rpm:rpm -DskipTests -Drat.skip
2、Python.h: No such file or directory
[exec] psutil/_psutil_linux.c:12:20: fatal error: Python.h: No such file or directory
[exec] #include <Python.h>
[exec] ^
[exec] compilation terminated.
[exec] error: command 'gcc' failed with exit status 1
[ERROR] Failed to execute goal org.apache.maven.plugins:maven-antrun-plugin:1.7:run (psutils-compile) on project ambari-metrics-host-monitoring: An Ant BuildException has occured: exec returned: 1
解决方案:yum install -y python-devel
3、Failed build dependencies:fuse is needed by
> Task :hadoop-rpm FAILED
error: Failed build dependencies:
        fuse is needed by hadoop_3_2_1-3.3.6-1.el7.x86_64
Installing /opt/module/bigtop-branch-3.2/output/hadoop/hadoop_3_2_1-3.3.6-1.el7.src.rpm

FAILURE: Build failed with an exception.

* Where:
Script '/opt/module/bigtop-branch-3.2/packages.gradle' line: 529

* What went wrong:
Execution failed for task ':hadoop-rpm'.
> Process 'command 'rpmbuild'' finished with non-zero exit value 1

* Try:
Run with --stacktrace option to get the stack trace. Run with --info or --debug option to get more log output. Run with --scan to get full insights.

* Get more help at https://help.gradle.org
解决方案:yum install fuse
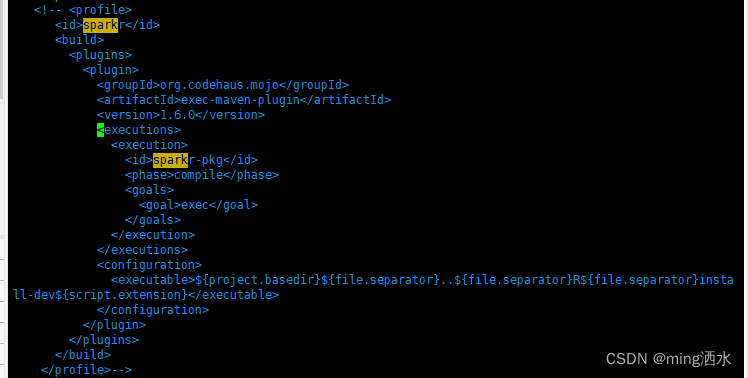
4、spark编译这个sparkr包的时候报错,我想了想我用不上R语言所以我直接进pom包里删除了这个部分
Failed to execute goal org.codehaus.mojo:exec-maven-plugin:1.6.0:exec (sparkr-pkg) on project spark-core_2.12: Command execution failed.: Process exited with an error: 1 (Exit value: 1) -> [Help 1]
解决方案:
cd bigtop-3.2.0/dl
tar -zxvf spark-3.2.3.tar.gz
vim spark-3.2.3/core/pom.xml
找到sparkr将其注释掉
本文章借鉴了一部分泽芯博主的文章https://blog.csdn.net/m0_48319997/article/details/130069050?spm=1001.2014.3001.5502
在安装途中遇到的问题我均记录下来了,最后由于tez和solr编译报错我也没编译了,因为也用不上,所以我编译的包是少了这两个组件的。
最后我也把我编译好的包放github上了,希望大家觉得好用的点点星星


 被折叠的 条评论
为什么被折叠?
被折叠的 条评论
为什么被折叠?
 到【灌水乐园】发言


