


SpringBoot学习
快速入门
创建Maven项目
导入SpringBoot起步依赖
在pom.xml里面加上
 <!--spring工程需要继承的父工程-->
    <parent>
        <groupId>org.springframework.boot</groupId>
        <artifactId>spring-boot-starter-parent</artifactId>
        <version>2.5.0</version>
    </parent>

    <dependencies>
        <!--web开发需要的起步依赖-->
        <dependency>
            <groupId>org.springframework.boot</groupId>
            <artifactId>spring-boot-starter-web</artifactId>
        </dependency>
    </dependencies>
定义Controller
编写一个简单的Controller类
@SpringBootApplication
public class HelloApplication {
    public static void main(String[] args) {
        SpringApplication.run(HelloApplication.class, args);
    }
}
编写引导类
SpringBoot的主类
@SpringBootApplication//这个注解的作用是提醒他是主类
public class HelloApplication {
    public static void main(String[] args) {
        SpringApplication.run(HelloApplication.class, args);
    }
}
启动测试
直接运行main方法
再访问对应的地址就可以了
快速创建一个SpringBoot项目
在idea中new一个porject
在最右侧选择Spring Initailizr
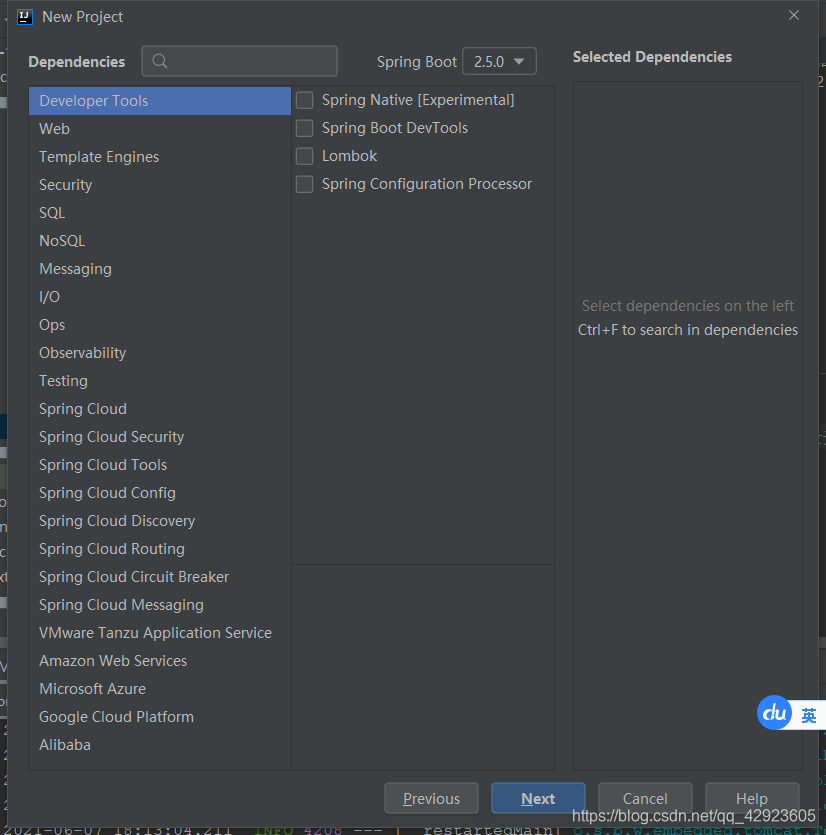
在这个页面选择自己需要用到的场景
比如web mysql mybatis

他会自动引入依赖和创建初始的项目结构
SpringBoot配置
配置文件的名称必须是application.yml(yaml)或者application.properties
他的优先级是properties>yml>yaml
如果在高优先级中配置了数据 那么低优先级中配置相同的数据将不会生效
yaml
基本语法:
key: value;kv之间有空格
大小写敏感
使用缩进表示层级关系
缩进不允许使用tab,只允许空格
缩进的空格数不重要,只要相同层级的元素左对齐即可
'#‘表示注释
字符串无需加引号,如果要加,’ '(单引号)与" "(双引号)表示字符串内容 会被 转义/不转义
字面量:单个的、不可再分的值。date、boolean、string、number、null
k: v
对象:键值对的集合。map、hash、set、object
行内写法:  k: {k1:v1,k2:v2,k3:v3}
#或
k:
  k1: v1
  k2: v2
  k3: v3
数组:一组按次序排列的值。array、list、queue
行内写法:  k: [v1,v2,v3]
#或者
k:
 - v1
 - v2
 - v3
参数引用:
personZS:
  name: ahangsan
  age: 20

animal:
  person: ${personZS}
配置文件数据获取
@Value方式
在需要的变量上面添加这个注解
如下 ${ }里面的值对应的是配置文件里的key
name: NAME
@Value("${name}")
private String name1;
数组方式比较特别
arraylist: [a,b,c,d,e]
@Value("${arraylist[0]}")
    private String arraylist;
Environment
首先需要有一个Environment类的变量 springBoot会自动注入
	@Autowired
    private Environment env;
然后直接调用方法即可:
System.out.println(env.getProperty("name"));
System.out.println(env.getProperty("arraylist[0]"));
字符串的值和value注解注入规则一样
@ConfigurationProperties
Person类:
package com.xzh.boot12.bean;

import lombok.Data;
import lombok.ToString;
import org.springframework.boot.context.properties.ConfigurationProperties;
import org.springframework.stereotype.Component;

import java.util.Date;
import java.util.List;
import java.util.Map;
import java.util.Set;

/**
 * @Author XuZhuHong
 * @CreateTime 2021/6/7 18:40
 */
//下面的代码由Lombok提供
//@Data  自动生成get,set方法
@Data
//@ToString  自动生成tostring注解
@ToString
//@AllArgsConstructor  自动生成构造方法(全部参)
@AllArgsConstructor
//@NoArgsConstructor  自动生成无参构造方法
@NoArgsConstructor
//@EqualsAndHashCode  重写HashCode方法
@EqualsAndHashCode
//@ConfigurationProperties绑定配置文件key为person的数据
//用这个注解过后里面的数据有变量名和配置key相等时会自动注入
@ConfigurationProperties(prefix = "person")
@Component//放到容器中的注解
public class Person {
    private String userName;
    private Boolean boss;
    private Date birth;
    private Integer age;
    private Pet pet;
    private String[] interests;
    private List<String> animal;
    private Map<String, Object> score;
    private Set<Double> salarys;
    private Map<String, List<Pet>> allPets;
}

/**
注意想要使用上面关于lombok的注解必须要在pom.xml中导入以下代码:
<dependency>
            <groupId>org.projectlombok</groupId>
            <artifactId>lombok</artifactId>
</dependency>
*/
application.yml配置文件:
# yaml表示以上对象
person:
  userName: zhangsan
  boss: false
  birth: 2019/12/12 20:12:33
  age: 18
  pet:
    name: tomcat
    weight: 23.4
  interests: [ 篮球,游泳 ]
  animal:
    - jerry
    - mario
  score:
    english:
      first: 30
      second: 40
      third: 50
    math: [ 131,140,148 ]
    chinese: { first: 128,second: 136 }
  salarys: [ 3999,4999.98,5999.99 ]
  allPets:
    sick:
      - { name: tom }
      - { name: jerry,weight: 47 }
    health: [ { name: mario,weight: 47 } ]
配置文件时没有提示解决方法:
在pom.xml中导入以下依赖
  <!--yaml编写提示-->
 <!--配置处理器 就是解决在配置文件中没有提示的问题-->
        <dependency>
            <groupId>org.springframework.boot</groupId>
            <artifactId>spring-boot-configuration-processor</artifactId>
            <optional>true</optional>
        </dependency>


 <build>
        <plugins>
            <plugin>
                <groupId>org.springframework.boot</groupId>
                <artifactId>spring-boot-maven-plugin</artifactId>
                <!--这句话的意思是 让这个打包插件 不要把yaml的代码提示放进去-->
                <configuration>
                    <excludes>
                        <exclude>
                            <groupId>org.springframework.boot</groupId>
                            <artifactId>spring-boot-configuration-processor</artifactId>
                        </exclude>
                    </excludes>
                </configuration>
            </plugin>
        </plugins>
    </build>
profile动态切换配置文件
- profile是用来完成不同环境下, 配置动态切换功能的。
- profile配置方式
●多profile文件方式:提供多个配置文件,每个代表-种环境。
●application-dev.properties/yml开发环境
●application-test.properties/yml测试环境
●application-pro.properties/yml生产环境
●yml多文档方式:
● 在yml中使用—分隔不同配置 - profile激活方式
●配置文件:再配置文件中配置: spring.profiles.active=dev
●虚拟机参数:在VM options指定: -Dspring.profiles.active=dev
●命令行参数: java -jar xx.jar --spring.profiles.active=dev
有可能每一个环境下面开发的配置不一样就可以用到他
profile配置方式一多文件方式
怎么激活:

只需要在application配置文件上加上下面的语句即可
需要注意的是 加载哪个文件只需要写-后面的名字就可以了
spring:
  profiles:
    active: dev
方式二 yaml分割方式
只需要在不同的yaml中加入分割线,每一个分割线中用spring.profiles属性命名
然后spring. profiles. active激活他们
如下:
spring:
  profiles:
    active: dev
---
server:
  port: 8083

spring:
  profiles: dev
---
server:
  port: 8082
spring:
  profiles: pro
---
spring:
  profiles: test

server:
  port: 8081
---
其他框架整合
整合junit框架
直接在他自动生成的测试文件夹里写测试代码即可
整合Redis框架
在创建的时候直接添加Redis起步依赖
如果已经创建
在pom里面添加也可以
<dependency>
            <groupId>org.springframework.boot</groupId>
            <artifactId>spring-boot-starter-data-redis</artifactId>
        </dependency>
然后用自动注入再调用函数就可以了
  @Autowired
    RedisTemplate redisTemplate;

    @Test
    void redisTemplateSet() {
        redisTemplate.boundValueOps("name").set("zhangsan");
    }

    @Test
    void redisTemplateGet() {
        Object o = redisTemplate.boundValueOps("name").get();
        System.out.println(o.toString());
    }
需要注意的是他的redis默认是本机
如果需要修改可以在application配置文件里修改
整合Mybits框架
快速创建的时候选择添加这两个起步依赖

首先在application配置对应的数据源
这里有个坑 密码必须要用字符串表示 不然他会识别成为数字
spring:
  datasource:
    driver-class-name: com.mysql.jdbc.Driver
    url: jdbc:mysql://localhost:3306/springboot
    username: root
    password: "000000"
用注解的方式:
写好对应的Mapper接口就可以直接开始用了
接口类:
@Mapper
@Repository
public interface UserMapper {
    @Select("select * from t_user")
    List<User> findAll();
}
测试类:
 @Autowired
    UserMapper userMapper;
    @Test
    void contextLoads() {
        List< User > all = userMapper.findAll();
        for (User user : all) {
            System.out.println(user);
        }
    }
配置文件的方式:
需要在application中指定配置文件的路径
#mybatis
mybatis:
  #mapper的映射文件路径   就是和接口匹配的xml文件
  mapper-locations: classpath*:mapper/*Mapper.xml
并且在对应的xml中编写好代码
就可以直接运行测试了
和上面的一样
监听机制
SpringBoot分别有4个监听器
ApplicationContextlnitializer
SpringApplicationRunListener
CommandLineRunner
ApplicationRunner
怎么使用:
ApplicationRunner和ApplicationRunner接口
首先自定义一个类 实现他的接口 在实现方法 并且在类上加上@Component(实例化到IOC容器中)就可以了
SpringApplicationRunListener和ApplicationContextlnitializer
需要在META-INF/spring.factories文件里面进行配置
配置的参数为:接口全类名=实现接口类的全类名:如下:
org.springframework.boot.SpringApplicationRunListener=com.xzh.listener.Mylistener.Mylistener
要注意的是 SpringApplicationRunListener接口需要有一个构造函数,不然会出错
如下:
public class Mylistener implements SpringApplicationRunListener {
    public Mylistener (SpringApplication application,String[] args){

    }
    //具体继承代码省略
    }
SpringBoot监控
使用步骤:

或者在快速创建里面 可以在ops里面找到actuator进行创建即可
怎么查看所有的监控信息 在properties里面配置:
#监控所有的endpoint暴露出来
management.endpoints.web.exposure.include=*


 969
969


 被折叠的 条评论
为什么被折叠?
被折叠的 条评论
为什么被折叠?
 到【灌水乐园】发言


