


首先,我们要安装搭建好一个linux服务器。
然后是将该服务器配置成FTP服务器。
具体操作如下:
1.检查是否安装vsftpd
rpm -qa | grep vsftpd
其实这一步也没啥乱用,就看一下,rpm命令是否可以使用,vsftpd的版本号而已。
2.安装 vsftpd
yum -y install vsftpd报错了:
错误:运行此命令需要管理员特权(多数系统下是root用户)。
原因是我的这个账号不是管理员,那我们 修改命令再操作:
sudo yum -y install vsftpd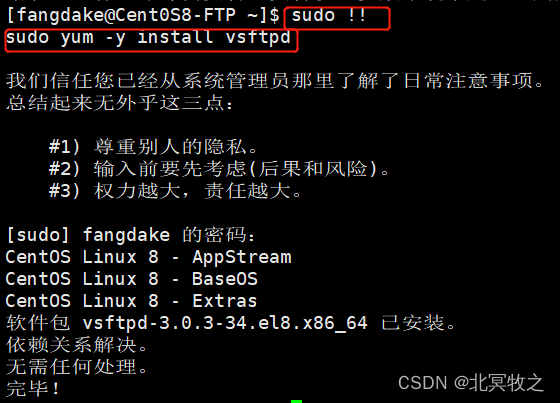
命令!!的意思就是重复上一条执行的命令,所以我的 sudo !! 的下面显示的就是我们真正要执行的命令。输入密码之后自动安装。
命令解释:
yum:在线安装,所以你的电脑必须联网;
-y:一路yes,避免询问;
install:安装的命令
vsftpd:是“very secure FTP daemon”的缩写,安全性是它的一个最大的特点。vsftpd 是一个 UNIX 类操作系统上运行的服务器的名字,它可以运行在诸如 Linux、BSD、Solaris、 HP-UNIX等系统上面,是一个完全免费的、开放源代码的ftp服务器软件,支持很多其他的 FTP 服务器所不支持的特征。比如:非常高的安全性需求、带宽限制、良好的可伸缩性、可创建虚拟用户、支持IPv6、速率高等。
3、关闭匿名访问
关闭匿名访问后,想访问里面的文件就需要账号和密码;如果不关,就可以直接访问。所以,这一步是可选操作。
vim /etc/vsftpd/vsftpd.conf如果提示是只读文件,那么你只需要输入命令:
sudo vim /etc/vsftpd/vsftpd.conf打开之后的页面显示如下:
# Example config file /etc/vsftpd/vsftpd.conf
#
# The default compiled in settings are fairly paranoid. This sample file
# loosens things up a bit, to make the ftp daemon more usable.
# Please see vsftpd.conf.5 for all compiled in defaults.
#
# READ THIS: This example file is NOT an exhaustive list of vsftpd options.
# Please read the vsftpd.conf.5 manual page to get a full idea of vsftpd's
# capabilities.
#
# Allow anonymous FTP? (Beware - allowed by default if you comment this out).
anonymous_enable=NO
#
# Uncomment this to allow local users to log in.
local_enable=YES
#
# Uncomment this to enable any form of FTP write command.
write_enable=YES
#
# Default umask for local users is 077. You may wish to change this to 022,
# if your users expect that (022 is used by most other ftpd's)
local_umask=022
#
# Uncomment this to allow the anonymous FTP user to upload files. This only
# has an effect if the above global write enable is activated. Also, you will
# obviously need to create a directory writable by the FTP user.
# When SELinux is enforcing check for SE bool allow_ftpd_anon_write, allow_ftpd_full_access
#anon_upload_enable=YES
#
# Uncomment this if you want the anonymous FTP user to be able to create
# new directories.
#anon_mkdir_write_enable=YES
#
# Activate directory messages - messages given to remote users when they
# go into a certain directory.
dirmessage_enable=YES
#
# Activate logging of uploads/downloads.
xferlog_enable=YES
#
# Make sure PORT transfer connections originate from port 20 (ftp-data).
connect_from_port_20=YES
#
# If you want, you can arrange for uploaded anonymous files to be owned by
# a different user. Note! Using "root" for uploaded files is not
# recommended!
#chown_uploads=YES
#chown_username=whoever
#
# You may override where the log file goes if you like. The default is shown
# below.
#xferlog_file=/var/log/xferlog
#
# If you want, you can have your log file in standard ftpd xferlog format.
# Note that the default log file location is /var/log/xferlog in this case.
xferlog_std_format=YES
#
# You may change the default value for timing out an idle session.
#idle_session_timeout=600
关闭匿名访问就是将:anonymous_enable=NO
我们输入 i ,然后找到这个对应的字段,修改为NO即可。然后输入 ESC,再输入 :wq! 最后回车即可。
我这里的默认就是anonymous_enable=NO,我们不做修改。如果你的这个文件的这个字段的取值是YES,同时你想禁止匿名访问,把它该成NO即可。
当然还有其他的配置可以修改,我们这里就先修改匿名访问的配置。
3、启动服务
systemctl start vsftpd.service4、查看服务状态
启动之后我们可以查看服务的状态,看看启动是否成功:
systemctl status vsftpd.service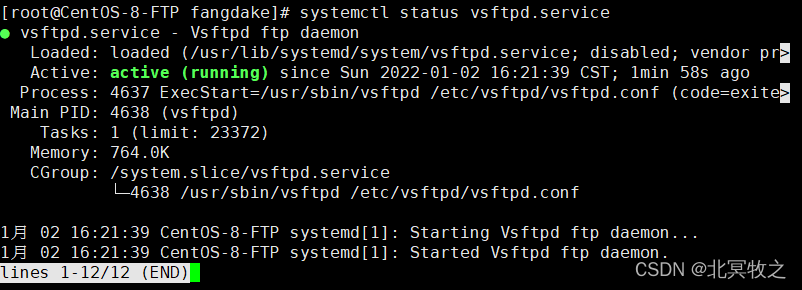
我们看到绿色的 active(running),代表着启动成功正在运行中。
我们按 q 或者Ctrl + c 退出这个显示页面,回到命令行。
5、开放访问端口
启动成功之后我们可以在服务器上访问了,但是如果我们要在电脑上访问的话还是不行的,因为这个存在防火墙的问题,此时就需要打开相应端口的防火墙了。
# 开启21端口访问权
firewall-cmd --zone=public --add-port=21/tcp --permanent
#开启1025-65535端口访问权
firewall-cmd --zone=public --add-port=1025-65535/tcp --permanent
# 重启防火墙
systemctl restart firewalld
切记:最后一个命令的 firewall后面有个d,不然会报错:
Failed to restart firewall.service: Unit firewall.service not found.
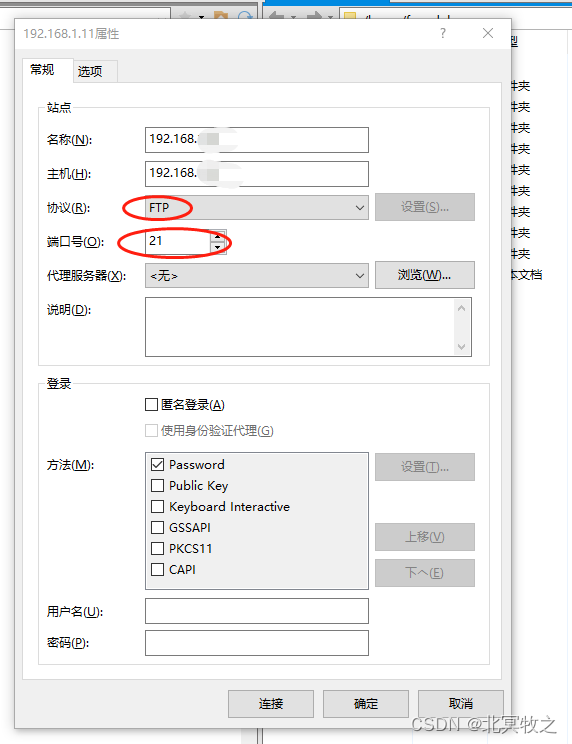
此时我们可以通电脑去查看对应FTP服务器的情况了,在电脑上输入:
ftp://192.168.xx.xx
上面是你的服务器的ip,然后显示页面如下:
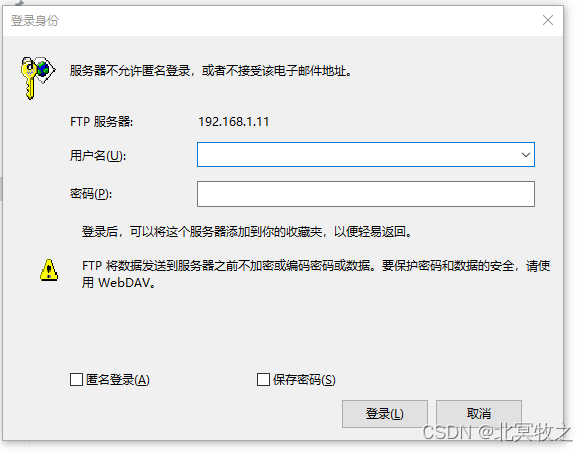
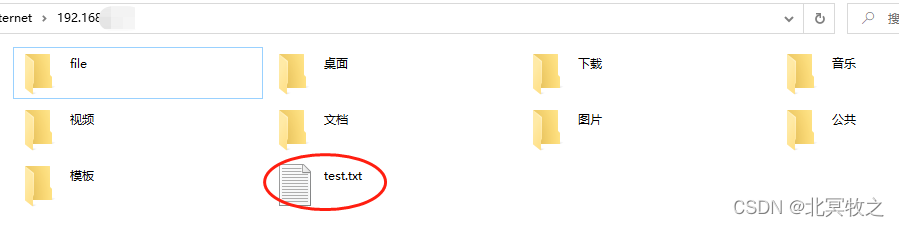
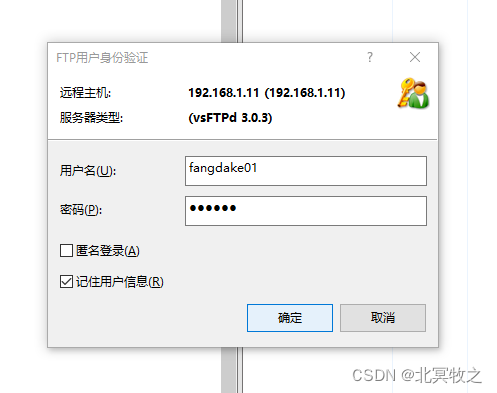
输入用户名密码并保存密码,登陆之后的页面如下:
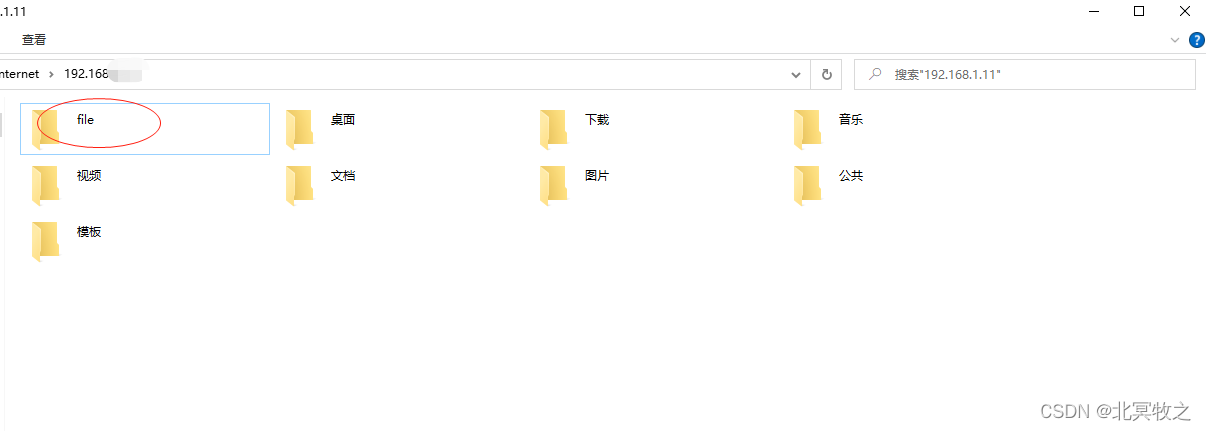
上图中的file目录是我自己之前在服务器上创建的,其他的都是服务器安装时生成的目录。
6、新增用户
我们可以创建一个用户用于FTP操作,因为在Linux上,root用户是不能登陆FTP的。如果你输入的是root用户,登陆会失败的。
adduser fangdake01上面是创建的用户名:fangdake01
给fangdake01设置密码:
passwd fangdake01输入两次密码就ok了。
至此为止我们的FTP服务器搭建完了,怎么验证呢?我们把一个文件拖到ftp的某一个地方,比如:
然后我们去服务器上看看:

文件确实上传上去了,同时所在的目录也是正确的。
至此,我们的FTP服务器搭建完毕。
我们还可以通过ftp连接工具去打开,我们这里使用Xftp 7连接:
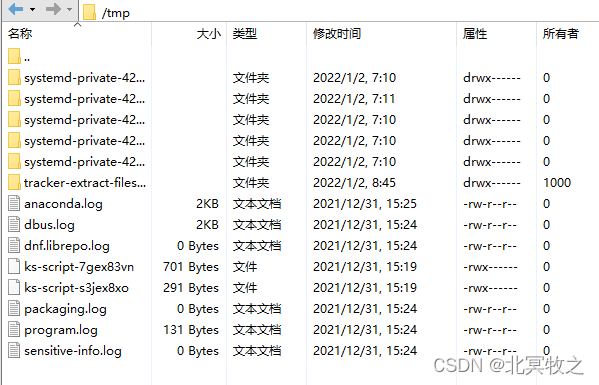
fangdake01是我们刚才创建的用户,登陆之后发现在该用户自己的目录下,什么都没有,因为这个是我们刚创建一个普通用户而已。如果我们使用fangdake来登陆的话,发现就不一样了。我们可以访问对应的目录,比如以临时目录文件来说:
至此,说明通过ftp连接工具也是可以正常访问我们的ftp服务器了。那么我么的FTP服务器就搭建好了。
服务器搭建好之后,默认不是开机自动启动的,我们需要设置开机启动。网上找了不少方法,有不少都不行,可能与我的虚拟机版本有问题,我的是CentOS 8 Stream版本的。
最终可行的方法是:
chkconfig vsftpd on但是这个命令好像被废弃了,直接转发到其他命令上了。
[fangdake@CentOS-8-FTP file]$ chkconfig vsftpd on
注意:正在将请求转发到“systemctl enable vsftpd.service”。
==== AUTHENTICATING FOR org.freedesktop.systemd1.manage-unit-files ====
Authentication is required to manage system service or unit files.
Authenticating as: fangdake
Password:
==== AUTHENTICATION COMPLETE ====
Created symlink /etc/systemd/system/multi-user.target.wants/vsftpd.service → /usr/lib/systemd/system/vsftpd.service.
==== AUTHENTICATING FOR org.freedesktop.systemd1.reload-daemon ====
Authentication is required to reload the systemd state.
Authenticating as: fangdake
Password:
==== AUTHENTICATION COMPLETE ====
也就是说将命令转发到了“systemctl enable vsftpd.service”上面。我们输入密码即可。或者Ctrl + c退出,然后使用命令:
systemctl enable vsftpd.service然后输入两次密码即可。
最后,需要说明的是:
1.原始的服务器的网络适配器必须是桥接模式;
2.必须联网,因为要联网安装。


 5904
5904

 被折叠的 条评论
为什么被折叠?
被折叠的 条评论
为什么被折叠?
 到【灌水乐园】发言


