


spring
1. spring概述
Spring 是 Java web 开发一站式的开源框架 。以 IoC (Inverse of Control ,控制反转) 和 AOP (Aspect Oriented Programming,切面编程) 为内核,提供了展现层 Spring MVC , 持久层 Spring JDBC 以及业务层事务管理等一站式的企业级应用技术。
1.1 spring 的优点
① Spring是一个开源框架
② Spring为简化企业级开发而生,使用Spring开发可以将Bean对象,Dao组件对象,Service组件对象等交给Spring容器来管理,这样使得很多复杂的代码在Spring中开发却变得非常的优雅和简洁,有效的降低代码的耦合度,极大的方便项目的后期维护、升级和扩展。
③ Spring是一个IOC(DI)和AOP容器框架。
④ Spring的优良特性
[1]非侵入式:基于Spring开发的应用中的对象可以不依赖于Spring的API
[2]控制反转:IOC——Inversion of Control,指的是将对象的创建权交给Spring去创建。使用Spring之前,对象的创建都是由我们自己在代码中new创建。而使用Spring之后。对象的创建都是由给了Spring框架。
[3]依赖注入:DI——Dependency Injection,是指依赖的对象不需要手动调用setXX方法去设置,而是通过配置赋值。
[4]面向切面编程:Aspect Oriented Programming——AOP
[5]容器:Spring是一个容器,因为它包含并且管理应用对象的生命周期
[6]组件化:Spring实现了使用简单的组件配置组合成一个复杂的应用。在 Spring 中可以使用XML和Java注解组合这些对象。
[7]一站式:在IOC和AOP的基础上可以整合各种企业应用的开源框架和优秀的第三方类库(实际上Spring 自身也提供了表述层的SpringMVC和持久层的Spring JDBC)
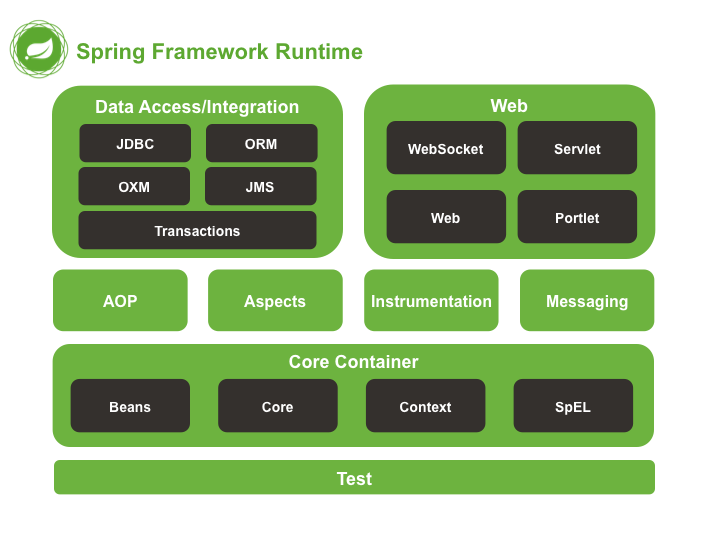
1.2 Spring框架四大模块
Core核心模块。负责管理组件的Bean对象
spring-beans-4.0.0.RELEASE.jar
spring-context-4.0.0.RELEASE.jar
spring-core-4.0.0.RELEASE.jar
spring-expression-4.0.0.RELEASE.jar
面向切面编程
spring-aop-4.0.0.RELEASE.jar
spring-aspects-4.0.0.RELEASE.jar
数据库操作
spring-jdbc-4.0.0.RELEASE.jar
spring-orm-4.0.0.RELEASE.jar
spring-oxm-4.0.0.RELEASE.jar
spring-tx-4.0.0.RELEASE.jar
spring-jms-4.0.0.RELEASE.jar
Web模块
spring-web-4.0.0.RELEASE.jar
spring-webmvc-4.0.0.RELEASE.jar
spring-websocket-4.0.0.RELEASE.jar
spring-webmvc-portlet-4.0.0.RELEASE.jar
2. IOC控制反转
2.1 概述
控制反转(ioc,inversion of Control),是一个概念,是一种思想。指导开发人员如何使用对象,管理对象的,吧对象的创建,属性赋值,对象的书名周期都交给代码之外的容器管理。
Ioc分为控制和反转
**控制:**对象创建,属性赋值,对象声明周期管理
**反转:**吧开发人员管理对象的权限转移给了代码之外的容器实现,由容器完成对象的管理。
**正转:**开发人员在代码中,使用new构造方法创建对象,掌握了对象的创建,属性赋值,对象从开始销毁的全部过程,开发人员对 对象 全部控制。
通过容器,可以使用容器中的对象(容器已经创建了对象,对象属性赋值了,对象也组装好了)。
**IoC的别名:依赖注入(DI)**Dependency Injection,是IOC的一种技术实现,程序只需要提供要使用的对象的名称就可以了,对象如何创建,如何从容器中查找,获取都由容器内部自己实现。
依赖:classA类中含有classB的实例,在classA中调用classB的方法完成功能,即classA对classB有依赖。
public class ClassB(){
	public void createOrder(){};
}

public class ClassA(){
    private ClassB b = new ClassB();
	public void buy(){
        b.createOrder();
    }
}

执行CLassA的buy()
 ClassA a = new ClassA();
 a.buy()
Spring框架使用的DI实现Ioc
通过Spring框架,只需要提供要使用的对象名称就可以了,从容器中获取名称对应的对象。spring底层使用的反射机制,通过反射创建对象,给属性。
2.2 spring 的配置文件
applicationContext.xml
<?xml version="1.0" encoding="UTF-8"?>
<beans xmlns:xsi="http://www.w3.org/2001/XMLSchema-instance"
       xmlns="http://www.springframework.org/schema/beans"
       xmlns:context="http://www.springframework.org/schema/context"
       xmlns:aop="http://www.springframework.org/schema/aop"
       xmlns:tx="http://www.springframework.org/schema/tx"
       xsi:schemaLocation="http://www.springframework.org/schema/beans http://www.springframework.org/schema/beans/spring-beans-4.2.xsd
                           http://www.springframework.org/schema/context http://www.springframework.org/schema/context/spring-context-4.2.xsd
                           http://www.springframework.org/schema/aop http://www.springframework.org/schema/aop/spring-aop-4.2.xsd
                           http://www.springframework.org/schema/tx http://www.springframework.org/schema/tx/spring-tx-4.2.xsd ">

</beans>
spring标准的配置文件:
	beans:根标签
	xmlns:约束文件说明
	bean:就是java对象,spring容器管理的java对象,叫bean
声明对象
id:自定义对象名称,唯一值
class:类的全限定类名,spring通过反射机制创建对象,不能是接口
spring跟根据id,class创建对象,吧对象放入到spring的一个map对象
map.put(id,对象)
<bean id="some" class="com.dao..."></bean>
创建容器对象
创建spring容器对象的时候,会读取配置文件,创建文件中声明的java对象
优点:获取对象速度快,因为对象已经创建好了
缺点:占用内存
public static void main(String[] args) {
    //创建容器对象,ApplicationContext 表示spring容器对象,通过ap获取某个java对象
    ApplicationContext ap = new ClassPathXmlApplicationContext("applicationContext.xml");
    //从容器中获取指定名称的对象,使用getBean("id")
    Printing pr = (Printing)ap.getBean("printing");
    //调用对象的方法,接口中的方法
    pr.print();
}
2.3 依赖注入
value与注入的区别
使用子元素注入 使用value属性注入 参数值位置 写在首位标签()的中间(不加双引号) 写在value的属性值中(必须加双引号 type属性 有(可选)可以通过type属性指定数据类型 无 参数值包含特殊字符(<,&)时的处理方法 两种处理方法:1.使用 <![CDATA[ 符号] ]>标记 2.使用xml预定义的实体引用 一种处理方法,即使使用xml预定义的实体引用 XML预定义的实体引用
实体引用 表示的符号 < < $amp; & > >
<bean id="colo" class="com.printer.Cl.Colo"></bean>
<bean id="red" class="com.printer.Cl.Red"></bean>

<bean id="a4z" class="com.printer.zhi.a4C"></bean>
<bean id="b5z" class="com.printer.zhi.b5C"></bean>

<bean id="printing" class="com.printer.InterfaceCl.Printing">
    <!-- ref:bean的id值 -->
	<property name="ink" ref="colo"></property>
	<property name="pa" ref="a4z"></property>
</bean>
2.4 IOC容器赋值
value:简单类型(8个基本类型+String)
ref:对象类型
2.4.1 简单类型的设值注入
使用的是value
<bean id="aop" class="com.aop.UserAop">
    <property name="name"><value>张三</value> </property>
    <property name="name" value="李四"></property>
</bean>
2.4.2 引用类型的设值注入
使用的是ref
<bean id="aop" class="com.aop.UserAop">
    <property name="name"><ref>张三</ref> </property>
    <property name="name" ref="李四"></property>
</bean>
2.4.3 给list注入值:
<property name="list">
	<list>
    	<value>值</value>
    </list>
</property>
2.4.4 给array数组注入值:
<property name="list">
	<list>
    	<value>值</value>
    </list>
</property>
2.4.5 给set集合注入值:
<property name="set">
	<set>
    	<value>值</value>
    </set>
</property>
2.4.6 给map类型注入值:
<property name="map">
	<map>
    	<entry>
        	<key>
            	<value>key</value>
            </key>
            <value>value</value>
        </entry>
        <entry>
        	<key>
            	<value>key</value>
            </key>
            <value>value</value>
        </entry>
    </map>
</property>
2.4.7 给对象赋null值
<bean id="aop" class="com.aop.UserAop">
    <property name="name">
   	 <null/>	<!-- 赋null后没有value -->
    </property>
</bean>
2.5 构造注入
构造注入:spring 调用类中的有参构造方法,在创建对象的同时,给属性赋值。有了有参方法就必须在手动创建一个无参构造方法
[外链图片转存失败,源站可能有防盗链机制,建议将图片保存下来直接上传(img-N1t4IYzH-1608357752085)(C:\Users\17821\AppData\Roaming\Typora\typora-user-images\image-20201211105807071.png)]
标签属性有:name:构造方法形参名
index:构造方法的参数位置
value:简答类型的形参值
ref: 引用类型的形参值
构造注入,使用index,参数的位置,构造方法参数从0开始
推荐使用name注入
<bean id="userDao" calss="dao.impl..."></bean>
<bean id="userService" class="service.impl...">
	<constructor-arg name="name" value="张三"></constructor-arg>
	<constructor-arg name="address" ref="userDao"></constructor-arg>
</bean>
一个 元素表示构造方法的一个参数,且使用时不区分顺序。当构造方法的参数出现混淆,无法区分时,可以通过元素的index属性指定该参数的索引,位置从0开始。
2.6 引用类型的自动注入
概念:spring可以根据某些规则给引用类型完成赋值。只对引用类型有效。
byName(按名称注入):java类中引用类型属性名称和spring容器中的bean的id名称一样的,且数据类型也是一样的,这些bean能够赋值给引用类型(其他bean的id值 = 该Course类的属性名)
byType(按类型注入):java类中引用类型的数据类型和spring容器中bean的calss值是同源关系,这样的bean赋值给引用类型。(若有两个类型一致就会报错)(一对一)
constructor:寻找bean的类型(calss)是否与Course累的构造方法参数的类型一致(本质就是byType)
<bean id="aop" class="com.aop.UserAop" aotowire="byName | byTyep"></bean>
可以在头文件中一次性将ioc容器的所有的bean 统一设置成自动装配:default-autowire=“byName”
自动装配虽然可以减少代码量,但是会降低程序的可读性,使用需谨慎
2.7 使用注解开发
2.7.1 bean的实现
实际开发使用注解
1.配置扫描哪些包下的注解
<!--指定注解扫描包-->
<context:component-scan base-package="com.kuang.pojo"/>
2.在指定包下编写类,增加注解
@ Component:细化
Dao层注解:@Repository
service层注解:@Service
控制器层:@Controller
@Component("user")
// 相当于配置文件中 <bean id="user" class="当前注解的类"/>
public class User {
   public String name = "立勤";
}
3.测试类
@Test
public void test(){
   ApplicationContext applicationContext =
       new ClassPathXmlApplicationContext("beans.xml");
   User user = (User) applicationContext.getBean("user");
   System.out.println(user.name);
}
2.7.2 属性注入
使用注解注入属性
1、可以不用提供set方法,直接在直接名上添加@value(“值”)
@Component("user")
// 相当于配置文件中 <bean id="user" class="当前注解的类"/>
public class User {
   @Value("立勤")
   // 相当于配置文件中 <property name="name" value="立勤"/>
   public String name;
}
1234567
2、如果提供了set方法,在set方法上添加@value(“值”);
@Component("user")
public class User {

   public String name;

   @Value("立勤")
   public void setName(String name) {
       this.name = name;
  }
}
3,引用类型注入
@Autowired 按照类型匹配
@Qualifier("…") 按照指定的名称id匹配
@Resource 如果写上name,就是按照@Qualifier,如果不写name就和@Autowired同理
3. 面向切面编程(AOP)
3.1 理解面向切面编程
面向切面编程(Aspect Oriented Programming ,AOP)是软件编程思想发展一定阶段的产物。
面向切面编程,简单地说就是在不改变原程序的基础上为代码段增加新的功能,对代码段进行增强处理,设计思想来源于代理设计模式,
Aop在spring中的作用
提供声明式事务;允许用户自定义切面
以下名词需要了解下:
- 横切关注点:跨越应用程序多个模块的方法或功能。即是,与我们业务逻辑无关的,但是我们需要关注的部分,就是横切关注点。如日志 , 安全 , 缓存 , 事务等等 …
- 切面(ASPECT):横切关注点 被模块化 的特殊对象。即,它是一个类。
- 通知(Advice):切面必须要完成的工作。即,它是类中的一个方法。
- 目标(Target):被通知对象。
- 代理(Proxy):向目标对象应用通知之后创建的对象。
- 切入点(PointCut):切面通知 执行的 “地点”的定义。
- 连接点(JointPoint):与切入点匹配的执行点。
3.2 使用Spring实现Aop
1.使用AOP使用AOP织入,需要导入一个依赖包!
<!-- https://mvnrepository.com/artifact/org.aspectj/aspectjweaver -->
<dependency>
   <groupId>org.aspectj</groupId>
   <artifactId>aspectjweaver</artifactId>
   <version>1.9.4</version>
</dependency>
2.创建增强类,编写两个方法,一个前置增强,一个后置增强
public class Log implements MethodBeforeAdvice {

    //method : 要执行的目标对象的方法
    //objects : 被调用的方法的参数
    //Object : 目标对象
    @Override
    public void before(Method method, Object[] objects, Object o) throws Throwable {
        System.out.println( o.getClass().getName() + "的" + method.getName() + "方法被执行了");
    }
}
public class AfterLog implements AfterReturningAdvice {
    //returnValue 返回值
    //method被调用的方法
    //args 被调用的方法的对象的参数
    //target 被调用的目标对象
    @Override
    public void afterReturning(Object returnValue, Method method, Object[] args,Object target) throws Throwable {
        System.out.println("执行了" + target.getClass().getName()
                           +"的"+method.getName()+"方法,"
                           +"返回值:"+returnValue);
    }
}
3.在applicationContext.xml中对相关组件进行声明,
<bean id="dao" calss="dao.impl..."></bean>
<bean id="service" class="service.impl...">
	<property name="dao" ref="dao"></property>
</bean>
<bean id="theLogger" calss="aop.UserServiceLogger"></bean>

<aop:config>
    <!-- 定义切面 -->
	<aop:pointcut id="pointcut" expression="execution(public void addNewsUser(entity.User))"/>
    <!-- 引用包含增强方法的Bean -->
	<aop:aspect ref="theLogger">
        <!-- 将before()方法定义为前置增强并引用pointcut切入点 -->
    	<aop:before method="方法" point-ref="pointcut"/>
        <!-- 将after-returning  -->
        <aop:after-returning method="方法" point-ref="pointcut" returning="result"/>
    </aop:aspect>
</aop:config>
与AOP相关的配置都放在<aop:config >标签中
exection是切入点指示符,它的括号中是一个切入点表达式,可以配置需要切入增强的方法的特征,切入点表达式支持模糊查匹配,
public * addNewUser(entity.User):		//*表示匹配所有类型的返回值
public void * (entity.User):		//*表示匹配所有方法名
public void addNewUser(..):		//..表示匹配所有参数个数和类型
* com.service.*.*(..):	//这个表达式匹配com.service包下所有类的所有方法
* com.service..*.*(..):	//这个表达式匹配com.service包及其子包下所有类的所有方法
3.3 使用注解实现
第一步:编写一个注解实现的增强类
package com.kuang.config;

import org.aspectj.lang.ProceedingJoinPoint;
import org.aspectj.lang.annotation.After;
import org.aspectj.lang.annotation.Around;
import org.aspectj.lang.annotation.Aspect;
import org.aspectj.lang.annotation.Before;

@Aspect
public class AnnotationPointcut {
   @Before("execution(* com.kuang.service.UserServiceImpl.*(..))")
   public void before(){
       System.out.println("---------方法执行前---------");
  }

   @After("execution(* com.kuang.service.UserServiceImpl.*(..))")
   public void after(){
       System.out.println("---------方法执行后---------");
  }

   @Around("execution(* com.kuang.service.UserServiceImpl.*(..))")
   public void around(ProceedingJoinPoint jp) throws Throwable {
       System.out.println("环绕前");
       System.out.println("签名:"+jp.getSignature());
       //执行目标方法proceed
       Object proceed = jp.proceed();
       System.out.println("环绕后");
       System.out.println(proceed);
  }
}
第二步:在Spring配置文件中,注册bean,并增加支持注解的配置
<!--第三种方式:注解实现-->
<bean id="annotationPointcut" class="com.kuang.config.AnnotationPointcut"/>
<aop:aspectj-autoproxy/>
aop:aspectj-autoproxy:说明
通过aop命名空间的<aop:aspectj-autoproxy />声明自动为spring容器中那些配置@aspectJ切面的bean创建代理,织入切面。当然,spring 在内部依旧采用AnnotationAwareAspectJAutoProxyCreator进行自动代理的创建工作,但具体实现的细节已经被<aop:aspectj-autoproxy />隐藏起来了

<aop:aspectj-autoproxy />有一个proxy-target-class属性,默认为false,表示使用jdk动态代理织入增强,当配为<aop:aspectj-autoproxy  poxy-target-class="true"/>时,表示使用CGLib动态代理技术织入增强。不过即使proxy-target-class设置为false,如果目标类没有声明接口,则spring将自动使用CGLib动态代理。


 2453
2453


 被折叠的 条评论
为什么被折叠?
被折叠的 条评论
为什么被折叠?
 到【灌水乐园】发言


