


一、API后端服务的安装环境
环境:Windows Server 2016 + SQL Server 2016 + Python3.6 +Django2+ IIS10.0
二、搭建Python环境及安装IIS、CGI
1.下载并安装python到相应的目录:https://www.python.org/downloads/release/python-368/
2.创建python虚拟环境
1.创建目录
e:
mkdir xxxxxxx
cd E:\xxxxxxxxx
mkdir virtualenvs
cd E:\xxxxxxxxxxxxxxxxx\virtualenvs
2.创建虚拟环境
python -m venv innovation_venv
3.激活虚拟环境
cd innovation_venv\Scripts

activate.bat # activate the virtual env
三.配置django项目
备注:服务器没有联网的情况下;需将安装包都下载到本地 然后复制到服务器上安装;或在联网的情况下用pip安装后讲包
目录复制过来
1.安装Django项目依赖包
cd 项目根目录
2.安装依赖包
pip install -r requirements.txt
3.安装wfastcgi
在激活虚拟环境下执行命令
pip install wfastcgi
4.执行命令
切换至虚拟环境下E:\xxxxxxxxxxxx\virtualenvs\innovation_venv\Scripts\
执行命令,注意,此处必须使用管理员打开终端执行此命令,否则iis启动会失效
wfastcgi-enable
出现以下信息则代表执行成功!
"E:\xxxxxxxxxxxx\virtualenvs\innovation_venv\Scripts\python.exe|E:\xxxxxxxxxxxx\virtualenvs\innovation_venv\lib\site-packages\wfastcgi.py" can now be used as a FastCGI script processor
出现以上说明wfastcgi配置成功
wfastcgi是一个类似于Gunicorn或uwsgi的WSGI。wfastcgi是由微软维护的,使用它会比尝试在windows上编译其他基于linux的WSGI服务器更好。
如果你的Django应用只在Windows上使用,你可以考虑把wfastcgi放到requirements.txt文件中。
参考: https://pypi.org/project/wfastcgi/
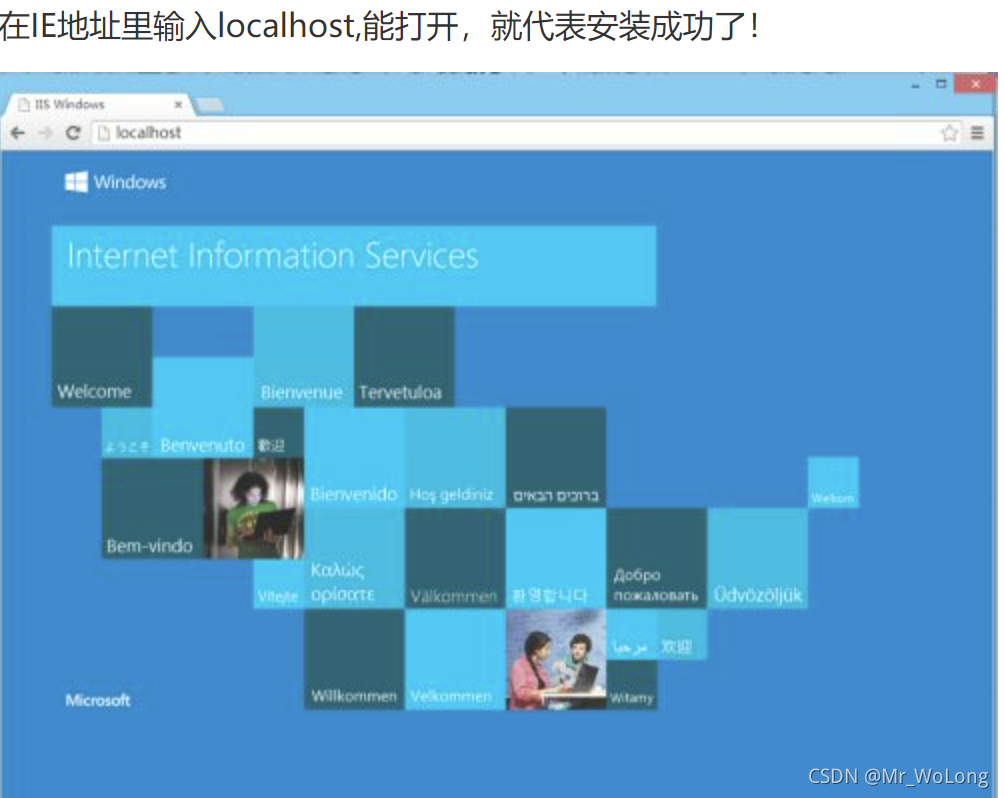
安装配置完上述环境后,验证python项目是否能运行

出现以上信息说明项目启动成功!
四.在IIS中配置django项目
1.安装iis
这里就不详细介绍了
Windows10如何安装IIS(互联网信息服务):https://jingyan.baidu.com/article/eb9f7b6d9e73d1869364e8d8.html
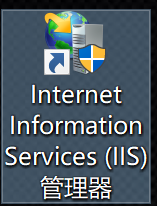
安装成功后的额界面,安装成功后可以启动iis,windows桌面会生成图标,双击即可运行
2.配置django服务
在iis中配置FastCGI
在项目根目录中,创建一个新的web。配置配置文件并放入以下内容
<?xml version="1.0" encoding="UTF-8"?>
<configuration>
    <system.webServer>
        <modules>
            <remove name="WebDAVModule" />
        </modules>
        <handlers>
            <remove name="WebDAV" />
            <add name="django-innovation" path="*" verb="*" modules="FastCgiModule" scriptProcessor="E:\xxxxx\virtualenvs\innovation_venv\Scripts\python.exe|E:\xxxxxxx\virtualenvs\innovation_venv\lib\site-packages\wfastcgi.py" resourceType="Unspecified" requireAccess="Script" />
        </handlers>
	    <security>
            <requestFiltering>
                <requestLimits maxAllowedContentLength="419430400" />
            </requestFiltering>
        </security>
        <httpErrors errorMode="Detailed" />
        <asp scriptErrorSentToBrowser="true"/>
    </system.webServer>
    <appSettings>
       <add key="PYTHONPATH" value="E:\xxxxxxxx\backend" />
       <add key="WSGI_HANDLER" value="django.core.wsgi.get_wsgi_application()" />
       <add key="DJANGO_SETTINGS_MODULE" value="innovation.settings" />
       <add key="WSGI_LOG" value="E:\xxxxxxxx\logs\wfastcgi.log" />
    </appSettings>
    <system.web>
        <httpRuntime executionTimeout="6000" maxRequestLength="419430400" />
        <customErrors mode="Off"/>
        <compilation debug="true"/>
    </system.web>
</configuration>
scriptProcessor="E:\xxxxxxxxxx\virtualenvs\innovation_venv\Scripts\python.exe|E:\xxxxxxxxxxxxxxxx\virtualenvs\innovation_venv\lib\site-packages\wfastcgi.py"
这里的路径是在配置wfastcgi是获取的
简配版:
<?xml version="1.0" encoding="UTF-8"?>
    <configuration>
        <system.webServer>
            <handlers>
                <add name="Python FastCGI" path="*" verb="*" modules="FastCgiModule" scriptProcessor="D:\Program Files (x86)\Python\Python37\python.exe|E:\System_ENG\system_register\wfastcgi.py" resourceType="Unspecified" requireAccess="Script" />
            </handlers>
        </system.webServer>
        <appSettings>
            <add key="WSGI_HANDLER" value="django.core.wsgi.get_wsgi_application()" />
            <add key="PYTHONPATH" value="E:\System_ENG\system_register" />
            <add key="DJANGO_SETTINGS_MODULE" value="system_register.settings" />
        </appSettings>
    </configuration>
配置说明:
1、system.webServer.handlers
    FastCgiModule
2、appSettings
 python项目配置
3、支持大文件上传的配置
system.webServer.security.requestLimits
system.web.httpRuntime

解决超时问题修改配置:
FastCGI Settings:Activity Timeout、Idle Timeout、Request Timeout
    Application Pool: Idle Time-out (minutes)
参考:
https://docs.microsoft.com/en-us/visualstudio/python/configure-web-apps-for-iis-windows?view=vs-2019
https://pypi.org/project/wfastcgi/
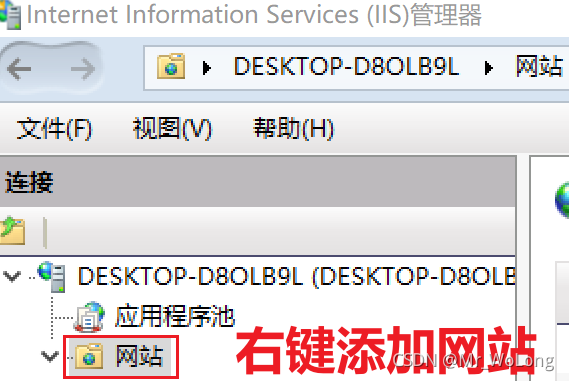
3. 创建并配置新的IIS网站
打开IIS管理器→右键网站→添加网站
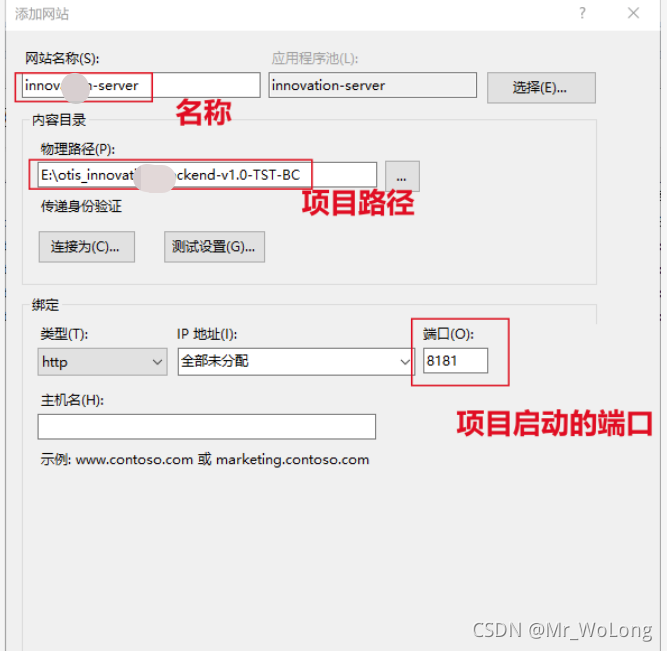
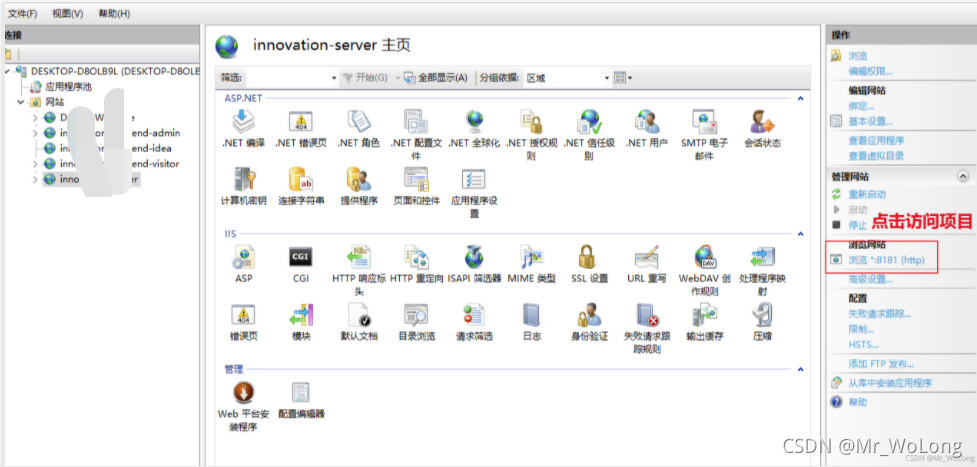
ermark,type_ZHJvaWRzYW5zZmFsbGJhY2s,shadow_50,text_Q1NETiBATXJfV29Mb25n,size_20,color_FFFFFF,t_70,g_se,x_16)
访问项目
项目启动成功
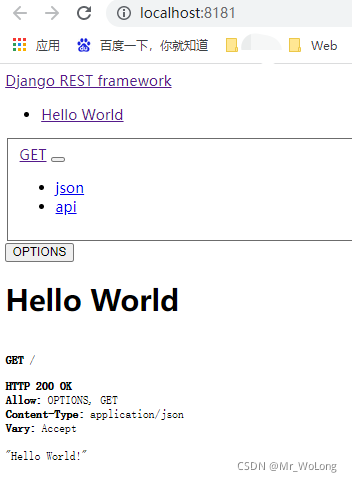
至此,后端django项目配置完成!
服务器目录说明
项目部署主目录:E:\innovation
Python3.6.8安装目录:D:\Program Files(x86)\Python\Python36
1、后端API服务
代码及存储
   代码 目录:E:\xxxxxxx\backend
   ldap配置:E:\xxxxxxxxxxx\backend\innovation\ldap_settings.py
   数据库等配置项:E:\xxxxxxxxxxxx\backend\innovation\secret.py
   上传文件 目录:E:\xxxxxxxxxxxxxxx\media
   缓存文件 目录:E:\xxxxxxxxxxx\cache
   日志文件 目录:E:\xxxxxxxxxxxxx\logs
Python虚拟环境目录
   E:\xxxxxxxxxxxx\virtualenvs\innovation_venv

2、Web前端
   E:\xxxxxxxxxx\dist //前端源码 build后的文件
迭代部署:
Web前端:
1、替换E:\xxxxxxx\dist目录
API后端
1、替换E:\xxxxxxxxxxxx\backend目录
    如果有新的migrations文件的话 需要执行一下数据库迁移
2、执行数据库迁移(migrations)
打开命令行工具(Windows Command Prompt)
进入E盘:
 e:
进入项目Python虚拟环境并激活
      cd E:\xxxxxxxxxxxx\virtualenvs\innovation_venv
          Scripts\activate.bat
进入项目代码目录,执行数据库迁移
          cd E:\xxxxxxxxxxxxxxxxx\backend
python manage.py migrate
项目相关配置
Sql Server数据库配置
DATABASES = {
   'default': {
   'ENGINE': 'sql_server.pyodbc',
   'HOST': 'localhost',
   # 'PORT': 1433, // when use host 'ocnsia11\LDC', the port is no not required.
   'NAME': 'test',
   'USER': 'test',
   'PASSWORD': 'test',
   'OPTIONS': {
#'driver': 'SQL Server Native Client 11.0',
   'driver': 'ODBC Driver 17 for SQL Server',
   },
   },
}
备注:请确保部署的服务器上已经安装了 (“ODBC Driver 17 for SQL Server”, “ODBC Driver 13 for SQL Server”,
“SQL Server Native Client 11.0”)中的任何一个
参考:
https://github.com/michiya/django-pyodbc-azure
https://docs.microsoft.com/en-us/sql/connect/odbc/microsoft-odbc-driver-for-sql-server
https://docs.microsoft.com/en-us/sql/relational-databases/native-client/applications/installing-sql-server-native-client
Ldap For Django配置
第三方库:django-python3-ldap
备注:对接 项目的ldap中需要修改部分源码
ldap.py、ldap_settings.py在后端代码中 和 本文档一起打包成zip
配置文件:
 innovation/ldap_settings.py
需要被替换的源码文件:({venv_path}为python环境的目录)
{venv_path}\lib\site-packages\django-python3-ldap\ldap.py

主要配置项的说明:
  # The URL of the LDAP server.
 LDAP_AUTH_URL = "ldap://xxxx.COM"
# Initiate TLS on connection.
 LDAP_AUTH_USE_TLS = False
# The LDAP search base for looking up users.
# LDAP_AUTH_SEARCH_BASE = "OU=users,OU=China,OU=ap,DC=xx,DC=COM"
 LDAP_AUTH_SEARCH_BASE = ["OU=users,OU=China,OU=ap,DC=xxxxxx,DC=COM", "OU=users,OU=Ch
      "OU=xxxxx,OU=APAC,OU=CSC_Users,OU=.Resources,DC=xxxx,DC=COM
# Keep ModelBackend around for per-user permissions and maybe a local
 AUTHENTICATION_BACKENDS = (
   "django_python3_ldap.auth.LDAPBackend",
   'django.contrib.auth.backends.ModelBackend',
   )
    # attributes that represent them.
    LDAP_AUTH_USER_FIELDS = {
   "username": "xxxxxx",
   "first_name": "xxxxxxx",
   "last_name": "sn",
   "email": "mail"
}
文件存储配置
# Log、Cache、Media
MEDIA_ROOT = r"E:\innovation\media" # 上传文件目录
CACHE_FILE_ROOT = r"E:\innovation\cache" # 缓存文件目录
LOGGING_FILE_ROOT = r"E:\innovation\logs" # 缓日志文件目录
邮件SMTP
# Email SMTP
DEFAULT_FROM_EMAIL = 'xxxx@pusher.mail.xxxx.com' #默认的邮件发件人
EMAIL_HOST = 'xxxxx.xxxxx.com'  #邮件SMTP的Host
EMAIL_PORT = 80  #邮件SMTP的端口
EMAIL_USE_TLS = False
EMAIL_HOST_USER = 'xxxx@xxxx.mail.xxxx.com' #邮件SMTP的用户名
EMAIL_HOST_PASSWORD = '' #邮件SMTP的密码
# ADMINS Will ReceiveServer Error Mail
SERVER_EMAIL = 'xxxx@pusher.mail.xxxx.com' #服务器Error邮件发件邮箱名
ADMINS = [('xxxxxxxxxxxxxx', 'xxxxxx@xxxx.com'), ]  #服务器Error邮件接收人
前端vue项目的部署会在第二篇文章中介绍!
前端vue项目iis部署:https://blog.csdn.net/qq_43030934/article/details/120907103
希望对你有帮助,欢迎留言点赞收藏!


 1010
1010


 被折叠的 条评论
为什么被折叠?
被折叠的 条评论
为什么被折叠?
 到【灌水乐园】发言


