


一、anaconda安装
1、下载anaconda安装包
[清华镜像网](https://mirrors.tuna.tsinghua.edu.cn/anaconda/archive/)`
2、命令安装
bash Anaconda3-5.2.0-Linux-x86_64.sh
pip install jupyterlab
二、配置jupyter
1、生成配置文件
a.  jupyter --paths
  查看.jupyter目录下是否有jupyter_notebook_config.py,
  如果没有,shell运行
  jupyter notebook --generate-config(生成jupyter_notebook_config.py,该命令执行之后会显示对应的文件路径)

b.  vim jupyter_notebook_config.py(修改配置)
2、配置文件修改
2.1 password生成
# ipython进入代码行,输入一下两行代码以及对应的密码生成秘闻
(dev37) mashunda@ip-192-168-0-35 project % ipython
Python 3.7.12 | packaged by conda-forge | (default, Oct 26 2021, 05:59:23)
Type 'copyright', 'credits' or 'license' for more information
IPython 7.33.0 -- An enhanced Interactive Python. Type '?' for help.

In [1]: from notebook.auth import passwd
   ...: passwd()
Enter password:
Verify password:
Out[1]: 'argon2:$argon2id$v=19$m=10240,t=10,p=8$RPFTJPYMgIgpj9OaLZQ9Dg$81axqbnxoIBCwgxy2SGqdPp7nBM+0ab16oBJkp1bA/A'
2.2 jupyter_notebook_config.py中修改的相关的内容
# Nginx访问时会出现跨域访问,需要在这里允许
c.NotebookApp.allow_origin = '*'
# 禁止随意修改密码
c.NotebookApp.allow_password_change = False
# 是否允许远程访问
c.NotebookApp.allow_remote_access = True
# IP
c.NotebookApp.ip = '0.0.0.0'
# 端口
c.NotebookApp.port = 9820
# 工作目录
c.NotebookApp.notebook_dir = '/jupyter/'
# 启动Jupyter Notebook之后是否打开浏览器
c.NotebookApp.open_browser = False
# 客户端打开Jupyter Notebook的密码哈希值
c.NotebookApp.password = 'sha1:7e9d8d4722c3:aa0a16fcf06b44ecbf208a3172af65f4d57163da'
3、启动
# 指定配置文件路径: /home/ubuntu/.jupyter/jupyter_lab_config.py: 改为自己的配置文件路径
nohup jupyter-lab --config /home/ubuntu/.jupyter/jupyter_lab_config.py --allow-root>/mnt/sdma/jupyter/develop37.txt>/mnt/sdma/jupyter/develop37_jupyter.txt 2>&1 &
三、配置开机自启
1、编写自启脚本
#!/bin/bash
nohup /home/ubuntu/anaconda3/envs/develop37/bin/jupyter-lab --config /home/ubuntu/.jupyter/jupyter_lab_config.py --allow-root>/mnt/sdma/jupyter/develop37.txt>/mnt/sdma/jupyter/develop37_jupyter.txt 2>&1 &
2、开发自启服务(自启服务的路径: linux服务器一般都是该路径:/etc/systemd/system/)
[Unit]
Description=jupyter-lab
After=network.target


[Service]
ExecStart=/opt/jupyter.sh


[Install]
WantedBy=multi-user.target
(三.1中的自启脚本已经加了#!/bin/bash,所有ExecStart直接文件全路径就可以启动)
2.1 自启服务内容解释:
[Unit]:服务的说明
Description:描述服务
After:描述服务类别

[Service]服务运行参数的设置
Type=forking            是后台运行的形式
ExecStart               为服务的具体运行命令
ExecReload              为服务的重启命令
ExecStop                为服务的停止命令
PrivateTmp=True         表示给服务分配独立的临时空间
注意:启动、重启、停止命令全部要求使用绝对路径
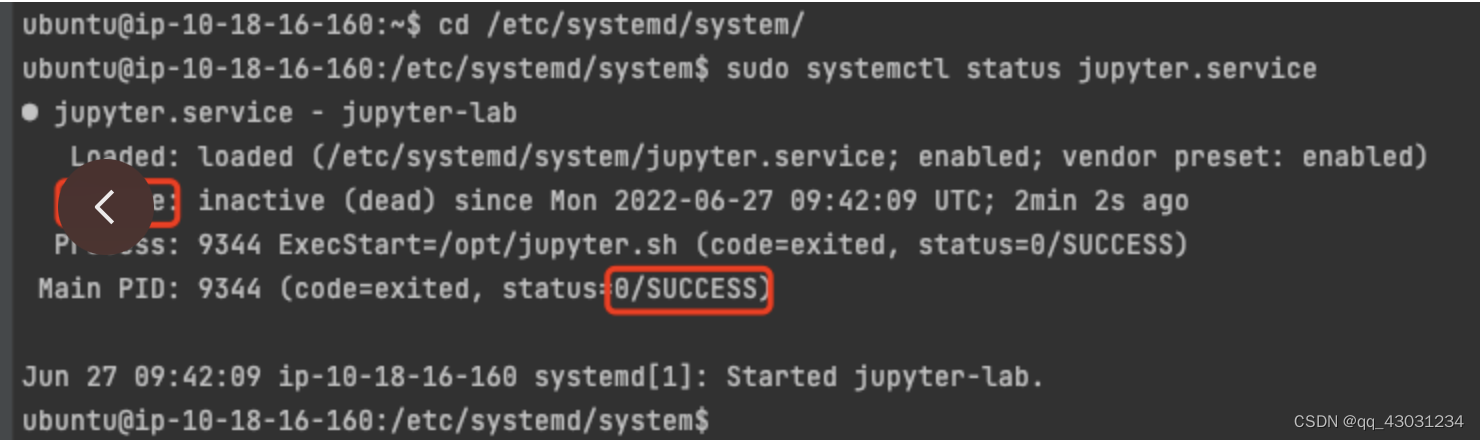
3、启动并查看状态
systemctl enable rc-local
systemctl start rc-local.service  #启动服务
systemctl stop rc-local.service  #暂停服务
systemctl status rc-local.service #查看状态
systemctl daemon-reload # 重新加载自启服务
执行成功的话会如下显示


 820
820


 被折叠的 条评论
为什么被折叠?
被折叠的 条评论
为什么被折叠?
 到【灌水乐园】发言


