spring cloud bus AMQP
三种jar包
- spring-cloud-bus 源包
- spring-cloud-starter-bus-amqp 整合了RabbitMQ
- spring-cloud-starter-bus-kafka 整合了kafka
pom.xml
我这里使用的是RabbitMQ做消息队列,所以我使用的是spring-cloud-starter-bus-amqp
<!-- https://mvnrepository.com/artifact/org.springframework.cloud/spring-cloud-starter-bus-amqp -->
<dependency>
    <groupId>org.springframework.cloud</groupId>
    <artifactId>spring-cloud-starter-bus-amqp</artifactId>
</dependency>
application.yml配置
spring:
  application:
    name: cloud-config9001
  rabbitmq:          #要用rabbitmq做消息中间件
    host: localhost
    port: 5672
    username: guest
    password: guest


#暴露监控端口
management:
  endpoints:
    web:
      exposure:
        include: 'bus-refres'
配合spring cloud config动态刷新配置
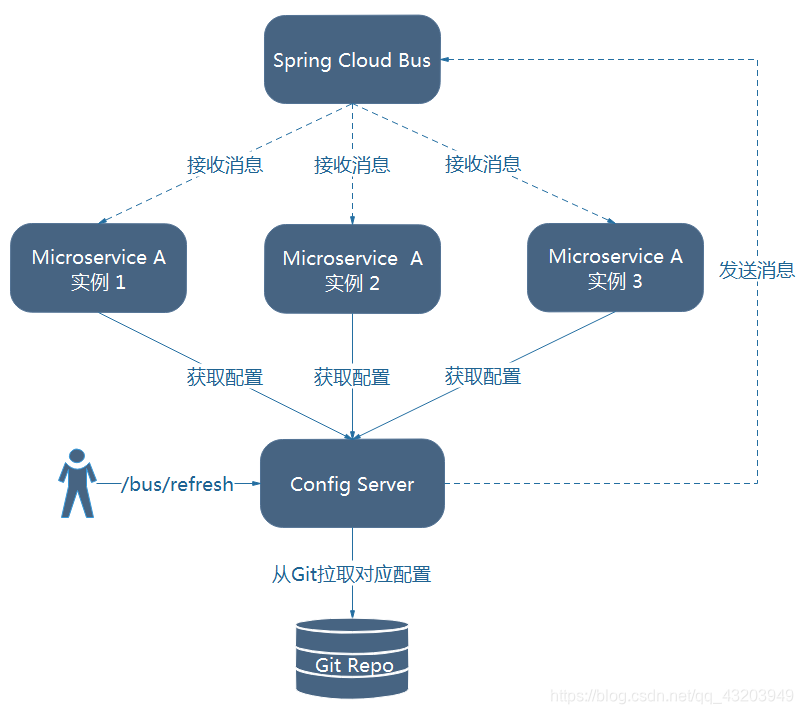
spring cloud config+spring cloud Bus是制作微服务配置中心的经典组合。Spring bus的一个核心思想是通过分布式的启动器对spring boot应用进行扩展,也可以用来建立一个多个应用之间的通信频道。实本质是利用了MQ的广播机制在分布式的系统中传播消息。
Stream通过对消息中间件进行抽象封装,提供一个统一的接口供我们发送和监听消息,而Bus则是在Stream基础之上再次进行抽象封装,使得我们可以在不用理解消息发送、监听等概念的基础上使用消息来完成业务逻辑的处理。
添加spring cloud config
<!-- https://mvnrepository.com/artifact/org.springframework.cloud/spring-cloud-starter-config -->
<dependency>
    <groupId>org.springframework.cloud</groupId>
    <artifactId>spring-cloud-starter-config</artifactId>
</dependency>
配置中心的主启动类
添加@EnableConfigServer注解,开启配置服务中心功能。
@SpringBootApplication
@EnableConfigServer
public class ConfigServer {
  public static void main(String[] args) {
    SpringApplication.run(ConfigServer.class, args);
  }
}
跟新配置中心的application.yml配置
spring:
  application:
    name: cloud-config9001
  rabbitmq:          #要用rabbitmq做消息中间件
    host: localhost
    port: 5672
    username: guest
    password: guest
  cloud:
    config:
      server:
        git:
          uri: xxx.git         #仓库地址
          search-paths: springcloud-config #扫描路径
      label: master

#暴露监控端口
management:
  endpoints:
    web:
      exposure:
        include: 'bus-refres'
其他微服务配置信息
bootstrap.yml配置
spring:
  application:
    name: cloud-config-client
  cloud:
    config:
      label: master     #分支
      name: config      #配置名
      profile: dev      #信息后缀(对应上面的profile)
      uri: http://localhost:9001   #配置中心
添加监控器依赖和bus依赖
<!-- https://mvnrepository.com/artifact/org.springframework.boot/spring-boot-starter-actuator -->
<dependency>
    <groupId>org.springframework.boot</groupId>
    <artifactId>spring-boot-starter-actuator</artifactId>
</dependency>

<!-- https://mvnrepository.com/artifact/org.springframework.cloud/spring-cloud-starter-bus-amqp -->
<dependency>
    <groupId>org.springframework.cloud</groupId>
    <artifactId>spring-cloud-starter-bus-amqp</artifactId>
</dependency>
暴露监控端点
management:
  endpoints:
    web:
      exposure:
        include: *
通过网络接口发起post请求刷新
对配置中心发生刷新请求http://localhost:8888/actuator/refresh 发起post请求,以刷新微服务的配置信息。发生post请求之后,就会触发bus的广播效应,Bus本质还是利用了消息中间件做发布订阅,从而实现广播效果。
结果就像下面的图一样(网络图片):


 494
494


 被折叠的 条评论
为什么被折叠?


