


前言:继续学习HTML、CSS和JS的基础知识。这个系列的代码均为GitHub上项目代码,目的为了巩固HTML、CSS和JS的基础学习。关于代码解析部分,这是我所理解的代码意义,如果感觉有不对的地方,请指出我们一起探讨。
一、总体效果
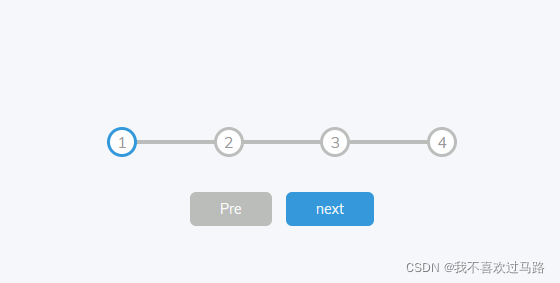
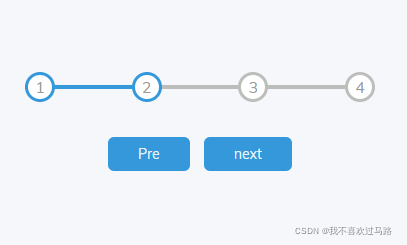
功能:点击next,下一个圆圈被点亮
实现方式:新建一个文件夹,文件夹中新建三个txt,改后缀,分别命名style.css;script.js;index.html;将下面三部分代码对应放入。
二、JavaScript代码
const progress=document.getElementById('progress')
const prev=document.getElementById('prev')
const next=document.getElementById('next')
const circles=document.querySelectorAll('.circle')

let currentActive=1

next.addEventListener('click',()=>{
    currentActive++
    if(currentActive > circles.length){
        currentActive=circles.length
    }
    update()
})

prev.addEventListener('click',()=>{
    currentActive--
    if(currentActive<1){
        currentActive=1
    }
    update()
})

function update(){
    circles.forEach((circle,idx) => {
        if(idx<currentActive){
            circle.classList.add('active')
        }else{
            circle.classList.remove('active')
        }
    })
    const actives=document.querySelectorAll('.active')
    progress.style.width = (actives.length - 1) / (circles.length - 1) * 100 + '%'
    if(currentActive === 1) {
        prev.disabled = true
    } else if(currentActive === circles.length) {
        next.disabled = true
    } else {
        prev.disabled = false
        next.disabled = false
    }
}
代码解析
第1-4行:定义4个变量
第5行:定义初始值currentActive,为后期点击next和pre做初始值;
第6-12行:目的是当点击next时,currentActive自加,如果currentactive大于圆的个数时,currentActive的值为圆的个数。执行update()函数。
1、利用箭头函数 ()=>{ }
箭头函数表达式的语法比函数表达式更简洁,并且没有自己的this,arguments,super或new.target。箭头函数表达式更适用于那些本来需要匿名函数的地方,并且它不能用作构造函数。
语法:

第13-19行:目的是当点击pre时,currentActive自减,如果currentActive小于1,currentActive的值为1.执行update()函数。
语法同上
第20-38行:定义函数update();
我的理解是当目前索引值小于currentActive时,可以继续点击,反之不能;progress.style.width这句应该是点击next或者pre时,连接两个圈的横线变化。
IF函数的功能是设置当圆圈在第一个时,pre不能点击;圆圈在最后一个时,next不能点击。其余位置,都可点击。
1、利用forEach()方法调用数组的每一个元素,并将元素传递给回调函数。
语法:array.forEach(function(currentValue, index, arr), thisValue)
其中function(currentValue, index, arr)必需,数组中每个元素需要调用的函数;currentValue必需,指当前元素;index可选,指当前元素的索引值;arr可选,值当前元素所属的数组对象。

三、CSS代码
@import url('https://fonts.googleapis.com/css?family=Muli&display=swap');

:root{
    /*
    :root 表示 <html> 元素,除了优先级更高之外,与 html 选择器相同。
    */
    --line-border-fill:#3498db;
    --line-border-empty: #afb1afd5;
}
 *{
     box-sizing: border-box;
 }

body{
    background-color: #f6f7fb;
    font-family: 'Muli',sans-serif;
    display: flex;  /*定义为弹性容器*/
    align-items: center; /*定义flex子项在flex容器的当前行的侧轴(纵轴)方向上的对齐方式*/
    justify-content: center; /*设置或检索弹性盒子元素在主轴(横轴)方向上的对齐方式*/
    height: 100vh;
    overflow: hidden;  /*指定如果内容溢出一个元素的框,会发生什么*/
    margin: 0;  /*设置所有外边距属性*/
}

.container{
    text-align: center;
}

.progress-container{
    display: flex;
    justify-content: space-between;
    position: relative; /*定义定位方式,有相对的、绝对的、静态的*/
    margin-bottom: 30px; /* 设置元素下边距*/
    max-width: 100%;
    width: 350px;
}
.progress-container::before{
    /*
    ::before 创建一个伪元素,其将成为匹配选中的元素的第一个子元素
    */
    content: '';
    background-color: var(--line-border-empty);
    position: absolute;
    top: 50%;
    left: 0;
    transform: translateY(-50%);
    height: 4px;
    width: 100%;
    z-index: -1;
}
.progress{
    background-color: var(--line-border-fill);
    position: absolute;
    top: 50%;
    left: 0;
    transform: translateY(-50%);
    height: 4px;
    width: 0%;
    z-index: -1;
    transition: 0.4s ease;

}
.circle{
    background-color: #fff;
    color: #999;
    border-radius: 50%;
    height: 30px;
    width: 30px;
    display: flex;
    align-items: center;
    justify-content: center;
    border: 3px solid var(--line-border-empty);
    transition: 0.4s ease;
}
.circle.active{
    border-color: var(--line-border-fill);

}
.btn{
    background-color: var(--line-border-fill);
    color: rgba(255, 255, 255, 0.89);
    border: 0;
    border-radius: 6px;
    cursor: pointer;
    font-family: inherit;
    padding: 8px 30px;
    margin: 5px;
    font-size: 14px;


}
.btn:active{
    /*
    :active 伪类匹配被用户激活的元素。它让页面能在浏览器监测到激活时给出反馈。
    当用鼠标交互时,它代表的是用户按下按键和松开按键之间的时间。
    */
    transform: scale(0.98);
}
.btn:focus{
    /*
    :focus表示获得焦点的元素(如表单输入)。
    当用户点击或触摸元素或通过键盘的 “tab” 键选择它时会被触发。
    */
    outline: 0;
}
.btn:disabled{
    /*
    CSS 伪类表示任何被禁用的元素。
    如果一个元素不能被激活(如选择、点击或接受文本输入)或获取焦点,则该元素处于被禁用状态。
    */
    background-color: var(--line-border-empty);
    cursor:not-allowed;
}
代码解析:
CSS代码的作用是设置页面上出现的所有要素的格式。
通过类选择器来设置每个模块的显示,解析在代码中标注。主要是要熟悉这些属性。
四、HTML代码
<!DOCTYPE html>
<html lang="en">
<head>
    <meta charset="UTF-8">
    <meta http-equiv="X-UA-Compatible" content="IE=edge">
    <meta name="viewport" content="width=device-width, initial-scale=1.0">
    <title>Progress Steps</title>
    <link rel="stylesheet" href="style.css"/>
</head>
<body>
    <div class="container">
        <div class="progress-container">
            <div class="progress" id="progress"></div>
            <div class="circle active">1</div>
            <div class="circle">2</div>
            <div class="circle">3</div>
            <div class="circle">4</div>
        </div>

        <button class="btn" id="prev" disabled>Pre</button>
        <button class="btn" id="next" >next</button>
    </div>
    <script src="script.js"></script>

</body>
</html>
HTML代码设置了页面放置什么,大容器中放小容器,下图是本次代码的大致框架。container在页面上是看不到的(想看到的话,在CSS中设置颜色),container中有3大块,这个可见,两个按钮和四个圆。

小结
做前端展示要结合CSS和JS,才能做出动态美观的界面。
HTML部分:设置界面的布局;
CSS部分:设置界面中元素静态格式;
JS部分:设置界面动态格式;
后期继续进行代码解析,加油!
转载请说明出处,谢谢!


 383
383


 被折叠的 条评论
为什么被折叠?
被折叠的 条评论
为什么被折叠?
 到【灌水乐园】发言


