redux中官方废弃了用createStore,取而代之的是提供了一个新的第三方模块Redux Toolkit,因此对于之前的用redux和react-redux的配置发生了一些变化。
1.创建store.ts
用@reduxjs/toolkit提供的configureStore创建一个store对象,然后在配置选项reducer中导入处理模块(类似之前的combineReducers),hooks开发要导出两个类型用于建立新的Api。
import { configureStore } from '@reduxjs/toolkit'
import count from './modules/count'

export const store = configureStore({
  reducer: {
    count
  }
})
// 导出配置选项用于配置hooks专用api
// Infer the `RootState` and `AppDispatch` types from the store itself
export type RootState = ReturnType<typeof store.getState>
// Inferred type: {posts: PostsState, comments: CommentsState, users: UsersState}
export type AppDispatch = typeof store.dispatch
2.创建hooks.ts
这里是对之前的Api进行了一个配置,之前是用useSelector,useDispatch,配置之后现在用useAppDispatch,useAppSelector。一个映射数据,一个映射方法。
import { TypedUseSelectorHook, useDispatch, useSelector } from 'react-redux'
import type { RootState, AppDispatch } from './store'

// 配置新的api导出 useAppDispatch映射方法 useAppSelector映射数据
// Use throughout your app instead of plain `useDispatch` and `useSelector`
export const useAppDispatch = () => useDispatch<AppDispatch>()
export const useAppSelector: TypedUseSelectorHook<RootState> = useSelector
3.创建modules/count.ts
这里就是创建处理数据的模块了,借助了createSlice创建一个Slice对象,包含name,initialState(固定字段),reducers,然后reducers里写处理函数,最后需要把处理函数和reducer导出,这里导出的处理函数需要在组件中用到,导出的reducer需要在store.ts引入并配置。异步也有,相比之前需要引入thunk和中间件才能进行异步,这里能够直接写异步。
import { createSlice, PayloadAction } from '@reduxjs/toolkit'
import type { RootState } from '../store'
// 定义接口
interface Icount {
  number: number,
  list: any[] // 定义任意类型 要不然无法渲染数据
}

// 初始化数据
const initialState: Icount = {
  number: 0,
  list: []
}
// Slice对象
export const CountSlice = createSlice({
  name: 'count',
  initialState,
  reducers: {
    // 加
    increment: state => {
      state.number += 1
    },
    // 减
    decrement: state => {
      state.number -= 1
    },
    // 添加数据
    addList: (state, action) => {
      if (action.payload.content.trim() === '') return alert('输入不能为空!')
      state.list = [action.payload, ...state.list]
    }
  }
})
// 异步处理
export const incrementAsync = (state: any) => {
  return async (dispatch: any, getState: any) => {
    setTimeout(() => {
      dispatch(increment())
    }, 500)
  }
}
// 导出处理函数
export const { increment, decrement, addList } = CountSlice.actions
// 导出reducer
export default CountSlice.reducer
4.传递store数据
这里和之前一样,如果借助了connet连接了容器就可以不用写。
import React from 'react';
import ReactDOM from 'react-dom/client';
import App from './App';
import { store } from './redux/store';
import { Provider } from 'react-redux';
const root = ReactDOM.createRoot(
  document.getElementById('root') as HTMLElement
);
root.render(
  <Provider store={store}>
    <App />
  </Provider>
);
5.App组件获取修改数据
这里我就直接在App里写了,映射数据通过useAppSelector,映射方法通过useAppDispathch,数据写了两个做了下测试。
import { useRef } from 'react'
import { useAppSelector, useAppDispatch } from './redux/hooks'
import { increment, decrement, incrementAsync, addList } from './redux/modules/count';
import { nanoid } from 'nanoid'
interface Ilist {
id: string,
content: string
}
function App() {
const number = useAppSelector(state => state.count.number)
const list = useAppSelector(state => state.count.list)
const dispatch = useAppDispatch()
const inputRef = useRef<HTMLInputElement>(null)
return (
<div className="App">
<h2>当前数字为{number}</h2>
<button onClick={() => { dispatch(increment()) }}>点我加1</button>
<button onClick={() => { dispatch(decrement()) }}>点我减1</button>
<button onClick={() => { dispatch(incrementAsync('test')) }}>点我异步加1</button>
<ul>
{
list.map(item => {
return <li key={item.id}>{item.content}</li>
})
}
</ul>
<input type="text" ref={inputRef} placeholder="填写一个数据" />
<button onClick={() => {
const obj = {
id: nanoid(),
content: (inputRef.current as HTMLInputElement).value
}
dispatch(addList(obj))
}}>点我添加一个数据</button>
</div >
);
}
export default App;
6.效果图展示
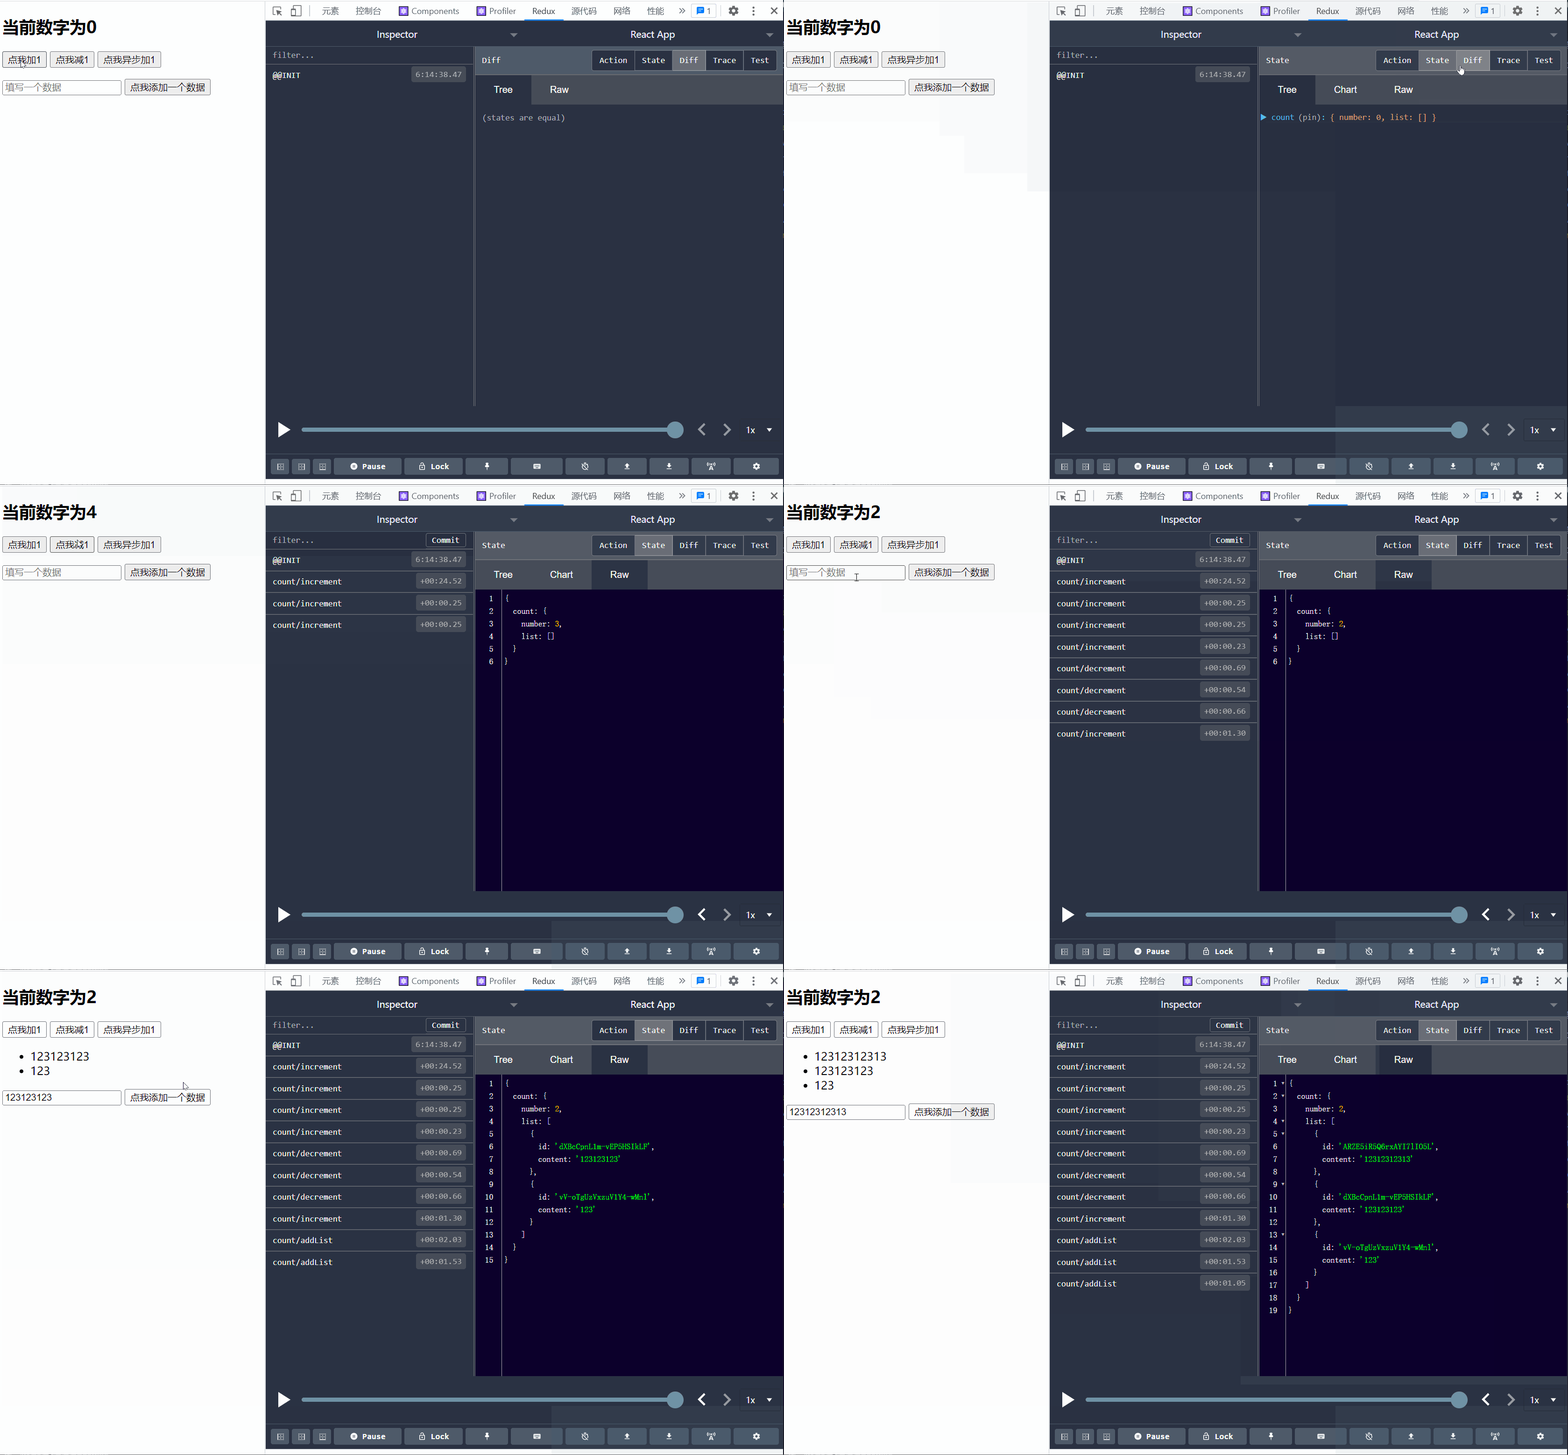
配置好之后如果下载了redux插件他会自动配置无需导入其他包,大致效果如下,如果看到redux工具中有数据就是成功了。

以上就是配置@reduxjs/toolkit的方式,第一次发博客,一起加油学习!


 1万+
1万+


 被折叠的 条评论
为什么被折叠?


