


一.Spring介绍
1.基本介绍:
优点:创建独立的Spring应用
内嵌web服务器
自动starter依赖,简化构建配置
自动配置Spring以及第三方功能
提供生产级别的监控,健康检查和外部化配置
无代码生成,无需编写XML
缺点:版本迭代太快,内部原理复杂,不容易精通
微服务:微服务是一种架构风格
一个应用拆分为一组小型任务
每个服务运行在自己的进程内,也就是可以独立部署和升级
服务之间使用轻量级HTTP交互
服务围绕业务功能拆分
可以由全自动部署机制独立部署
去中心化,服务自治,服务可以使用不同的语言,不同的存储技术
分步式:远程调用,服务发现,负载均衡,服务容错,服务监控,链路追踪,日志管理,任务调度
(可以用SpringBoot+Spring Cloud解决)
云原生:服务自愈,弹性伸缩,服务隔离,自动化部署,灰度发布,流量治理
(使用Docker,星际级容器编排KUbernetes)
2.依赖管理:
父项目做依赖管理和版本仲裁:
   <!--这是我们导入的父项目-->
   <parent>
      <groupId>org.springframework.boot</groupId>
      <artifactId>spring-boot-starter-parent</artifactId>
      <version>2.3.4.RELEASE</version>
   </parent>


  <!--这是上面那个玩意里面的父项目-->
  <parent>
    <groupId>org.springframework.boot</groupId>
    <artifactId>spring-boot-dependencies</artifactId>
    <version>2.3.4.RELEASE</version>
  </parent>
可以看到版本号都在这里规定好了,几乎声明了所有的常用的依赖的版本号,这就是自动版本仲裁机制。如果引入了非版本仲裁的jar包,还是要自己设置版本号的。

如果想要自己声明版本号:
1.查看spring-boot-dependencies中里面规定版本用的key,比如mysql的就是mysql.version
2.然后在当前项目里重写配置。例子如下:
    <properties>
        <mysql.version>5.1.43</mysql.version>
    </properties>

    <dependencies>
        <!--记得要在子工程中把依赖导进来,父工程只是规定,他没有引jar包-->
        <dependency>
            <groupId>mysql</groupId>
            <artifactId>mysql-connector-java</artifactId>
        </dependency>
    </dependencies>
场景启动器:
1.我们之后会见到很多的spring-boot-starter-* : *表示某种场景
2.只要引入starter,这个场景的所有常规需要的依赖我们都能自动导入
3.springboot支持所有的场景
4.见到的*-spring-boot-starter : 这些是第三方给我们提供的简化开发的场景启动器
5.所有的场景启动器最底层的依赖都是:
<dependency>
<groupId>org.springframework.boot</groupId>
<artifactId>spring-boot-starter</artifactId>
<version>2.3.4.RELEASE</version>
<scope>compile</scope>
</dependency>
3.自动配置
自动配置好tomcat:
引入Tomcat依赖,配置Tocat
自动配置好SpringMvc:
引入SpringMVC全套组件,自动配置好了SpringMVC的常用组件(功能)
自动配置好web常见功能,如字符编码问题:
SpringBoot帮我们配置好了所有web开发的常见场景
默认包结构:
主程序所在包及其子包下面的左右组件都会被默认扫描进来
无需以前的包扫描
如果想改变扫描路径:@SpringBootApplication(scanBasePackages = "com.atguigu")
各种配置都有默认值:
默认配置最终都是映射到某个类上,如MultipartProperties
配置文件的值最终会绑定在每个类上,这个类会在容器中创建对象
按需加载所有自动配置项:
有非常多的starter
引入了哪些场景这些场景的自动配置才会开启
SpringBoot所有的自动配置功能都在spring-boot-autoconfigure包里面
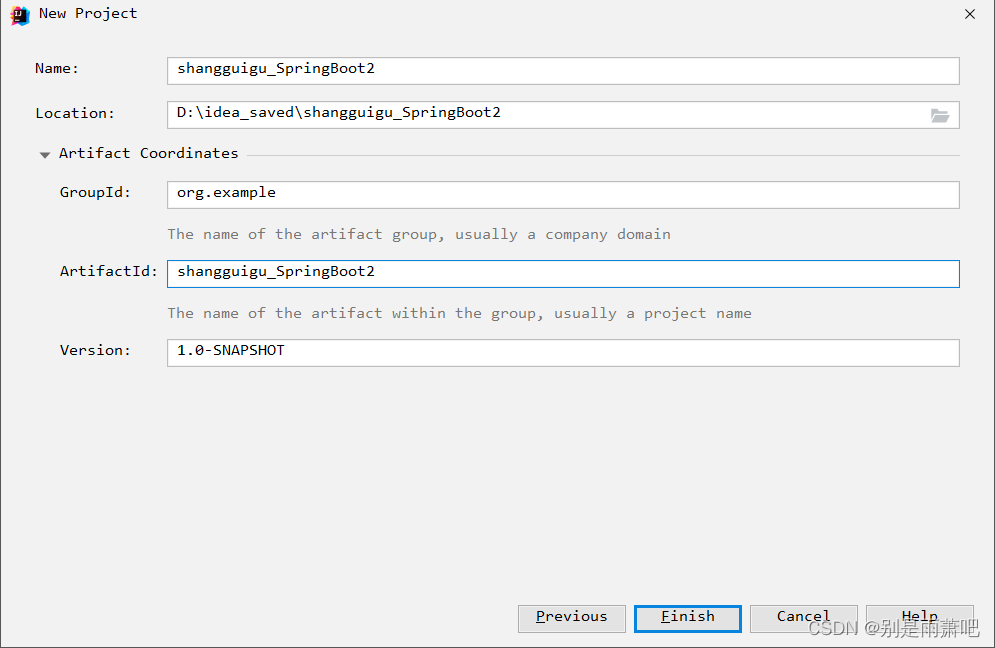
二.SpringBoot快速入门
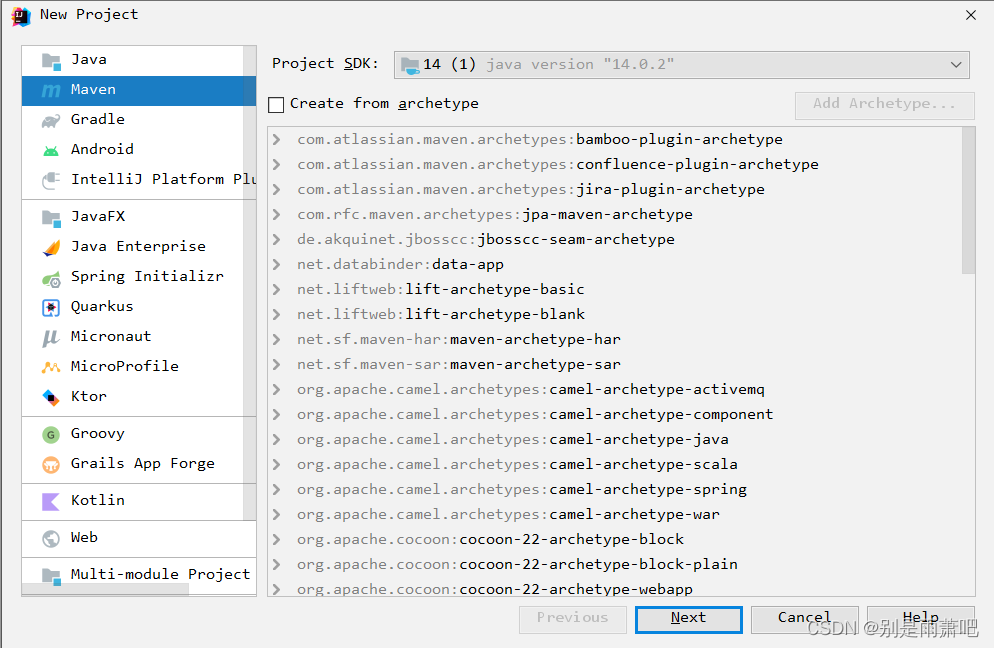
配置下maven的本地仓库:

来康康pom文件:
<?xml version="1.0" encoding="UTF-8"?>
<project xmlns="http://maven.apache.org/POM/4.0.0"
         xmlns:xsi="http://www.w3.org/2001/XMLSchema-instance"
         xsi:schemaLocation="http://maven.apache.org/POM/4.0.0 http://maven.apache.org/xsd/maven-4.0.0.xsd">
    <modelVersion>4.0.0</modelVersion>

    <groupId>org.example</groupId>
    <artifactId>shangguigu_SpringBoot2</artifactId>
    <version>1.0-SNAPSHOT</version>

    <properties>
        <maven.compiler.source>14</maven.compiler.source>
        <maven.compiler.target>14</maven.compiler.target>
    </properties>
    <!--第一步:导入一个springboot父工程-->
    <parent>
        <groupId>org.springframework.boot</groupId>
        <artifactId>spring-boot-starter-parent</artifactId>
        <version>2.3.4.RELEASE</version>
    </parent>

    <dependencies>
        <dependency>
            <!--第二步:我们要进行web开发就导入web的环境-->
            <groupId>org.springframework.boot</groupId>
            <artifactId>spring-boot-starter-web</artifactId>
        </dependency>
    </dependencies>

    <!--引入一个插件,用来简化部署-->
    <build>
        <plugins>
            <plugin>
                <groupId>org.springframework.boot</groupId>
                <artifactId>spring-boot-maven-plugin</artifactId>
            </plugin>
        </plugins>
    </build>

</project>
先得有个springboot的启动类:
package com.atguigu;

import org.springframework.boot.SpringApplication;
import org.springframework.boot.autoconfigure.SpringBootApplication;

@SpringBootApplication
public class mainApplicatin {
    public static void main(String[] args) {
        SpringApplication.run(mainApplicatin.class,args);
    }
}
然后再写个Controller层的代码:
package com.atguigu.controller;
import org.springframework.stereotype.Controller;
import org.springframework.web.bind.annotation.RequestMapping;
import org.springframework.web.bind.annotation.ResponseBody;
@ResponseBody
@Controller//或者也可以直接把上面的两个注解合并成@RestController
public class HelloController {
@RequestMapping("/hello")
public String show(){
return "hello SpringBoot";
}
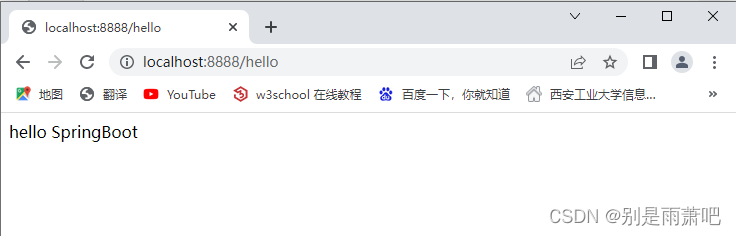
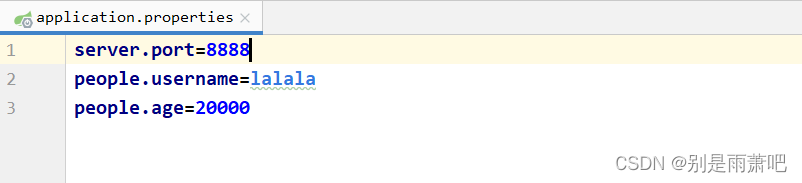
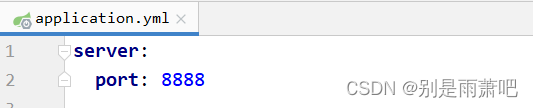
}可以在配置文件application.properties中改下配置,比如端口号

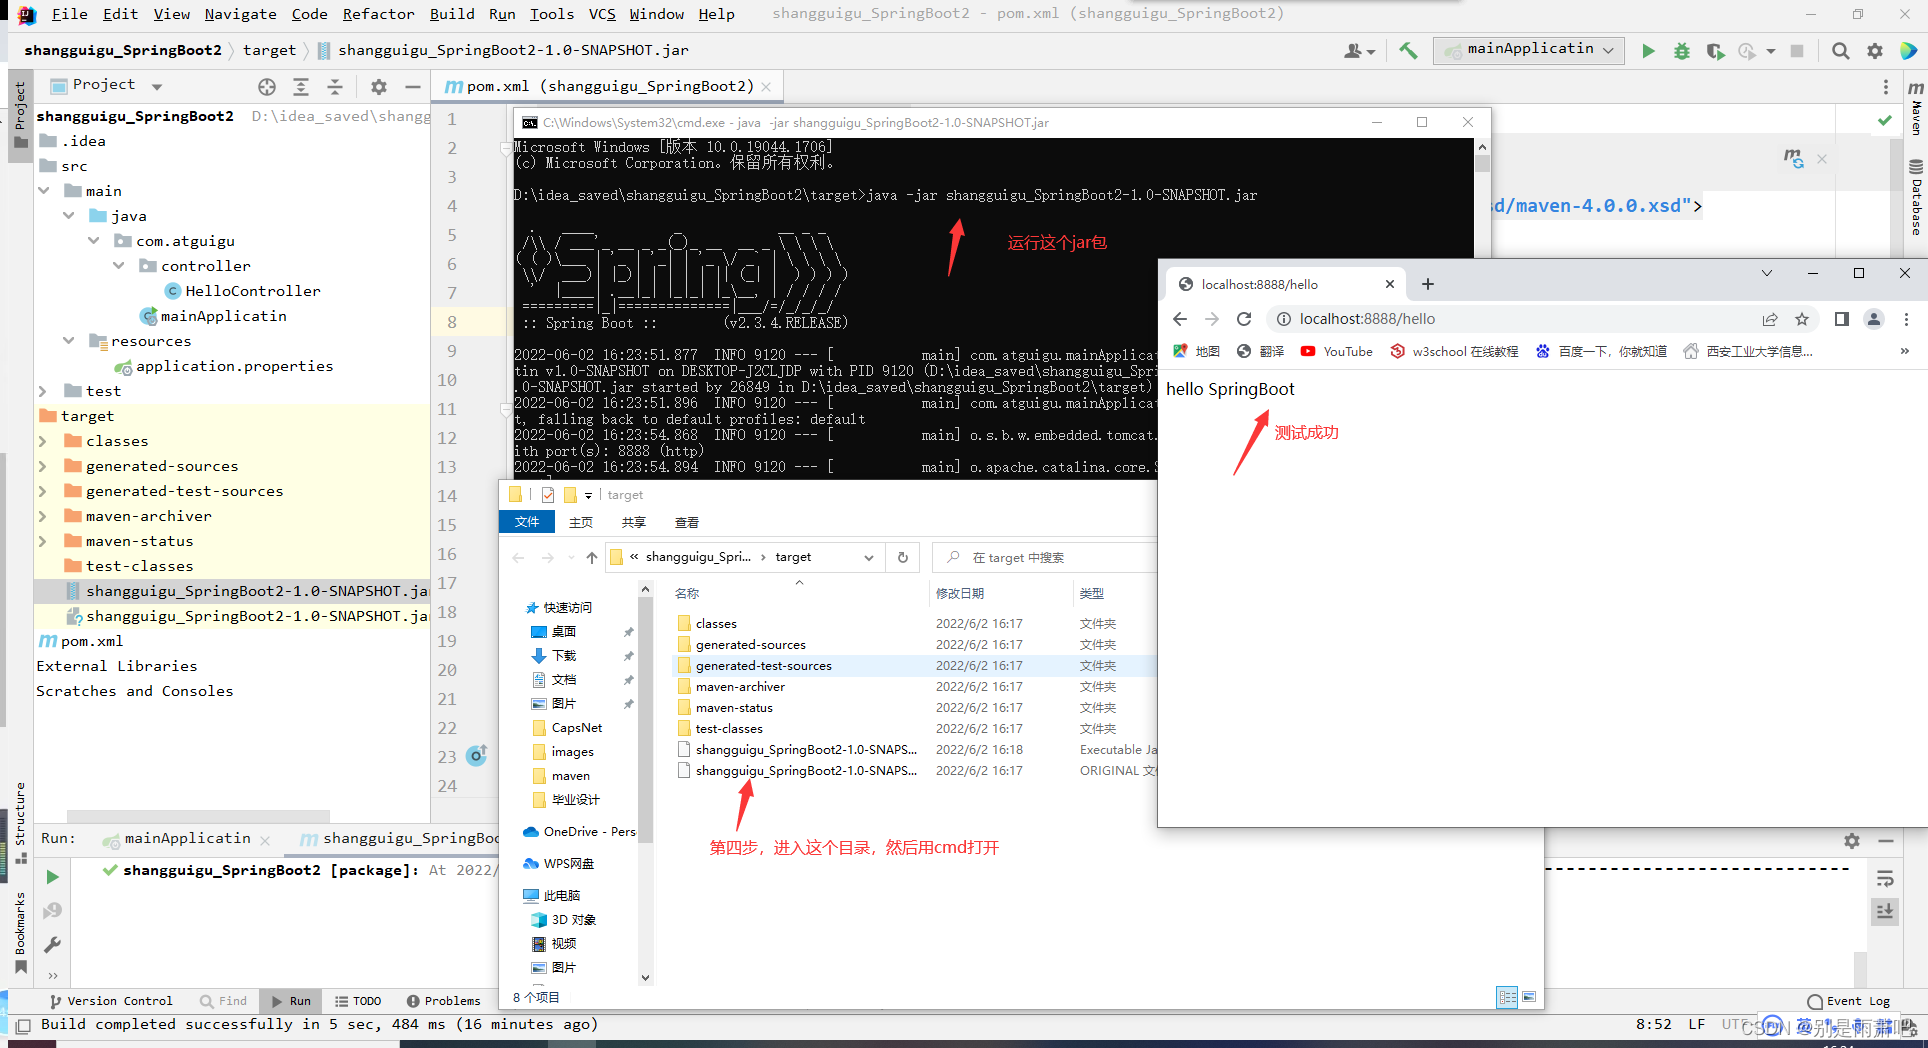
看下结构目录:

测试:ok测试成功
简化部署,不需要在目标服务器安装tomcat服务器:

三.容器功能
1.组件添加 @Bean...
1、配置类里面使用@Bean标注在方法上给容器注册组件,默认也是单实例的,如例1
2、配置类本身也是组件,如例2
3、proxyBeanMethods:代理bean的方法
Full(proxyBeanMethods = true)【每个@Bean方法被调用多少次返回的组件都是单实例的】
Lite(proxyBeanMethods = false)【每个@Bean方法被调用多少次返回的组件都是新创建的】
如果@Configuration(proxyBeanMethods = true)代理对象调用方法。SpringBoot总会检查这个
组件是否在容器中有。如例3
4、组件依赖必须使用Full模式默认(true)。其他默认是否Lite模式(false)。如例4
5、用@Service @Controller @Repository @Component 进行组件添加
6、@Import导入组件,默认组件名字是全类名,这个注解要放到别的组件上。如例5
7、@Conditional条件装配。只有满足条件的时候才会被注入进来。如例6
//用户的实体类
package com.atguigu.bean;
import lombok.AllArgsConstructor;
import lombok.Data;
import lombok.NoArgsConstructor;
@Data
@AllArgsConstructor
@NoArgsConstructor
public class User {
    String username;
    int age;
    Pet pet;
    public User(String username, int age) {
        this.username = username;
        this.age = age;
    }
}

//宠物实体类
package com.atguigu.bean;
import lombok.AllArgsConstructor;
import lombok.Data;
import lombok.NoArgsConstructor;
@Data
@AllArgsConstructor
@NoArgsConstructor
public class Pet {
    String name;
    int age;
}

//配置类
package com.atguigu.config;
import com.atguigu.bean.Pet;
import com.atguigu.bean.User;
import org.springframework.context.annotation.Bean;
import org.springframework.context.annotation.Configuration;
@Configuration(proxyBeanMethods = true)
public class MyConfig {
    @Bean//给容器中添加组件。以方法名作为组件的id。返回类型就是组件类型。返回的值,就是组件在容器中的实例
    public User user(){
        User xiao = new User("萧萧", 200);
        //User组件依赖了Pet组件
        xiao.setPet(pet());
        return xiao;
    }
    @Bean
    public Pet pet(){
        return new Pet("萧萧的狗",200);
    }
}

//测试类
package com.atguigu;
import ch.qos.logback.core.db.DBHelper;
import com.atguigu.bean.Pet;
import com.atguigu.bean.User;
import com.atguigu.config.MyConfig;
import org.springframework.boot.SpringApplication;
import org.springframework.boot.autoconfigure.SpringBootApplication;
import org.springframework.context.ConfigurableApplicationContext;
import org.springframework.context.annotation.Import;
@Import({DBHelper.class})
@SpringBootApplication(scanBasePackages = "com.atguigu")
public class mainApplicatin {
    public static void main(String[] args) {
        ConfigurableApplicationContext run = SpringApplication.run(mainApplicatin.class, args);
        //例1.检测组件的单实例,这个是从容器里面拿,所以即使proxyBeanMethods=false,这里拿到的也是相同的
        User user1 = (User)run.getBean("user");
        User user2 = (User)run.getBean("user");
        System.out.println(user1==user2);
        //例2.证明配置类也是组件
        MyConfig myConfig = run.getBean(MyConfig.class);
        System.out.println(myConfig);
        //例3.验证proxyBeanMethods的属性值true和false的区别,false是轻量级
        User user3 = myConfig.user();
        User user4 = myConfig.user();
        System.out.println(user3==user4);//如果是true,则这里是一样的;如果是false,这里就不一样
        //例4.组件依赖
        User user5 = run.getBean("user", User.class);
        Pet pet2 = run.getBean("pet", Pet.class);
        System.out.println(user5.getPet()==pet2);//如果是true,则这里是一样的,说明用户的宠物就是容器中的宠物;如果是false,这里就不一样
        //例5.@Import导入组件验证
        DBHelper dbHelper = run.getBean(DBHelper.class);
        System.out.println(dbHelper);
    }
}
//宠物和人的实体类用上面的

//配置类
package com.atguigu.config;
import com.atguigu.bean.Pet;
import com.atguigu.bean.User;
import org.springframework.boot.autoconfigure.condition.ConditionalOnBean;
import org.springframework.context.annotation.Bean;
import org.springframework.context.annotation.Configuration;
@Configuration
public class MyConfig {
    @Bean("pet1")
    public Pet pet(){//注意这个要放在user()方法的前面,先在容器里注册
        return new Pet("萧萧的狗",200);
    }
    @ConditionalOnBean(name = "pet1")
    @Bean("user1")
    public User user(){
        User xiao = new User("萧萧", 200);
        return xiao;
    }
}

//测试类
package com.atguigu;
import ch.qos.logback.core.db.DBHelper;
import org.springframework.boot.SpringApplication;
import org.springframework.boot.autoconfigure.SpringBootApplication;
import org.springframework.context.ConfigurableApplicationContext;
import org.springframework.context.annotation.Import;
@Import({DBHelper.class})
@SpringBootApplication(scanBasePackages = "com.atguigu")
public class mainApplicatin {
    public static void main(String[] args) {
        ConfigurableApplicationContext run = SpringApplication.run(mainApplicatin.class, args);
        //例6,测试@ConditionalOnBean注解
        boolean user6 = run.containsBean("user1");
        System.out.println(user6);
        boolean pet3 = run.containsBean("pet1");
        System.out.println(pet3);
    }
}
2.原生配置文件注入@ImportResource
<?xml version="1.0" encoding="UTF-8"?>
<beans xmlns="http://www.springframework.org/schema/beans"
       xmlns:xsi="http://www.w3.org/2001/XMLSchema-instance"
       xsi:schemaLocation="http://www.springframework.org/schema/beans http://www.springframework.org/schema/beans/spring-beans.xsd">

    <!--宠物和人的实体类就不写了,在上面-->
    <bean id="haha" class="com.atguigu.bean.User">
        <property name="username" value="shiqikaungsan"></property>
        <property name="age" value="19"></property>
    </bean>
    <bean id="haihaihai" class="com.atguigu.bean.Pet">
        <property name="name" value="萧萧的狗"></property>
        <property name="age" value="9"></property>
    </bean>
</beans>
package com.atguigu;
import ch.qos.logback.core.db.DBHelper;
import org.springframework.boot.SpringApplication;
import org.springframework.boot.autoconfigure.SpringBootApplication;
import org.springframework.context.ConfigurableApplicationContext;
import org.springframework.context.annotation.Import;
import org.springframework.context.annotation.ImportResource;
@Import({DBHelper.class})
@SpringBootApplication(scanBasePackages = "com.atguigu")
@ImportResource("classpath:beans.xml")
public class mainApplicatin {
public static void main(String[] args) {
ConfigurableApplicationContext run = SpringApplication.run(mainApplicatin.class, args);
boolean user7 = run.containsBean("haha");
System.out.println(user7);
boolean pet4 = run.containsBean("haihaihai");
System.out.println(pet4);
}
}3.配置绑定@ConfigurationProperties
1.第一种直接使用@ConfigurationProperties
一定要在组件上写
//实体类
package com.atguigu.bean;
import org.springframework.boot.context.properties.ConfigurationProperties;
import org.springframework.stereotype.Component;
@Component
@ConfigurationProperties(prefix = "people")//一定要在组件上写
public class User {
    String username;//注意这里的属性名和配置文件中的名字是一样的
    int age;
}

//Controller层的测试类
import com.atguigu.bean.User;
import org.springframework.beans.factory.annotation.Autowired;
import org.springframework.web.bind.annotation.RequestMapping;
import org.springframework.web.bind.annotation.RestController;
@RestController
public class HelloController {
    @Autowired
    User user;
    @RequestMapping("/p")
    public User show2(){
        return user;
    }
}
2.@EnableConfigurationProperties(User.class)+@ConfigurationProperties(prefix = "people")
前一个注解能自动将实体类注册进容器中,并且开启他的绑定功能
//测试Controller是不变的
//实体类(去掉了@Component)
package com.atguigu.bean;
import org.springframework.boot.context.properties.ConfigurationProperties;
@ConfigurationProperties(prefix = "people")//一定要在组件上写
public class User {
String username;//注意这里的属性名和配置文件中的名字是一样的
int age;
}
//主类
package com.atguigu;
import com.atguigu.bean.User;
import org.springframework.boot.SpringApplication;
import org.springframework.boot.autoconfigure.SpringBootApplication;
import org.springframework.boot.context.properties.EnableConfigurationProperties;
import org.springframework.context.ConfigurableApplicationContext;
@SpringBootApplication(scanBasePackages = "com.atguigu")
@EnableConfigurationProperties(User.class)
public class mainApplicatin {
public static void main(String[] args) {
ConfigurableApplicationContext run = SpringApplication.run(mainApplicatin.class, args);
}
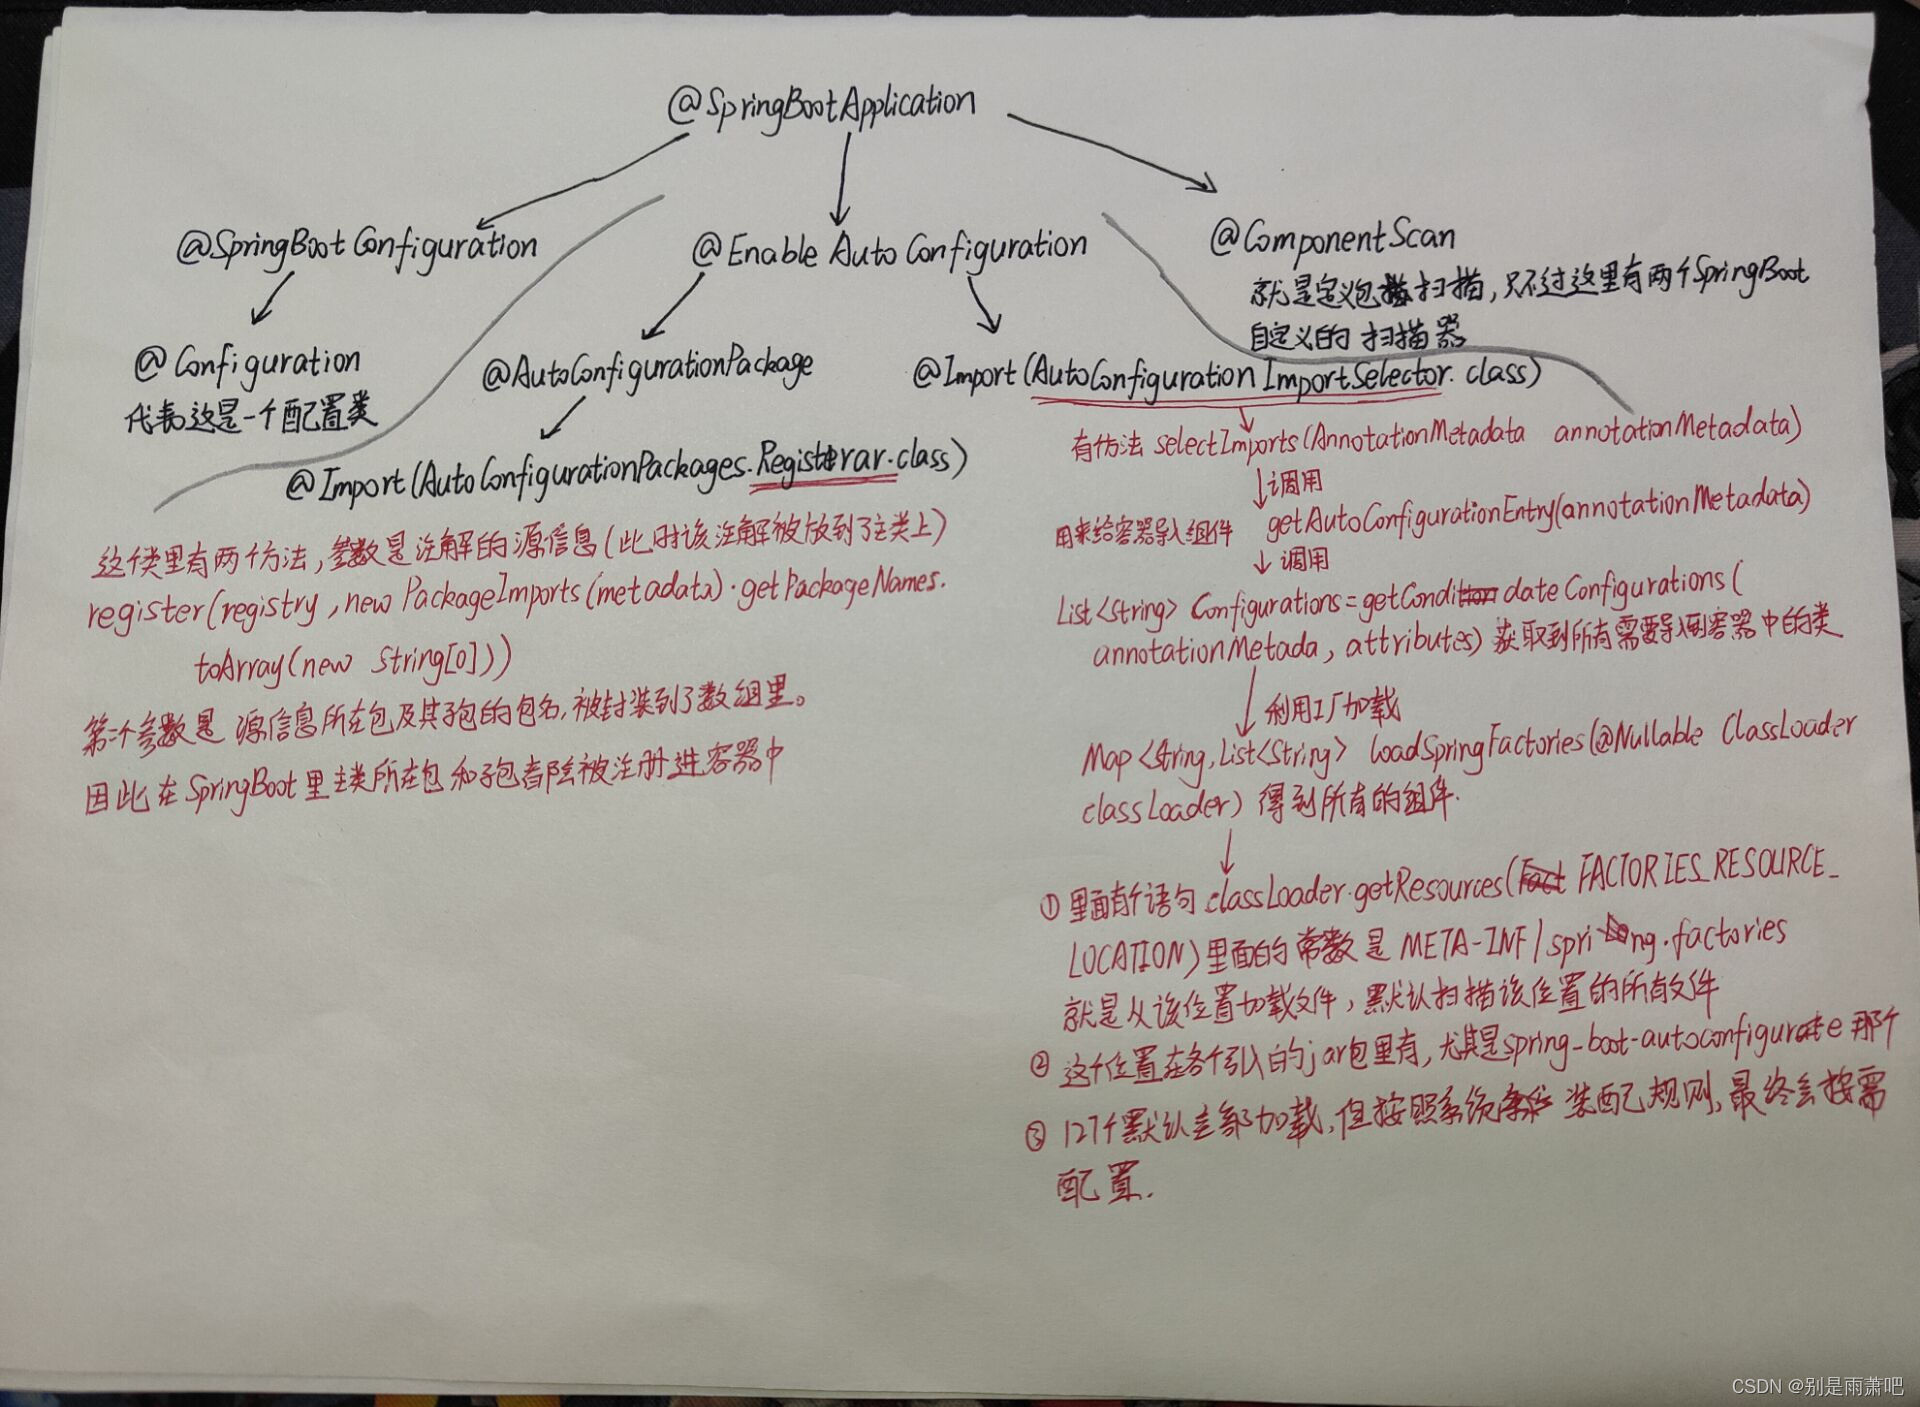
}四.自动配置原理入门
1.引导加载自动配置类
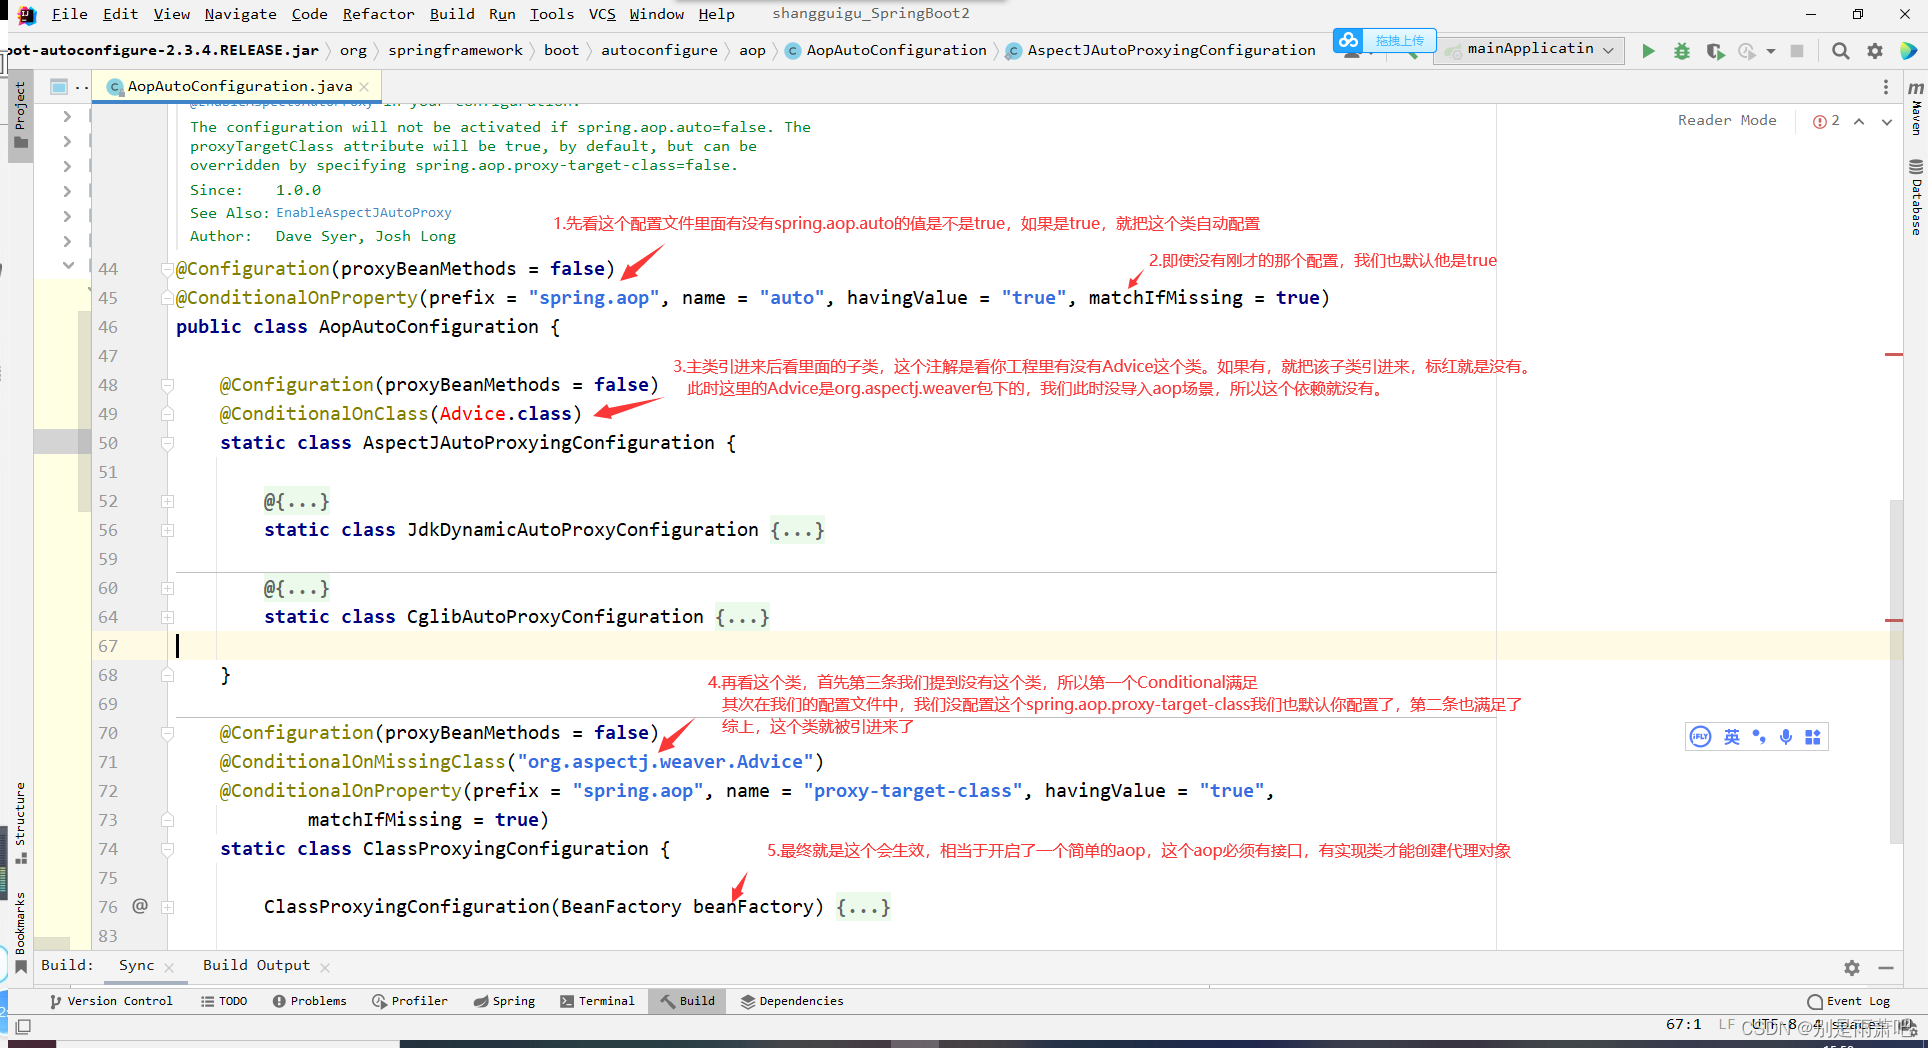
2.自动配置流程
我们以springframework-boot-aop 不生效举例
再找个生效的案例
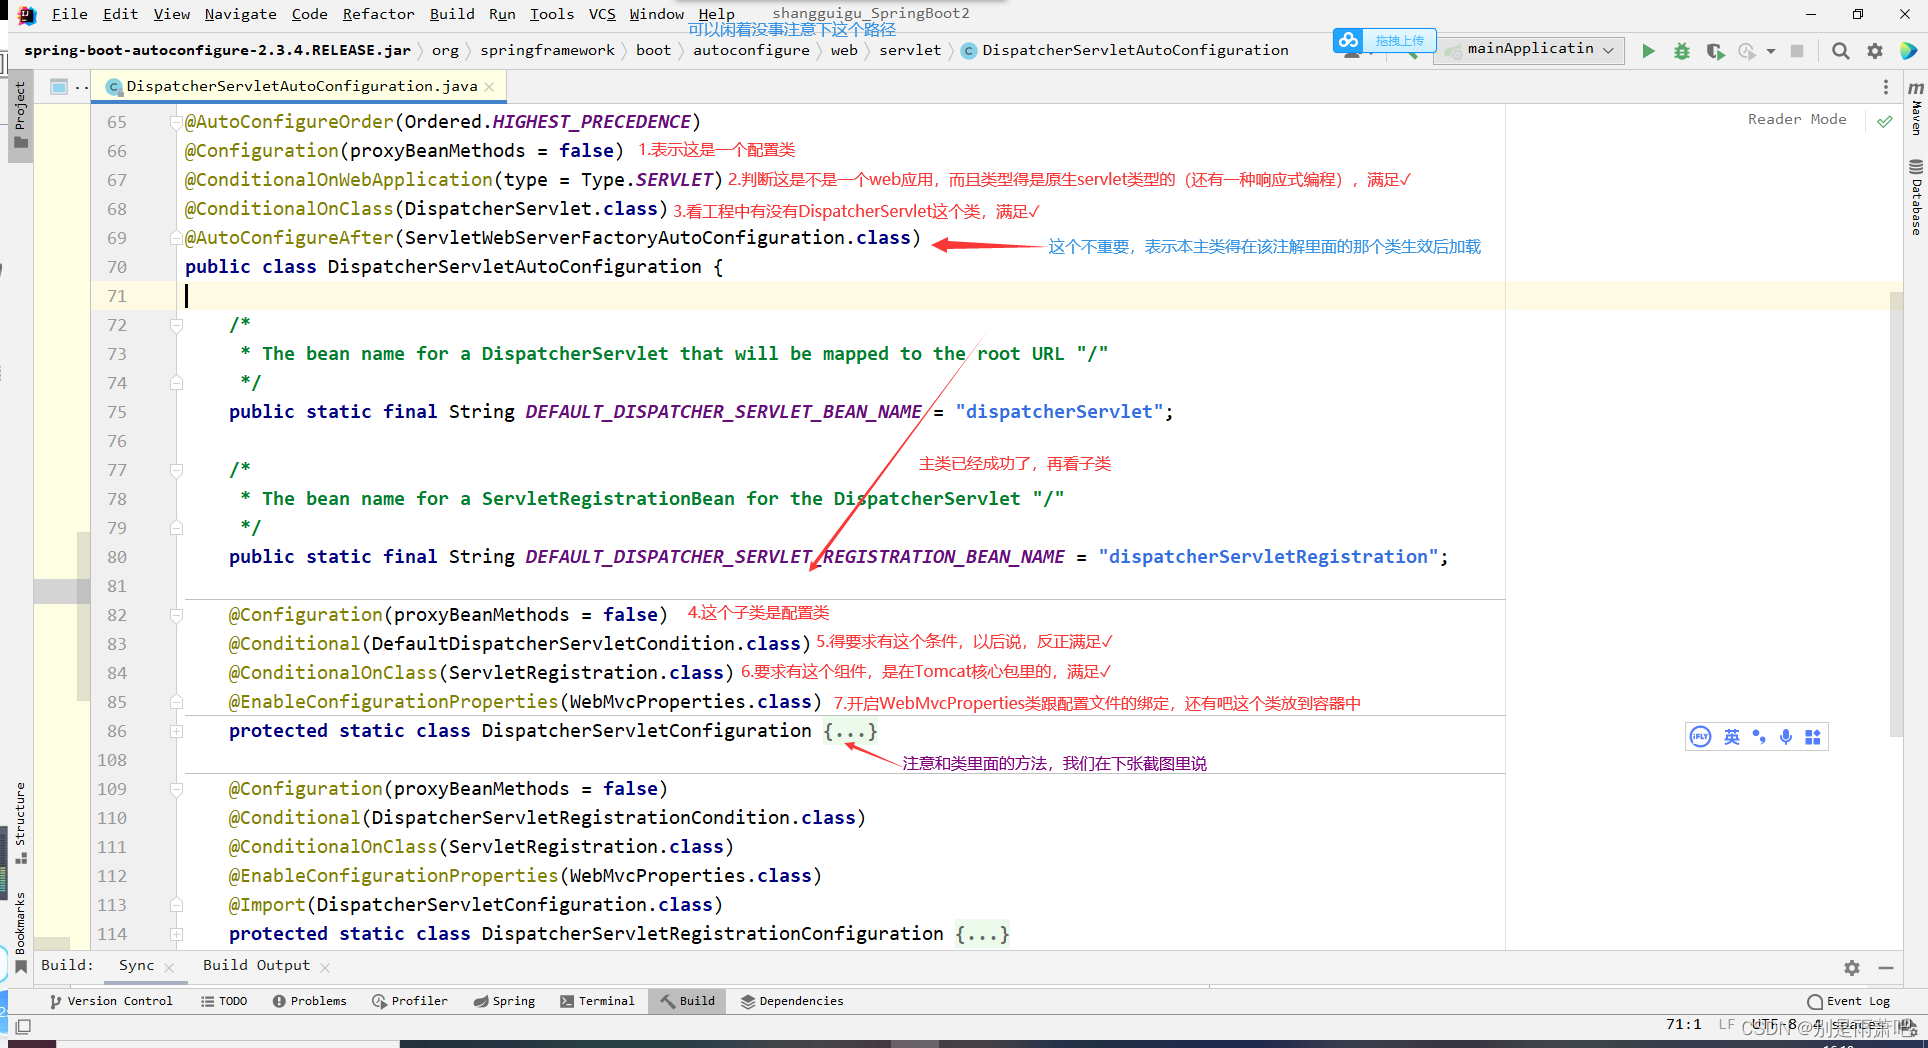
总之就是
1.SpringBoot会加载所有的配置类:xxxxAutoConfiguration
2.每个自动配置类都按照条件进行生效,一般都会默认绑定配置文件中的值xxxxProperties里
面拿,而这个xxxxProperties是和我们的application.properties进行绑定
3.生效的配置类就会给容器添加很多的组件
4.只要容器中有这些组件,相当于这些功能就有了
5.只要用户自己配置的,就以用户配置的优先
定制化组件:
1.用户直接自己@Bean替换掉底层的组件
2.用户自己去看这个组件获取的是配置文件的哪些值,我们直接去改配置文件
xxxxAutoConfiguration->创建组件->xxxxProperties里面拿值->application.properties
3.最佳实践-应用咋写
1.引入场景依赖
Developing with Spring Boot
2.查看配置了哪些东西
自己爬源码
配置文件中添加debug=true,然后运行程序,就能打印自动配置报告
3.是否需要修改?
参照文档修改配置,自己分析咋配置Common Application Properties
自定义加入或者替换组件
自定义器xxxxCustomizer
五.核心功能
1.配置文件
yaml:YAML 是 "YAML Ain't Markup Language"(YAML 不是一种标记语言)的递归缩写。在开发的这种语言时,YAML 的意思其实是:"Yet Another Markup Language"(仍是一种标记语言)。非常适合用来做以数据为中心的配置文件
基本语法:
key: value kv之间有空格
大小写敏感
使用缩进表示层级关系
缩进时不是用tab,只允许使用空格
缩进的空格数不重要,只要相同层级的元素左对齐就好
#表示注释
字符串不需要加引号,如果要加,‘’与‘’ ‘’表示字符串内容会被转义/不转义
数据类型:
字面量:单个的,不可再分的值date、boolean、string、number、null
对象:简直对的集合。map hash set object
行内写法: k: {k1:v1,k2:v2,k3:v3}
#或
k:
k1: v1
k2: v2
k3: v3
数组:一次按次序排列的值,array、list、queue
行内写法:k: [v1,v2,v3]
#或
k:
- v1
- v2
- v3
实例:
@Data
public class Person {
    private String userName;
    private Boolean boss;
    private Date birth;
    private Integer age;
    private Pet pet;
    private String[] interests;
    private List<String> animal;
    private Map<String, Object> score;
    private Set<Double> salarys;
    private Map<String, List<Pet>> allPets;
}
person:
userName: zhangsan #这个是字面量
boss: false
birth: 2019/12/12 20:12:33
age: 18
pet: #对象 非行内写法
name: tomcat
weight: 23.4
interests: [篮球,游泳] #数组 行内写法
animal: #数组 非行内写法
- jerry
- mario
score:
english:
first: 30
second: 40
third: 50
math: [131,140,148]
chinese: {first: 128,second: 136} #对象 行内写法
salarys: [3999,4999.98,5999.99]
allPets:
sick: #对象的非行内写法+数组非行内写法+对象的行内写法
- {name: tom}
- {name: jerry,weight: 47}
health: [{name: mario,weight: 47}] #对象的非行内写法+数组行内写法+对象的行内写法 书写提示:
    <!--为了让自定义的类在写yaml文件时有提示-->
    <dependency>
        <groupId>org.springframework.boot</groupId>
        <artifactId>spring-boot-configuration-processor</artifactId>
        <optional>true</optional>
    </dependency>

    <!--引入一个插件,用来简化部署,打包一个小胖jar-->
    <build>
        <plugins>
            <plugin>
                <groupId>org.springframework.boot</groupId>
                <artifactId>spring-boot-maven-plugin</artifactId>
                <configuration>
                    <!--打包时候,别把这个辅助的jar包打进去-->
                    <excludes>
                        <exclude>
                            <groupId>org.springframework.boot</groupId>
                            <artifactId>spring-boot-configuration-processor</artifactId>
                        </exclude>
                    </excludes>
                </configuration>
            </plugin>
        </plugins>
    </build>
2.静态资源访问
(1)静态资源访问
1.静态资源目录:/static 、 /public、 /resources 、 /META-INF/resources,将静态资源放到
这些目录下就能直接访问到。例如:http://localhost:8080/2.jpg

2.流程:静态映射是默认是/**,但是在进行请求是要先看Controller能不能解决问题,如果不
能那就去上面的静态目录中找静态资源,如果连静态资源都没有就404
3.修改静态资源的访问前缀,或者静态资源的默认目录

(2)支持欢迎页
1. 静态资源路径下 index.html的会被当做欢迎界面,访问根路径就能看到
此时可以配置静态资源的路径
但不能配置静态资源的访问前缀,否则欢迎页效果会失效,报404
2.controller能处理/index
(3)自定义Favicon
就是设置浏览器菜单栏的小图标,只要把favicon.ico放到静态资源目录下就好。
同样也是不能配置静态资源的访问前缀,否则会失效。
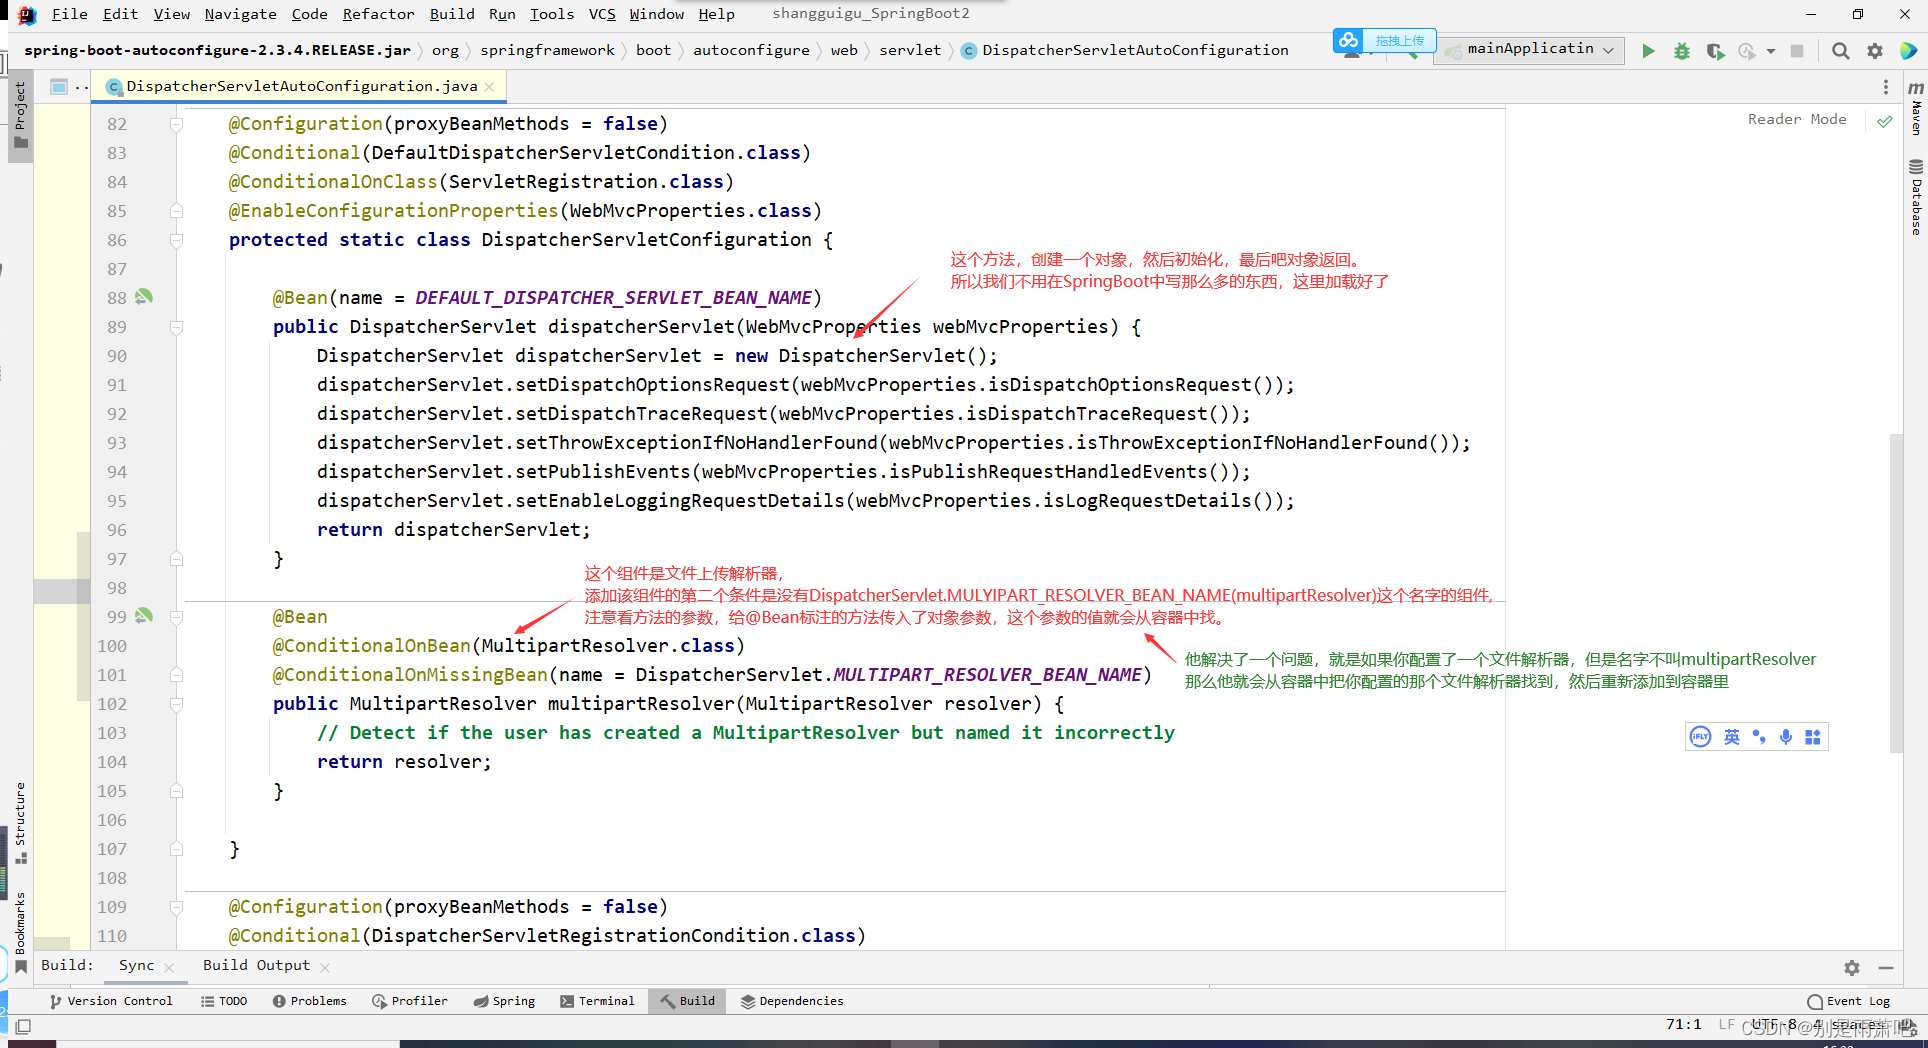
(4)静态资源配置原理
找主类
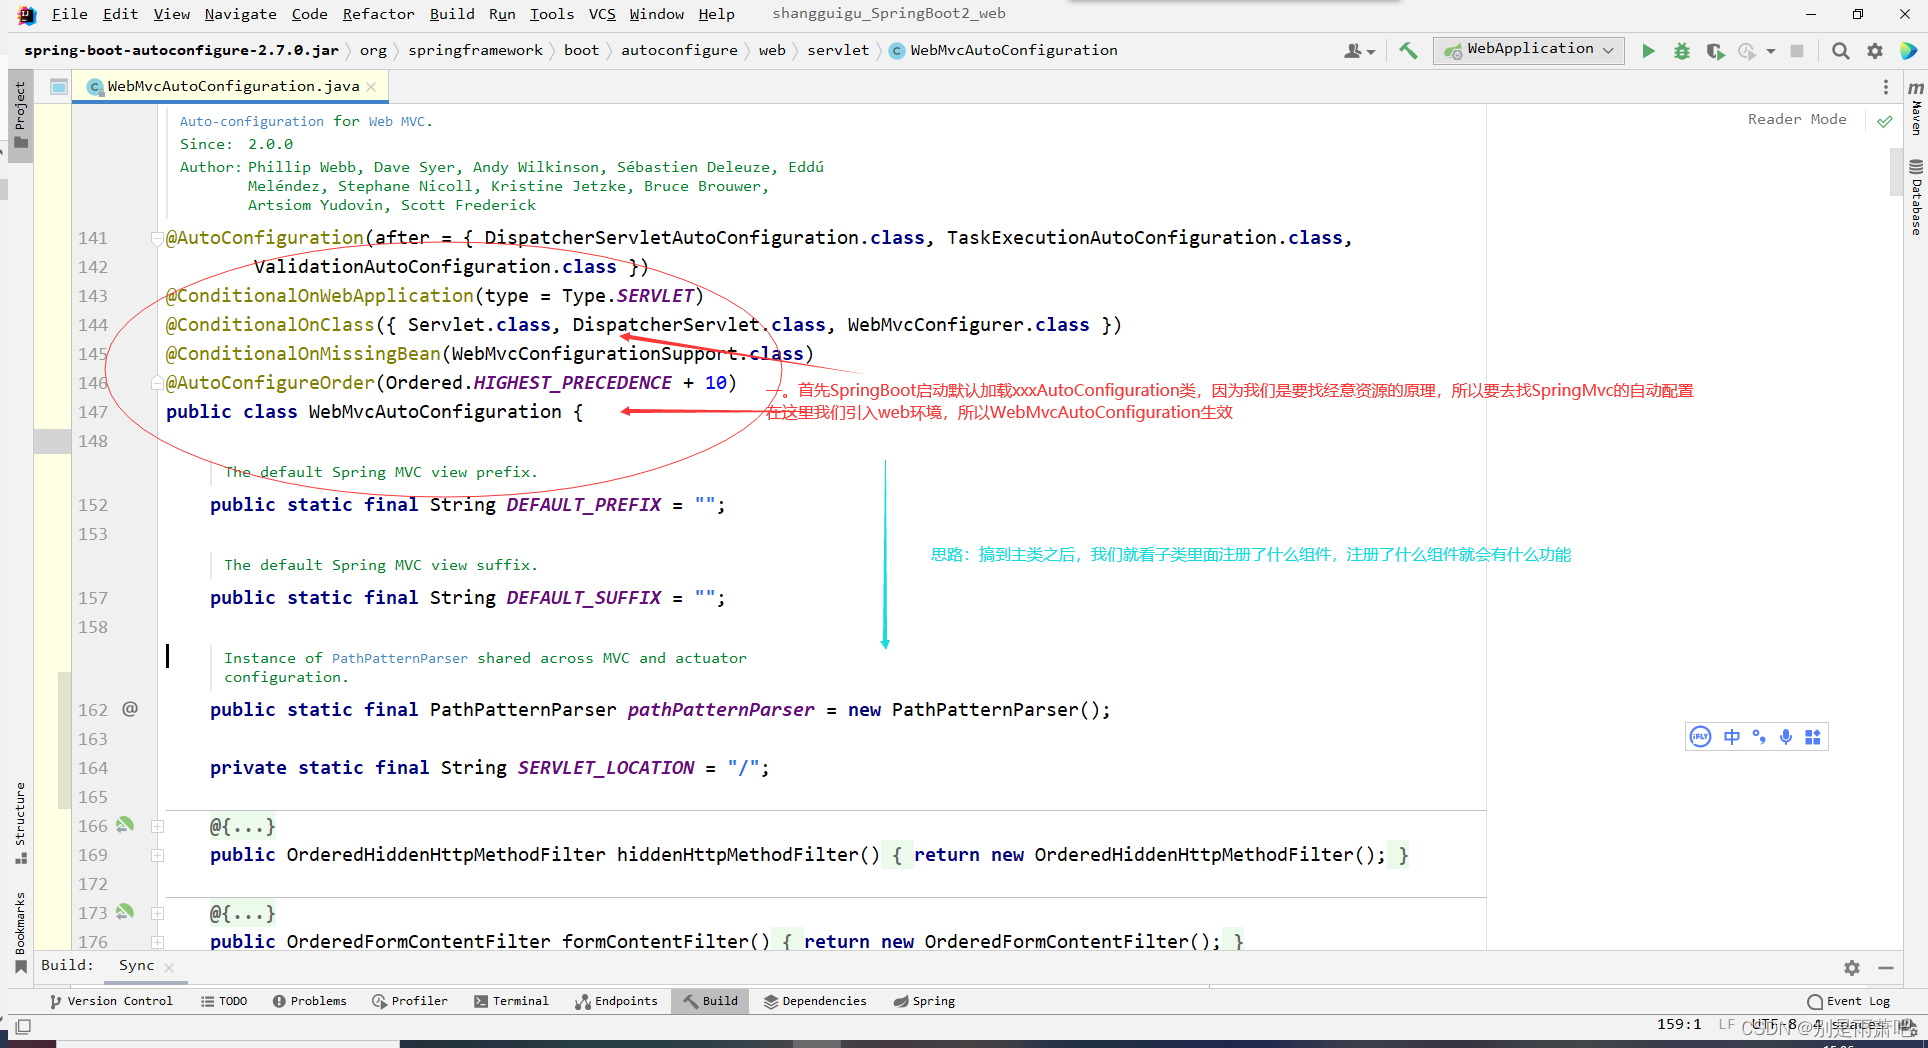
找子类

写错了...WebProperties绑定的是spring.web

找到了上面子类的构造器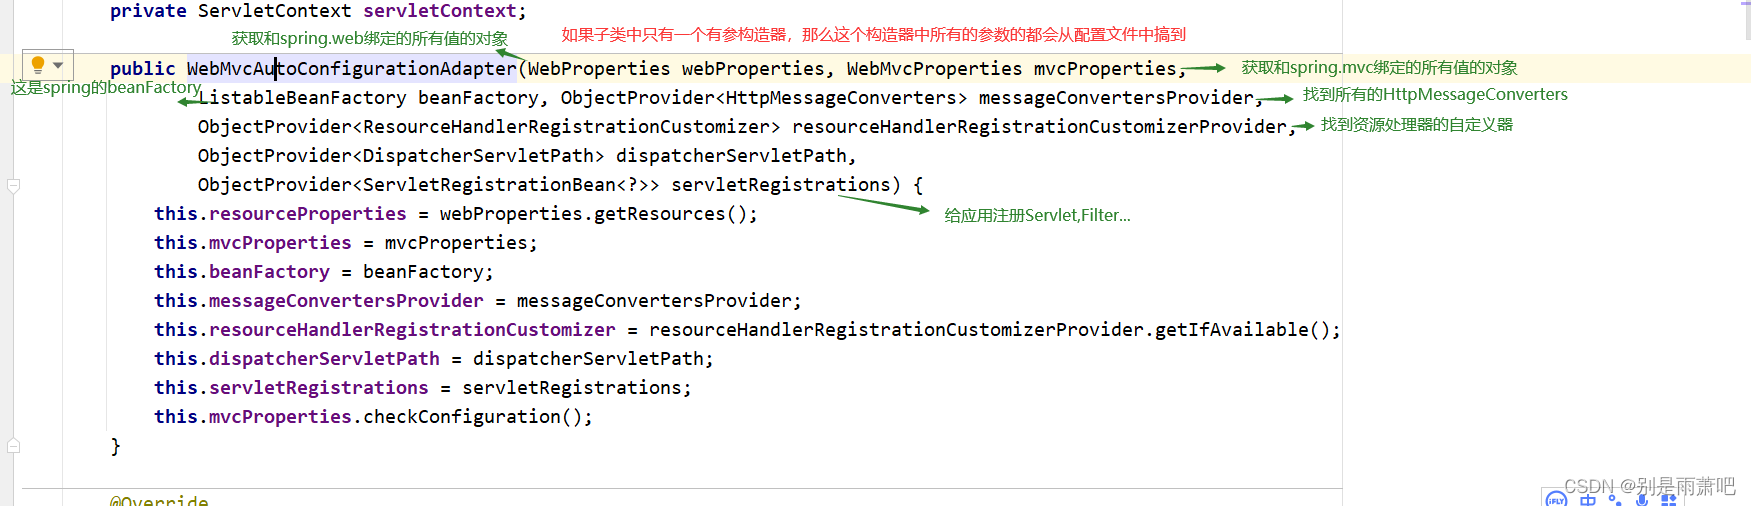 在子类中找组件
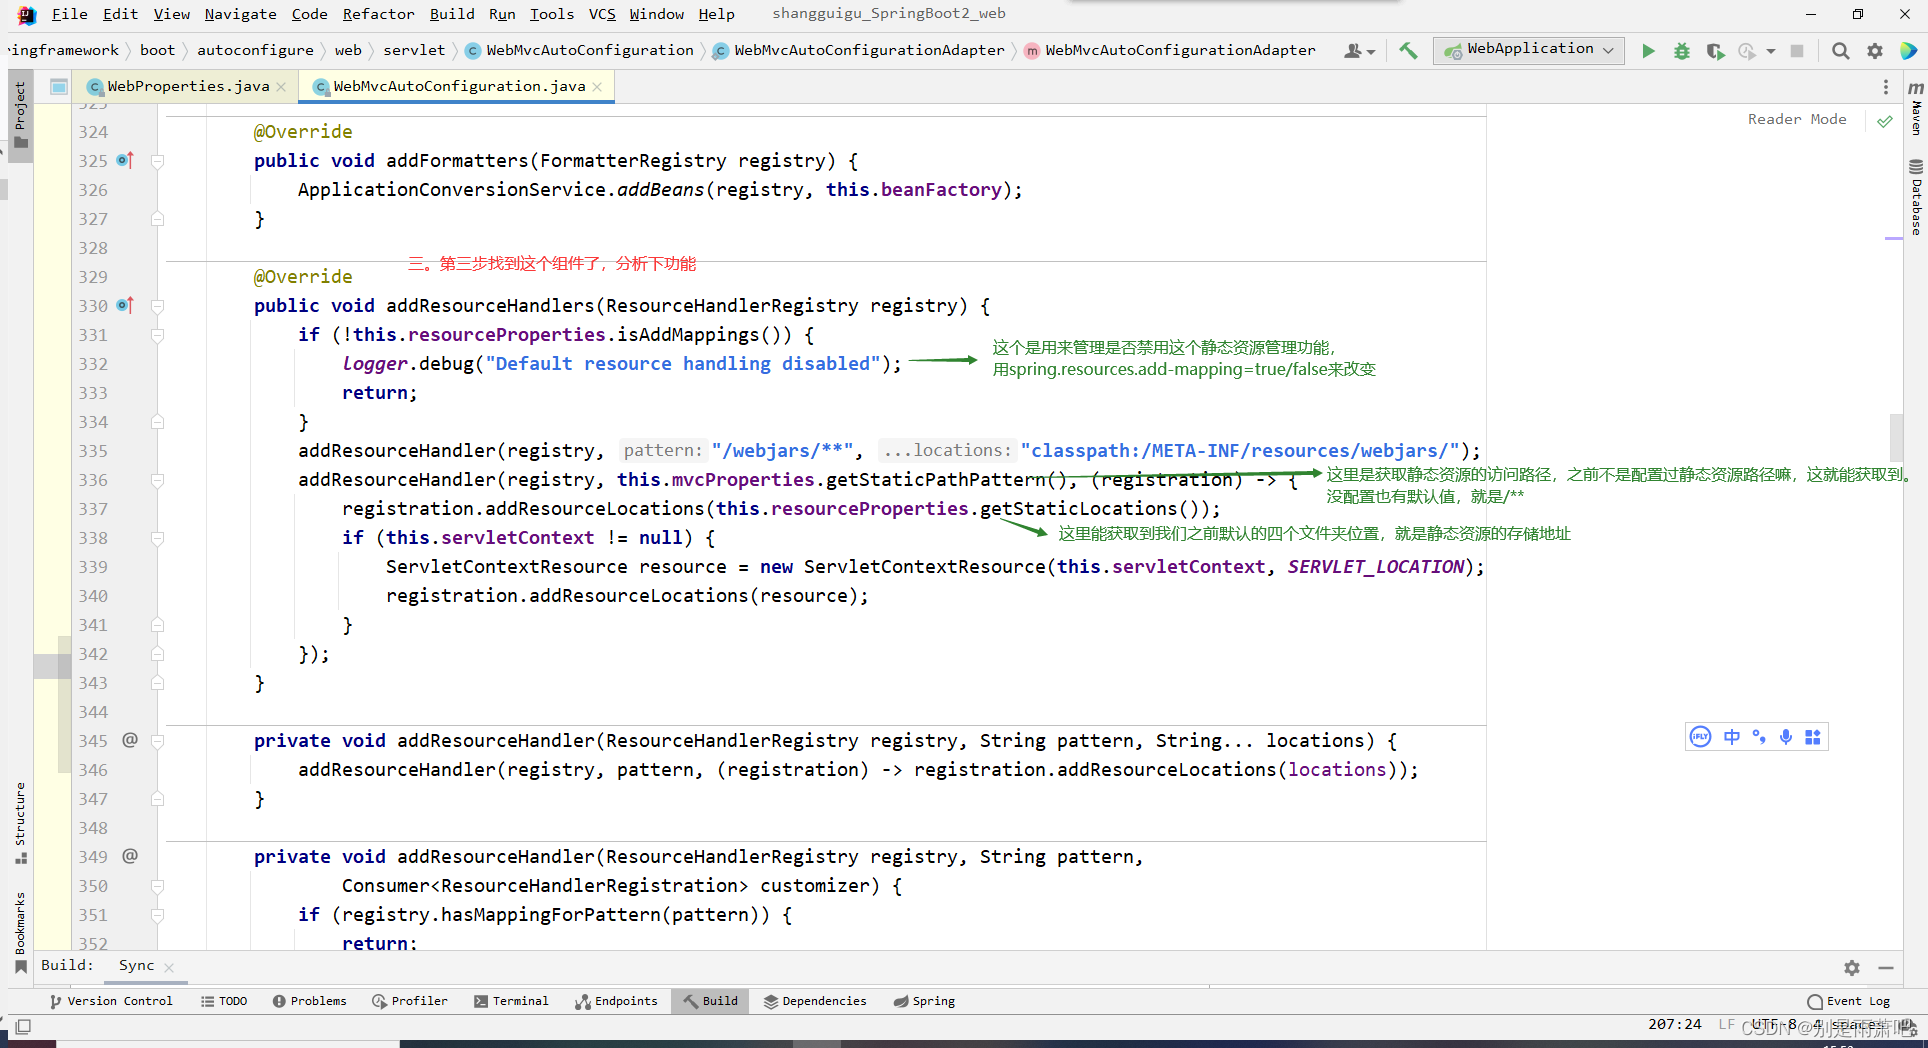
3.请求处理
(1) 请求映射
@xxxMapping
Rest风格支持(使用HTTP请求方式动词来表示对资源的操作)
以前:/getUser 获取用户 /deleteUser 删除用户 /editUser修改用户 /saveUser保存用户
现在:/user GET-获取用户 DELETE-删除用户 PUT-修改用户 POST-保存用户
Resrt风格请求实现:
众所周知,在表单提交时只能提交两种方式,所以为了让我们的Rest风格能够生效,我们需
要做一些配置:
1.自动配置一下这个filter的开启

2.这两种特殊的表单提交方式改一下
<!DOCTYPE html>
<html lang="en">
<head>
    <meta charset="UTF-8">
    <title>测试</title>
</head>
<body>
测试rest风格
<form action="/user" method="get">
    <input value="GET提交" type="submit">
</form>
<form action="/user" method="post">
    <input value="POST提交" type="submit">
</form>
<form action="/user" method="post">
    <input name="_method" type="hidden" value="delete"><!--这个value大小写无所谓-->
    <input value="DELETE提交" type="submit">
</form>
<form action="/user" method="post">
    <input name="_method" type="hidden" value="PUT">
    <input value="PUT提交" type="submit">
</form>
</body>
</html>
rest风格请求原理
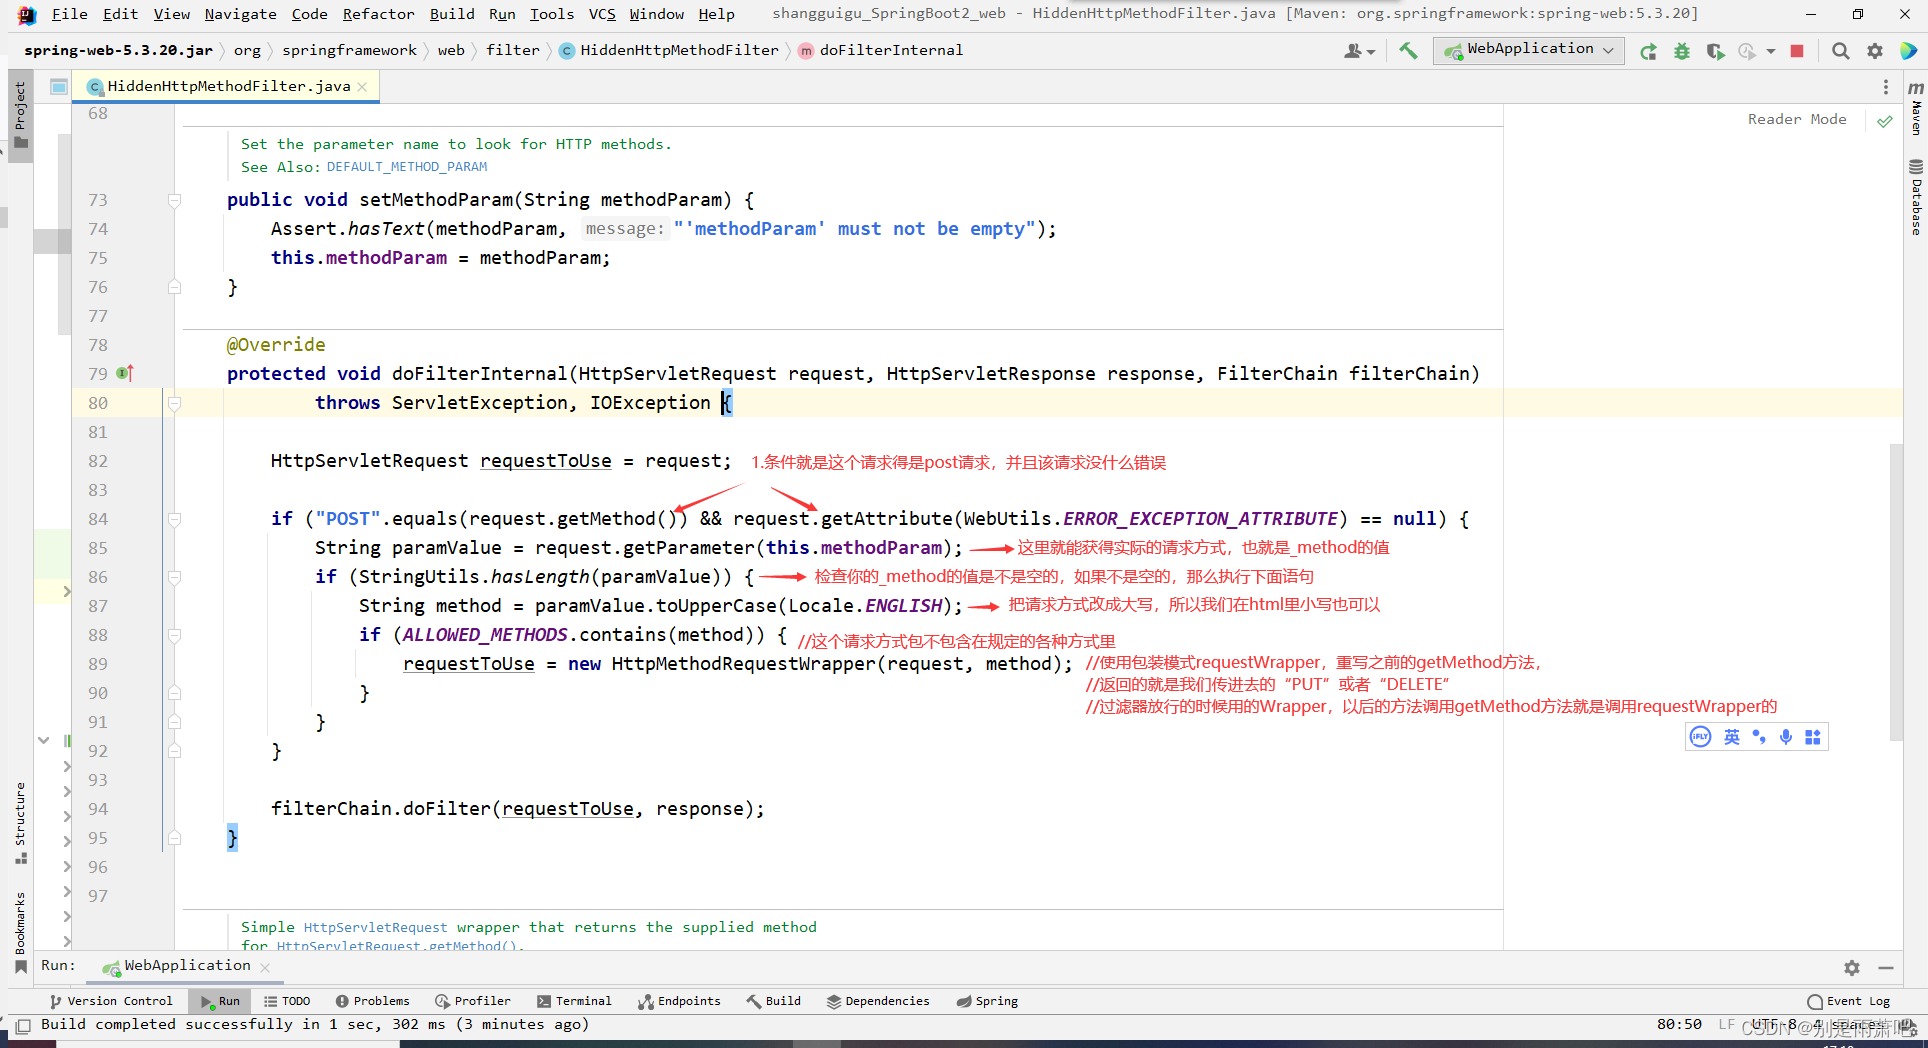
修改默认的_method:原理是本来他给我们的那个OrderedHiddenHttpMethodFilter,是建立在HiddenHttpMethodFilter.class不存在的前提下。默认放的OrderedHiddenHttpMethodFilter这个组件继承了HiddenHttpMethodFilter,底层默认的是"_method",这个就是原理。
我们修改的思路就是:那我们直接给工程里自己添加一个HiddenHttpMethodFilter不就行了吗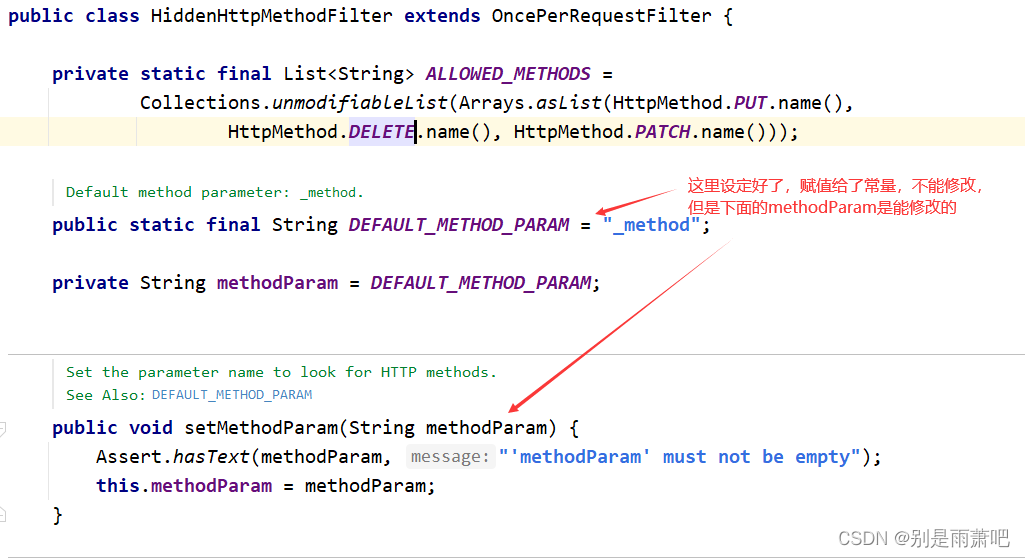
package com.example.webdemo.config;
import org.springframework.context.annotation.Bean;
import org.springframework.context.annotation.Configuration;
import org.springframework.web.filter.HiddenHttpMethodFilter;
@Configuration(proxyBeanMethods = false)
public class MyConfig {//修改你默认的_method
@Bean
public HiddenHttpMethodFilter hiddenHttpMethodFilter(){
HiddenHttpMethodFilter hiddenHttpMethodFilter = new HiddenHttpMethodFilter();
hiddenHttpMethodFilter.setMethodParam("_changedmethod");
return hiddenHttpMethodFilter;
}
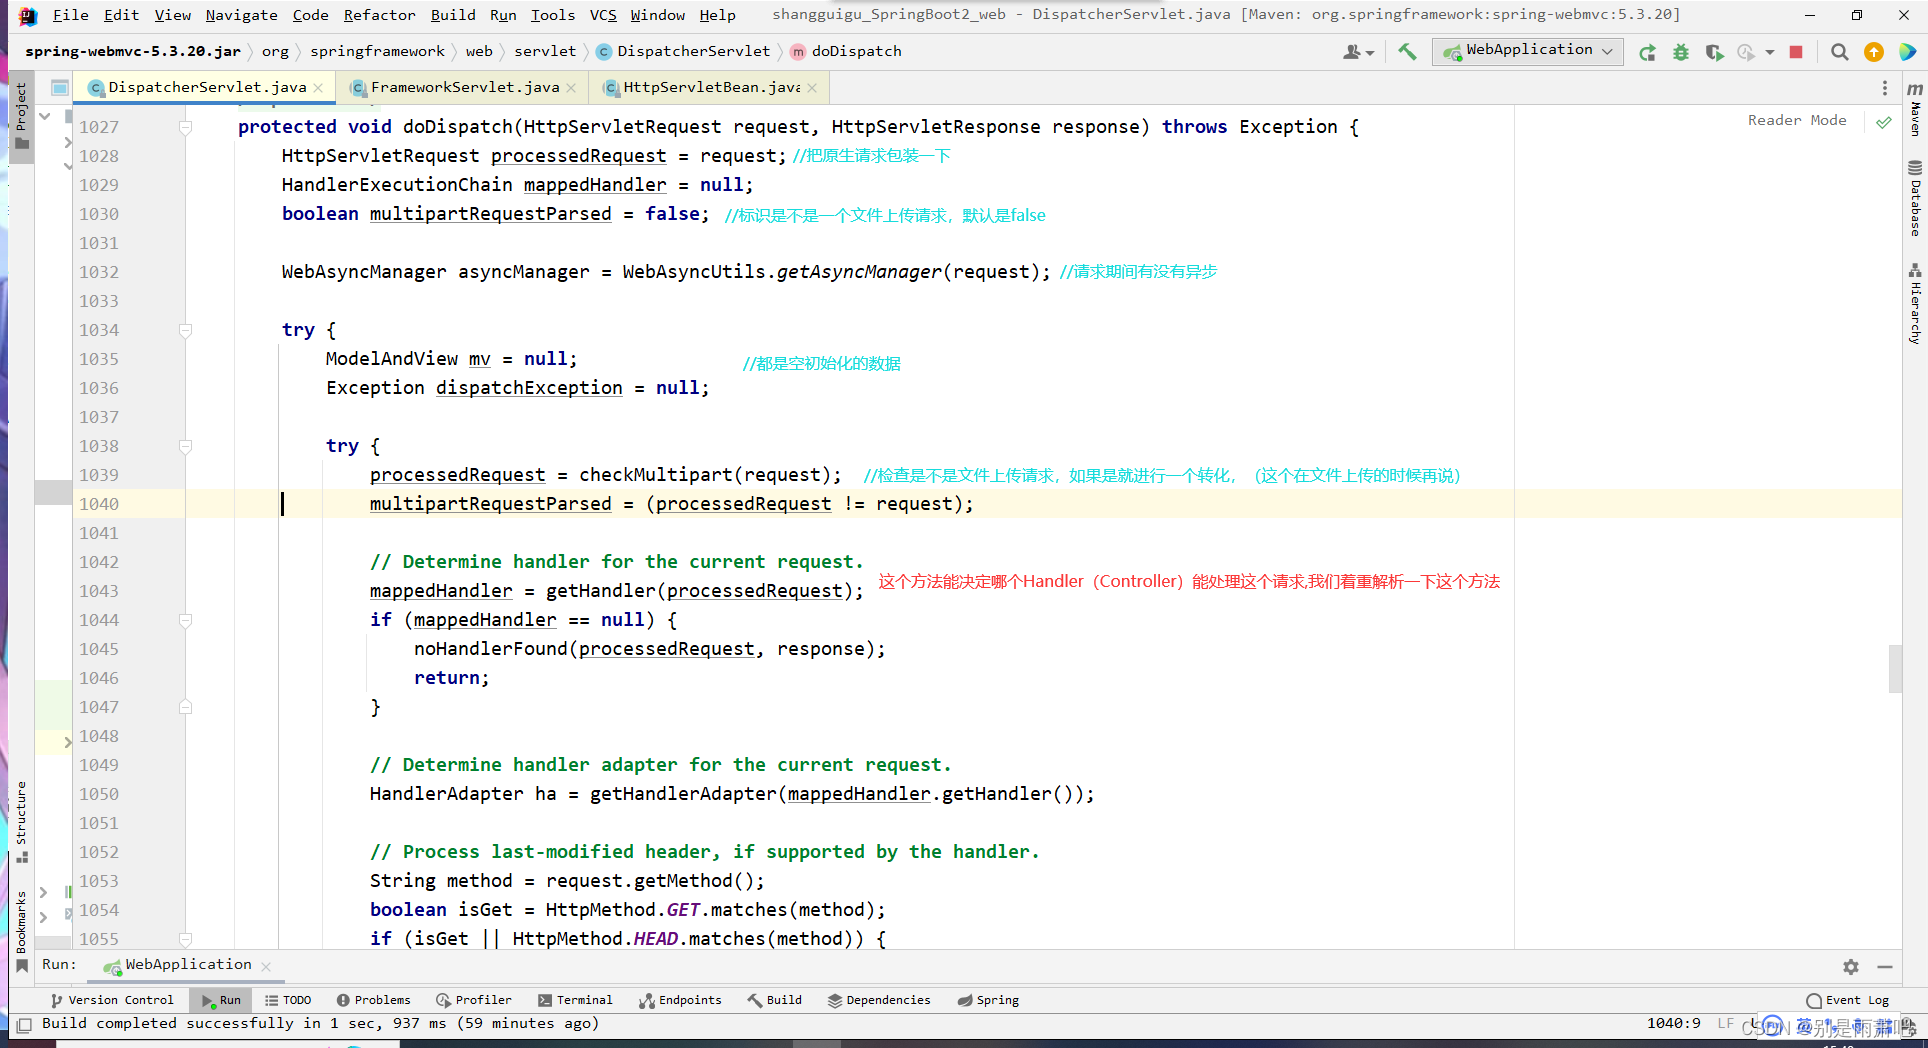
}请求映射原理(它是如何通过请求路径找到对应的方法)
本节讲的是浏览器是怎么知道我们要找的是哪个请求,也就是MVC的基本原理流程:
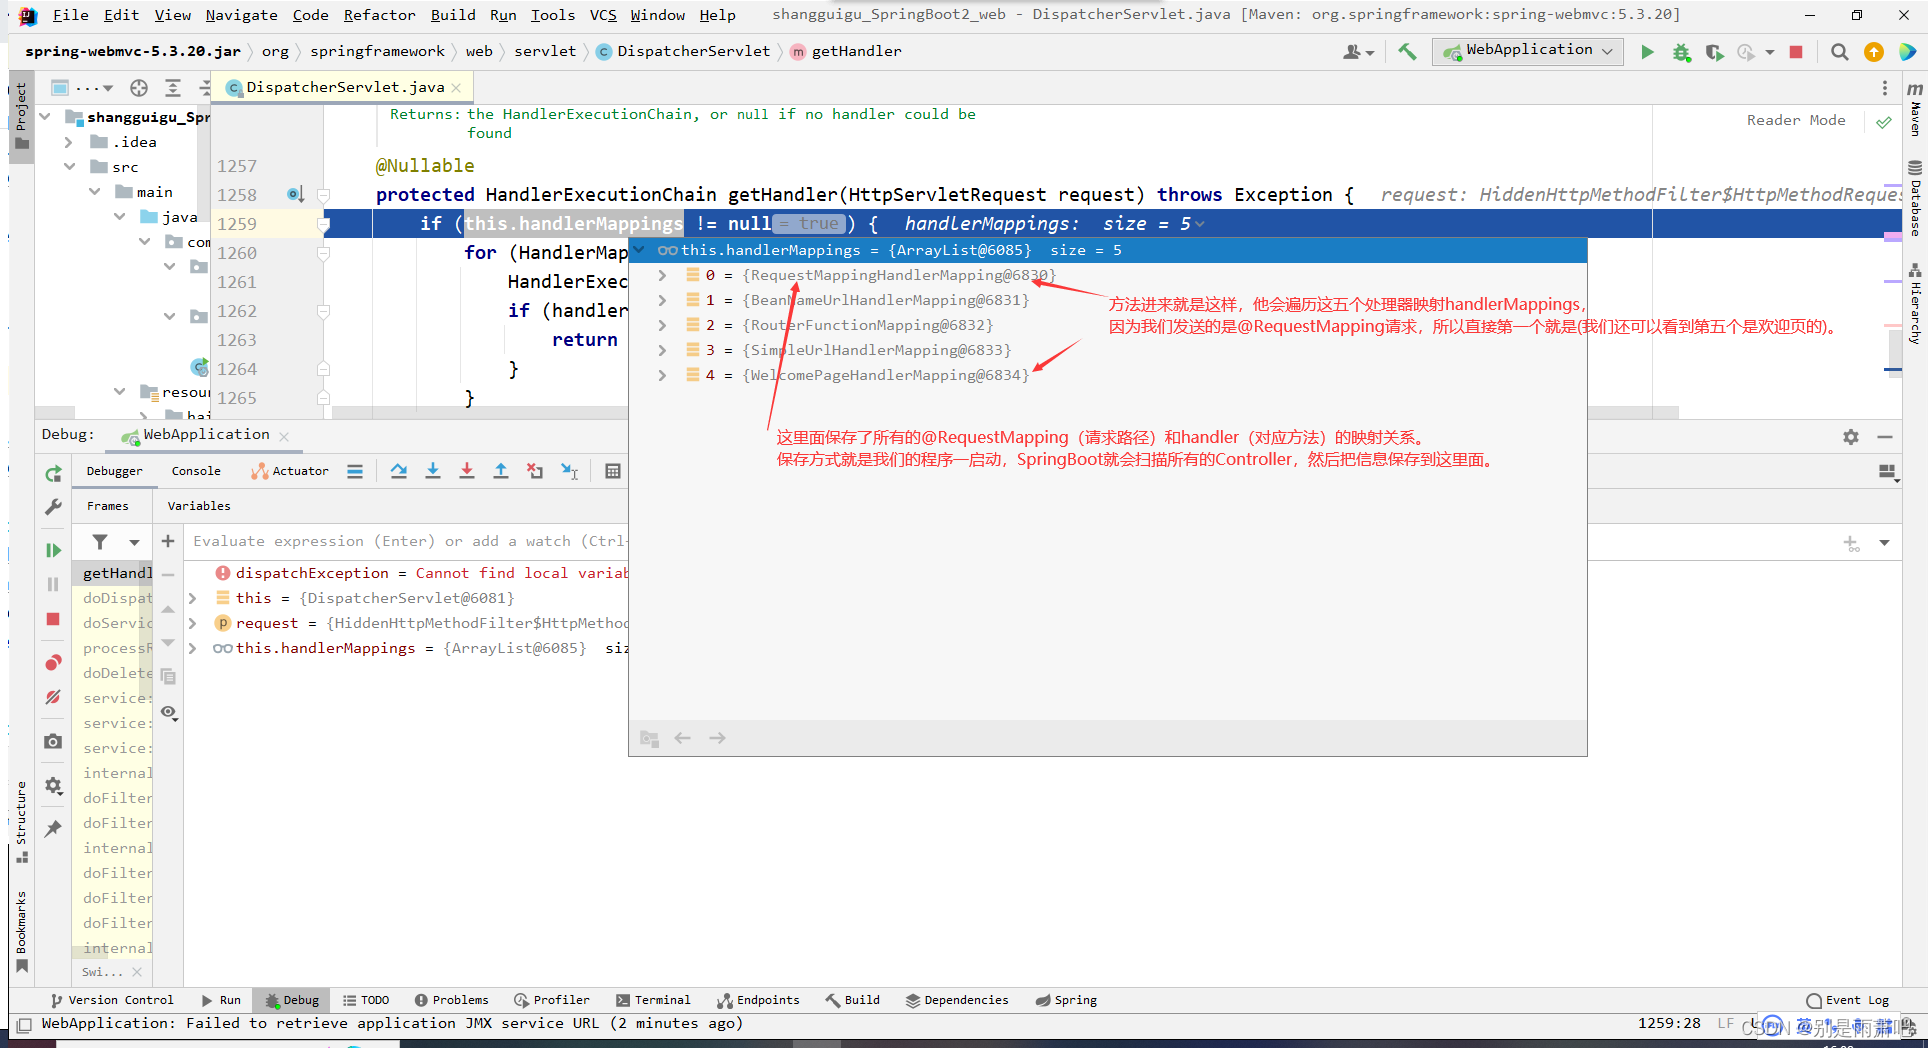
SpringBoot自动配置欢迎页的 WelcomePageHandlerMapping 。访问 /能访问到index.html;
1.SpringBoot自动配置了默认 的 RequestMappingHandlerMapping
2.请求进来,挨个尝试所有的HandlerMapping看是否有请求信息。
3.如果有就找到这个请求对应的handler如果没有就是下一个 HandlerMapping
4.我们需要一些自定义的映射处理,我们也可以自己给容器中放HandlerMapping。自定义
HandlerMapping

processRequest方法又调用了doService方法,但是在FrameworkServlet类中并没有对这个doService的实现,所以我们去子类DispatcherServlet中去找实现,能找到!在这个方法前面都是一些初始化,然后他调用了一个方法doDispatch(request, response);这是最重要的。

(2)Controller里的参数问题
@PathVariable("id") :
路径:@GetMapping("/car/{id}/owner/{username}")
形参:(@PathVariable("id") Integer id,@PathVariable("username") String name)
作用:把路径中的值,赋值给参数中对应的值。
@@RequestHeader("User-Agent") :
路径:和路径无关
形参:(@RequestHeader("User-Agent") String userAgent)
作用:获得请求头中的信息
@RequestParam("age") :
路径:localhost:8080/test?name=zhangsan
形参:(@RequestParam("name") String name)
作用:获取get提交时后面跟着的信息
@CookieValue("_ga") :
路径:和路径无关
形参:(@CookieValue("_ga") String _ga)
作用:获得session中的值
@RequestBody :
路径:和路径无关
形参:(@RequestBody String content)
作用:获得请求体中的数据
@RequestAttribute:
场景:在转发的时候使用,在转发时一般会使用setAttribte("msg","success")来设置值
形参:(@RequestAttribute String msg)
作用:获得请求域对象中的属性
@MatrixVariable:
localhost:8080/test?name=zhangsan 这个插查询字符串用 @RequestParam。
localhost:8080/car;low=34;brand=byd,audi,yd 矩阵变量
场景:我们进行页面开发,如果cookie禁用了,那么session中的内容怎么使用?答:有
一个原理,我们在session中保存了a的值"b",使用set(a,"b")。我们的每个人每个
session都有一个jsessionid,这个id会被保存在cookie里面,cookie每次发送请求都
会携带。在没禁用之前,每次发请求,都会在cookie里携带jsessionid,服务器根
据这个jsessionid找到session对象,然后就能获取其中的数据。但是我们可以使用
矩阵变量的方式,为请求带上jsessionid,比如localhost:8080/car;jessionid=xxx 。
这个行为被称之为路径重写,把cookie的值使用矩阵变量的方式进行重写。
作用:矩阵变量的方式获得数据
语法:分号前面是访问路径,分号后面是键值对
路径:localhost:8080/{path};low=34;brand=byd,audi,yd
形参:(@MatrixVariable("low") Integer low,
@MatrixVariable("brand") List<String> brand)
复杂路径:@GetMapping("/boss/{bossId}/{empId}")
/boss/1;age=20/2;age=30
(@MatrixVariable(value="age" pathVar="bossId") Integer bossAge,
@MatrixVariable(value="age" pathVar="empId") Integer empAge)
特殊:默认会自动取消路径中分号后面的东西,所以这个矩阵变量的功能要手动开启。
对于路径的解析是通过UrlPathHelper进行解析,使用removeSemicolonContent(移
除分号内容)支持矩阵变量的。方法如下:
    //在配置类里面添加上这样一个组件,手动开启@MatrixVariable注解的解析
    @Bean
    public WebMvcConfigurer webMvcConfigurer(){
        return new WebMvcConfigurer() {
            @Override
            public void configurePathMatch(PathMatchConfigurer configurer) {
                UrlPathHelper urlPathHelper = new UrlPathHelper();
                urlPathHelper.setRemoveSemicolonContent(false);
                configurer.setUrlPathHelper(urlPathHelper);
            }
        };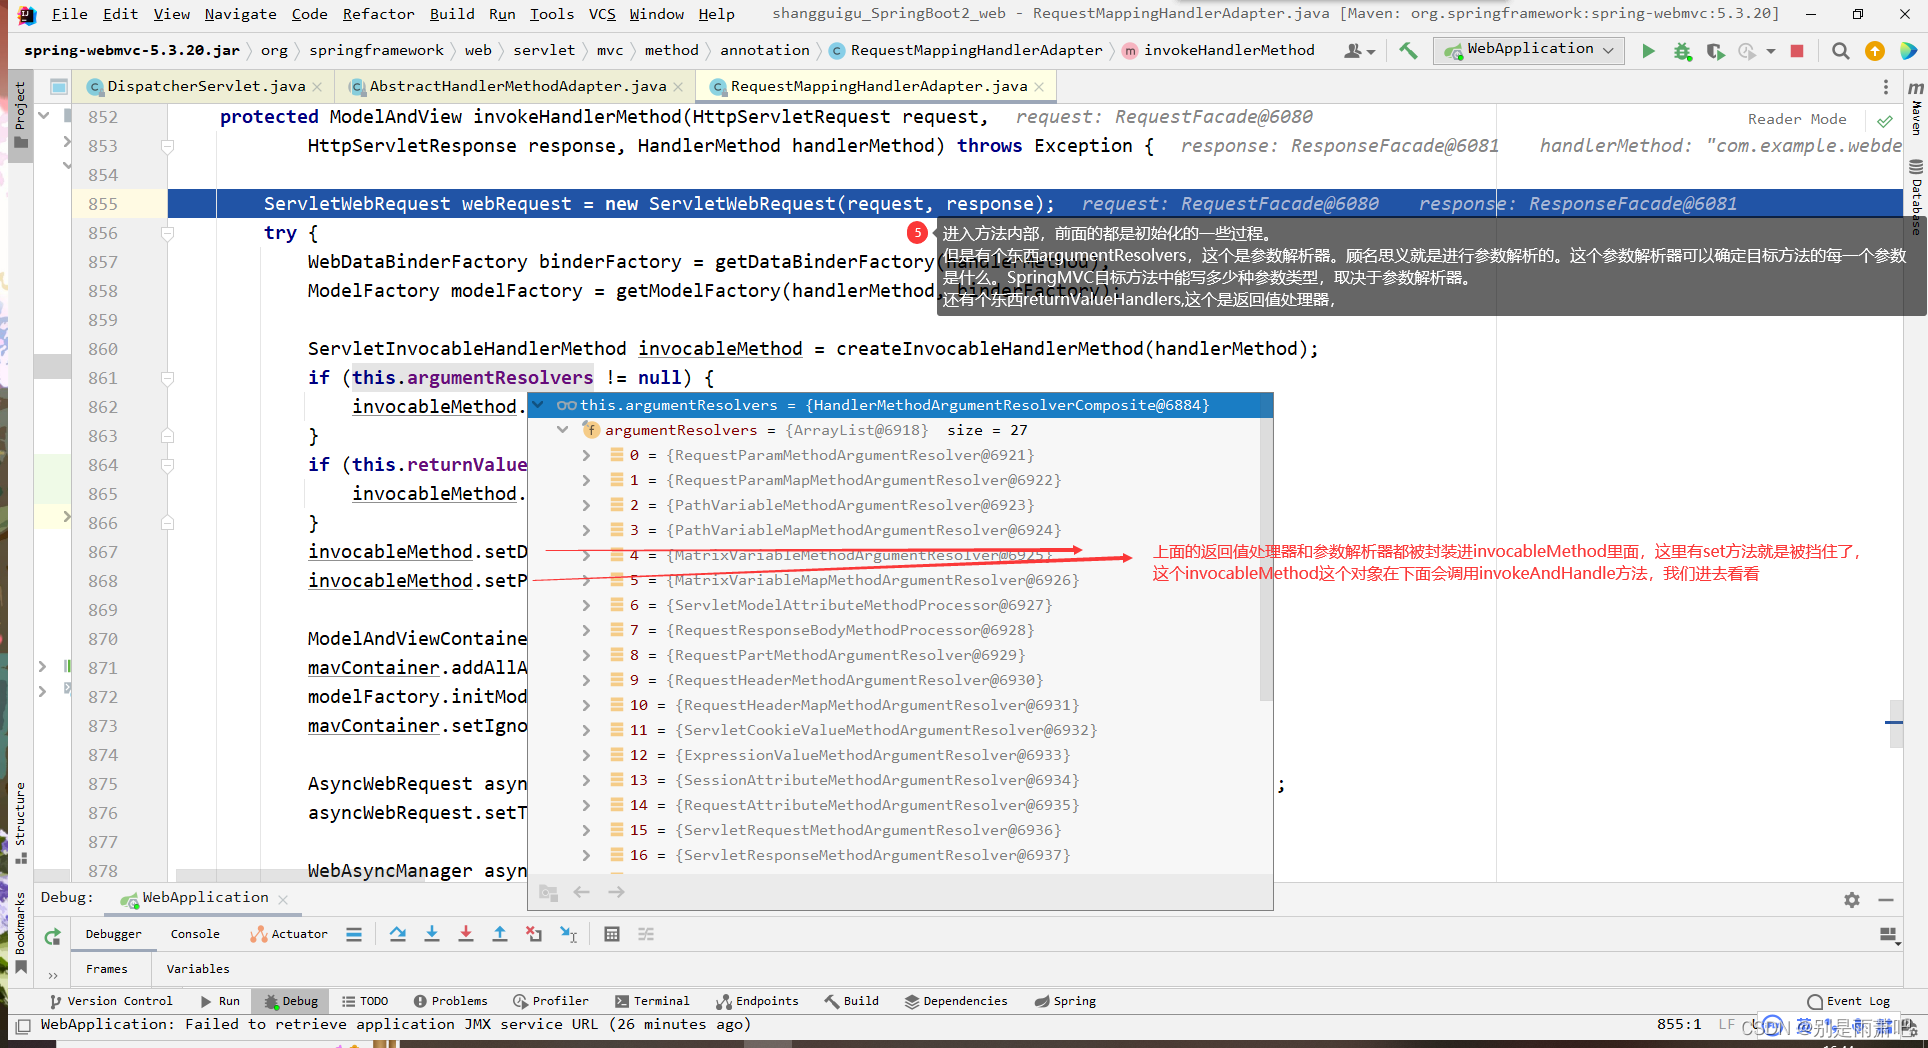
}各种类型参数解析原理:
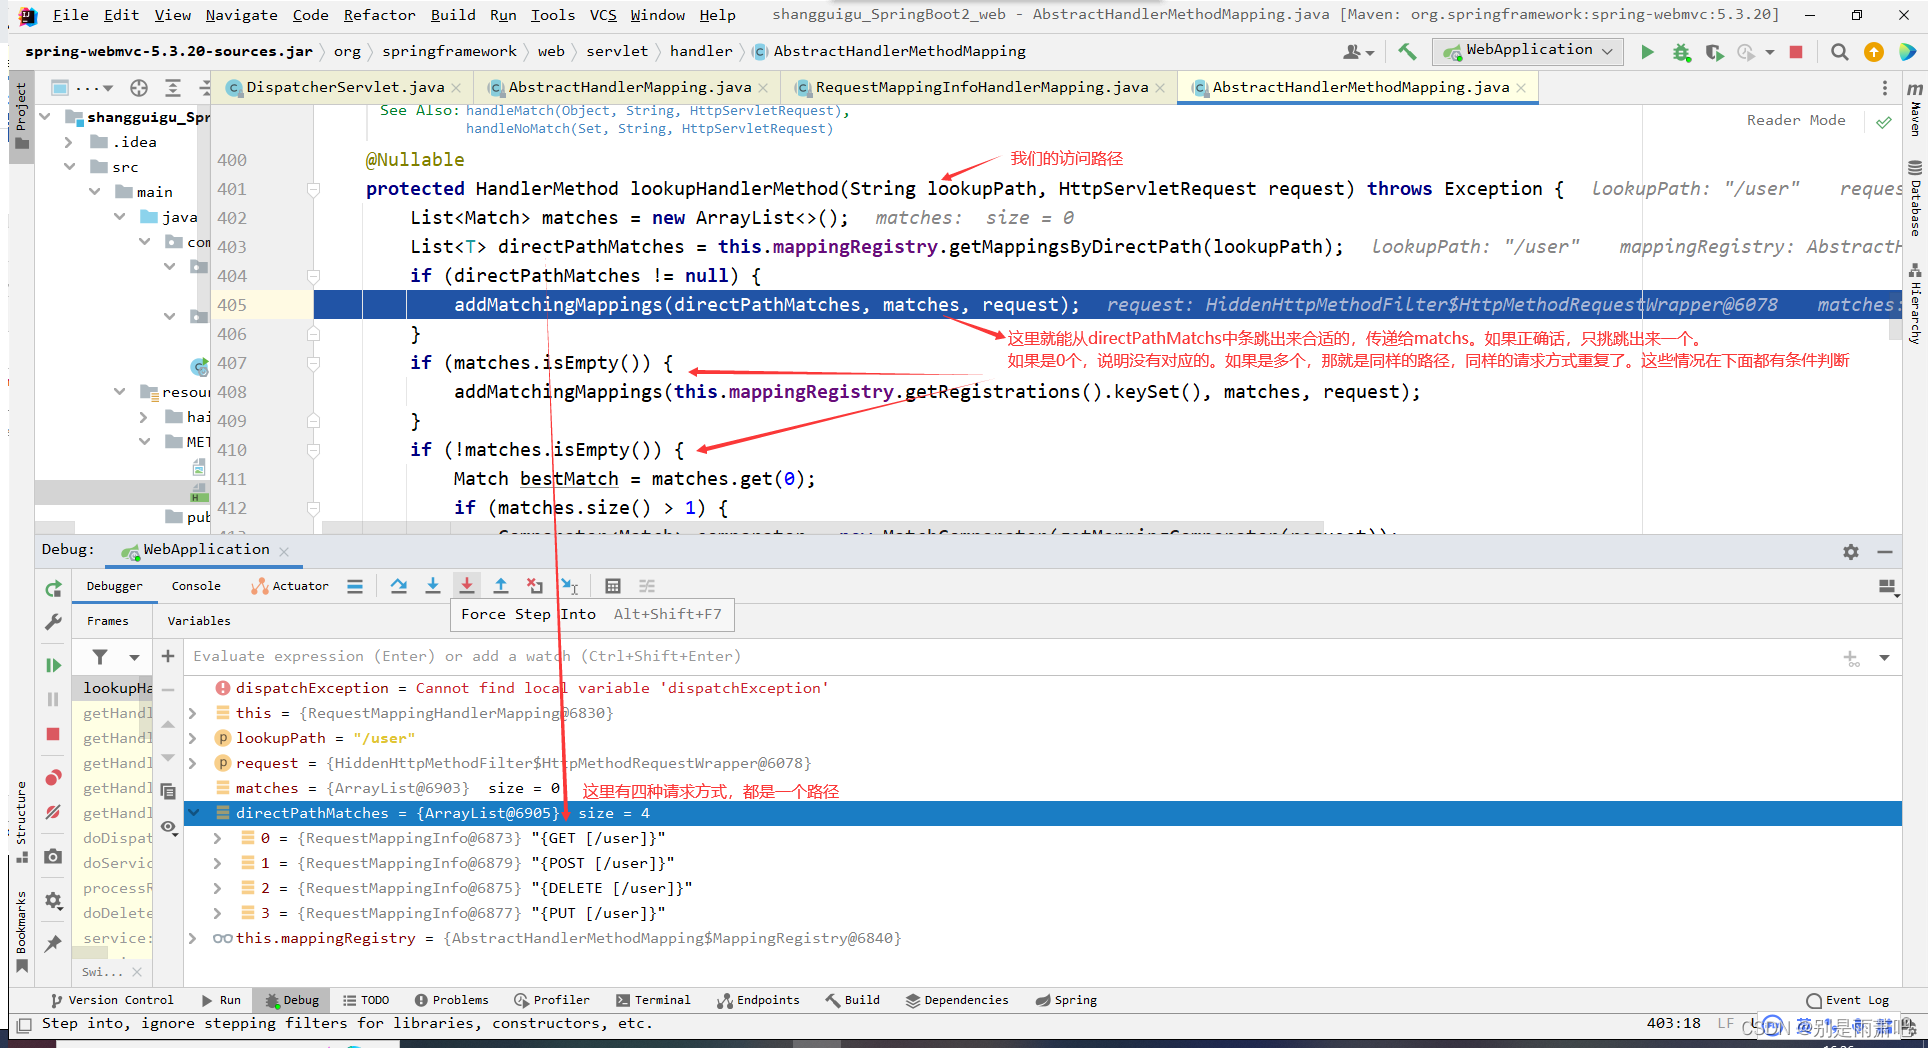
1.首先HandlerMapping中找能处理请求的Handler(其实就是找到某个Controller的方法)
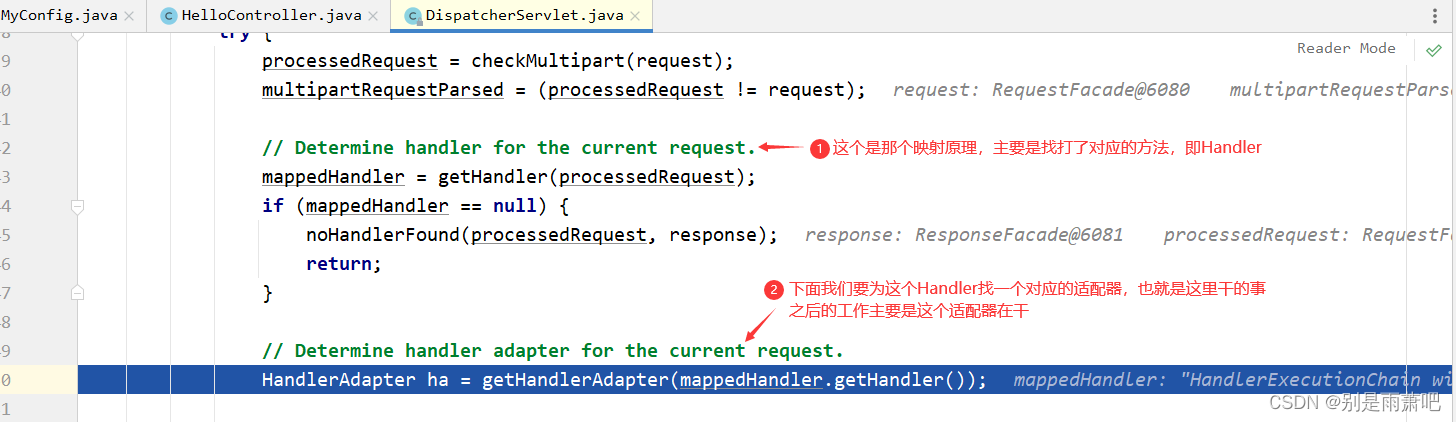
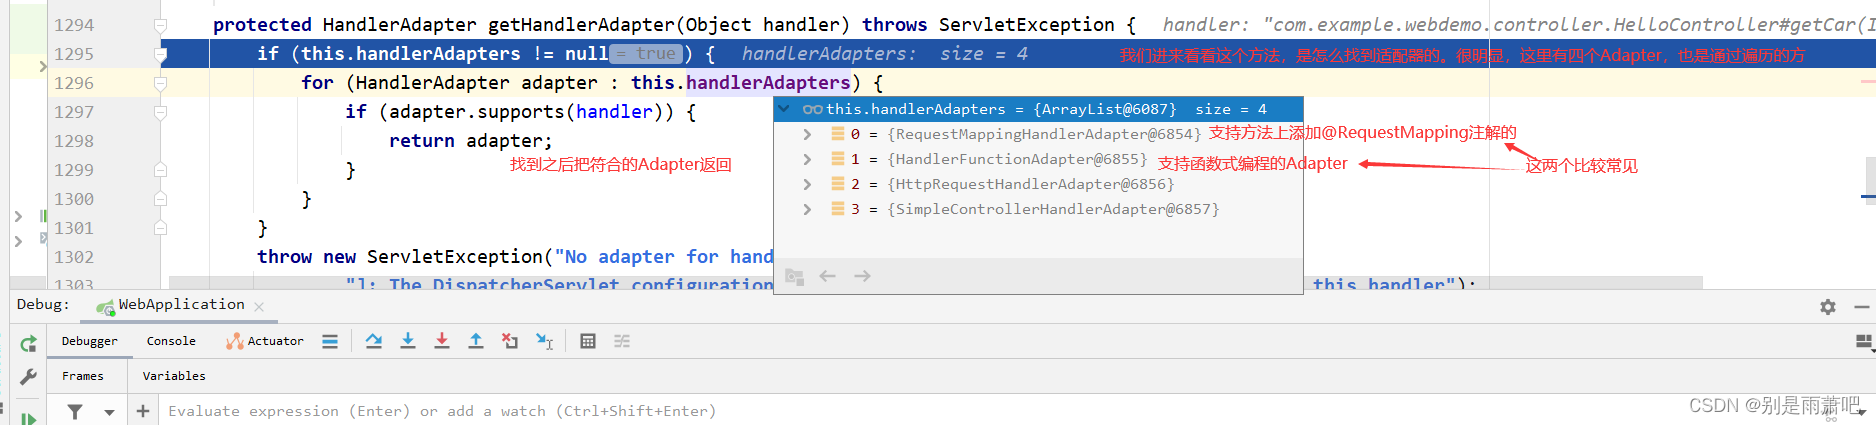
2.然后为当前的Handler找一个适配器HandlerAdapter


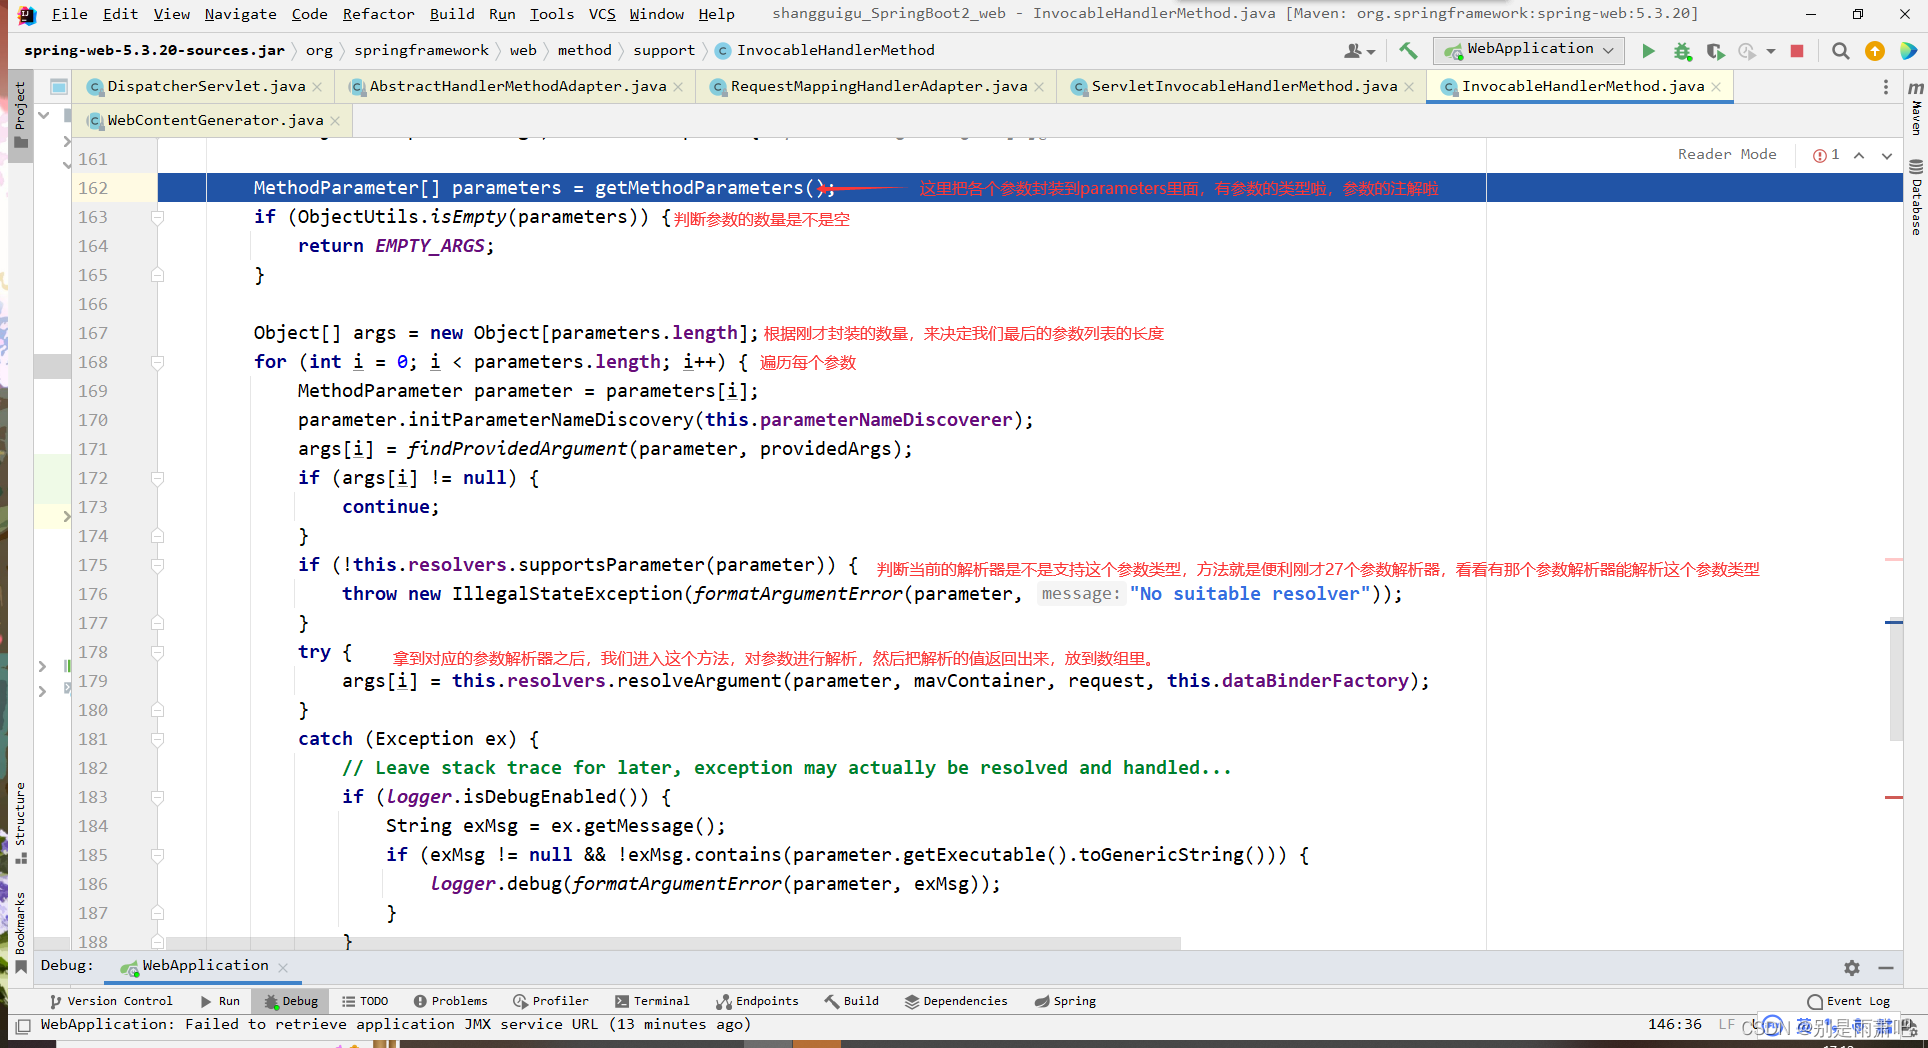
Servlet API参数解析原理:
这原理和上面差不多,就是在挑选解析器的时候不一样,这个解析器用的是
ServletRequestMethodArgumentResolver
复杂参数:
Map、Model(map、model里面的数据会被放在request的请求域 request.setAttribute)
Errors/BindingResult
RedirectAttributes( 重定向携带数据)
ServletResponse(response)
SessionStatus
UriComponentsBuilder
ServletUriComponentsBuilder
1.在map,model,request都可以给request域中放数据,可以通过getAttribute()方法得到
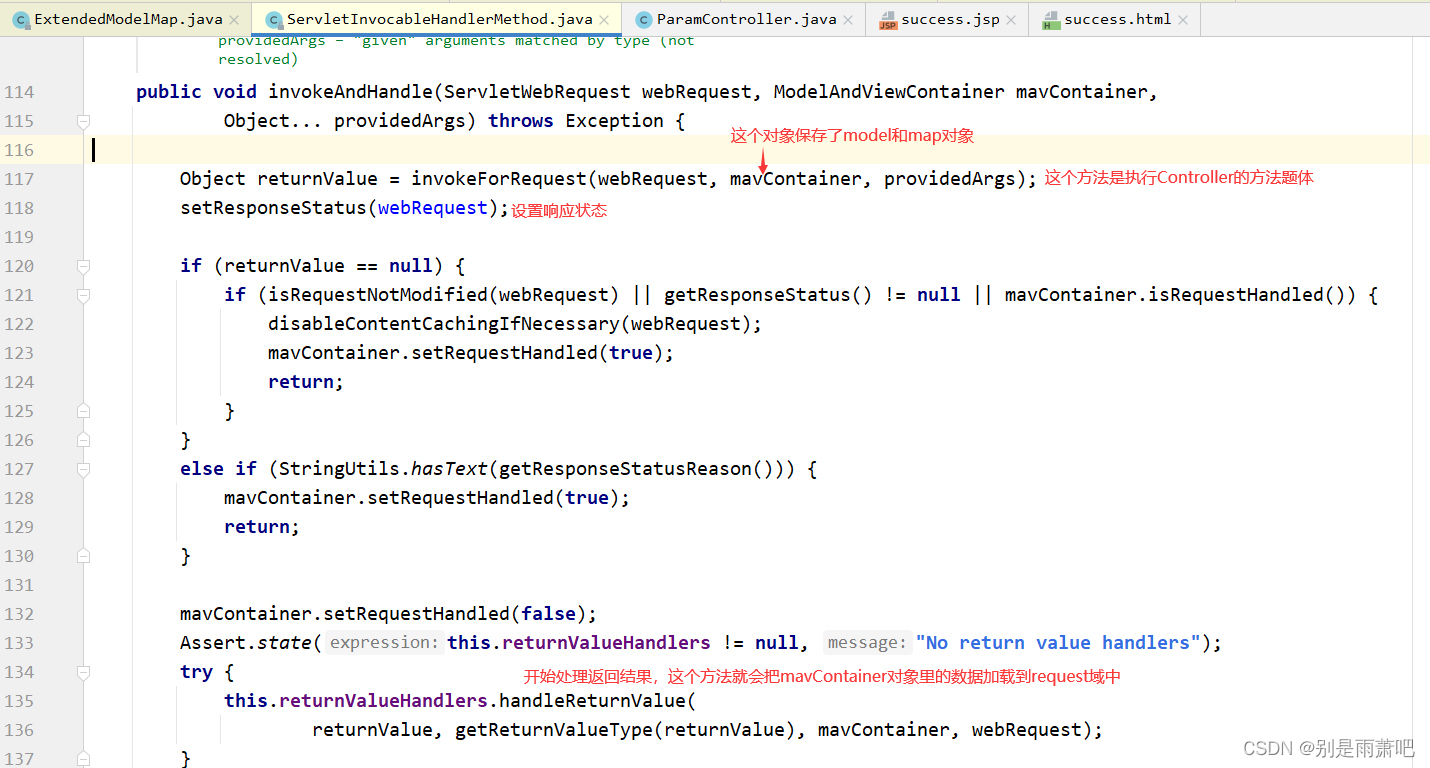
2.目标方法执行后,所有的数据都会放在ModelAndViewContainer,即视图模型容器。这里面
包含了我们要跳转的页面view,还有包含model数据
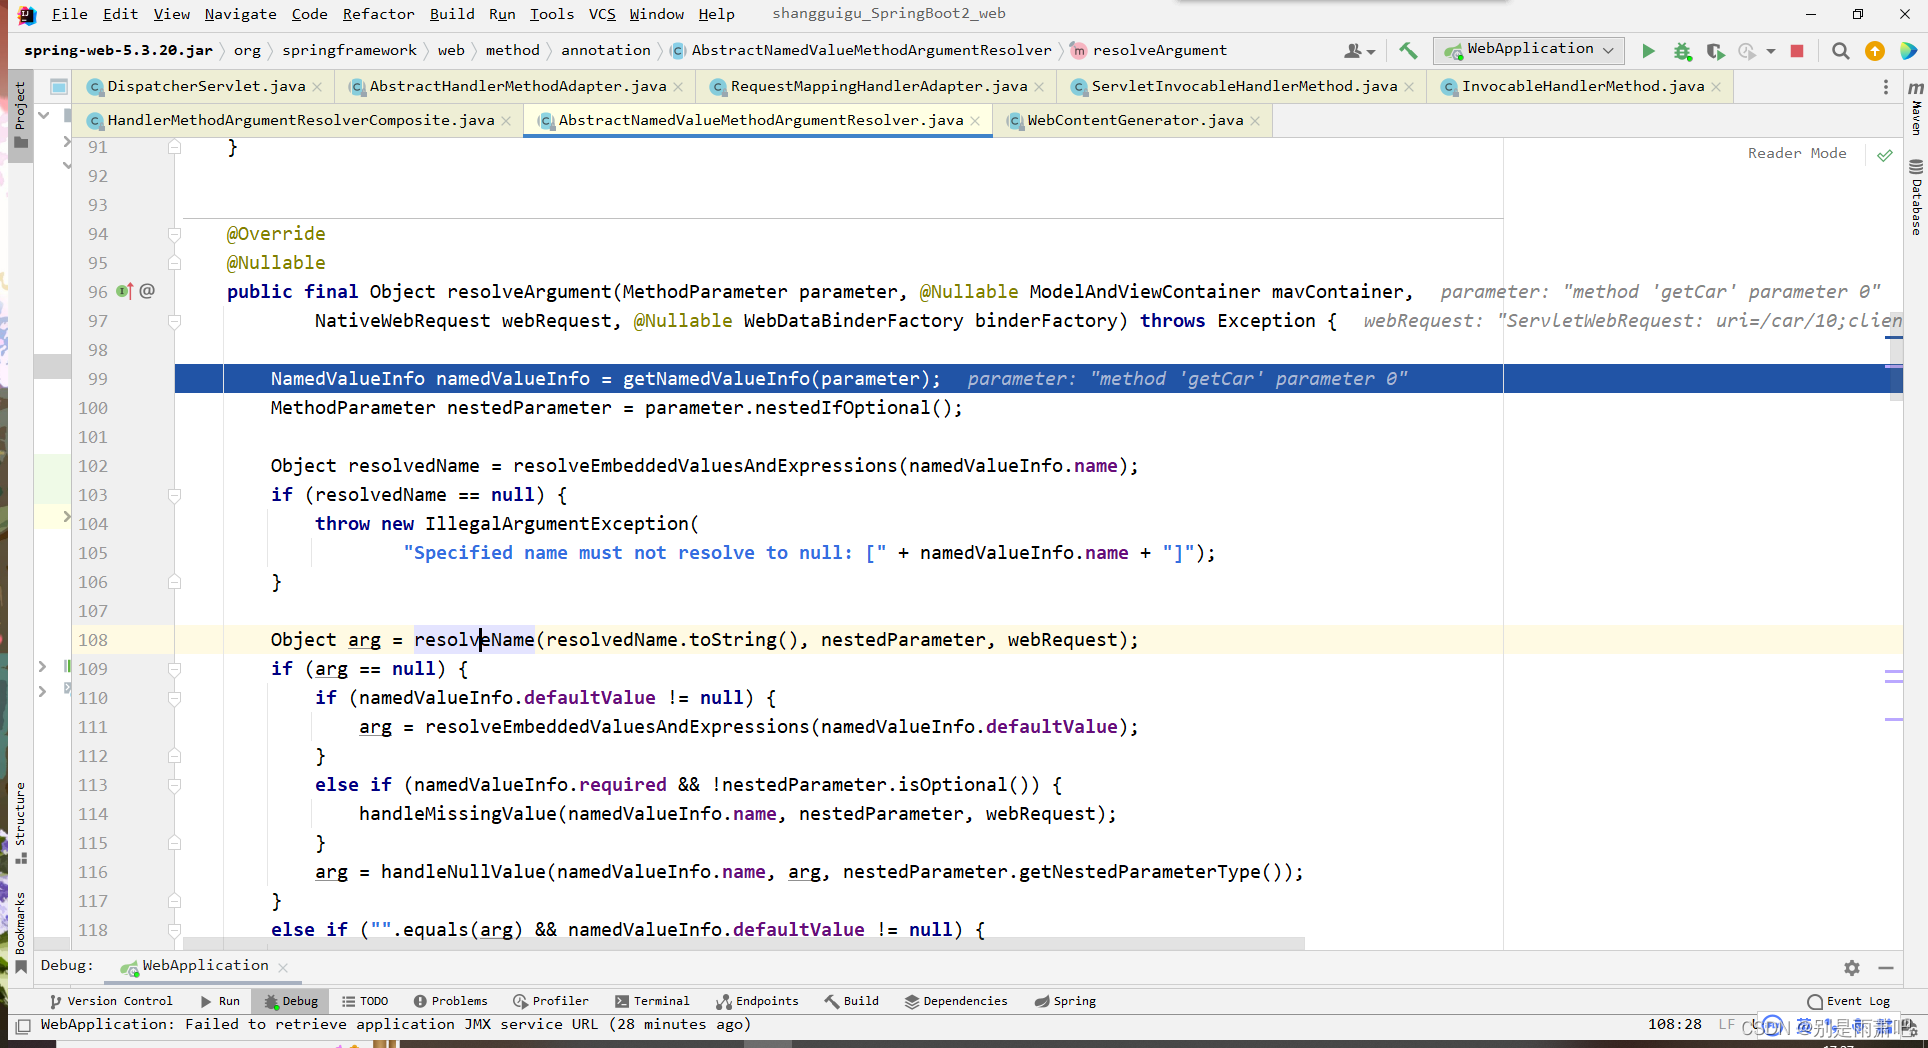
原理:
我们从找到正确的解析器,解析器开始解析这里开始分析。
如果是Map类型:
1.他的解析器是MapMethodProcessor
2.那么解析器就会返回一个return mavContainer.getModel();
3.getModel()的返回值类型是ModelMap,返回值是new BindingAwareModelMap();
4.这个BindingAwareModelMap最终extends ModelMap implements Model

如果是Model类型:
1.它的解析器是ModelMethdProcessor
2.解析器在解析时会返回return mavContainer.getModel();和Map类型一模一样
3.所以在下面的例子中那个map和model是一个对象
执行完方法体后,map和model的数据是如何加载到请求域中:
1.图中的handleReturnValue就是在干这件事情,我们进去看看
2.这个方法创建了一个HandleMethodReturnValueHandler对象,这个对象又调用了
handleReturnValue方法,参数里有mavContainer对象
3.在该方法里mavContainer对象设置了viewName,就是视图的地址,然后返回了一个
对象,不过该对象是方法getModelAndView()。这个方法返回值类型ModelAndView。
4.进入该方法,有一个modelFactory对象调用updateModel方法
5. 该方法中将mavContainer中的model封装成了ModelAndView
6.处理派发结果
processDispatchResult(processedRequest, response, mappedHandler, mv, dispatchException);
renderMergedOutputModel(mergedModel, getRequestToExpose(request), response);
package com.example.webdemo.controller;

import org.springframework.stereotype.Controller;
import org.springframework.ui.Model;
import org.springframework.web.bind.annotation.*;
import javax.servlet.http.Cookie;
import javax.servlet.http.HttpServletRequest;
import javax.servlet.http.HttpServletResponse;
import java.util.HashMap;
import java.util.Map;

@Controller
public class ParamController {
        //复杂参数
        @GetMapping("params")
        public String getCar(Map<String,Object> map,
                                         Model model,
                                         HttpServletRequest request,
                                         HttpServletResponse response){
            map.put("hello","world666");
            model.addAttribute("world","world555");
            request.setAttribute("message","helloworld");
            Cookie cookie = new Cookie("c1", "adwqdjowieh");
            cookie.setDomain("localhost");
            response.addCookie(cookie);
            return "forward:/success";
        }
        @ResponseBody
        @GetMapping("/success")
        public HashMap<String, Object> success(HttpServletRequest request){
            Object message = request.getAttribute("message");
            Object hello = request.getAttribute("hello");
            Object world = request.getAttribute("world");
            HashMap<String, Object> map = new HashMap<>();
            map.put("hello",hello);
            map.put("world",world);
            map.put("message",message);
            return map;
        }
}
5.视图解析与模板引擎
视图解析:
SpringBoot默认不支持JSP,需要引进第三方的木板引擎技术实现页面渲染。在这我们使用thymeleaf这个服务器引擎。
基本语法:
1.表达式 
2、字面量
文本值: 'one text' , 'Another one!' ,…
数字: 0 , 34 , 3.0 , 12.3 ,…布尔值: true , false
空值: null
变量: one,two,.... 变量不能有空格
3、文本操作
字符串拼接: +
变量替换: |The name is ${name}|
4、数学运算
运算符: + , - , * , / , %
5、布尔运算
运算符: and , or
一元运算: ! , not
6、比较运算
比较: > , < , >= , <= ( gt , lt , ge , le )等式: == , != ( eq , ne )
7、条件运算
If-then: (if) ? (then)
If-then-else: (if) ? (then) : (else)
Default: (value) ?: (defaultvalue)
8、特殊操作
无操作: _
9、设置属性值-th:attr
<!--设置单个的值-->
<form action="subscribe.html" th:attr="action=@{/subscribe}">
  <fieldset>
    <input type="text" name="email" />
    <input type="submit" value="Subscribe!" th:attr="value=#{subscribe.submit}"/>
  </fieldset>
</form>

<!--设置多个的值-->
<img src="../../images/gtvglogo.png"  th:attr="src=@{/images/gtvglogo.png},title=#{logo},alt=#{logo}" />

<!--以上两个的代替写法-->
<input type="submit" value="Subscribe!" th:value="#{subscribe.submit}"/>
<form action="subscribe.html" th:action="@{/subscribe}">
10. 迭代
<tr th:each="prod : ${prods}">
        <td th:text="${prod.name}">Onions</td>
        <td th:text="${prod.price}">2.41</td>
        <td th:text="${prod.inStock}? #{true} : #{false}">yes</td>
</tr>

<tr th:each="prod,iterStat : ${prods}" th:class="${iterStat.odd}? 'odd'">
  <td th:text="${prod.name}">Onions</td>
  <td th:text="${prod.price}">2.41</td>
  <td th:text="${prod.inStock}? #{true} : #{false}">yes</td>
</tr>
11.条件运算
<a href="comments.html"
th:href="@{/product/comments(prodId=${prod.id})}"
th:if="${not #lists.isEmpty(prod.comments)}">view</a>

<div th:switch="${user.role}">
  <p th:case="'admin'">User is an administrator</p>
  <p th:case="#{roles.manager}">User is a manager</p>
  <p th:case="*">User is some other thing</p>
</div>
12.属性优先级: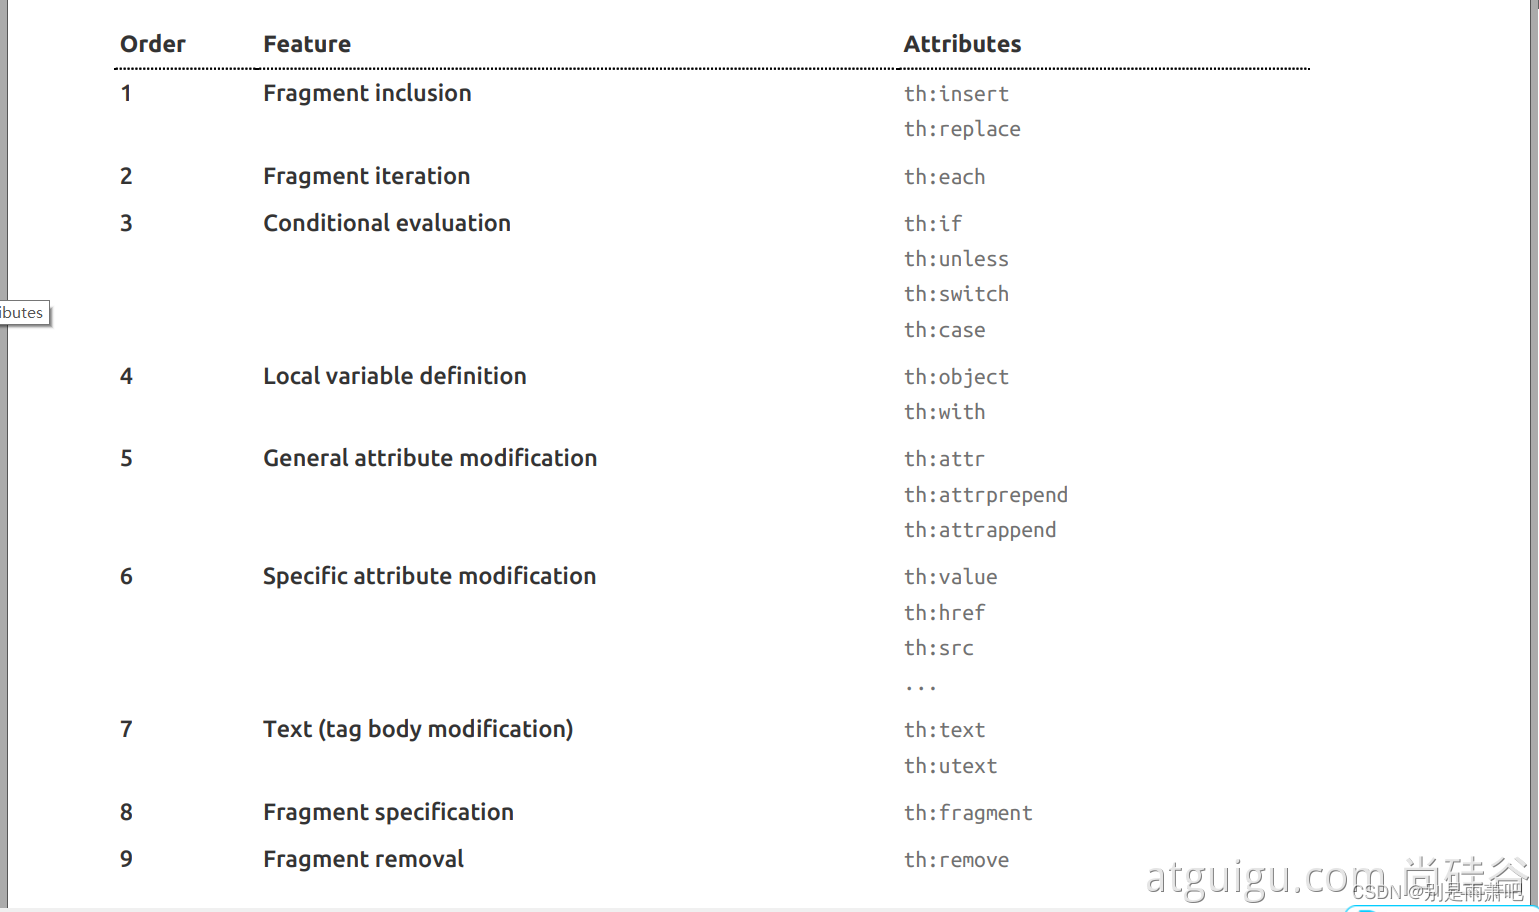 thymeleaf使用:
1.导包
        <!--引入第三方页面渲染引擎-->
        <dependency>
            <groupId>org.springframework.boot</groupId>
            <artifactId>spring-boot-starter-thymeleaf</artifactId>
        </dependency>
2.SpringBoot已经把这个自动配置了
1、所有thymeleaf的配置值都在 ThymeleafProperties
2、配置好了 SpringTemplateEngine
3、配好了 ThymeleafViewResolver
4、我们只需要直接开发页面
@Configuration(proxyBeanMethods = false)
@EnableConfigurationProperties(ThymeleafProperties.class)
@ConditionalOnClass({ TemplateMode.class, SpringTemplateEngine.class })
@AutoConfigureAfter({ WebMvcAutoConfiguration.class, WebFluxAutoConfiguration.class })
public class ThymeleafAutoConfiguration { }


public static final String DEFAULT_PREFIX = "classpath:/templates/";//默认路径
public static final String DEFAULT_SUFFIX = ".html";  //xxx.html,这是默认的文件后缀
3.举个例子
<!DOCTYPE html>
<html lang="en" xmlns:th="http://www.thymeleaf.org"><!--要加这个命名空间-->
<head>
    <meta charset="UTF-8">
    <title>Title</title>
</head>
<body>
<h1 th:text="${message}">嗨嗨嗨</h1>
<a href="www.atguigu.com" th:href="${link}">去百度</a>
</body>
</html>
package com.example.webdemo.controller;
import org.springframework.stereotype.Controller;
import org.springframework.ui.Model;
import org.springframework.web.bind.annotation.RequestMapping;
@Controller
public class ViewTestController {
//复杂参数
@RequestMapping("/atguigu")
public Object getCar(Model model){
model.addAttribute("message","你好呀萧炽凛");
model.addAttribute("link","www.atguigu.com");
return "success";//有前缀有后缀,所以我们直接写名字就好了
}
}(1)整合Thymeleaf后台管理系统

6.拦截器


 1321
1321


 被折叠的 条评论
为什么被折叠?
被折叠的 条评论
为什么被折叠?
 到【灌水乐园】发言


