


一、Thread的run与start方法
class MyThread extends Thread{

    @Override
    public void run() {
        System.out.println("hello word");
    }
}

MyThread thread = new MyThread();
thread.start();
run方法内为线程所要执行的任务,直接调用thread.run(),只是串行的执行,而没有以多线程的方式来执行。
调用start方法JVM会自动调用run方法,并以多线程的方式来执行,但start方法只能执行一次。
对于start与run方法来说是模板设计模式的一种体现。
1、模板设计模式
什么是模板设计模式 ?即由父类负责整体的逻辑结构,而子类则负责逻辑的实现细节,以下是一个简单的示例:
public class Template {

    public final void print(String message){
        System.out.println("=============");
        printTask(message);
        System.out.println("========");
    }

    protected void printTask(String message){
        //你要做的事
    }


    public static void main(String[] args) {
        Template template = new Template() {
            @Override
            protected void printTask(String message) {
                System.out.println("打印信息:" +message);
            }
        };

        template.print("1998-12-17");
    }

}


结果:

=============
打印信息:1998-12-17
========
print方法类似于Thread的start方法,而printTask则类似于run方法,这样做的好处是,程序结构由父类控制,并且是final修饰的,不允许被重写,子类只需要实现想要的逻辑任务即可
2、start与run模板设计模式的体现
2.1 start ()
public synchronized void start() {
    /**
         * This method is not invoked for the main method thread or "system"
         * group threads created/set up by the VM. Any new functionality added
         * to this method in the future may have to also be added to the VM.
         *
         * A zero status value corresponds to state "NEW".
         */
    if (threadStatus != 0)
        throw new IllegalThreadStateException();

    /* Notify the group that this thread is about to be started
         * so that it can be added to the group's list of threads
         * and the group's unstarted count can be decremented. */
    group.add(this);

    boolean started = false;
    try {
        start0();
        started = true;
    } finally {
        try {
            if (!started) {
                group.threadStartFailed(this);
            }
        } catch (Throwable ignore) {
            /* do nothing. If start0 threw a Throwable then
                  it will be passed up the call stack */
        }
    }
}
执行流程:
在线程开始时,会调用start方法 -----> JNI的satrt0方法 -----> run方法 。
知识要点:
Thread被构造后的NEW(新建)状态,事实上threadStatus这个内部属性为0。
不能两次启动Thread,否则就会出现IllegalThreadStateException异常。
线程启动后将会被加入到一个ThreadGroup中,后文中我们将详细介绍ThreadGroup。
一个线程生命周期结束,也就是到了TERMINATED(终止)状态,再次调用start方法是不允许的,也就是说TERMINATED(终止)状态是没有办法回到RUNNABLE(可运行)状态的。
2.2 run()
@Override
public void run() {
    if (target != null) {
        target.run(); //此处的target为传入的是Runnable对象,如果你没有传入那么就是null了
    }
}
Thread的run和start就是一个比较典型的模板设计模式,父类编写逻辑结构结构代码,子类实现逻辑细节。
二、创建线程的方式
创建线程只有一种方式那就是构造Thread类,而实现线程的执行单元(即run方法)则有两种方式。
第一种是重写Thread的run方法,第二种是实现Runnable接口的run方法,并且将Runnable实例用作构造Thread的参数。
1、继承Thread类
class MyThread extends Thread{

    @Override
    public void run() {
        System.out.println("hello word");
    }
}

MyThread thread = new MyThread();
thread.start();
2、实现Runnable接口
Runnable runnable = new Runnable() {
     @Override
     public void run() {
       System.out.println("t2:传入参数的Runnable接口重写方法");
     }
};

Thread t2 = new Thread(runnable);
t2.start();
此处是重写Runnable接口的run方法,将这个Runnale接口的实现类作为参数创建Thread对象。
内部执行流程为:将Runnable接口实现类对象赋值给内部的target属性,target调用run方法。
3、两者比较实现Runnable接口的好处
避免了java的单继承的局限性
多个线程可以共享同一个接口实现类的对象,非常适用于处理同一份资源的情况。
4、关于线程池与Callable接口
关于网上很多说线程池与(Callable接口、FutureTask)也是创建线程的方式,我自己之前也是这样认为的,不过现在可能有点偏差。
线程池确实可以创建线程,但最终也是以Runnable接口作为参数来创建Thread。
而Callable接口、FutureTask,单单的凭借这两个类,线程都创建不了,还是要依靠Thread类来创建线程。
因此创建线程只有一种方式,而实现线程的执行单元有两种方法:重写Thread的run方法、实现Runnable接口的run方法,并且将Runnable实例用作构造Thread的参数。
4.1 线程池创建
对于线程池中线程的创建是通过ThreadFactory的newThread方法来创建的,而Executors中提供了一个默认实现DefaultThreadFactory,代码如下:
private static class DefaultThreadFactory implements ThreadFactory {
        private static final AtomicInteger poolNumber = new AtomicInteger(1);
        private final ThreadGroup group;
        private final AtomicInteger threadNumber = new AtomicInteger(1);
        private final String namePrefix;

        DefaultThreadFactory() {
            SecurityManager s = System.getSecurityManager();
            group = (s != null) ? s.getThreadGroup() :
                                  Thread.currentThread().getThreadGroup();
            namePrefix = "pool-" +
                          poolNumber.getAndIncrement() +
                         "-thread-";
        }

        public Thread newThread(Runnable r) {
            Thread t = new Thread(group, r,
                                  namePrefix + threadNumber.getAndIncrement(),
                                  0);
            if (t.isDaemon())
                t.setDaemon(false);
            if (t.getPriority() != Thread.NORM_PRIORITY)
                t.setPriority(Thread.NORM_PRIORITY);
            return t;
        }
    }
通过上面代码发现它会把传递过来的Runnable的参数,作为Thread的参数来创建线程。
4.2 Callable与FutureTask
一个单纯的Callable没鸟用,需要配合FutureTask来使用,即便是配合线程池来使用,其内部也是通过创建FutureTask的方式。
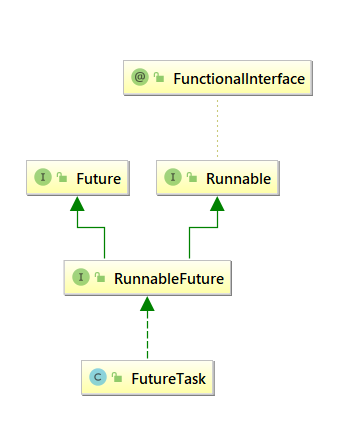
我们发现FutureTask实现了Runnable接口,以下是其run方法的实现:
public void run() {
        if (state != NEW ||
            !RUNNER.compareAndSet(this, null, Thread.currentThread()))
            return;
        try {
            Callable<V> c = callable;
            if (c != null && state == NEW) {
                V result;
                boolean ran;
                try {
                    result = c.call(); //此处调用的就是你实现Callable接口的call方法
                    ran = true;
                } catch (Throwable ex) {
                    result = null;
                    ran = false;
                    setException(ex);
                }
                if (ran)
                    set(result);
            }
        } finally {
            // runner must be non-null until state is settled to
            // prevent concurrent calls to run()
            runner = null;
            // state must be re-read after nulling runner to prevent
            // leaked interrupts
            int s = state;
            if (s >= INTERRUPTING)
                handlePossibleCancellationInterrupt(s);
        }
    }
分析:
FutureTask实现了Runnable接口的run()方法,在重写的run方法内部会调用你传入的Callable接口的实现类的call方法,如果你需要以多线程的方式执行的话,要么将FutureTask对象作为Thread参数(实现了Runnable接口)来创建Thread再调用start方法,要么使用线程池,尽管最后依旧是一样的。
整个大概的调用链:
thread的start()方法 -> -----> JNI的satrt0方法 -----> futureTask的run方法 —> callable的call方法
参考:
汪文君:Java高并发编程详解


 690
690


 被折叠的 条评论
为什么被折叠?
被折叠的 条评论
为什么被折叠?
 到【灌水乐园】发言


