


一、前言
- 不像
Flutter / swiftUI那样,UIimageView并没有现成的 - 这里介绍两种为
UIImageView内图片设置边距的方法均为自定义方法
二、方案
- 包括两种方案
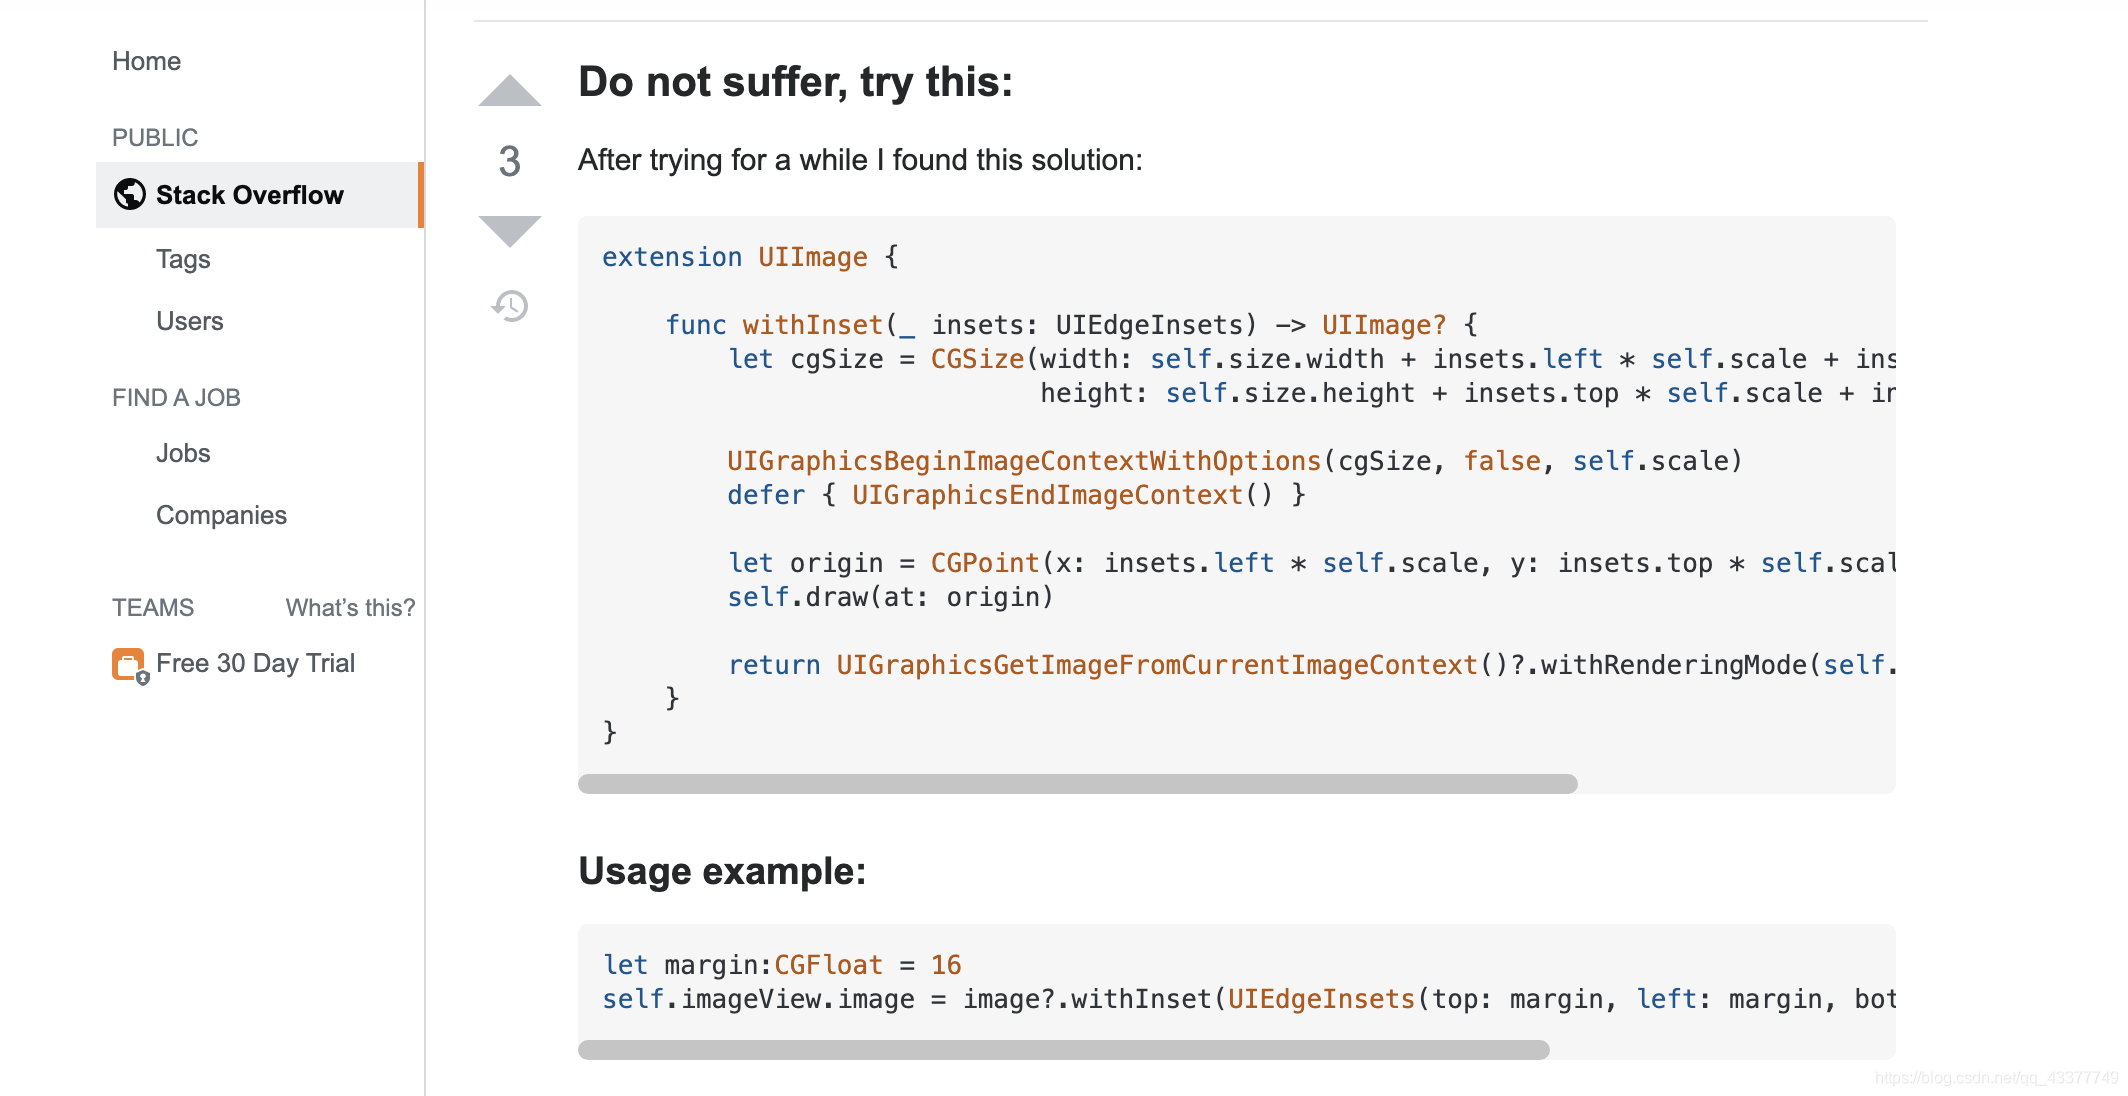
- 第一种:借鉴
stackoverflow上大佬提出的 - 第二种:我自己优化的
2.1 设置 UIImage 大小
- 先设置
UIImage的大小,再将其放入UIImageView内 - 设置
contentMode为center居中便可有padding效果
    func imageWithImage(image: UIImage, scaledToSize: CGSize) -> UIImage? {
        //UIGraphicsBeginImageContext(newSize);
        // In next line, pass 0.0 to use the current device's pixel scaling factor (and thus account for Retina resolution).
        // Pass 1.0 to force exact pixel size.
        let radio = image.size.width / image.size.height
        UIGraphicsBeginImageContextWithOptions(scaledToSize, false, 0.0)
        image.draw(in: CGRect(x: 0, y: 0, width: scaledToSize.width * radio, height: scaledToSize.height))
        let newImage = UIGraphicsGetImageFromCurrentImageContext()
        UIGraphicsEndImageContext()
        return newImage
    }
原文链接:https://stackoverflow.com/questions/32304349/insets-to-uiimageview
2.2 方案一使用
- 在设置
UIImageView.image是调用即可
xxxUIImageView.image = imageWithImage(image: UIImage(named: "six")!, scaledToSize: CGSize(width: 18, height: 18))
xxxUIImageView.contentMode = .center
2.3 对 UIImageView 类新增拓展方法
- 该方法是对 stackoverflow 方案的改良版,不需要提前给定图片大小
- 通过设置内边距的大小,就可以自动适应、调整
- 设置上更为方便,同时能自动兼容各种图像
extension UIImageView {

    /// 使用前请先设置 UIImageView.contentMode = .center
    func padding(_ all: CGFloat) {
        guard let image = self.image else {
            print("this image is nil when padding")
            return
        }
        let originSize = self.frame.size
        var scaledToSize: CGSize = .zero
        if image.size.width > image.size.height {
            let radio = image.size.height / image.size.width
            scaledToSize = CGSize(width: originSize.width - all * 2, height: (originSize.height - all * 2) * radio)
        } else {
            let radio = image.size.width / image.size.height
            scaledToSize = CGSize(width: (originSize.width - all * 2) * radio, height: originSize.height - all * 2)
        }
        UIGraphicsBeginImageContextWithOptions(scaledToSize, false, 0.0)
        image.draw(in: CGRect(x: 0, y: 0, width: scaledToSize.width, height: scaledToSize.height))
        let newImage = UIGraphicsGetImageFromCurrentImageContext()
        UIGraphicsEndImageContext()
        self.image = newImage
    }

}
这个方法我没有经过系统的测试,如果有问题欢迎在评论区给我留言改进 👏
2.4 方案二使用
- 分两步走,可以在
config时直接设置 - 如果你的
UIImageView会不断的变化,那么可以把padding移到layoutSubviews中调用,以便同步视图刷新
config:实例化时
	xxxUIImageView.contentMode = .center
	xxxUIImageView.image = UIImage(named: "enter your picture name")

layoutSubviews:刷新 image
	xxxUIImageView.padding(3)
三、总结
- 我在 GitHub 新建了一个仓库,正在为大家整理 iOS 学习笔记,欢迎大家 star 支持:https://github.com/Knowledge-Precipitation-Tribe/ios_notes
- 如果大家有更好的方案,欢迎在评论区分享,我会更新到本文中 👏
- 欢迎大家点赞或者关注支持,因为这是我持续输出的最大动力~


 3184
3184

 被折叠的 条评论
为什么被折叠?
被折叠的 条评论
为什么被折叠?
 到【灌水乐园】发言


