


MySQL主从复制和读写分离
0x00准备环境
| master服务器 | rlave服务器 | amoeba服务器 |
|---|---|---|
| 192.168.12.134 | 192.168.12.135 | 192.168.12.136 |
0x01主从复制
master服务器上对数据库有操作会写入到二进制日志中,save服务器通过/0线程将master上的二进制日志读取过来写入到中继日志
中,从而同步数据
1、master和slave的时间得保持一致
-
让两台服务器的时间和网络时间一致
# 下载ntp
yum -y install ntp

# 同步时间
ntpdate time.windows.com
2、master配置
vim /etc/my.cnf
# 末尾添加
server-id = 11
log_bin = master-bin
log-slave-updates = true

# 重启数据库
systemctl restart mysqld
# 添加授权
grant replication slave on *.* to 'slave'@'192.168.88.129' identified by 'Woniuxy.123';

# 刷新授权
flush privileges;

# 查看master状态
show master status;
+-------------------+----------+--------------+------------------+-------------------+
| File              | Position | Binlog_Do_DB | Binlog_Ignore_DB | Executed_Gtid_Set |
+-------------------+----------+--------------+------------------+-------------------+
| master-bin.000003 |     1559 |              |                  |                   |
+-------------------+----------+--------------+------------------+-------------------+
3、slave配置
vim /etc/my.cnf
# 末尾添加
server-id = 22
relay-log = relay-log-bin
relay-log-index = slave-relay-bin.index

# 重启mysqld
systemctl restart mysqld
# 登录数据库,配置同步
change master to master_host='192.168.12.134',master_user='slave',master_password='Woniu.123',master_log_file='master-bin.000003',master_log_pos=1559;

# 开启slave
start slave;
# 查看slave状态
show slave status\G;
*************************** 1. row ***************************
               Slave_IO_State: Waiting for master to send event
                  Master_Host: 192.168.12.134
                  Master_User: slave
                  Master_Port: 3306
                Connect_Retry: 60
              Master_Log_File: master-bin.000003
          Read_Master_Log_Pos: 1730
               Relay_Log_File: relay-log-bin.000002
                Relay_Log_Pos: 492
        Relay_Master_Log_File: master-bin.000003
             Slave_IO_Running: Yes
            Slave_SQL_Running: Yes
              Replicate_Do_DB:
          Replicate_Ignore_DB:
           Replicate_Do_Table:
       Replicate_Ignore_Table:
      Replicate_Wild_Do_Table:
  Replicate_Wild_Ignore_Table:
                   Last_Errno: 0
                   Last_Error:
                 Skip_Counter: 0
          Exec_Master_Log_Pos: 1730
              Relay_Log_Space: 697
              Until_Condition: None
               Until_Log_File:
                Until_Log_Pos: 0
           Master_SSL_Allowed: No
           Master_SSL_CA_File:
           Master_SSL_CA_Path:
              Master_SSL_Cert:
            Master_SSL_Cipher:
               Master_SSL_Key:
        Seconds_Behind_Master: 0
Master_SSL_Verify_Server_Cert: No
                Last_IO_Errno: 0
                Last_IO_Error:
               Last_SQL_Errno: 0
               Last_SQL_Error:
  Replicate_Ignore_Server_Ids:
             Master_Server_Id: 11
                  Master_UUID: 0ffe0a95-65b9-11ed-9c82-000c29d7b6fc
             Master_Info_File: /var/lib/mysql/master.info
                    SQL_Delay: 0
          SQL_Remaining_Delay: NULL
      Slave_SQL_Running_State: Slave has read all relay log; waiting for more updates
           Master_Retry_Count: 86400
                  Master_Bind:
      Last_IO_Error_Timestamp:
     Last_SQL_Error_Timestamp:
               Master_SSL_Crl:
           Master_SSL_Crlpath:
           Retrieved_Gtid_Set:
            Executed_Gtid_Set:
                Auto_Position: 0
         Replicate_Rewrite_DB:
                 Channel_Name:
           Master_TLS_Version:
1 row in set (0.00 sec)

ERROR:
No query specified


#Slave_IO_Running: Yes
#Slave_SQL_Running: Yes
#这两个值均为Yes
0x02读写分离
1、准备安装包
jdk:
amoeba:
2、jdk安装
# 为jdk添加权限
chmod +x jdk-6u14-linux-x64.bin

# 执行jdk
./jdk-6u14-linux-x64.bin

# 查看目录,发现已经生成一个jdk1.6.0_14文件夹
# 将文件夹移动到/usr/local/jdk1.6
mv jdk1.6.0_14/ /usr/local/jdk1.6

# 配置环境变量
vim /etc/profile

# 在末尾添加环境变量
export JAVA_HOME=/usr/local/jdk1.6
export CLASSPATH=$JAVA_HOME/lib:$JAVA_HOME/lib/tools.jar:$JAVA_HOME/lib/dt.jar
export PATH=$PATH:$JAVA_HOME/bin

# 应用
source /etc/profile

# 测试
java -version
3、安装amoeba
# 创建目录
mkdir amoeba

# 将amoeba-mysql-binary-2.2.0.tar.gz解压到目录中
tar zxf amoeba-mysql-binary-2.2.0.tar.gz -C amoeba

# 移动amoeba到/usr/local/下
mv amoeba /usr/local/

# 配置环境变量
vim /etc/profile

# 在末尾添加环境变量
export AMOEBA_HOME=/usr/local/amoeba
export PATH=$PATH:$JAVA_HOME/bin:$AMOEBA_HOME/bin

# 应用
source /etc/profile

# 启动amoeba
amoeba start
效果为
[root@CentOS7-3 ~]# amoeba start
log4j:WARN log4j config load completed from file:/usr/local/amoeba/conf/log4j.xml
2022-11-28 21:12:31,752 INFO  context.MysqlRuntimeContext - Amoeba for Mysql current versoin=5.1.45-mysql-amoeba-proxy-2.2.0
log4j:WARN ip access config load completed from file:/usr/local/amoeba/conf/access_list.conf
2022-11-28 21:12:31,927 INFO  net.ServerableConnectionManager - Amoeba for Mysql listening on 0.0.0.0/0.0.0.0:8066.
2022-11-28 21:12:31,928 INFO  net.ServerableConnectionManager - Amoeba Monitor Server listening on /127.0.0.1:3920.
4、在master服务器添加授权用户
grant all on *.* to 'test'@'192.168.12.136' identified by 'Woniu.123';
5、配置amoeba
# 配置amoeba.xml
vim /usr/local/amoeba/conf/amoeba.xml

# 设置用户名密码
30				<property name="user">amoeba</property>
32				<property name="password">woniu.123</property>
115				<property name="defaultPool">master</property>
118             <property name="writePool">master</property>
119             <property name="readPool">slaves</property>

# 配置dbServers.xml
vim /usr/local/amoeba/conf/dbServers.xml

19              <!-- mysql port -->
20              <property name="port">3306</property>

22              <!-- mysql schema -->
23              <property name="schema">mysql</property>

25              <!-- mysql user -->
26              <property name="user">test</property>

28              <!--  mysql password    -->
29              <property name="password">Woniu.123</property>

45         		<dbServer name="master"  parent="abstractServer">
48              <property name="ipAddress">192.168.12.134</property>

52         		<dbServer name="slave1"  parent="abstractServer">
55              <property name="ipAddress">192.168.12.135</property>

59         		<dbServer name="slaves" virtual="true">
65              <property name="poolNames">slave1</property>

# 启动amoeba
amoeba start
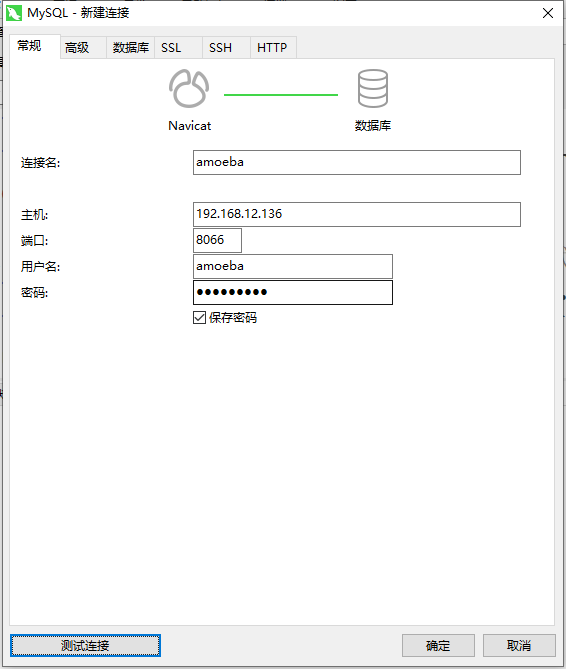
6、navicat连接


 287
287


 被折叠的 条评论
为什么被折叠?
被折叠的 条评论
为什么被折叠?
 到【灌水乐园】发言


