


一、前言
自己在阿里云安装mysql过程中,运用网上的yum方法总会出现这样那样的问题,所以结合网上搜索到的资料,写一篇用rpm包进行下载mysql服务的博客
二、卸载系统中的mysql
首先运行:
rpm -qa|grep -i mysql
会显示安装的mysql各软件包
mysql57-community-release-el7-8.noarch
mysql-community-server-5.7.25-1.el7.x86_64
mysql-community-common-5.7.25-1.el7.x86_64
mysql-community-client-5.7.25-1.el7.x86_64
mysql-community-libs-5.7.25-1.el7.x86_64
再利用 rpm -e --nodeps 命令一个一个删除
rpm -e --nodeps mysql57-community-release-el7-8.noarch
rpm -e --nodeps mysql-community-server-5.7.25-1.el7.x86_64
rpm -e --nodeps mysql-community-common-5.7.25-1.el7.x86_64
rpm -e --nodeps mysql-community-client-5.7.25-1.el7.x86_64
rpm -e --nodeps mysql-community-libs-5.7.25-1.el7.x86_64
删除干净后再用以下命令确认已经删除干净
rpm -qa | grep -i mysql
三、在windows中先下载好linux的mysql安装包
官网5.7版本:https://cdn.mysql.com//Downloads/MySQL-5.7/mysql-5.7.29-1.el7.x86_64.rpm-bundle.tar
官网下载很慢,也可以选择其他版本的只要是rpm-bundle.tar的包就好。
下载所需的tar包


之后选择下面的需要下载的版本,因为要直接解压安装,所以我下载的是第一个
大家可以根据自己的版本选择下载
点击下载

用winscp或其他软件将安装包传到阿里云服务器上(一般服务器解压的地址在/usr/local/下,可以新建mysql文件夹,将压缩包放入,然后解压)
cd /usr/local/
mkdir mysql
tar -xvf xxx
使用tar命令解压
tar -xvf mysql-5.7.29-1.el7.x86_64.rpm-bundle.tar
[外链图片转存失败,源站可能有防盗链机制,建议将图片保存下来直接上传(img-O7aeyJlI-1603611057880)(C:\Users\ASUS\AppData\Roaming\Typora\typora-user-images\image-20201025151804465.png)]
安装新版mysql前,需将系统自带的mariadb-lib卸载
rpm -qa|grep mariadb
mariadb-libs-5.5.60-1.el7_5.x86_64
rpm -e --nodeps mariadb-libs-5.5.60-1.el7_5.x86_64
为了避免出现权限问题,给mysql解压文件所在目录赋予最大权限
chmod -R 777 ./mysql
严格按照顺序安装:
mysql-community-common-5.7.29-1.el7.x86_64.rpm
mysql-community-libs-5.7.29-1.el7.x86_64.rpm
mysql-community-client-5.7.29-1.el7.x86_64.rpm
mysql-community-server-5.7.29-1.el7.x86_64.rpm这四个包
其实你不按这个顺序安装也可以,只是你在安装这个包时系统会提醒你首先需要安装这个包的依赖包(另一个rpm包,依赖包就在这几个rpm中),就这样递归的找下去,也可以安装好。
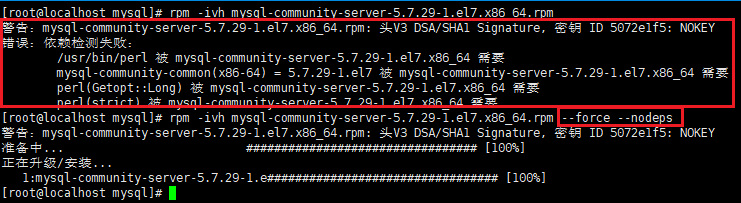
rpm -ivh mysql-community-common-5.7.29-1.el7.x86_64.rpm
rpm -ivh mysql-community-libs-5.7.29-1.el7.x86_64.rpm
rpm -ivh mysql-community-client-5.7.29-1.el7.x86_64.rpm
rpm -ivh mysql-community-server-5.7.29-1.el7.x86_64.rpm
如果安装过程中出现这个错误就在后面添加 --force --nodeps,这可能是由于yum安装了旧版本的GPG keys造成的
四、配置数据库
vim /etc/my.cnf
添加这三行
skip-grant-tables
character_set_server=utf8
init_connect='SET NAMES utf8'
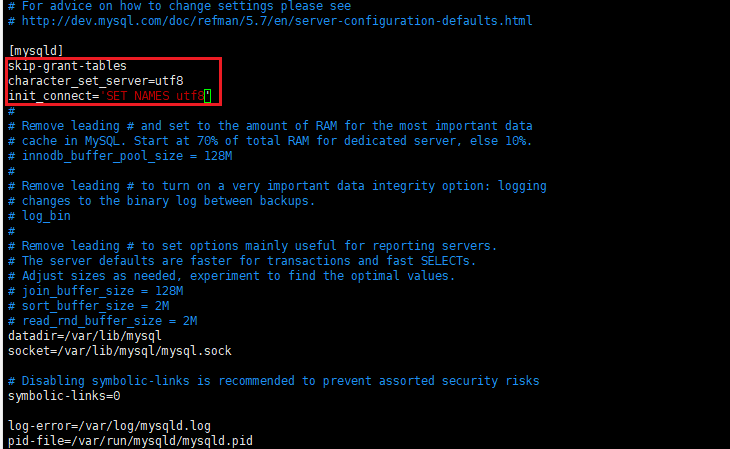
skip-grant-tables:跳过登录验证
character_set_server=utf8:设置默认字符集UTF-8
init_connect=‘SET NAMES utf8’:设置默认字符集UTF-8
启动MySQL服务
设置开机启动
systemctl start mysqld.service
启动mysql
mysql
进入mysql的命令行界面
先设置一个简单的密码
update mysql.user set authentication_string=password('123456') where user='root';

立即生效
flush privileges;
退出mysql并停止mysql服务
systemctl stop mysqld.service
编辑my.cnf配置文件将:skip-grant-tables这一行注释掉
重启mysql服务
systemctl start mysqld.service
再次登录mysql
mysql -uroot -p123456
如果输入其他命令出错,再重设密码
set password=password('123456');
开启远程登陆
grant all privileges on *.* to 'root'@'%' identified by '123123' with grant option;

by后面的就是远程登录密码,远程登录密码可以和用户密码不一样
开放3306端口
firewall-cmd --zone=public --add-port=3306/tcp --permanent
–zone #作用域
–add-port=80/tcp #添加端口,格式为:端口/通讯协议
–permanent #永久生效,没有此参数重启后失效
重启防火墙
firewall-cmd --reload
如果这一步执行完毕后,在你的电脑上依然无法连接到阿里云的mysql服务器,你可以试一试:
1.mysql的服务是否处于运行状态
systemctl status mysql
2.关闭防火墙
五、阿里云服务器配置安全组
a、打开阿里云后台

b、点击配置规则配置

c、配置具体规则

重启服务器
然后测试

六、一些centos下mysql基本操作命令
1、登陆mysql
本地:mysql -u root -p, 回车后输入密码; 也可以p后不加空格,直接加密码。回车就登录了
远程:mysql -h ip -u root -p -P 3306例如:mysql -h 127.0.0.1 -u root -p -P 3306
附:连接mysql出现错误:Can’t connect to local MySQL server through socket '/var/lib/mysql/mysql.soc
1、先通过:service mysqld status 查看mysql是否启动
(没装mysql service 也可通过 /etc/rc.d/init.d/mysqld status查看)
若没启动,则启动mysql:service mysqld start
2、方法: 修改/etc/my.conf:
[mysqld]
datadir=/usr/local/mysql/data
socket=/var/lib/mysql/mysql.sock
[mysql.server]
user=mysql
basedir=/usr/local/mysql
If there is not currently a section called [client], add one at the bottom of the file and copy the socket= line under the [mysqld] section such as:
[client]
socket=/var/lib/mysql/mysql.sock
(注意:红色标记部分文件路径必须相同)
发现依旧如此,运行/etc/init.d/mysql start报错:Starting MySQLCouldn’t find MySQL manager or server
e is not currently a section called [client], add one at the bottom of the file and copy the socket= line under the [mysqld] section such as:
[client]
socket=/var/lib/mysql/mysql.sock
(注意:红色标记部分文件路径必须相同)
发现依旧如此,运行/etc/init.d/mysql start报错:Starting MySQLCouldn’t find MySQL manager or server
是mysqld服务没启,运行/usr/local/mysql/bin/mysqld_safe &


 3414
3414

 被折叠的 条评论
为什么被折叠?
被折叠的 条评论
为什么被折叠?
 到【灌水乐园】发言


