


简介
如果我们使用SpringBoot是挺简单的,因为它就是将很多东西给你封装起来
然后简化给你使用的,
一般的步骤是创建SpringBoot应用,选中我们需要的模块;
然后SpringBoot已经默认将这些场景配置好了,
只需要在配置文件中指定少量配置就可以运行起来
然后就编写自己的业务代码就行了
SpringBoot的自动配置原理,一般是
xxxxAutoConfiguration:帮我们给容器中自动配置组件;
xxxxProperties:配置类来封装配置文件的内容;
SpringBoot对静态资源的映射规则
之前我们都是将自己的静态资源打包在类路径下的webapp文件夹下面,
但是现在SpringBoot快速创建的项目没有这个文件夹
但是SpringBoot有自己的静态资源文件放在哪里有规定
我们找到WebMvcAutoConfiguration这个定义自动配置的规则查看
找到里面的addResourceHandlers方法
public void addResourceHandlers(ResourceHandlerRegistry registry) {
    if (!this.resourceProperties.isAddMappings())
    {
        logger.debug("Default resource handling disabled");
    } else
    {
        Integer cachePeriod = this.resourceProperties.getCachePeriod();
        //所有 /webjars/**
        if (!registry.hasMappingForPattern("/webjars/**")) {
            this.customizeResourceHandlerRegistration(
            //都去 classpath:/META-INF/resources/webjars/ 找资源
            registry.addResourceHandler(new String[]{"/webjars/**"}).
            addResourceLocations(
            new String[]{"classpath:/META-INF/resources/webjars/"}).setCachePeriod(cachePeriod));
        }

        String staticPathPattern = this.mvcProperties.getStaticPathPattern();
        if (!registry.hasMappingForPattern(staticPathPattern))
        {
            this.customizeResourceHandlerRegistration(
            registry.addResourceHandler(
            new String[]{staticPathPattern}).addResourceLocations(
            this.resourceProperties.getStaticLocations()).setCachePeriod(cachePeriod));
        }

    }
}
@ConfigurationProperties(
    prefix = "spring.resources",
    ignoreUnknownFields = false
)
public class ResourceProperties implements ResourceLoaderAware {}
//可以设置和静态资源有关的参数,缓存时间等
1.
	所有 /webjars/** ,都去 classpath:/META-INF/resources/webjars/ 找资源;
	webjars:以jar包的方式引入静态资源;
	具体的可以去官网进行查看https://www.webjars.org/
	里面将常见的框架可以打包成各种各样的方式进行引入
	比如使用pom的方式进行引入,就只需要导入依赖就行了,
	到时候引用的时候的路径是:localhost:8080/webjars/jquery/3.3.1/jquery.js

	<!‐‐引入jquery‐webjar‐‐>在访问的时候只需要写webjars下面资源的名称即可
	<dependency>
		<groupId>org.webjars</groupId>
		<artifactId>jquery</artifactId>
		<version>3.3.1</version>
	</dependency>
webjars导入jquery后里面的结构

2.
	但是如果是想导入自己的静态资源怎么办?
	在下面中有另外一个路径
	String staticPathPattern = this.mvcProperties.getStaticPathPattern();
	里面调用的是this.staticPathPattern = "/**";
	"/**" 访问当前项目的任何资源,都去(静态资源的文件夹)找映射
	对应的资源路径addResourceLocations(this.resourceProperties.getStaticLocations())
	里面对应的方法是:

   private static final String[] SERVLET_RESOURCE_LOCATIONS = new String[]{"/"};
   private static final String[] CLASSPATH_RESOURCE_LOCATIONS = new String[]{"classpath:/META-INF/resources/", "classpath:/resources/", "classpath:/static/", "classpath:/public/"};

   public ResourceProperties()
   {
       this.staticLocations = RESOURCE_LOCATIONS;
       this.addMappings = true;
       this.chain = new ResourceProperties.Chain();
    }

    static
    {
      RESOURCE_LOCATIONS = new String[CLASSPATH_RESOURCE_LOCATIONS.length + SERVLET_RESOURCE_LOCATIONS.length];
      System.arraycopy(SERVLET_RESOURCE_LOCATIONS, 0, RESOURCE_LOCATIONS, 0, SERVLET_RESOURCE_LOCATIONS.length);
      System.arraycopy(CLASSPATH_RESOURCE_LOCATIONS, 0, RESOURCE_LOCATIONS, SERVLET_RESOURCE_LOCATIONS.length, CLASSPATH_RESOURCE_LOCATIONS.length);
    }
所以说对应的路径是:
"classpath:/META‐INF/resources/",
"classpath:/resources/",
"classpath:/static/",
"classpath:/public/"
"/":当前项目的根路径
localhost:8080/a === 去静态资源文件夹里面找a
3.
	在这个自动配置类里面还写了欢迎页的配置

@Bean
public WebMvcAutoConfiguration.WelcomePageHandlerMapping welcomePageHandlerMapping(ResourceProperties resourceProperties)
{
    return new WebMvcAutoConfiguration.WelcomePageHandlerMapping(
    resourceProperties.getWelcomePage(),
    this.mvcProperties.getStaticPathPattern());
}
进入getWelcomePage()方法
publicResource getWelcomePage() {
    String[] var1 = this.getStaticWelcomePageLocations();
    int var2 = var1.length;

    for(int var3 = 0; var3 < var2; ++var3) {
        String location = var1[var3];
        Resource resource = this.resourceLoader.getResource(location);

        try {
            if (resource.exists()) {
                resource.getURL();
                return resource;
            }
        } catch (Exception var7) {
            ;
        }
    }

    return null;
}
进入getStaticWelcomePageLocations()方法
private String[] getStaticWelcomePageLocations() {
   String[] result = new String[this.staticLocations.length];

   for(int i = 0; i < result.length; ++i) {
       String location = this.staticLocations[i];
       if (!location.endsWith("/")) {
           location = location + "/";
       }

       result[i] = location + "index.html";
   }
   return result;
}
而getStaticPathPattern()对应调用就是this.staticPathPattern = "/**";
所以说就是访问静态资源文件夹下的所有index.html页面;被"/**"映射
4.
	图标的映射
	@Configuration
	@ConditionalOnProperty(
	    value = {"spring.mvc.favicon.enabled"},
	    matchIfMissing = true
	)
	public static class FaviconConfiguration {
	    private final ResourceProperties resourceProperties;

	    public FaviconConfiguration(ResourceProperties resourceProperties) {
	        this.resourceProperties = resourceProperties;
	    }

	    @Bean
	    public SimpleUrlHandlerMapping faviconHandlerMapping() {
	        SimpleUrlHandlerMapping mapping = new SimpleUrlHandlerMapping();
	        mapping.setOrder(-2147483647);
	        mapping.setUrlMap(Collections.singletonMap("**/favicon.ico", this.faviconRequestHandler()));
	        return mapping;
	    }

		//这里还是调用了静态文件夹进行路径映射
	    @Bean
	    public ResourceHttpRequestHandler faviconRequestHandler() {
	        ResourceHttpRequestHandler requestHandler = new ResourceHttpRequestHandler();
	        requestHandler.setLocations(this.resourceProperties.getFaviconLocations());
	        return requestHandler;
	    }
	}
5.
	spring.resources.static-locations=classpath:/jane1/,classpath:.jane2/
	//这是在配置文件里面配置静态资源文件夹
模板引擎
什么鬼是模板引擎,其实我们之前学过的jsp就是一个模板引擎,
它的作用就是我们写好了一些html模板,但是里面的数据还没有
数据得需要从数据库里面进行获取,然后模板引擎就是输入模板和数据
模板引擎输出这个显示得html页面给你
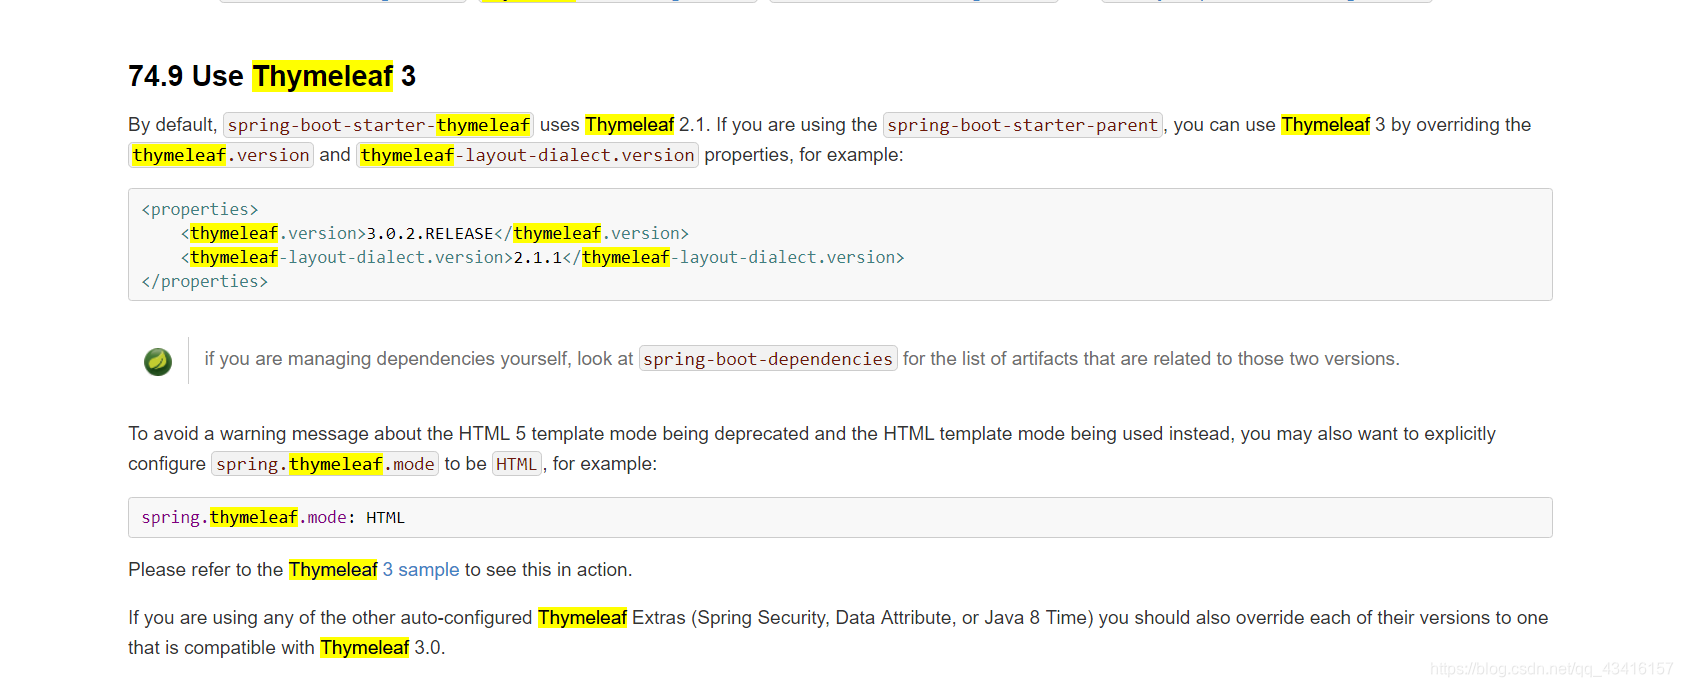
模板引擎有很多,SpringBoot推荐的Thymeleaf;语法更简单,功能更强大;
引入thymeleaf只需要导入相关依赖就行
<!--导入模板引擎-->
<dependency>
	   <groupId>org.springframework.boot</groupId>
	   <artifactId>spring-boot-stater-thymeleaf</artifactId>
</dependency>

而切换thymeleaf的版本,只需要向官网说的改一下就行了
<properties>
	<thymeleaf.version>3.0.9.RELEASE</thymeleaf.version>
	<!‐‐ 布局功能的支持程序 thymeleaf3主程序适配layout2以上版本 ‐‐>
	<!‐‐ thymeleaf2 适配layout1‐‐>
	<thymeleaf-layout-dialect.version>2.2.2</thymeleaf-layout-dialect.version>
</properties>
模板引擎使用
它的使用又得查看自动配置原理里面的规则了

可以看出只要我们把HTML页面放在classpath:/templates/,thymeleaf就能自动渲染;
简单的使用:
控制器
@RequestMapping("/success")
public String success(Map<String,String> map)
{
    map.put("name","jane");
    return "success";
}

HTML编写
<!DOCTYPE html>
<html lang="en"  xmlns:th="http://www.thymeleaf.org">
<head>
    <meta charset="UTF-8">
    <title>成功</title>
</head>
<body>
    <h1>成功了</h1>
    <!‐‐th:text 将标签里面的文本内容设置为取到的值 ‐‐>
    <h1 th:text="${name}">谁成功了?</h1>
</body>
</html>
语法规则

表达式语法:
Simple expressions:(表达式语法)
	Variable Expressions: ${...}:获取变量值;底层是OGNL;
		1)、获取对象的属性、调用方法
		2)、使用内置的基本对象:
				#ctx : the context object.
				#vars: the context variables.
				#locale : the context locale.
				#request : (only in Web Contexts) the HttpServletRequest object.
				#response : (only in Web Contexts) the HttpServletResponse object.
				#session : (only in Web Contexts) the HttpSession object.
				#servletContext : (only in Web Contexts) the ServletContext object.
				${session.foo}
		3)、内置的一些工具对象:
				#execInfo : information about the template being processed.
				#messages : methods for obtaining externalized messages inside variables expressions, in the
				same way as they would be obtained using #{…} syntax.
				#uris : methods for escaping parts of URLs/URIs
				#conversions : methods for executing the configured conversion service (if any).
				#dates : methods for java.util.Date objects: formatting, component extraction, etc.
				#calendars : analogous to #dates , but for java.util.Calendar objects.
				#numbers : methods for formatting numeric objects.
				#strings : methods for String objects: contains, startsWith, prepending/appending, etc.
				#objects : methods for objects in general.
				#bools : methods for boolean evaluation.
				#arrays : methods for arrays.
				#lists : methods for lists.
				#sets : methods for sets.
				#maps : methods for maps.
				#aggregates : methods for creating aggregates on arrays or collections.
				#ids : methods for dealing with id attributes that might be repeated (for example, as a result of an iteration).

	Selection Variable Expressions: *{...}:选择表达式:和${}在功能上是一样;
		补充:配合 th:object="${session.user}:
		<div th:object="${session.user}">
			<p>Name: <span th:text="*{firstName}">Sebastian</span>.</p>
			<p>Surname: <span th:text="*{lastName}">Pepper</span>.</p>
			<p>Nationality: <span th:text="*{nationality}">Saturn</span>.</p>
		</div>

	Message Expressions: #{...}:获取国际化内容

	Link URL Expressions: @{...}:定义URL;
		@{/order/process(execId=${execId},execType='FAST')}

	Fragment Expressions: ~{...}:片段引用表达式
		<div th:insert="~{commons :: main}">...</div>

	Literals(字面量)
		Text literals: 'one text' , 'Another one!' ,…
		Number literals: 0 , 34 , 3.0 , 12.3 ,…
		Boolean literals: true , false
		Null literal: null
		Literal tokens: one , sometext , main ,…

	Text operations:(文本操作)
		String concatenation: +
		Literal substitutions: |The name is ${name}|

	Arithmetic operations:(数学运算)
		Binary operators: + , ‐ , * , / , %
		Minus sign (unary operator): ‐

	Boolean operations:(布尔运算)
		Binary operators: and , or
		Boolean negation (unary operator): ! , not

	Comparisons and equality:(比较运算)
		Comparators: > , < , >= , <= ( gt , lt , ge , le )
		Equality operators: == , != ( eq , ne )

	Conditional operators:条件运算(三元运算符)
		If‐then: (if) ? (then)
		If‐then‐else: (if) ? (then) : (else)
		Default: (value) ?: (defaultvalue)

	Special tokens:(特殊操作)
		No‐Operation: _
例子
@RequestMapping("/success")
public String success(Map<String, Object> map)
{
    map.put("hello", "<h1>你好</h1>");
    map.put("users", Arrays.asList("zhangsan", "lisi", "wangwu"));
    return "success";
}
HTML
<div th:text="${hello}"></div><!--这样会在浏览器显示<h1>你好</h1>-->
<div th:utext="${hello}"></div><!--这样会在浏览器显示h1样式的你好-->

<!-- th:each每次遍历都会生成当前这个标签: 3个h4 -->
<h4 th:text="${user}" th:each="user:${users}"></h4>

<!--显示3个span-->
<h4>
    <span th:each="user:${users}"> [[${user}]] </span>
</h4>
[[]]和[()]的区别
Note that, while [[...]] corresponds to th:text (i.e. result will be HTML-escaped),
 [(...)] corresponds to th:utext and will not perform any HTML-escaping.
 So with a variable such as msg = 'This is <b>great!</b>', given this fragment:
自动配置的SpringMVC
springMVC自动配置
27.1.1 Spring MVC auto-configuration

SpringBoot提供了大多数SpringMVC的场景应用
Spring Boot provides auto-configuration for Spring MVC that works well with most applications.

下面是SpringBoot对SpringMVC的默认配置
The auto-configuration adds the following features on top of Spring’s defaults:

自动配置了ViewResolver(视图解析器:根据方法的返回值得到视图对象(View),
		视图对象决定如何渲染(转发?重定向?))
	ContentNegotiatingViewResolver:组合所有的视图解析器的
	如何定制:我们可以自己给容器中添加一个视图解析器;自动的将其组合进来;
Inclusion of ContentNegotiatingViewResolver and BeanNameViewResolver beans.

下面是支持静态资源文件夹路径和webjars的
Support for serving static resources, including support for WebJars (see below).

自动注册了Converter, GenericConverter, Formatter 组件
	Converter(转换器) :比如要将页面送过来的字符串18转换成整数18
	Formatter (格式化器):比如将2020.12.12转换成日期的格式类型
	    @Bean
        @ConditionalOnProperty(
            prefix = "spring.mvc",
            name = {"date-format"}
        )
        public Formatter<Date> dateFormatter() {
            return new DateFormatter(this.mvcProperties.getDateFormat());
        }
        //只要你在文件中配置了日期格式化格则,就会给日期添加日期格式化组件
        后面的 public void addFormatters(FormatterRegistry registry) 方法
        说明自己添加的格式化器转换器,转换器,我们只需要放在容器中即可
        因为它是从容器里面进行注册添加的
        public void addFormatters(FormatterRegistry registry) {
            Iterator var2 = this.getBeansOfType(Converter.class).iterator();

            while(var2.hasNext()) {
                Converter<?, ?> converter = (Converter)var2.next();
                registry.addConverter(converter);
            }

            var2 = this.getBeansOfType(GenericConverter.class).iterator();

            while(var2.hasNext()) {
                GenericConverter converter = (GenericConverter)var2.next();
                registry.addConverter(converter);
            }

            var2 = this.getBeansOfType(Formatter.class).iterator();

            while(var2.hasNext()) {
                Formatter<?> formatter = (Formatter)var2.next();
                registry.addFormatter(formatter);
            }

        }
Automatic registration of Converter, GenericConverter, Formatter beans.

支持HttpMessageConverters,SpringMVC用来转换Http请求和响应的,
	比如返回的person类对象,想用json来写出去,就可以使用HttpMessageConverters
Support for HttpMessageConverters (see below).

定义错误代码生成规则
Automatic registration of MessageCodesResolver (see below).

静态首页
Static index.html support.

用户图标
Custom Favicon support (see below).

又有一个ConfigurableWebBindingInitializer 组件
Automatic use of a ConfigurableWebBindingInitializer bean (see below).


如果你想保持SpringBoot对MVC的特性,但是你又想添加额外的MVC配置
(拦截器、格式化程序、视图控制器等)。
您可以添加您自己的WebMvcConfigurerAdapter类型的@ConfigurerAdapter,
但不需要@EnableWebMvc。
如果希望提供RequestMappingHandlermap、RequestMappingHandlerAdapter
或ExceptionHandlerExceptionResolver的自定义实例,
则可以声明提供此类组件的WebMvcRegistrationsAdapter实例。
If you want to keep Spring Boot MVC features,
and you just want to add additional MVC configuration
(interceptors, formatters, view controllers etc.)
you can add your own @Configuration class of type WebMvcConfigurerAdapter,
but without @EnableWebMvc.
If you wish to provide custom instances of RequestMappingHandlerMapping,
RequestMappingHandlerAdapter or ExceptionHandlerExceptionResolver
you can declare a WebMvcRegistrationsAdapter instance providing such components.

如果您想完全控制SpringMVC,可以添加自己的@Configuration配置类(里面带有@EnableWebMvc注释)。
If you want to take complete control of Spring MVC,
you can add your own @Configuration annotated with @EnableWebMvc.
ContentNegotiatingViewResolver和BeanNameViewResolver
WebMvcAutoConfiguration里面增加的bean
可以看出里面首先new了一个ContentNegotiatingViewResolver对象
@Bean
@ConditionalOnBean({ViewResolver.class})
@ConditionalOnMissingBean(
    name = {"viewResolver"},
    value = {ContentNegotiatingViewResolver.class}
)
public ContentNegotiatingViewResolver viewResolver(BeanFactory beanFactory) {
    ContentNegotiatingViewResolver resolver = new ContentNegotiatingViewResolver();
    resolver.setContentNegotiationManager((ContentNegotiationManager)beanFactory.getBean(ContentNegotiationManager.class));
    resolver.setOrder(-2147483648);
    return resolver;
}
ContentNegotiatingViewResolver里面的resolveViewName
可以看出首先是得到所有的视图对象candidateViews
然后选择最好的视图对象getBestView,然后返回回去
public View resolveViewName(String viewName, Locale locale) throws Exception {
     RequestAttributes attrs = RequestContextHolder.getRequestAttributes();
     Assert.state(attrs instanceof ServletRequestAttributes, "No current ServletRequestAttributes");
     List<MediaType> requestedMediaTypes = this.getMediaTypes(((ServletRequestAttributes)attrs).getRequest());
     if (requestedMediaTypes != null) {
         List<View> candidateViews = this.getCandidateViews(viewName, locale, requestedMediaTypes);
         View bestView = this.getBestView(candidateViews, requestedMediaTypes, attrs);
         if (bestView != null) {
             return bestView;
         }
     }

     if (this.useNotAcceptableStatusCode) {
         if (this.logger.isDebugEnabled()) {
             this.logger.debug("No acceptable view found; returning 406 (Not Acceptable) status code");
         }

         return NOT_ACCEPTABLE_VIEW;
     } else {
         this.logger.debug("No acceptable view found; returning null");
         return null;
     }
 }
ContentNegotiatingViewResolver里面的getCandidateViews()获取所有的视图对象
首先是获取所有的视图解释器,然后挨个进行解析
    private List<View> getCandidateViews(String viewName, Locale locale, List<MediaType> requestedMediaTypes) throws Exception {
        List<View> candidateViews = new ArrayList();
        Iterator var5 = this.viewResolvers.iterator();

        while(var5.hasNext()) {
            ViewResolver viewResolver = (ViewResolver)var5.next();
            View view = viewResolver.resolveViewName(viewName, locale);
            if (view != null) {
                candidateViews.add(view);
            }

            Iterator var8 = requestedMediaTypes.iterator();

            while(var8.hasNext()) {
                MediaType requestedMediaType = (MediaType)var8.next();
                List<String> extensions = this.contentNegotiationManager.resolveFileExtensions(requestedMediaType);
                Iterator var11 = extensions.iterator();

                while(var11.hasNext()) {
                    String extension = (String)var11.next();
                    String viewNameWithExtension = viewName + '.' + extension;
                    view = viewResolver.resolveViewName(viewNameWithExtension, locale);
                    if (view != null) {
                        candidateViews.add(view);
                    }
                }
            }
        }

        if (!CollectionUtils.isEmpty(this.defaultViews)) {
            candidateViews.addAll(this.defaultViews);
        }

        return candidateViews;
    }
ContentNegotiatingViewResolver里面的initServletContext
可以看出
Collection<ViewResolver> matchingBeans =
BeanFactoryUtils.beansOfTypeIncludingAncestors(
this.getApplicationContext(), ViewResolver.class).values();
里面的视图解释器是直接从容器里面拿的
所以我们可以自己给容器中添加一个视图解析器;ContentNegotiatingViewResolver自动的将其组合进来;
protected void initServletContext(ServletContext servletContext) {
     Collection<ViewResolver> matchingBeans = BeanFactoryUtils.beansOfTypeIncludingAncestors(this.getApplicationContext(), ViewResolver.class).values();
     if (this.viewResolvers == null) {
         this.viewResolvers = new ArrayList(matchingBeans.size());
         Iterator var3 = matchingBeans.iterator();

         while(var3.hasNext()) {
             ViewResolver viewResolver = (ViewResolver)var3.next();
             if (this != viewResolver) {
                 this.viewResolvers.add(viewResolver);
             }
         }
     } else {
         for(int i = 0; i < this.viewResolvers.size(); ++i) {
             if (!matchingBeans.contains(this.viewResolvers.get(i))) {
                 String name = ((ViewResolver)this.viewResolvers.get(i)).getClass().getName() + i;
                 this.getApplicationContext().getAutowireCapableBeanFactory().initializeBean(this.viewResolvers.get(i), name);
             }
         }
     }

     if (this.viewResolvers.isEmpty()) {
         this.logger.warn("Did not find any ViewResolvers to delegate to; please configure them using the 'viewResolvers' property on the ContentNegotiatingViewResolver");
     }

     AnnotationAwareOrderComparator.sort(this.viewResolvers);
     this.cnmFactoryBean.setServletContext(servletContext);
 }
HttpMessageConverters
HttpMessageConverters是在一个内部类里面
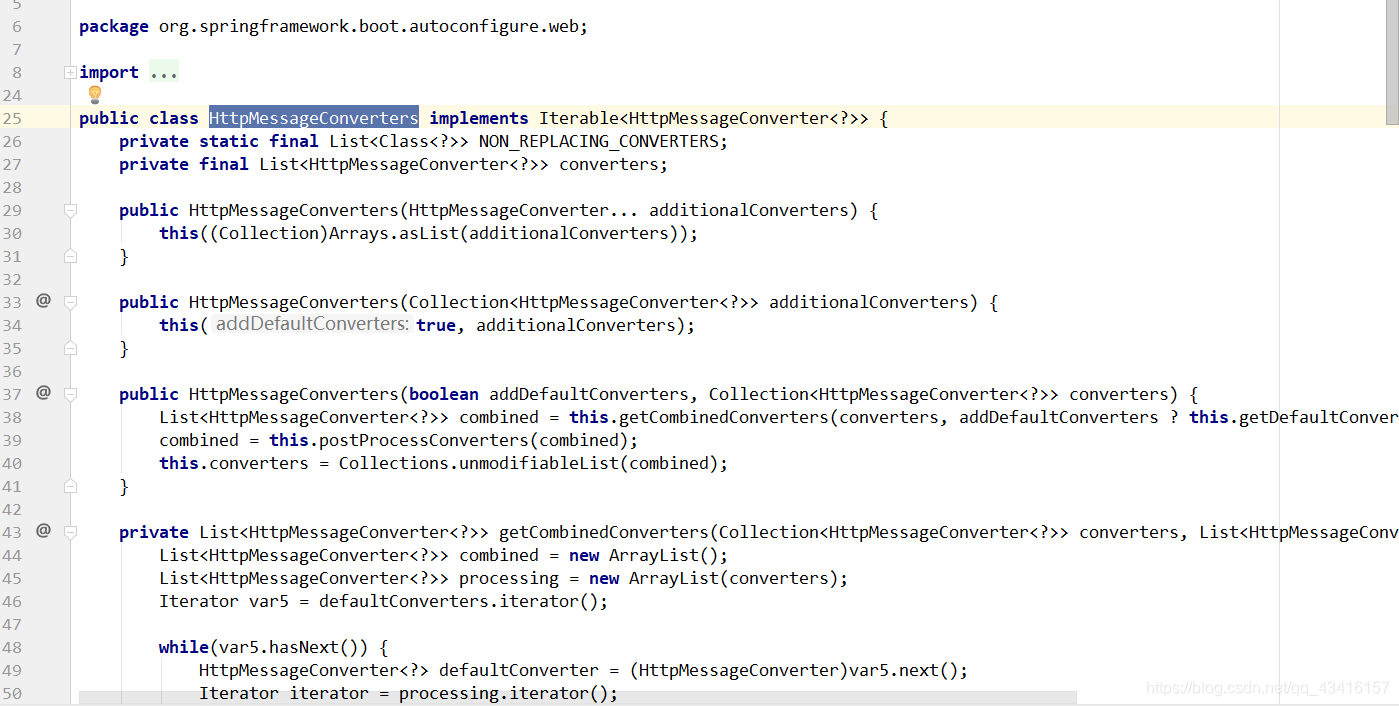
里面都是有参构造器,所有的参数都是从容器里面获取
HttpMessageConverters 是从容器中确定;获取所有的HttpMessageConverter;
如果想自己给容器中添加HttpMessageConverter,
只需要将自己的组件注册容器中(@Bean,@Component)
ConfigurableWebBindingInitializer
WebMvcAutoConfiguration里面的getConfigurableWebBindingInitializer()
可以看出首先是从容器里面拿,如果拿不到就调用父类的
getConfigurableWebBindingInitializer()
所以我们可以配置一个ConfigurableWebBindingInitializer来替换默认的;(直接添加到容器中就行)
protected ConfigurableWebBindingInitializer getConfigurableWebBindingInitializer() {
   try {
       return (ConfigurableWebBindingInitializer)this.beanFactory.getBean(ConfigurableWebBindingInitializer.class);
   } catch (NoSuchBeanDefinitionException var2) {
       return super.getConfigurableWebBindingInitializer();
   }
}
WebMvcConfigurationSupport的getConfigurableWebBindingInitializer()
/**
 * Return the {@link ConfigurableWebBindingInitializer} to use for
 * initializing all {@link WebDataBinder} instances.
 */
protected ConfigurableWebBindingInitializer getConfigurableWebBindingInitializer() {
	ConfigurableWebBindingInitializer initializer = new ConfigurableWebBindingInitializer();
	initializer.setConversionService(mvcConversionService());
	initializer.setValidator(mvcValidator());
	initializer.setMessageCodesResolver(getMessageCodesResolver());
	return initializer;
}
添加额外SpringMVC配置
比如上面官网解释的,我们想添加(interceptors, formatters, view controllers)
那么我们得先编写一个配置类(@Configuration),
是WebMvcConfigurerAdapter类型;而且不能标注@EnableWebMvc;
这样既保留了所有的自动配置,也能使用到我们的扩展的配置
package jane.test.jane.config;

import org.springframework.context.annotation.Configuration;
import org.springframework.web.servlet.config.annotation.ViewControllerRegistry;
import org.springframework.web.servlet.config.annotation.WebMvcConfigurerAdapter;

/**
 * @author jane
 * @create 2021-01-06 13:45
 */
//使用WebMvcConfigurerAdapter可以来扩展SpringMVC的功能
@Configuration
public class MyConfig extends WebMvcConfigurerAdapter
{
    @Override
    public void addViewControllers(ViewControllerRegistry registry)
    {
        //super.addViewControllers(registry);
        //这样就会将/jane的请求,请求来到success页面
        registry.addViewController("/jane").setViewName("success");
    }
}
原理
为什么能这样呢?
还是得来到WebMvcAutoConfiguration这个类里面,
里面有一个这样的类
@Configuration
@Import(EnableWebMvcConfiguration.class)
@EnableConfigurationProperties({ WebMvcProperties.class, ResourceProperties.class })
public static class WebMvcAutoConfigurationAdapter extends WebMvcConfigurerAdapter {
@Import(EnableWebMvcConfiguration.class)
会导入EnableWebMvcConfiguration这个类

@Configuration
public static class EnableWebMvcConfiguration extends DelegatingWebMvcConfiguration
{
	//它的父类DelegatingWebMvcConfiguration有个方法
	private final WebMvcConfigurerComposite configurers = new WebMvcConfigurerComposite();

	//从容器中获取所有的WebMvcConfigurer
	@Autowired(required = false)
	public void setConfigurers(List<WebMvcConfigurer> configurers) {
		if (!CollectionUtils.isEmpty(configurers)) {
			this.configurers.addWebMvcConfigurers(configurers);
		}
	}
}
然后后面调用的方法是:
@Override
protected void addViewControllers(ViewControllerRegistry registry) {
	this.configurers.addViewControllers(registry);
}
进入里面查看
//一个参考实现;将所有的WebMvcConfigurer相关配置都来一起调用;
@Override
public void addViewControllers(ViewControllerRegistry registry) {
	for (WebMvcConfigurer delegate : this.delegates) {
		delegate.addViewControllers(registry);
	}
}
所以容器中所有的WebMvcConfigurer都会一起起作用;
我们的配置类也会被调用;
效果:SpringMVC的自动配置和我们的扩展配置都会起作用;
全面接管SpringMVC配置
这个效果就类似之前写SSM框架的时候,刚刚将SpringMVC框架整合进去
我们啥都没配置
SpringBoot对SpringMVC的自动配置不需要了,
所有都是我们自己配置;所有的SpringMVC的自动配置都失效了
我们需要在配置类中添加@EnableWebMvc即可;
原理
进去@EnableWebMvc
@Retention(RetentionPolicy.RUNTIME)
@Target(ElementType.TYPE)
@Documented
@Import(DelegatingWebMvcConfiguration.class)
public @interface EnableWebMvc {
}
里面导入了DelegatingWebMvcConfiguration,进去
@Configuration
public class DelegatingWebMvcConfiguration extends WebMvcConfigurationSupport {
DelegatingWebMvcConfiguration 和WebMvcConfigurationSupport
就是SpringBoot帮我们整合的基本的逻辑
现在又回到WebMvcAutoConfiguration
里面有个生效条件@ConditionalOnMissingBean(WebMvcConfigurationSupport.class)
当容器没有WebMvcConfigurationSupport这个的时候才生效
@Configuration
@ConditionalOnWebApplication
@ConditionalOnClass({ Servlet.class, DispatcherServlet.class,
		WebMvcConfigurerAdapter.class })
@ConditionalOnMissingBean(WebMvcConfigurationSupport.class)
@AutoConfigureOrder(Ordered.HIGHEST_PRECEDENCE + 10)
@AutoConfigureAfter({ DispatcherServletAutoConfiguration.class,
		ValidationAutoConfiguration.class })
public class WebMvcAutoConfiguration {
总结
SpringBoot在自动配置很多组件的时候,
先看容器中有没有用户自己配置的(@Bean、@Component)
如果有就用用户配置的,如果没有,才自动配置;
如果有些组件可以有多个(ViewResolver)将用户配置的和自己默认的组合起来;

在SpringBoot中会有非常多的xxxConfigurer帮助我们进行扩展配置

在SpringBoot中会有很多的xxxCustomizer帮助我们进行定制配置


 474
474


 被折叠的 条评论
为什么被折叠?
被折叠的 条评论
为什么被折叠?
 到【灌水乐园】发言


