


声明:本App仅用于学习,禁止用于一切商业用途。
之前复习了一下Android的基础知识,自己又没有完全开发过一个能用的App,都是写一些小Demo。于是就想写一个简单的App来巩固自己的知识。于是SpecialDay就诞生了。

一、需求分析
作为一款倒计时的App,最主要的功能就是用户添加提醒事件,然后在App主页面向用户展示事件的剩余天数。
并且有一些事件属于是每年重复或每月重复的事件,用户在添加事件的时候可以选择重复类型。App需要调整重复事件的事件。
对于已有的事件用户也可以进行修改和删除。
二、实现
1.数据库设计
一个事件应该至少有标题,类型(方便后续可分类查看), 日期,重复类型的属性,所以数据库设计如下
| 列名 | 类型 | 注释 |
|---|---|---|
| id | integer | 主键,自增 |
| title | text | 标题 |
| type | integer | 事件类型,对应于type表格 |
| event_date | date | 事件日期 |
| repeat | integer | 重复类型,0-不重复,1-每年重复,2-每月重复 |
同时需要一个type表格存储事件类型
| 列名 | 类型 | 注释 |
|---|---|---|
| id | integer | 主键 |
| name | text | 类型名称 |
2.界面设计
2.1 主页面
在主页面里,需要展示的是标题栏和事件列表。
标题栏用一个RelativeLayout实现即可,这里排列的是三张图片,源于网络。而事件列表的展示我选用了RecyclerView。
<?xml version="1.0" encoding="utf-8"?>
<RelativeLayout xmlns:android="http://schemas.android.com/apk/res/android"
    xmlns:app="http://schemas.android.com/apk/res-auto"
    android:orientation="vertical"
    xmlns:tools="http://schemas.android.com/tools"
    android:layout_width="match_parent"
    android:layout_height="match_parent"
    tools:context=".MainActivity">

    <RelativeLayout
        android:id="@+id/main_menu"
        android:layout_width="match_parent"
        android:layout_height="60dp"
        tools:ignore="UselessParent"
        android:gravity="center">

        <ImageView
            android:id="@+id/setting"
            android:layout_width="25dp"
            android:layout_height="25dp"
            android:src="@drawable/setting"
            android:layout_gravity="center_vertical"
            android:background="@color/white"/>

        <ImageView
            android:id="@+id/title"
            android:layout_width="150dp"
            android:layout_height="30dp"
            android:layout_gravity="center_vertical"
            android:layout_marginLeft="50dp"
            android:layout_marginStart="50dp"
            android:src="@drawable/title"
            android:layout_toEndOf="@id/setting"
            android:layout_toRightOf="@id/setting" />


        <ImageView
            android:id="@+id/add"
            android:layout_width="25dp"
            android:layout_height="25dp"
            android:layout_gravity="center_vertical"
            android:layout_marginLeft="50dp"
            android:layout_marginStart="50dp"
            android:src="@drawable/add"
            android:layout_toRightOf="@id/title"
            android:layout_toEndOf="@id/title"
            />
    </RelativeLayout>

    <androidx.recyclerview.widget.RecyclerView
        android:id="@+id/rv_content"
        android:layout_width="match_parent"
        android:layout_height="wrap_content"
        android:layout_below="@id/main_menu">

    </androidx.recyclerview.widget.RecyclerView>

</RelativeLayout>
而RecyclerView具体的item也是用RelativeLayout和LinearLayout搭配使用实现布局。
<?xml version="1.0" encoding="utf-8"?>
<LinearLayout xmlns:android="http://schemas.android.com/apk/res/android"
android:layout_width="wrap_content"
android:orientation="horizontal"
android:paddingTop="10dp"
android:layout_height="wrap_content">
<ImageView
android:id="@+id/iv_icon"
android:layout_width="25dp"
android:layout_height="25dp"
android:layout_marginTop="15dp"
android:layout_marginLeft="15dp"
android:layout_marginStart="15dp"
android:layout_marginBottom="15dp"
android:src="@drawable/calendar"/>
<LinearLayout
android:layout_width="match_parent"
android:layout_height="55dp"
android:orientation="vertical">
<RelativeLayout
android:layout_width="match_parent"
android:layout_height="50dp"
android:gravity="center_vertical"
>
<LinearLayout
android:id="@+id/date_layout"
android:layout_width="150dp"
android:layout_height="match_parent"
android:orientation="vertical">
<TextView
android:id="@+id/tv_title"
android:layout_width="match_parent"
android:layout_height="30dp"
android:text="123"
android:textSize="20sp"
android:textColor="@color/black"
android:gravity="center_vertical"
android:paddingLeft="10dp"/>
<TextView
android:id="@+id/tv_date"
android:layout_width="match_parent"
android:layout_height="20dp"
android:text="2021-01-04"
android:textSize="15sp"
android:paddingLeft="10dp"/>
</LinearLayout>
<TextView
android:id="@+id/tv_countDown"
android:layout_width="180dp"
android:layout_height="match_parent"
android:paddingRight="10dp"
android:paddingTop="5dp"
android:text="就在今天"
android:textSize="20dp"
android:gravity="end"
android:paddingVertical="10dp"
android:textColor="#3FBFBF"
android:layout_toRightOf="@id/date_layout"
android:layout_toEndOf="@id/date_layout"/>
</RelativeLayout>
<View
android:layout_width="match_parent"
android:layout_height="1dp"
android:layout_marginTop="4dp"
android:layout_marginLeft="5dp"
android:background="#000000"
android:layout_marginStart="5dp" />
</LinearLayout>
</LinearLayout>这样主页面的布局就完成了。
2.2 添加事件页面
先看一下效果。
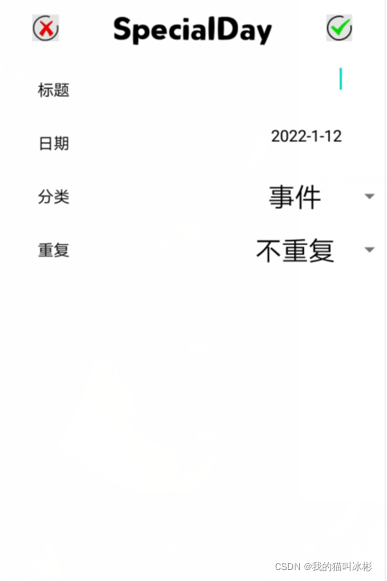
同样是通过RelativeLayout和LinearLayout就能实现这个布局。
<?xml version="1.0" encoding="utf-8"?>
<LinearLayout xmlns:android="http://schemas.android.com/apk/res/android"
android:orientation="vertical"
xmlns:tools="http://schemas.android.com/tools"
android:layout_width="match_parent"
android:layout_height="match_parent"
tools:context=".AddEventActivity">
<RelativeLayout
android:layout_width="match_parent"
android:layout_height="60dp"
android:gravity="center"
tools:ignore="UselessParent">
<ImageView
android:id="@+id/icon_return"
android:layout_width="25dp"
android:layout_height="25dp"
android:src="@drawable/icon_return"
android:layout_gravity="center_vertical"
android:background="@color/white"/>
<ImageView
android:id="@+id/title"
android:layout_width="150dp"
android:layout_height="30dp"
android:layout_gravity="center_vertical"
android:layout_marginLeft="50dp"
android:layout_marginStart="50dp"
android:src="@drawable/title"
android:layout_toRightOf="@id/icon_return"
android:layout_toEndOf="@id/icon_return"/>
<ImageView
android:id="@+id/submit"
android:layout_width="25dp"
android:layout_height="25dp"
android:layout_gravity="center_vertical"
android:layout_marginLeft="50dp"
android:layout_marginStart="50dp"
android:src="@drawable/submit"
android:layout_toRightOf="@id/title"
android:layout_toEndOf="@id/title"
/>
</RelativeLayout>
<LinearLayout
android:layout_width="match_parent"
android:layout_height="50dp"
>
<TextView
android:layout_width="80dp"
android:layout_height="match_parent"
android:layout_marginLeft="10dp"
android:text="标题"
android:textSize="15sp"
android:gravity="center"
android:textColor="@color/black"/>
<EditText
android:id="@+id/add_et_title"
android:layout_width="match_parent"
android:layout_height="match_parent"
android:background="@null"
android:layout_marginRight="40dp"
android:layout_marginEnd="40dp"
android:gravity="end"
android:maxLines="1"
android:maxLength="15"
android:layout_marginTop="5dp"
android:textSize="15sp"
/>
</LinearLayout>
<LinearLayout
android:layout_width="match_parent"
android:layout_height="50dp">
<TextView
android:layout_width="80dp"
android:layout_height="match_parent"
android:layout_marginLeft="10dp"
android:text="日期"
android:textSize="15sp"
android:gravity="center"
android:textColor="@color/black"/>
<TextView
android:id="@+id/add_tv_date"
android:layout_width="match_parent"
android:layout_height="match_parent"
android:background="@null"
android:layout_marginRight="40dp"
android:layout_marginEnd="40dp"
android:gravity="end"
android:maxLines="1"
android:textSize="15sp"
android:paddingTop="8dp"
android:text="2022-1-4"
android:textColor="@color/black"
/>
</LinearLayout>
<LinearLayout
android:layout_width="match_parent"
android:layout_height="50dp">
<TextView
android:layout_width="80dp"
android:layout_height="match_parent"
android:layout_marginLeft="10dp"
android:text="分类"
android:textSize="15sp"
android:gravity="center"
android:textColor="@color/black"/>
<Spinner
android:id="@+id/select_type"
android:layout_width="140dp"
android:layout_height="match_parent"
android:layout_marginLeft="140dp"
android:layout_marginStart="140dp"
android:layout_gravity="center_vertical"/>
</LinearLayout>
<LinearLayout
android:orientation="horizontal"
android:layout_width="match_parent"
android:layout_height="50dp">
<TextView
android:layout_width="80dp"
android:layout_height="match_parent"
android:layout_marginLeft="10dp"
android:text="重复"
android:textSize="15sp"
android:gravity="center"
android:textColor="@color/black"/>
<Spinner
android:id="@+id/select_repeat"
android:layout_marginLeft="140dp"
android:layout_width="140dp"
android:layout_height="match_parent"
android:layout_gravity="center_vertical"
android:layout_marginStart="140dp" />
</LinearLayout>
</LinearLayout>3.具体实现
3.1 EventItemAdapter
RecyclerView需要Adapter去填充数据,这里Adapter主要做的事情就是把数据绑定到UI控件上去。
class EventItemAdapter(private val list: List<EventItem>) : RecyclerView.Adapter<EventItemAdapter.ItemViewHolder>() {
inner class ItemViewHolder(view: View) : RecyclerView.ViewHolder(view) {
val icon: ImageView = view.findViewById(R.id.iv_icon)
val title: TextView = view.findViewById(R.id.tv_title)
val date: TextView = view.findViewById(R.id.tv_date)
val countDown: TextView = view.findViewById(R.id.tv_countDown)
}
override fun onCreateViewHolder(parent: ViewGroup, viewType: Int): ItemViewHolder {
val view = LayoutInflater.from(parent.context)
.inflate(R.layout.special_day_item, parent, false)
return ItemViewHolder(view)
}
@SuppressLint("SetTextI18n", "SimpleDateFormat")
override fun onBindViewHolder(holder: ItemViewHolder, position: Int) {
val event = list[position]
holder.title.text = event.title
holder.date.text = event.date
val day = DateUtil.getCountDown(event.date)
if (day > 0) {
holder.countDown.text = "还有 $day 天"
holder.countDown.setTextColor(android.graphics.Color.BLUE)
} else if (day == 0) {
holder.countDown.text = "就在今天!"
} else if (day < -365){
holder.countDown.text = "已经过了 ${abs(day/365)} 年"
holder.countDown.setTextColor(android.graphics.Color.RED)
} else {
holder.countDown.text = "已经过了 ${abs(day)} 天"
holder.countDown.setTextColor(android.graphics.Color.RED)
}
}
override fun getItemCount(): Int = list.size
}其中需要用到一个工具类去计算目标时间和系统时间相差的天数。由于用毫秒相减的方式对于需求来说并不适合,这里计算的方法是硬算有多少天。
   @SuppressLint("SimpleDateFormat")
    fun getCountDown(date: String): Int {
        val nowYear = getYear()
        val nowDay = getDayOfYear()
        val target = Calendar.getInstance()
        val ft = SimpleDateFormat("yyyy-MM-dd")
        val targetDate:Date?
        try {
            targetDate = ft.parse(date)!!
        }catch (e: ParseException) {
            e.printStackTrace()
            return 0
        }
        target.time = targetDate
        val targetYear = target.get(Calendar.YEAR)
        val targetDay = target.get(Calendar.DAY_OF_YEAR)
        if (nowYear == targetYear) {
            return targetDay - nowDay
        } else if (targetYear < nowYear) {
            return (targetYear - nowYear) * 365
        } else {
            var days = 0
            for (i in nowYear..targetYear) {
                if (i == nowYear) {
                    days += if(GregorianCalendar().isLeapYear(nowYear)) {
                        365 - nowDay
                    } else {
                        366 - nowDay
                    }
                } else if (i == targetYear) {
                    days += targetDay
                } else {
                    days += if(GregorianCalendar().isLeapYear(i)) {
                        365
                    } else {
                        366
                    }
                }
            }
            return days
        }
    }
3.2 MainActivity
这是整个app的主界面。他要做的工作如下(这里其实应该使用MVVM的方式,但是因为还没有深入了解过MVVM框架,这些事暂时由Activity完成):
-
在启动app的时候,判断一下是否有需要修改的事件日期。比如昨天的一个事件是每月重复,就需要先更新。
-
然后去数据库里读取数据,把数据传递给Adapter。
-
给控件添加点击事件
class MainActivity : AppCompatActivity() , View.OnClickListener{
var width: Int = 0
lateinit var myHelper: MyDatabaseHelper
private val databaseName = "specialDay.db"
private lateinit var db: SQLiteDatabase
override fun onCreate(savedInstanceState: Bundle?) {
super.onCreate(savedInstanceState)
supportRequestWindowFeature(Window.FEATURE_NO_TITLE)
setContentView(R.layout.activity_main)
setting.setOnClickListener(this)
add.setOnClickListener(this)
width = DeviceUtils.getScreenWidth(this)
myHelper = MyDatabaseHelper(this, databaseName, 1)
db = myHelper.writableDatabase
checkRepeat()
initContent()
}
override fun onClick(v: View) {
when (v.id) {
R.id.setting -> {
val sql = "delete from event"
db.execSQL(sql)
Toast.makeText(this, "11111", Toast.LENGTH_SHORT).show()
Log.d("MainActivity", width.toString())
}
R.id.add -> {
val intent = Intent(this, AddEventActivity::class.java)
startActivity(intent)
finish()
}
}
}
private fun initContent() {
val fakeData = getData()
Log.d("MainActivity", fakeData.size.toString())
val adapter = EventItemAdapter(fakeData)
val manager = LinearLayoutManager(this)
rv_content.layoutManager = manager
rv_content.adapter = adapter
}
@SuppressLint("SimpleDateFormat")
private fun getData(): List<EventItem>{
val sql = "select * from event order by event_date"
val cursor = db.rawQuery(sql, null)
val expired = ArrayList<EventItem>()
val unExpired = ArrayList<EventItem>()
val ft = SimpleDateFormat("yyyy-MM-dd")
if (cursor.moveToFirst()) {
val calendar = Calendar.getInstance()
do {
val id = cursor.getInt(0)
val title = cursor.getString(1)
val type = cursor.getInt(2)
val date = cursor.getString(3)
val time = ft.parse(date)!!
calendar.time = time
val repeat = cursor.getInt(4)
val year = calendar.get(Calendar.YEAR)
val day = calendar.get(Calendar.DAY_OF_YEAR)
if (year < DateUtil.getYear() ||
(year == DateUtil.getYear() && day < DateUtil.getDayOfYear())) {
expired.add(0, EventItem(id, title, type, date, repeat))
} else {
unExpired.add(EventItem(id, title, type, date, repeat))
}
}while (cursor.moveToNext())
}
cursor.close()
return unExpired + expired
}
@SuppressLint("SimpleDateFormat")
private fun checkRepeat() {
val nowDate = "${DateUtil.getYear()}-${DateUtil.getMonth()}-${DateUtil.getDayOfMonth()}"
val sql = "select * from event where event_date < ? and repeat != 0"
val db = myHelper.writableDatabase
val cursor = db.rawQuery(sql, arrayOf(nowDate))
if (cursor.moveToFirst()) {
val calendar = Calendar.getInstance()
val ft = SimpleDateFormat("yyyy-MM-dd")
do {
val id = cursor.getInt(0)
val repeat = cursor.getInt(4)
Log.d("MainActivity", repeat.toString())
val date = cursor.getString(3)
Log.d("MainActivity", "date: $date")
Log.d("MainActivity", "id: $id")
val time = ft.parse(date)!!
calendar.time = time
var year = calendar.get(Calendar.YEAR)
var month = calendar.get(Calendar.MONTH) + 1
val day = calendar.get(Calendar.DAY_OF_MONTH)
if (repeat == 1) {
year += 1
} else if (repeat == 2) {
month += 1
Log.d("MainActivity", "月份+1")
}
val newDate = "$year-$month-$day"
Log.d("MainActivity", "newDate $newDate")
val updateSql = "update event set event_date = ? where id = ?"
db.execSQL(updateSql, arrayOf(newDate, id))
} while (cursor.moveToNext())
}
cursor.close()
}3.3 AddEventActivity
添加事件方面,有选择日期和选择类型、是否重复的选项。
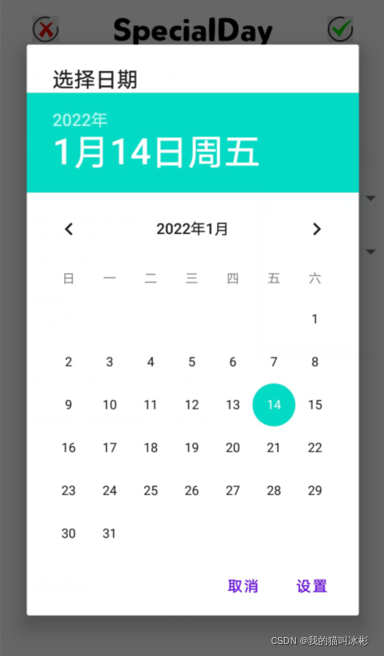
3.3.1 选择日期
选择日期主要用到了DatePicker控件,然后利用AlertDialog弹出一个对话框的形式,效果如下:
首先,我们要先获取当前系统时间,用全局变量存储。
    private fun initDateTime() {
        year = DateUtil.getYear()
        month = DateUtil.getMonth()
        day = DateUtil.getDayOfMonth()
    }
然后添加点击事件弹出对话框。
 private fun chooseDate() {
        val dateStr = StringBuffer()
        val dialogView = View.inflate(this, R.layout.dialog_date, null)
        val datePicker: DatePicker = dialogView.findViewById(R.id.datePicker)!!
        datePicker.init(year, month - 1, day, this)
        AlertDialog.Builder(this).apply {
            setPositiveButton("设置") {dialog, _ ->
                mDate = dateStr.append(year.toString()).append("-")
                    .append(month.toString()).append("-").append(day.toString()).toString()
                add_tv_date.text = mDate
                dialog.dismiss()
            }
            setNegativeButton("取消") {dialog, _ ->
                dialog.dismiss()
            }
            setTitle("选择日期")
            create()
            setView(dialogView)
            show()
        }
    }
同时还需要实现接口DatePicker.OnDateChangedListener,重写方法onDateChanged
    override fun onDateChanged(view: DatePicker?, year: Int, monthOfYear: Int, dayOfMonth: Int) {
        this.year = year
        this.month = monthOfYear + 1
        this.day = dayOfMonth
    }
3.3.2 选择类型和是否重复
这两个都是用了下拉框Spinner实现。
后续类型应该是从数据库中读取,方便用户自定义类型。不过这里一开始是写死的。在arrays.xml里写死了两个Spinner的数据。
<?xml version="1.0" encoding="utf-8"?>
<resources>
<string-array name="repeat">
<item>不重复</item>
<item>每年</item>
<item>每月</item>
</string-array>
<string-array name="type">
<item>事件</item>
<item>生日</item>
<item>爱情</item>
<item>生活</item>
<item>节日</item>
<item>娱乐</item>
<item>学习</item>
<item>工作</item>
</string-array>
</resources>然后写两个内部类实现接口AdapterView.OnItemSelectedListener来监听选择的内容
inner class RepeatSelectListener: AdapterView.OnItemSelectedListener {
override fun onItemSelected(parent: AdapterView<*>?, view: View?, position: Int, id: Long) {
repeat = position
}
override fun onNothingSelected(parent: AdapterView<*>?) {
repeat = 0
}
}
inner class TypeSelectListener: AdapterView.OnItemSelectedListener {
override fun onItemSelected(parent: AdapterView<*>?, view: View?, position: Int, id: Long) {
mType = position
}
override fun onNothingSelected(parent: AdapterView<*>?) {
mType = 0
}
}三、总结
这篇文章是实现app过程的笔记。
其实整个还有很多的不足。比如可以采用MVVM框架,让Activity的任务不要那么繁重;后续添加又滑删除事件的操作,点击标题可以选择分类进行查看事件等功能。
前面也声明了这只是一个用来巩固知识学习的练手app,如果想要源码的小伙伴可以戳这里:SpecialDay: 一个简单的Android应用。用于记录各种特殊日子。


 被折叠的 条评论
为什么被折叠?
被折叠的 条评论
为什么被折叠?
 到【灌水乐园】发言


