


总结element使用时出现的一些问题和解决办法
- 1.form 下面只有一个 input 时回车键刷新页面
- 2.表格固定列最后一行显示不全
- 3.气泡确认框文档里的confirm事件不生效
- 4.输入框用正则限制但绑定值未更新
- 5.去除type="number"输入框聚焦时的上下箭头
- 6.只校验表单其中一个字段
- 7.弹窗重新打开时表单上次的校验信息未清除
- 8.表头与内容错位
- 9.表单多级数据结构校验问题
- 10.表单同级数组校验问题
- 11.表格跨分页多选
- 12.根据条件高亮行并去除默认hover颜色
- 13.表单不想显示label但又想显示必填星号怎么办
- 14.table 内嵌 input 调用 focus 方法无效
- 15.表格内容超出省略
- 16.el-tree 展开/收起所有节点
- 17.el-popover 位置偏移问题
- 18.el-dialog 的 destroy-on-close 属性设置无效
- 19.el-cascader 选择后需要点击空白处才能关闭
- 20.使用图片查看器
- 21.el-table-column添加v-if后数据位置错乱
- 22.form表单 某一项自定义验证
1.form 下面只有一个 input 时回车键刷新页面
原因是触发了表单默认的提交行为,给el-form 加上@submit.native.prevent就行了。
<el-form inline @submit.native.prevent>
  <el-form-item label="订单号">
    <el-input
      v-model="query.orderNo"
      :placeholder="输入订单号查询"
      clearable
      @keyup.enter.native="enterInput"
    />
  </el-form-item>
</el-form>
2.表格固定列最后一行显示不全

这种情况有时在宽度刚好处于临界值状态时会出现。因为固定列是独立于表格body动态计算高度的,出现了固定列高度小于表格高度所以造成最后一行被遮挡。
// 设置全局
.el-table__fixed-right {
  height: 100% !important;
}
3.气泡确认框文档里的confirm事件不生效
如果你的版本是 2.13.2,记得使用onConfirm、onCancel,其他的版本还是使用 confirm 和 cancel
// 将confirm改为onConfirm
<el-popover @onConfirm="">
</el-popover>
4.输入框用正则限制但绑定值未更新
<el-input
  v-model="form.retailMinOrder"
  placeholder="请输入"
  @keyup.native="form.retailMinOrder=form.retailMinOrder.replace(/[^\d.]/g,'')"
/>
5.去除type="number"输入框聚焦时的上下箭头

/* 设置全局 */
.clear-number-input.el-input::-webkit-outer-spin-button,
.clear-number-input.el-input::-webkit-inner-spin-button {
  margin: 0;
  -webkit-appearance: none !important;
}
.clear-number-input.el-input input[type="number"]::-webkit-outer-spin-button,
.clear-number-input.el-input input[type="number"]::-webkit-inner-spin-button {
  margin: 0;
  -webkit-appearance: none !important;
}
.clear-number-input.el-input {
  -moz-appearance: textfield;
}
.clear-number-input.el-input input[type="number"] {
  -moz-appearance: textfield;
}
<el-input type="number" class="clear-number-input" />
6.只校验表单其中一个字段
在一些用户注册场景中,提交整个表单前有时候我们会做一些单独字段的校验,例如发送手机验证码,发送时我们只需要校验手机号码这个字段,可以这样做:
this.$refs['form'].validateField('mobile', valid => {
  if (valid) {
    // 发送验证码
  }
})
如果需要多个参数,将参数改为数组形式即可。
7.弹窗重新打开时表单上次的校验信息未清除
有人会在open时在$nextTick里重置表单,而我选择在关闭时进行重置。
<el-dialog @close="onClose">
  <el-form ref="form">
  </el-form>
</el-dialog>

// 弹窗关闭时重置表单
onClose() {
  this.$refs['form'].resetFields()
}
8.表头与内容错位
// 全局设置
.el-table--scrollable-y .el-table__body-wrapper {
 overflow-y: overlay !important;
}
9.表单多级数据结构校验问题
<el-form :model="form">
  <el-form-item label="部门" prop="dept"></el-form-item>
  <el-form-item label="姓名" prop="user.name"></el-form-item>
</el-form>
rules: {
  'user.name': [{ required: true, message: '姓名不能为空', trigger: 'blur' }]
}
10.表单同级数组校验问题
有时候表单需要输入区间验证时, 会遇到多重数组校验问题
<div v-for="(item, index) in form.activityRules.discounts" :key="item" class="discounts">
  <el-form-item :prop="`activityRules.discounts[${index}].fullAmount`"
      :rules="[{ required: true, message: '输入不能为空', trigger: 'blur' },
               { validator: (rule,value,callback) => fullAmountValidate(rule,value,callback,item,index), trigger: 'blur' }
              ]" style="margin-bottom:0">
     <span>优惠{{index + 1}}:消费满</span>
  	  <el-input-number :disabled="isEdit" v-model="item.fullAmount" style="width:100px;margin: 0 5px;" :precision="2" :controls="false" :min="0" :max="999999"></el-input-number>元
  </el-form-item>
</div>
methods: {
    fullAmountValidate (rule, value, callback, item, index) {
      // console.log(item, index)
      const object = this.form.activityRules
      const list = []
      object.discounts.forEach((e, i) => {
        if (i !== index) {
          list.push(e.fullAmount)
        }
      })
      if (list.includes(item.fullAmount)) {
        return callback(new Error('优惠冲突,请重新设置'))
      } else {
        return callback()
      }
    },
}
11.表格跨分页多选
看到项目里有小伙伴手动添加代码去处理这个问题,其实根据文档,只需加上row-key和reserve-selection即可。
<el-table row-key="id">
  <el-table-column type="selection" reserve-selection></el-table-column>
</el-table>
12.根据条件高亮行并去除默认hover颜色
<el-table :row-class-name="tableRowClassName">
</el-table>

tableRowClassName({ row }) {
  return row.status === 2 ? 'highlight' : ''
}

// 设置全局
.el-table .highlight {
  background-color: #b6e8fe;
  &:hover > td {
    background-color: initial !important;
  }
  td {
    background-color: initial !important;
  }
}
13.表单不想显示label但又想显示必填星号怎么办
// label给个空格即可
<el-form>
  <el-table>
    <el-table-column label="名称">
      <template>
        <el-form-item label=" ">
           <el-input placeholder="名称不能为空" />
        </el-form-item>
      </template>
    </el-table-column>
  </el-table>
</el-form>
14.table 内嵌 input 调用 focus 方法无效
<el-table>
  <el-table-column label="名称">
    <template>
      <el-input ref="inputRef" />
    </template>
  </el-table-column>
</el-table>

// 无效
this.$refs['inputRef'].focus()
this.$refs['inputRef'][0].focus()
this.$refs['inputRef'].$el.children[0].focus()

// 有效
<el-input id="inputRef" />
document.getElementById('inputRef').focus()
15.表格内容超出省略
看到有小伙伴在代码里自己手动去添加CSS来实现,害,又是一个不看文档的反面例子,其实只要加个show-overflow-tooltip就可以了,还自带tooltip效果,不香吗?
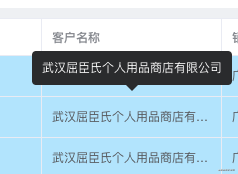
<el-table-column label="客户名称" prop="customerName" show-overflow-tooltip>
</el-table-column>
16.el-tree 展开/收起所有节点
<el-tree ref="tree"></el-tree>

expandTree(expand = true) {
  const nodes = this.$refs['tree'].store._getAllNodes()
  nodes.forEach(node => {
    node.expanded = expand
  })
}
17.el-popover 位置偏移问题
事情起因:el-popover 里的内容是动态获取的,所以刚打开时位置正确,此时内容为空,等到获取数据渲染后 el-popover 内容盒子大小发生变化从而造成位置偏移。
解决办法:通过源码知道 el-popover 里有个 updatePopper 方法用于更新位置(文档里没有),所以我们只需在获取数据后重新 updatePopper 就可以了。
<el-popover ref="popover" placement="left" trigger="click">
</el-popover>
// 获取数据后
this.$nextTick(() => {
  this.$refs['popover'].updatePopper()
})
18.el-dialog 的 destroy-on-close 属性设置无效
destroy-on-close 设置为 true 后发现弹窗关闭后 DOM 元素仍在,没有被销毁。
解决办法:在 el-dialog 上添加 v-if。
<el-dialog :visible.sync="visible" v-if="visible" destroy-on-close>
</el-dialog>
19.el-cascader 选择后需要点击空白处才能关闭
级联选择器在设置为可选任意一级时,选定某个选项时需要手动点击空白处才能关闭。
解决办法:可在 change 事件触发时将其关闭。
<el-cascader
  ref="cascader"
  @change="onChange"
/>
onChange() {
  this.$refs['cascader'].dropDownVisible = false
}
20.使用图片查看器
el-image 组件是自带图片预览功能的,传入 preview-src-list 即可。但有时候我们不用 image 组件但又想预览大图怎么办?例如点击一个按钮时弹出一个图片查看器?
答案是使用 el-image-viewer,文档里并没有这个组件,但通过查看源码知道,该组件正是 el-image 里预览图片所用的
<template>
  <div>
    <el-button @click="open">打开图片预览</el-button>
    <el-image-viewer
      v-if="show"
      :on-close="onClose"
      :url-list="urls"
      :initial-index="initialIndex"
    />
  </div>
</template>

<script>
import ElImageViewer from 'element-ui/packages/image/src/image-viewer'

export default {
  components: {
    ElImageViewer
  },

  data() {
    return {
      show: false,
      urls: ['https://img0.baidu.com/it/u=391928341,1475664833&fm=26&fmt=auto&gp=0.jpg'],
      initialIndex: 0
    }
  },

  methods: {
    open() {
      this.show = true
    },

    onClose() {
      this.show = false
    }
  }
}
</script>
21.el-table-column添加v-if后数据位置错乱
解决:给 el-table-column 添加key区分
<el-table-column v-if="type === 'edit'" key="1"></el-table-column>
<el-table-column v-if="type === 'edit'" key="2"></el-table-column>
22.form表单 某一项自定义验证
rules: {
   tableCnName: [{ required: true, validator: cNameValidate, trigger: 'blur' }],
   tableEnName: [{ required: true, validator: eNameValidate, trigger: 'blur' }],
},
在data里面 return外面定义验证信息
const cNameValidate = (rule, value, callback) => {
      const reg1 = /\s/
      const res1Flag = value.split('').every(item => { return reg1.test(item) === true })
      if (value === '' || res1Flag) {
        callback(new Error('请输入中文名称'))
      } else {
        callback()
      }
}
const eNameValidate = (rule, value, callback) => {
      const reg = /^[a-zA-Z0-9\\-]+$/
      if (!reg.test(value)) {
        callback(new Error('只能输入英文、数字或-'))
      } else if (value === '') {
        callback(new Error('请输入英文简称'))
      } else {
        callback()
      }
 }
this.$refs.form.validate((valid) => {
        if (valid) {
            // 如果返回true  才可以进行下一步保存
        }
})
该文章是引用一位大佬的文章以及我日常遇到一些问题的总结,如果大家还遇到其他问题不能解决的话可以评论留下问题。
以上问题对大家有用的话希望多多点赞支持 日后还会持续更新~
转自 掘金 小学生 study
https://juejin.cn/post/6981083988286767117


 3618
3618


 被折叠的 条评论
为什么被折叠?
被折叠的 条评论
为什么被折叠?
 到【灌水乐园】发言


