


在网上看了几个无缝循环轮播的实现方法,使用方法都比较复杂,所以这里提供一种比较简单的实现方式
gitee: https://gitee.com/philippines-kisses-snow/rotation
结构和理论梳理
理论
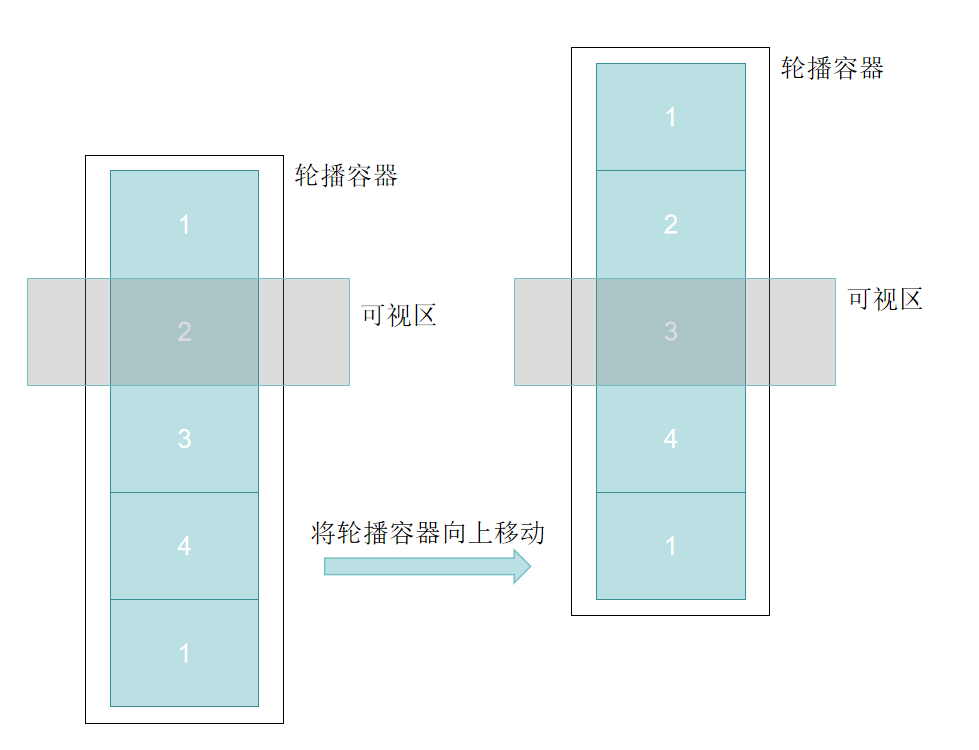
轮播的原理就是通过translateY/translateX移动轮播容器+过渡达到轮播项上下左右轮播效果的,为了达到无缝循环效果,这里在轮播容器的末尾追加第一项内容,如图:【“1”,“2”,“3”,“4”】这四项是我想轮播的内容,此时在容器末尾还追加了“1”,当轮播到“4”时,“4”与“1”之间的切换就达到了无缝效果,在切换到末尾的“1”时,等待过渡结束后取消过渡,立即切换到开头的“1”,这样就达到了将末尾切换到开始的循环
结构
  <div>
    <div>
      <div>1</div>
      <div>2</div>
      <div>3</div>
      <div>4</div>
      <div>1</div>
    </div>
  </div>
上下轮播代码
<template>
  <div style="height: 200px;overflow: hidden;">
    <div class="box" :style="{ transitionDuration: `${transitionDuration}ms`, transform: `translateY( ${translateX}px)`}">
      <div>1</div>
      <div>2</div>
      <div>3</div>
      <div>4</div>
      <div>1</div>
    </div>
  </div>
</template>

<script lang="ts" setup>
import { onMounted, ref } from 'vue';
// 当前滚动高度
const translateX = ref(0)
// 过渡时间
const transitionDuration = ref(500)

// 每次滚动高度
const translateValue = 200
// 滚动项个数
const switeCount = 4

onMounted(() => {
  setInterval(() => {
    translateX.value -= translateValue
    transitionDuration.value = 500
    if(translateX.value === -translateValue * switeCount) {
      setTimeout(() => {
        translateX.value -= translateValue
        transitionDuration.value = 0
        translateX.value = 0
      }, 600)
    }
  }, 2000)
})

</script>

<style scoped>

.box div {
  width: 300px;
  height: 200px;
  background-color: aquamarine;
}
</style>
基于这个理论的轮播表格
<template>
  <div style="width: 800px;" class="table">
    <table style="width: 100%;" border="0" cellpadding="0" cellspacing="0">
      <thead style="background-color: #333F4F;">
        <tr :style="{ height: rowHeight + 'px'}">
          <th style="max-width: 60px;width: 60px;">NO.</th>
          <th style="max-width: 120px;width: 120px;">客户代码</th>
          <th style="max-width: 120px;width: 120px;">客户名称</th>
          <th style="max-width: 120px;width: 120px;">提货人</th>
          <th style="max-width: 120px;width: 120px;">车牌</th>
          <th style="max-width: 120px;width: 120px;">出货日</th>
          <th>目的地</th>
        </tr>
      </thead>
    </table>
    <div style="overflow: hidden;position: relative;top: -2px;" :style="{ height: (Math.min(maxRow, tableData.length) * rowHeight) + 'px' }">
      <table  border="0" cellpadding="0" cellspacing="0" style="width: 100%;" :style="{ transitionDuration: `${transitionDuration}ms`, transform: `translateY( ${translateX}px)`}">
        <tbody style="background-color: #333F4F;">
          <tr v-for="(item, index) in tableData" :key="index" :style="{ height: rowHeight + 'px'}">
            <td style="max-width: 60px;width: 60px;text-align: center;">{{ item.demo1 }}</td>
            <td style="text-align: center;max-width: 120px;width: 120px;">{{ item.demo2 }}</td>
            <td style="text-align: center;max-width: 120px;width: 120px;">{{ item.demo3 }}</td>
            <td style="text-align: center;max-width: 120px;width: 120px;">{{ item.demo4 }}</td>
            <td style="text-align: center;max-width: 120px;width: 120px;">{{ item.demo5 }}</td>
            <td style="text-align: center;max-width: 120px;width: 120px;">{{ item.demo6 }}</td>
            <td style="text-align: center;">{{ item.demo7 }}</td>
          </tr>
          <template v-for="(item, index) in tableData" :key="index">
            <tr v-if="index < maxRow && tableData.length > maxRow" :style="{ height: rowHeight + 'px' }">
              <td style="max-width: 60px;width: 60px;text-align: center;">{{ item.demo1 }}</td>
              <td style="text-align: center;max-width: 120px;width: 120px;">{{ item.demo2 }}</td>
              <td style="text-align: center;max-width: 120px;width: 120px;">{{ item.demo3 }}</td>
              <td style="text-align: center;max-width: 120px;width: 120px;">{{ item.demo4 }}</td>
              <td style="text-align: center;max-width: 120px;width: 120px;">{{ item.demo5 }}</td>
              <td style="text-align: center;max-width: 120px;width: 120px;">{{ item.demo6 }}</td>
              <td style="text-align: center;">{{ item.demo7 }}</td>
            </tr>
          </template>
        </tbody>
      </table>
    </div>
  </div>
</template>

<script lang="ts" setup>
import { onMounted, ref } from 'vue';
import { tableData } from './table';

const translateX = ref(0)
const transitionDuration = ref(500)

const maxRow = 8
const rowHeight = 48
const translateValue = rowHeight
const switeCount = tableData.length

onMounted(() => {
  setInterval(() => {
    if(tableData.length > maxRow) {
      translateX.value -= translateValue
      transitionDuration.value = 500
      if(translateX.value === -translateValue * switeCount) {
        setTimeout(() => {
          translateX.value -= translateValue
          transitionDuration.value = 0
          translateX.value = 0
        }, 600)
      }
    }
  }, 2000)
})

</script>

<style scoped>

.box div {
  width: 300px;
  height: 200px;
  background-color: aquamarine;
}

table {
  color: #fff;
}

.table {
  border: 1px solid #046DB8;
  margin: auto;
}

table {
  color: #fff;
}
td {
  border-top: 1px solid #046DB8;
  border-bottom: 1px solid #046DB8;
  border-left: 1px solid #046DB8;
}

th {
  border-left: 1px solid #046DB8;
}

tr th:nth-child(1) {
  border-left: 0 !important;
}


tr td:nth-child(1) {
  border-left: 0 !important;
}
</style>


 113
113


 被折叠的 条评论
为什么被折叠?
被折叠的 条评论
为什么被折叠?
 到【灌水乐园】发言


