


Oauth2 授权码模式登录认证
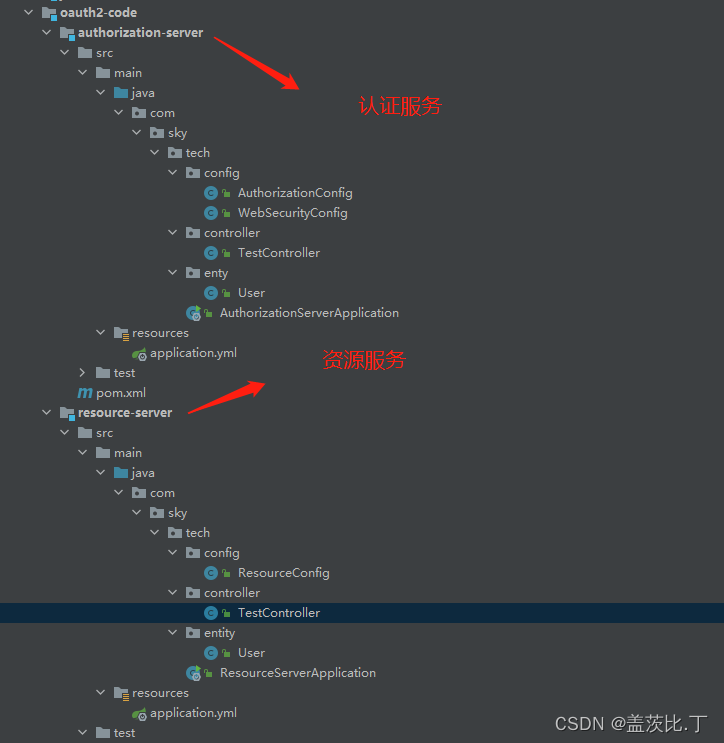
Maven层级
父级pom.xml文件依赖
<?xml version="1.0" encoding="UTF-8"?>
<project xmlns="http://maven.apache.org/POM/4.0.0"
         xmlns:xsi="http://www.w3.org/2001/XMLSchema-instance"
         xsi:schemaLocation="http://maven.apache.org/POM/4.0.0 http://maven.apache.org/xsd/maven-4.0.0.xsd">
    <parent>
        <artifactId>cloud2020</artifactId>
        <groupId>com.sky.springcould</groupId>
        <version>1.0.0-RELEASE</version>
    </parent>
    <modelVersion>4.0.0</modelVersion>

    <artifactId>oauth2-code</artifactId>
    <packaging>pom</packaging>
    <modules>
        <module>authorization-server</module>
        <module>resource-server</module>
    </modules>

    <properties>
        <maven.compiler.source>8</maven.compiler.source>
        <maven.compiler.target>8</maven.compiler.target>
    </properties>

    <dependencies>

        <!-- 状态机相关引用 -->
        <dependency>
            <groupId>com.alibaba.cola</groupId>
            <artifactId>cola-component-statemachine</artifactId>
            <version>4.0.1</version>
            <type>jar</type>
        </dependency>

        <dependency>
            <groupId>org.projectlombok</groupId>
            <artifactId>lombok</artifactId>
            <scope>test</scope>
        </dependency>
        <dependency>
            <groupId>junit</groupId>
            <artifactId>junit</artifactId>
            <scope>test</scope>
        </dependency>


        <dependency>
            <groupId>org.springframework.boot</groupId>
            <artifactId>spring-boot-starter-web</artifactId>
        </dependency>
        <dependency>
            <groupId>org.springframework.boot</groupId>
            <artifactId>spring-boot-starter-actuator</artifactId>
        </dependency>
        <dependency>
            <groupId>org.mybatis.spring.boot</groupId>
            <artifactId>mybatis-spring-boot-starter</artifactId>
        </dependency>
        <dependency>
            <groupId>com.alibaba</groupId>
            <artifactId>druid-spring-boot-starter</artifactId>
            <version>1.1.10</version>
        </dependency>
        <dependency>
            <groupId>mysql</groupId>
            <artifactId>mysql-connector-java</artifactId>
        </dependency>
        <dependency>
            <groupId>org.springframework.boot</groupId>
            <artifactId>spring-boot-starter-jdbc</artifactId>
        </dependency>
        <!-- 热部署 -->
        <dependency>
            <groupId>org.springframework.boot</groupId>
            <artifactId>spring-boot-devtools</artifactId>
        </dependency>
        <dependency>
            <groupId>org.projectlombok</groupId>
            <artifactId>lombok</artifactId>
            <optional>true</optional>
        </dependency>
        <dependency>
            <groupId>org.springframework.boot</groupId>
            <artifactId>spring-boot-starter-test</artifactId>
            <scope>test</scope>
        </dependency>

        <!-- 引入自定义jar包 -->
        <dependency>
            <groupId>com.sky.springcould</groupId>
            <artifactId>cloud-api-commons</artifactId>
            <version>1.0.0-RELEASE</version>
        </dependency>

        <!-- 注册到eureka成为服务提供者 -->
        <dependency>
            <groupId>org.springframework.cloud</groupId>
            <artifactId>spring-cloud-starter-netflix-eureka-client</artifactId>
        </dependency>

        <!-- 任务调度xxl-job -->
        <dependency>
            <groupId>com.xuxueli</groupId>
            <artifactId>xxl-job-core</artifactId>
            <version>2.2.0</version>
        </dependency>

        <!--redis-->
        <dependency>
            <groupId>org.springframework.boot</groupId>
            <artifactId>spring-boot-starter-data-redis</artifactId>
            <version>2.3.4.RELEASE</version>
        </dependency>

        <!--jwt-->
        <dependency>
            <groupId>io.jsonwebtoken</groupId>
            <artifactId>jjwt</artifactId>
            <version>0.9.1</version>
        </dependency>

        <!-- oauth2 -->
        <dependency>
            <groupId>org.springframework.cloud</groupId>
            <artifactId>spring-cloud-starter-oauth2</artifactId>
        </dependency>


        <!-- security-->
        <dependency>
            <groupId>org.springframework.cloud</groupId>
            <artifactId>spring-cloud-starter-security</artifactId>
        </dependency>
        <dependency>
            <groupId>org.springframework.boot</groupId>
            <artifactId>spring-boot-starter-thymeleaf</artifactId>
        </dependency>


    </dependencies>

    <build>
        <plugins>
            <plugin>
                <groupId>org.springframework.boot</groupId>
                <artifactId>spring-boot-maven-plugin</artifactId>
                <version>2.2.2.RELEASE</version>
                <executions>
                    <execution>
                        <goals>
                            <goal>repackage</goal>
                            <goal>build-info</goal>
                        </goals>
                    </execution>
                </executions>
            </plugin>
        </plugins>
    </build>

</project>
授权服务器配置
yml文件
server:
  port: 9000
spring:
  application:
    name: authorization-server
  datasource:
    type: com.alibaba.druid.pool.DruidDataSource
    driver-class-name: org.gjt.mm.mysql.Driver
    url: jdbc:mysql://ip:3307/xxl_job?useUnicode=true&characterEncoding=UTF-8&useSSL=false
    username: root
    password: xxx
#  security:
#    user:
#      name: dlf
#      password: dlf123
#    oauth2:
#      client:
#        client-id: webapp
#        client-secret: secret
#        access-token-uri: http://localhost:8009/oauth/token
#        user-authorization-uri: http://localhost:8110/oauth/authorize
#        user-info-uri: http://localhost:8110/oauth/user

  redis:
    host: ip
    port: 6380
    password: xxx
    database: 0

eureka:
  client:
    #标识是否将自己注册进EurekaServer默认为true
    register-with-eureka: true
    #是否从EurekaServer抓取已有的注册信息,默认为true。单节点无所谓,集群必须设置为true才能配合ribbon使用负载均衡。
    fetch-registry: true
    service-url:
      #集群版 http://eureka7001.com:7001/eureka,http://eureka7002.com:7002/eureka,http://eureka7003.com:7003/eureka
      defaultZone: ip:7001/eureka
  instance:
    instance-id: stateMachine_test8006
    #访问路径可以显示ip
    prefer-ip-address: true
    #心跳检测与续约时间
    #开发时设置小些,保证服务关闭后注册中心能及时剔除服务。
    #Eureka客户端向服务端发送心跳的时间间隔,单位为秒(默认是30秒)
    lease-renewal-interval-in-seconds: 1
    #Eureka服务端在收到最后一次心跳后的等待时间上限,单位为秒(默认是90秒),超时将剔除服务
    lease-expiration-duration-in-seconds: 2


##consul的注册地址
jwt:
  config:
    key: xxxxxxx
    ttl: 3600000
认证服务器启动类
import org.springframework.boot.SpringApplication;
import org.springframework.boot.autoconfigure.SpringBootApplication;

/**
 * @author dlf
 * @date 2023/5/29 17:29
 */
@SpringBootApplication(scanBasePackages = {"com.alibaba.cola", "com.sky"})
public class AuthorizationServerApplication {
    public static void main(String[] args) {
        SpringApplication.run(AuthorizationServerApplication.class, args);
        System.err.println("AuthorizationServerApplication-start-success!");
    }
}
授权服务器的配置
import org.springframework.context.annotation.Configuration;
import org.springframework.security.crypto.bcrypt.BCryptPasswordEncoder;
import org.springframework.security.crypto.password.PasswordEncoder;
import org.springframework.security.oauth2.config.annotation.configurers.ClientDetailsServiceConfigurer;
import org.springframework.security.oauth2.config.annotation.web.configuration.AuthorizationServerConfigurerAdapter;
import org.springframework.security.oauth2.config.annotation.web.configuration.EnableAuthorizationServer;
import org.springframework.security.oauth2.config.annotation.web.configurers.AuthorizationServerSecurityConfigurer;

import javax.annotation.Resource;

/**授权服务器的配置
 * @author dlf
 * @date 2023/5/29 17:36
 */
@Configuration
@EnableAuthorizationServer //开启认证服务
public class AuthorizationConfig extends AuthorizationServerConfigurerAdapter {

    @Resource
    private PasswordEncoder passwordEncoder;

    /**
     * 配置客户端详情信息(谁来申请令牌)
     * 用来配置客户端详情服务(ClientDetailsService),客户端详情信息在
     * 这里进行初始化,你能够把客户端详情信息写死在这里或者是通过数据库来存储调取详情信息。
     */
    @Override
    public void configure(ClientDetailsServiceConfigurer clients) throws Exception {

        System.err.println("password_client:"+passwordEncoder.encode("client-secret"));

        System.err.println("password_123456:"+passwordEncoder.encode("123456"));

        /**
         * 使用内存得方式
         */
        clients.inMemory()
                .withClient("client-a")//客户端 client_id
                .secret(passwordEncoder.encode("client-secret"))//客户端 secret
                .authorizedGrantTypes("authorization_code")//授权类型,授权码

                .scopes("app-read") //作用域
                .resourceIds("resource1") //资源id
                .redirectUris("http://localhost:9001/callback");//重定向地址
    }

    //检查token的策略
    @Override
    public void configure(AuthorizationServerSecurityConfigurer security) throws Exception {
        //资源服务器认证时使用
        security
                .tokenKeyAccess("permitAll()")
                .checkTokenAccess("permitAll()");

        //允许表单认证
        security.allowFormAuthenticationForClients();
    }
}
SpringSecurity相关配置
import org.springframework.context.annotation.Bean;
import org.springframework.context.annotation.Configuration;
import org.springframework.security.config.annotation.authentication.builders.AuthenticationManagerBuilder;
import org.springframework.security.config.annotation.method.configuration.EnableGlobalMethodSecurity;
import org.springframework.security.config.annotation.web.builders.HttpSecurity;
import org.springframework.security.config.annotation.web.configuration.EnableWebSecurity;
import org.springframework.security.config.annotation.web.configuration.WebSecurityConfigurerAdapter;
import org.springframework.security.crypto.bcrypt.BCryptPasswordEncoder;
import org.springframework.security.crypto.password.PasswordEncoder;

import java.util.Collections;

/**
 * SpringSecurity相关配置
 *
 * @author dlf
 * @date 2023/5/29 17:35
 */
@Configuration
@EnableWebSecurity
//对全部方法进行验证
@EnableGlobalMethodSecurity(prePostEnabled = true, securedEnabled = true, jsr250Enabled = true)
public class WebSecurityConfig extends WebSecurityConfigurerAdapter {

    @Bean
    public PasswordEncoder passwordEncoder() {
        return new BCryptPasswordEncoder();
    }

    //在内存中配置用户
    @Override
    protected void configure(AuthenticationManagerBuilder auth) throws Exception {
        auth.inMemoryAuthentication()
                .withUser("admin")
                .password(passwordEncoder().encode("123456"))
                .authorities(Collections.emptyList());
    }

    @Override
    protected void configure(HttpSecurity http) throws Exception {
        http.authorizeRequests()
                .anyRequest().authenticated() //所有请求都需要通过认证
                .and()
                .httpBasic() //Basic登录
                .and()
                .csrf().disable(); //关跨域保护
    }
}
客户端发起认证
http://localhost:9000/oauth/authorize?client_id=client-a&client_secret=client-secret&response_type=code
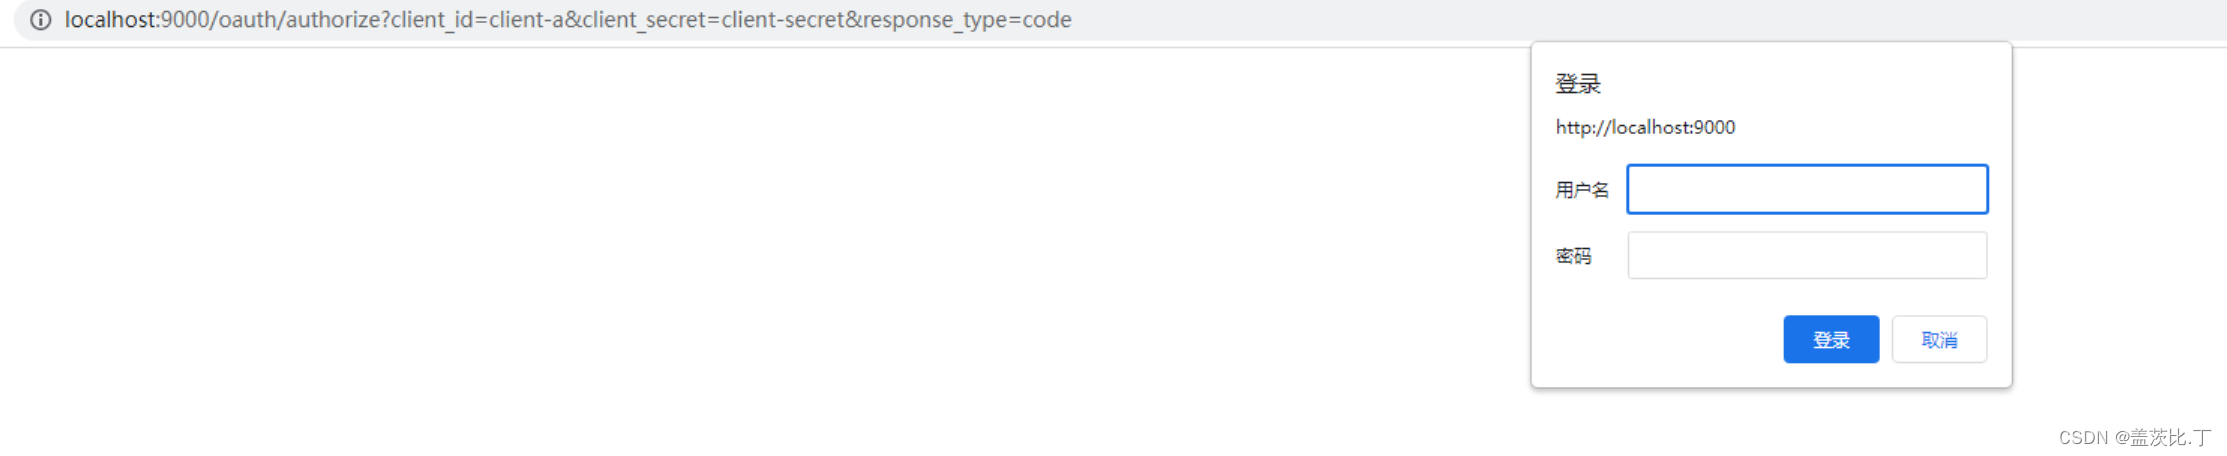
这里输入之前配置的内存用户,admin 123456
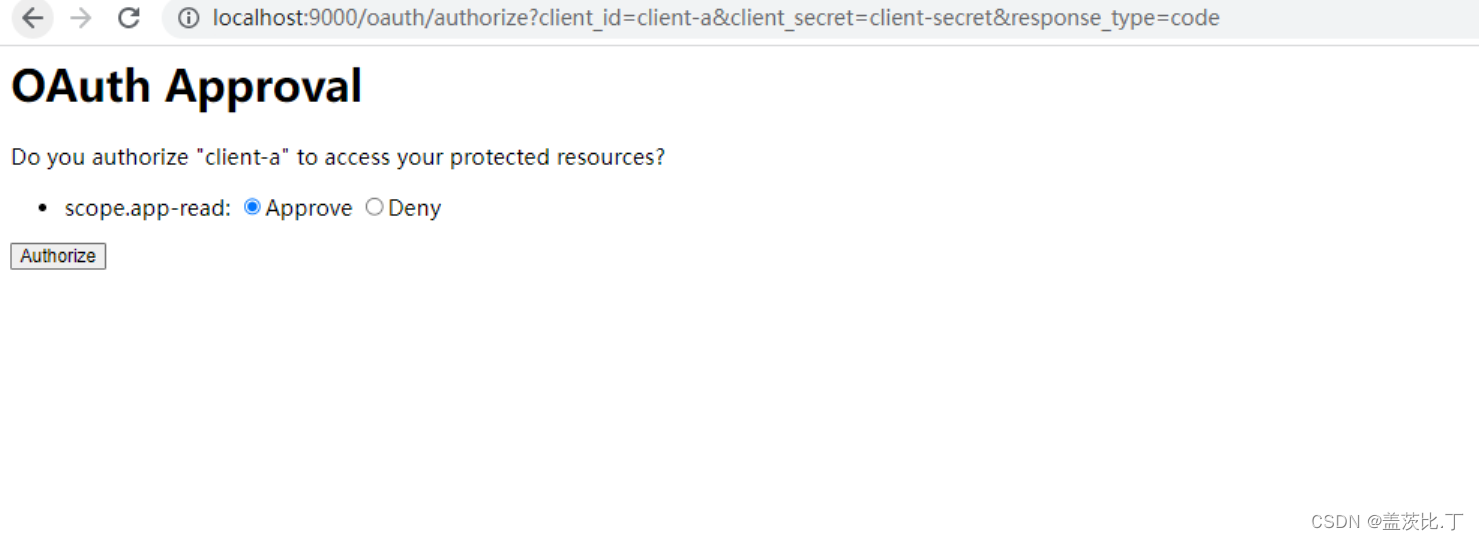
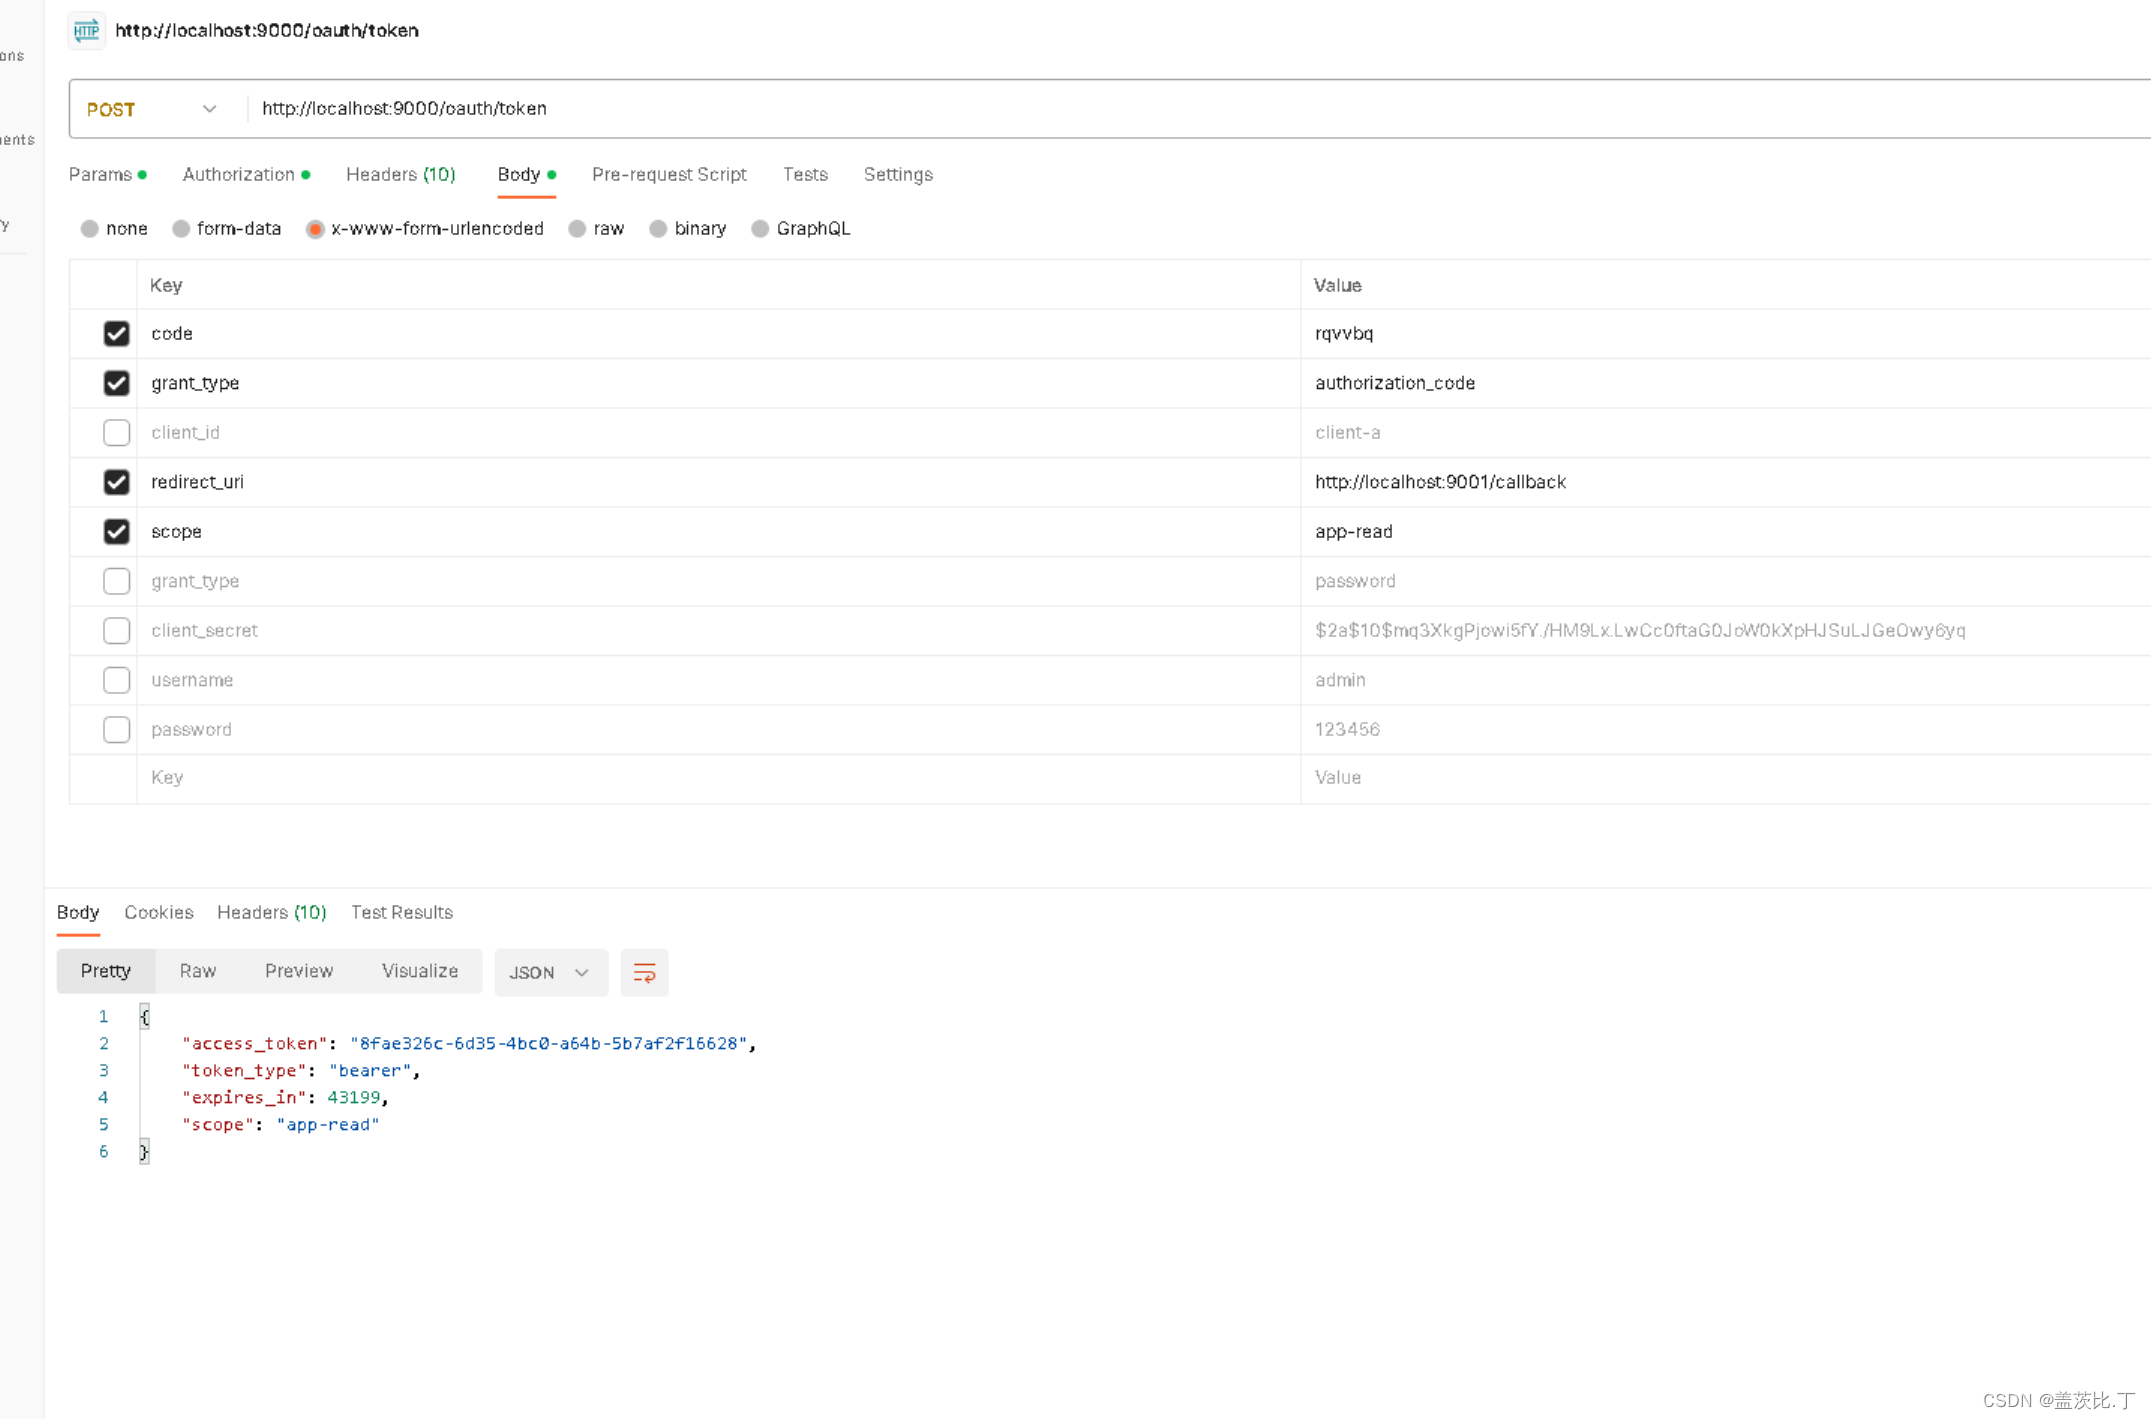
获取授权码,用授权码去拿access_token

这里的username和password要和之前配置的内存模式得设备id和secret保持一致
BasicAuth:这里填的是客户端配置的client_id和client_secret的值,相当于curl --user client_id:client_secret,配置后会在Header中添加Authorization:Basic Y2xpZW50LWE6Y2xpZW50LWEtc2VjcmV0,Basic空格 后的是client_id:client_secret具体值被Base64后得到的值
请求参数列表:
code=授权码
grant_type=authorization_code
redirect_uri=回调url ,要与配置处和获取授权码处相同
scope=作用域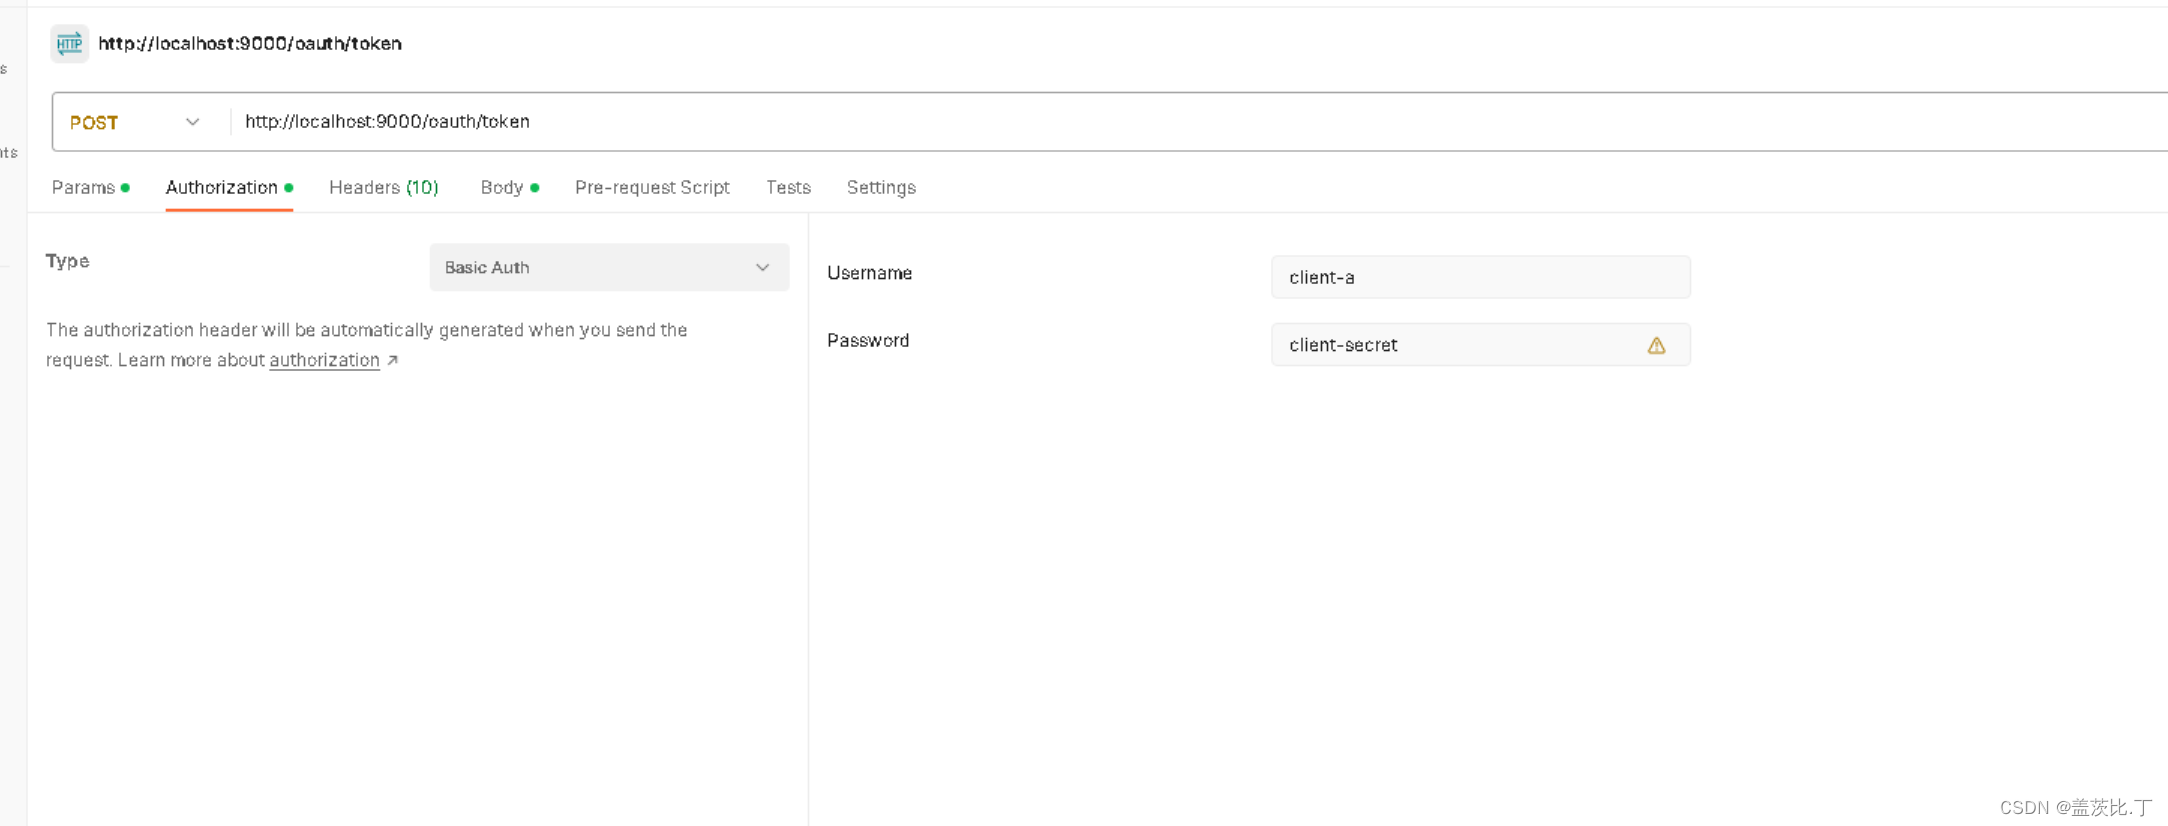
{
“access_token”: “99435e13-f9fe-438a-a94e-3b00d549b329”, //访问token
“token_type”: “bearer”, //token类型,使用时需要拼接在token前并在token前加空格
“expires_in”: 43199, //过期时间
“scope”: “read_user_info” //作用域
}
资源服务搭建
yml
server:
  port: 9001
spring:
  application:
    name: resource-server
  datasource:
    type: com.alibaba.druid.pool.DruidDataSource
    driver-class-name: org.gjt.mm.mysql.Driver
    url: jdbc:mysql://就不告诉你:3307/xxl_job?useUnicode=true&characterEncoding=UTF-8&useSSL=false
    username: root
    password: 就不告诉你
#  security:
#    user:
#      name: dlf
#      password: dlf123
#    oauth2:
#      client:
#        client-id: webapp
#        client-secret: secret
#        access-token-uri: http://localhost:8009/oauth/token
#        user-authorization-uri: http://localhost:8110/oauth/authorize
#        user-info-uri: http://localhost:8110/oauth/user


  redis:
    host: 就不告诉你
    port: 6380
    password: dlf123
    database: 0


eureka:
  client:
    #标识是否将自己注册进EurekaServer默认为true
    register-with-eureka: true
    #是否从EurekaServer抓取已有的注册信息,默认为true。单节点无所谓,集群必须设置为true才能配合ribbon使用负载均衡。
    fetch-registry: true
    service-url:
      #集群版 http://eureka7001.com:7001/eureka,http://eureka7002.com:7002/eureka,http://eureka7003.com:7003/eureka
      defaultZone: http://就不告诉你:7001/eureka
  instance:
    instance-id: stateMachine_test8006
    #访问路径可以显示ip
    prefer-ip-address: true
    #心跳检测与续约时间
    #开发时设置小些,保证服务关闭后注册中心能及时剔除服务。
    #Eureka客户端向服务端发送心跳的时间间隔,单位为秒(默认是30秒)
    lease-renewal-interval-in-seconds: 1
    #Eureka服务端在收到最后一次心跳后的等待时间上限,单位为秒(默认是90秒),超时将剔除服务
    lease-expiration-duration-in-seconds: 2


##consul的注册地址
jwt:
  config:
    key: 就不告诉你
    ttl: 3600000
资源服务器主要配置
import org.springframework.context.annotation.Bean;
import org.springframework.context.annotation.Configuration;
import org.springframework.context.annotation.Primary;
import org.springframework.security.config.annotation.web.builders.HttpSecurity;
import org.springframework.security.config.http.SessionCreationPolicy;
import org.springframework.security.crypto.bcrypt.BCryptPasswordEncoder;
import org.springframework.security.crypto.password.PasswordEncoder;
import org.springframework.security.oauth2.config.annotation.web.configuration.EnableResourceServer;
import org.springframework.security.oauth2.config.annotation.web.configuration.ResourceServerConfigurerAdapter;
import org.springframework.security.oauth2.config.annotation.web.configurers.ResourceServerSecurityConfigurer;
import org.springframework.security.oauth2.provider.token.RemoteTokenServices;

/**
 * @author dlf
 * @date 2023/5/29 17:42
 */

@Configuration
//资源服务器主要配置
@EnableResourceServer
public class ResourceConfig extends ResourceServerConfigurerAdapter {

    @Bean
    public PasswordEncoder passwordEncoder() {
        return new BCryptPasswordEncoder();
    }

    @Bean
    @Primary
    //实现自定义授权服务器
    public RemoteTokenServices remoteTokenServices() {
        final RemoteTokenServices tokenServices = new RemoteTokenServices();
        //设置授权服务器check_token端点完整地址
        tokenServices.setCheckTokenEndpointUrl("http://localhost:9000/oauth/check_token");
        //设置客户端id与secret,注意:client_secret值不能使用passwordEncoder加密
        tokenServices.setClientId("client-a");
        tokenServices.setClientSecret("client-secret");
        return tokenServices;
    }

    @Override
    public void configure(HttpSecurity http) throws Exception {
        //设置session策略
        http.sessionManagement().sessionCreationPolicy(SessionCreationPolicy.IF_REQUIRED);
        //@formatter:off
        //所有请求必须授权
        http.authorizeRequests()
                .anyRequest().authenticated();
        //@formatter:on
    }

    @Override
    public void configure(ResourceServerSecurityConfigurer resources) throws Exception {
        resources.resourceId("resource1").stateless(true);
    }
}
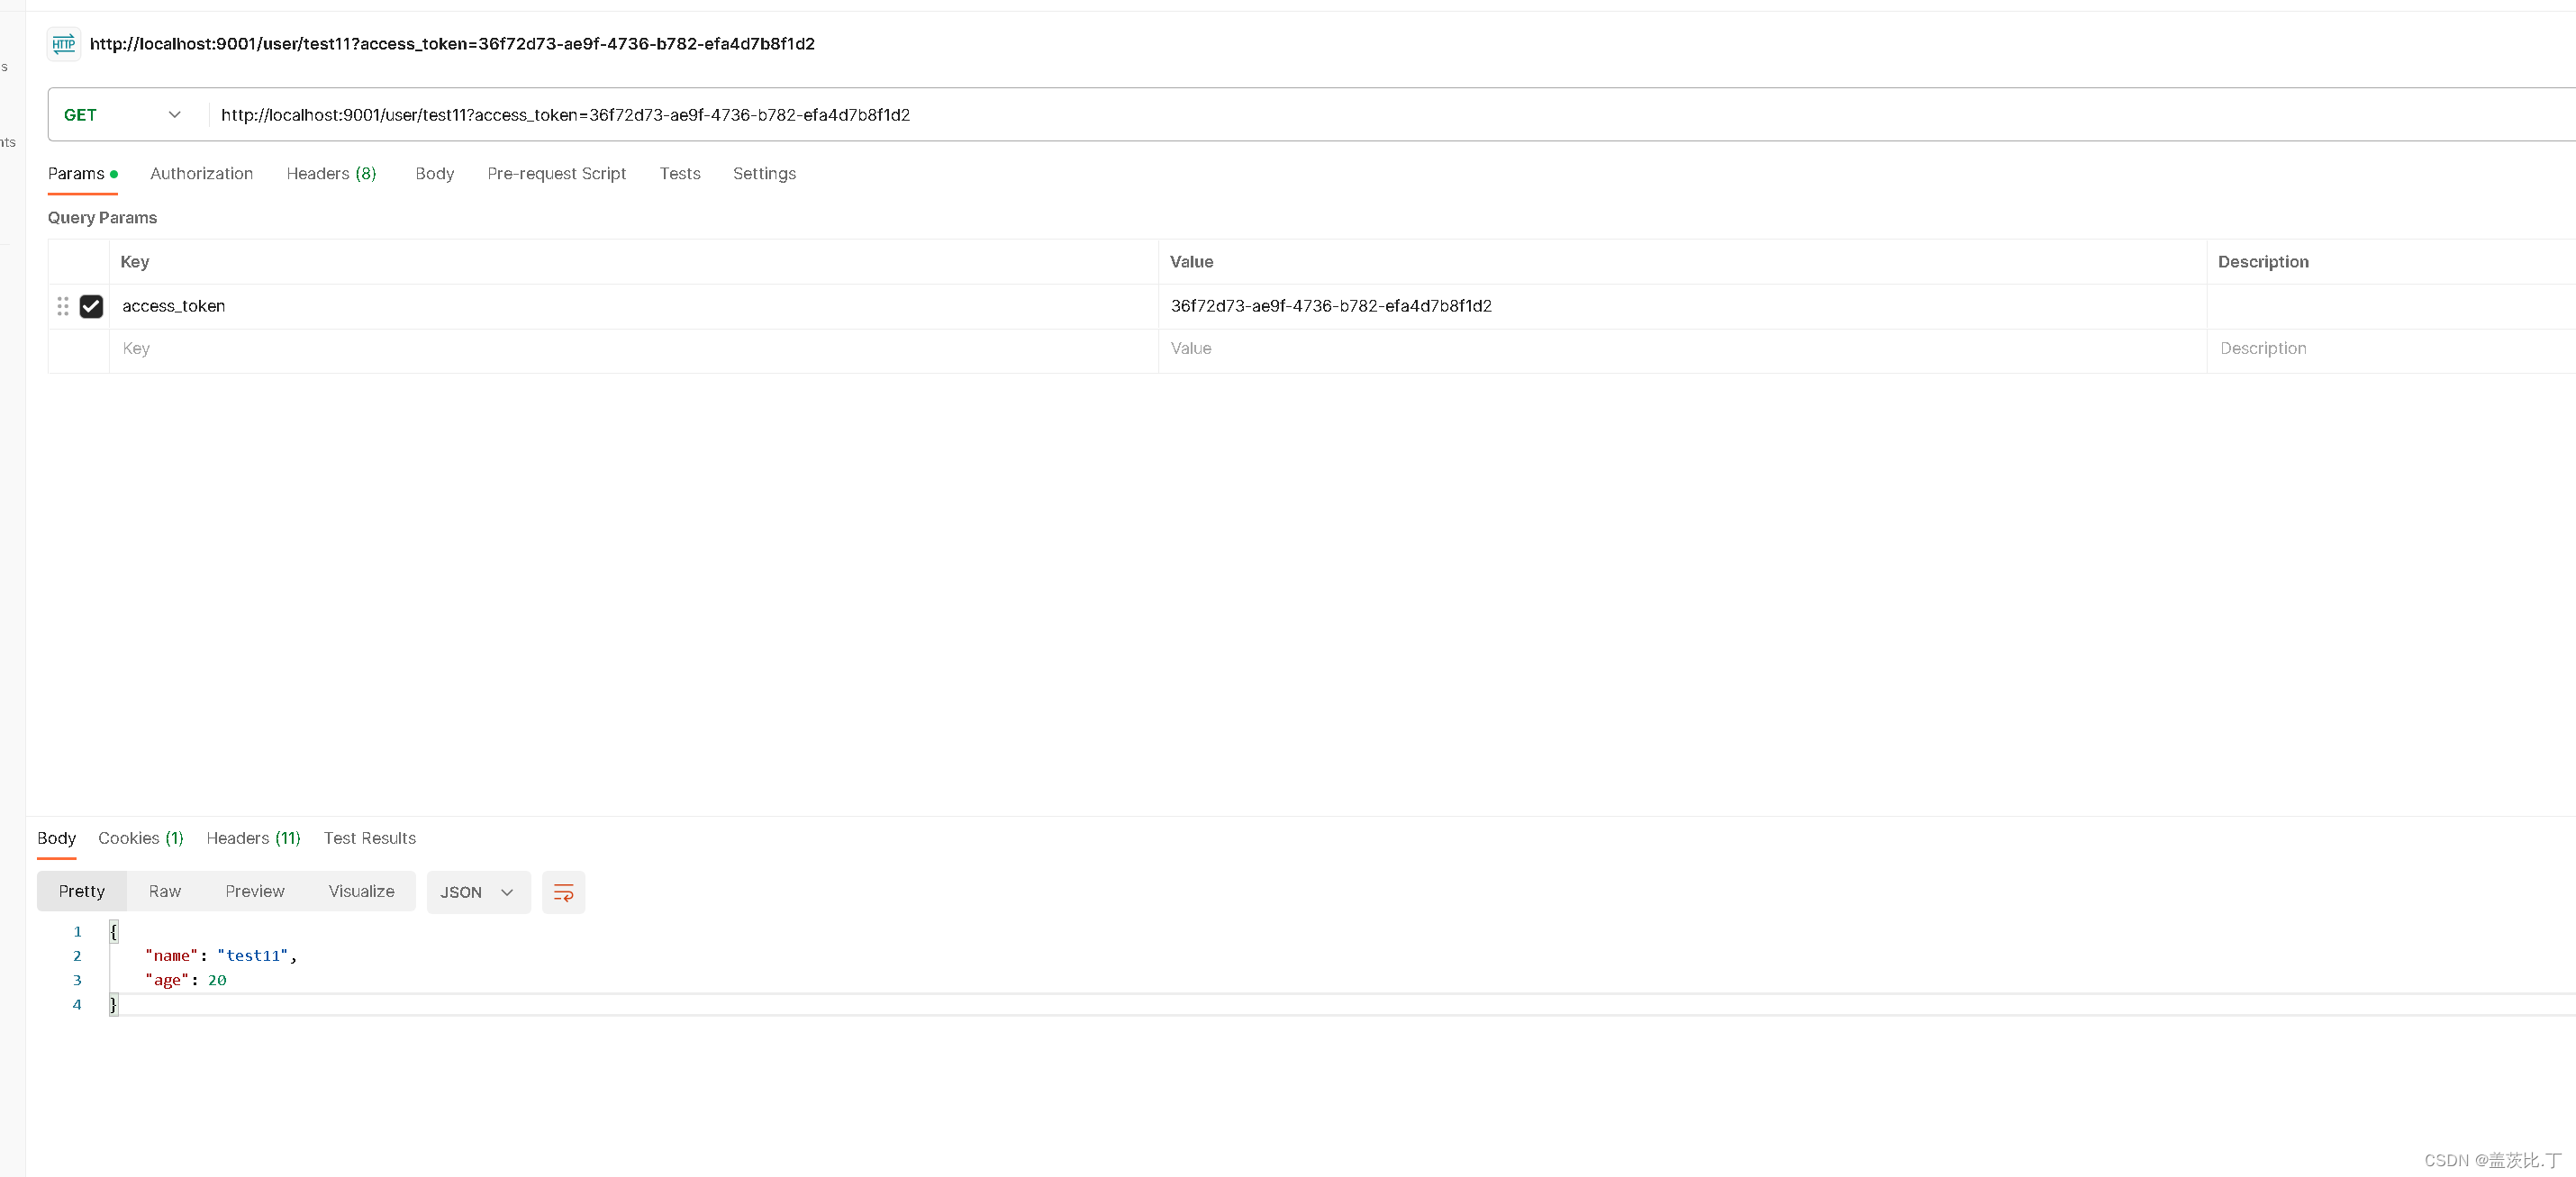
测试Controller
/**
 * @author dlf
 * @date 2023/5/29 17:40
 */
@RestController
public class TestController {
    @GetMapping("/user/{name}")
    public User user(@PathVariable String name) {
        return new User(name, 20);
    }
}
认证成功获取接口返回信息
参考文章 https://www.jb51.net/article/193523.htm
https://juejin.cn/post/6844903540175945742
https://juejin.cn/post/6987207613549117453
如果你也觉得有用


 1549
1549


 被折叠的 条评论
为什么被折叠?
被折叠的 条评论
为什么被折叠?
 到【灌水乐园】发言


