


DOM
获取元素、节点
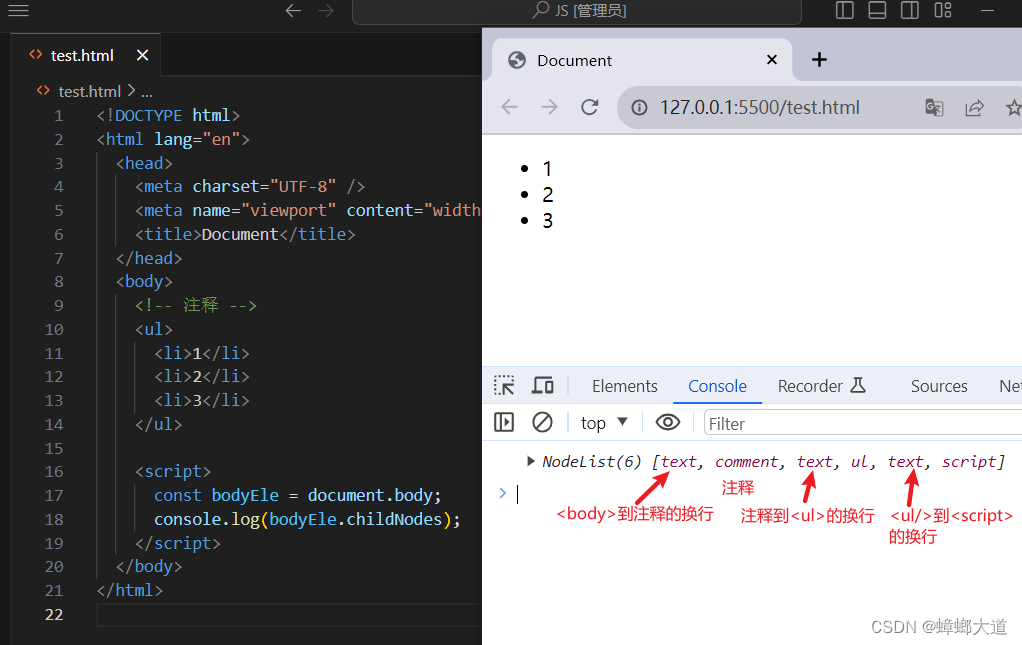
节点:节点包括元素、注释、文本等内容
元素:DOM元素,是节点的子类
// 获取声明文档
document.doctype
// 获取<html>元素
document.documentElement
// 获取<head>元素
document.head
// 获取<body>元素
document.body
获取元素方法
- querySelector(‘css选择器’) 返回符合条件的第一个元素
- querySelectorAll(‘css选择器’) 返回类数组对象
节点之间的关系
获取一个节点后,根据该节点的关系获取其他节点
- parentNode 父节点
- previousSibling 前一个兄弟节点
- nextSibling 下一个兄弟节点
- childNodes 子节点
- firstChild 第一个子节点
- lastChild 最后一个子节点
元素之间关系
获取一个元素后,根据该元素的关系获取其他元素
- parentElement 父元素
- previousElementSibling 前一个兄弟元素
- nextElementSibling 下一个兄弟元素
- children 子元素
- firstElementChild 第一个子元素
- lastElementChild 最后一个子元素
DOM节点内容的获取与设置
const lis = document.querySelectorAll("ul>li");

// 获取
console.log(lis[0].innerHTML);
console.log(lis[1].textContent);

// 设置
lis[0].innerHTML = "<a href=''>1</a>";
lis[1].textContent = "<a href=''>2</a>";
DOM节点的attribute、property
Attributes
- 属性(Attributes)包含在HTML标签中,用于定义元素的初始属性。
- 在HTML文档中定义,并通常以字符串形式表示
- 通过JS的getAttribute方法获取元素的属性值,通过setAttribute方法设置元素的属性值
<!DOCTYPE html>
<html lang="en">
  <head>
    <meta charset="UTF-8" />
    <meta name="viewport" content="width=device-width, initial-scale=1.0" />
    <title>Document</title>
  </head>
  <body>
    <input type="radio" checked="checked" data-test1="test1" test2="test2" />

    <script>
      const radio = document.querySelector("input");
      // 1.获取attribute
      console.log(
        radio.getAttribute("type"),
        radio.getAttribute("checked"),
        radio.getAttribute("data-test1"),
        radio.getAttribute("test2")
      );

	  // 2.获取所有attribute属性
      for (let attr of radio.attributes) {
        console.log(attr.name, attr.value);
      }

      // 3.设置attribute
      radio.setAttribute("class", "className1 className2");

      // 4.移除attribute
      radio.removeAttribute("test2");

      // 5.判定是否有attribute属性
      console.log(radio.hasAttribute("data-test1")); //true
    </script>
  </body>
</html>
Properties
- 属性(Properties)是DOM元素对象的属性,用于表示元素在JavaScript中的当前属性
- 以JS对象的形式存在,它们提供了元素的当前状态,如文本内容、值、样式、事件处理程序等。
- 通过对象打点的方式获取/设置属性值
注:
- attribute与property是相互作用的
- 标准的attribute属性会在DOM对象上创建对应的property
- 自定义的attribute属性可以通过domEle.dataset.xxx获取
<!DOCTYPE html>
<html lang="en">
  <head>
    <meta charset="UTF-8" />
    <meta name="viewport" content="width=device-width, initial-scale=1.0" />
    <title>Document</title>
  </head>
  <body>
    <input type="radio" checked="checked" data-test1="test1" test2="test2" />

    <script>
      const radio = document.querySelector("input");
      // 1.获取property
      console.log(
        radio.type,
        radio.checked,
        radio.dataset.test1,
        radio.dataset.test2
      );

      // 2.设置property
      radio.checked = false;
    </script>
  </body>
</html>
DOM节点样式style、class
style样式
# 1.获取domEle的所有style样式
getComputedStyle(domEle).xxx

# 2.获取或设置行内样式
domEle.style.xxx
案例:每点击一次 .box,盒子的宽度+1
<!DOCTYPE html>
<html lang="en">
  <head>
    <meta charset="UTF-8" />
    <meta name="viewport" content="width=device-width, initial-scale=1.0" />
    <title>Document</title>

    <style>
      .box {
        width: 200px;
        height: 200px;
        background-color: pink;
      }
    </style>
  </head>
  <body>
    <div class="box" style="color: #fff">123</div>

    <script>
      const boxEle = document.querySelector(".box");

      // 获取宽度
      let width = Number(getComputedStyle(boxEle).width.replace("px", ""));
	  // 点击盒子 增加1px
      boxEle.addEventListener("click", (target) => {
        boxEle.style.width = width++ + "px";
      });
    </script>
  </body>
</html>
class
# 0.覆盖类
elem.className = 'name1 name2'

# 1.追加类
elem.classList.add(className)

# 2.移除类
elem.classList.remove(className)

# 3.切换类
# 类存在则移除,类不存在则添加
elem.classList.toogle(className)

# 4.判断是否存在
elem.classList.contains(className)
DOM节点创建、移动、克隆、删除
# 1.创建元素节点
document.createElement("li");

# 2.移动
# 在ele的子元素的最后插入节点或字符串
ele.append(...nodes: (string | Node)[])

# 在ele的子元素的开头插入节点或字符串
ele.prepend(...nodes: (string | Node)[])

# 在ele之后插入(作为ele的兄弟节点)节点或字符串
ele.after(...nodes: (string | Node)[])

# 在node之前插入(作为ele的兄弟节点)节点或字符串
ele.before(...nodes: (string | Node)[])

# 将ele替换为给定节点或字符串
ele.replaceWith(...nodes: (string | Node)[])


# 3.克隆
ele.cloneNode(true)

# 4.删除
ele.remove()
DOM元素/window的大小、位置、滚动

元素
clientWidth: contentWidth + padding (不包含滚动条)
clientHeight: contentHeight + padding
clientLeft: border-left
clientTop: border-top
offsetWidth: 元素完整宽度
offsetHeight: 元素完整高度
offsetLeft: 距离父元素的x
offsetTop: 距离父元素的y
scrollWidth: 整个可滚动区域宽度
scrollHeight: 整个可滚动区域高度
scrollLeft: 被滚动的宽度
scrollTop: 被滚动的高度
window
innerWidth、innerHeight: window窗口的宽高(包含滚动条)
outerWidth、outerHeight: window窗口的宽度(包含调试工具、工具栏)
documentElement.clientWidth、documentElement.clientHeight: html的宽度(不包含滚动条)
scrollX、scrollY: x轴y轴滚动的位置
scrollBy(x,y) 相对于当前坐标,再移动x,y
scrollTo(x,y) 移动到绝对坐标(x,y)
事件
事件处理三种方式
<!DOCTYPE html>
<html lang="en">
  <head>
    <meta charset="UTF-8" />
    <meta name="viewport" content="width=device-width, initial-scale=1.0" />
    <title>Document</title>
  </head>
  <body>
    <!-- 方式1 -->
    <div class="box" onclick="console.log(1)">123</div>

    <script>
      const box = document.querySelector(".box");
      // 方式2
      // 给box元素添加onclick方法,故后面的同名方法会覆盖前面的
      box.onclick = function () {
        console.log(2);
      };
      box.onclick = function () {
        console.log(3);
      };

      // 方式3
      // 给box元素添加事件监听,可以添加多个同名事件
      box.addEventListener("click", () => {
        console.log(4);
      });

      box.addEventListener("click", () => {
        console.log(5);
      });
    </script>
  </body>
</html>
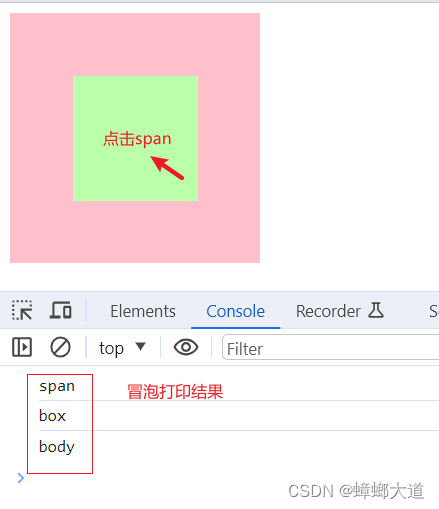
每次点击box元素,打印结果
3
4
5
事件处理函数的this指向
this的指向在函数调用时确定。
当元素触发该事件时,事件处理函数如何被调用:
 box.addEventListener("click", function (e) {
   console.log(this); // this指向box
 });

 box.addEventListener("click", (e) => {
   console.log(this); // this指向父级作用域window
 });

 box.onclick = function () {
   console.log(this); // this指向box
 };
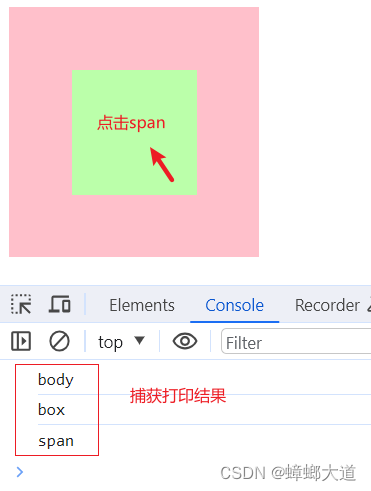
事件流
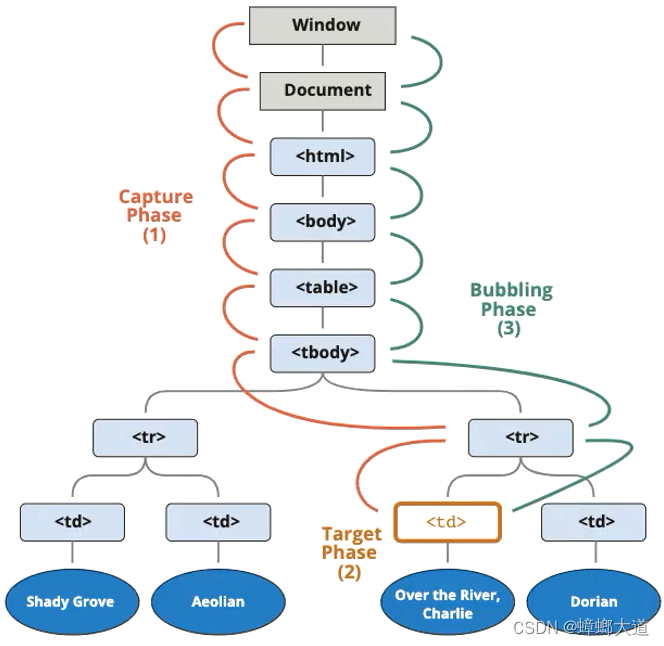
1.同时有捕获和冒泡阶段,则先执行捕获阶段,再执行冒泡阶段
2.addEventListener第三个参数默认值为false(表示冒泡阶段)
<!DOCTYPE html>
<html lang="en">
  <head>
    <meta charset="UTF-8" />
    <meta name="viewport" content="width=device-width, initial-scale=1.0" />
    <title>Document</title>

    <style>
      .box {
        display: flex;
        justify-content: center;
        align-items: center;
        width: 200px;
        height: 200px;
        background-color: pink;
      }

      .box > span {
        width: 100px;
        height: 100px;
        background-color: #bfa;
      }
    </style>
  </head>
  <body>
    <div class="box">
      <span></span>
    </div>

    <script>
      const body = document.body;
      const box = document.querySelector(".box");
      const span = document.querySelector(".box>span");

      body.addEventListener(
        "click",
        () => {
          console.log("body");
        },
        false
      );
      box.addEventListener(
        "click",
        () => {
          console.log("box");
        },
        false
      );

      span.addEventListener(
        "click",
        () => {
          console.log("span");
        },
        false
      );
    </script>
  </body>
</html>
<!DOCTYPE html>
<html lang="en">
  <head>
    <meta charset="UTF-8" />
    <meta name="viewport" content="width=device-width, initial-scale=1.0" />
    <title>Document</title>

    <style>
      .box {
        display: flex;
        justify-content: center;
        align-items: center;
        width: 200px;
        height: 200px;
        background-color: pink;
      }

      .box > span {
        width: 100px;
        height: 100px;
        background-color: #bfa;
      }
    </style>
  </head>
  <body>
    <div class="box">
      <span></span>
    </div>

    <script>
      const body = document.body;
      const box = document.querySelector(".box");
      const span = document.querySelector(".box>span");

      body.addEventListener(
        "click",
        () => {
          console.log("body");
        },
        true
      );
      box.addEventListener(
        "click",
        () => {
          console.log("box");
        },
        true
      );

      span.addEventListener(
        "click",
        () => {
          console.log("span");
        },
        true
      );
    </script>
  </body>
</html>
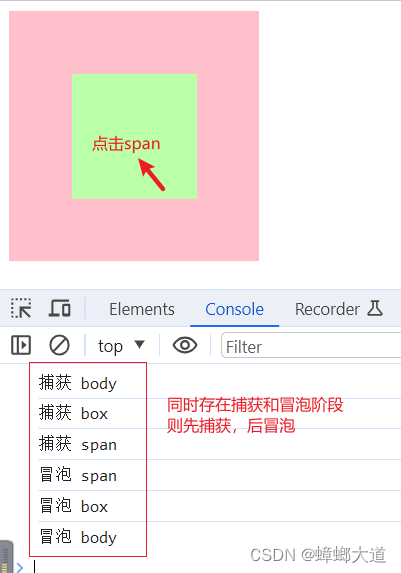
<!DOCTYPE html>
<html lang="en">
  <head>
    <meta charset="UTF-8" />
    <meta name="viewport" content="width=device-width, initial-scale=1.0" />
    <title>Document</title>

    <style>
      .box {
        display: flex;
        justify-content: center;
        align-items: center;
        width: 200px;
        height: 200px;
        background-color: pink;
      }

      .box > span {
        width: 100px;
        height: 100px;
        background-color: #bfa;
      }
    </style>
  </head>
  <body>
    <div class="box">
      <span></span>
    </div>

    <script>
      const body = document.body;
      const box = document.querySelector(".box");
      const span = document.querySelector(".box>span");

      // 1.冒泡阶段
      body.addEventListener(
        "click",
        () => {
          console.log("冒泡 body");
        },
        false
      );
      box.addEventListener(
        "click",
        () => {
          console.log("冒泡 box");
        },
        false
      );

      span.addEventListener(
        "click",
        () => {
          console.log("冒泡 span");
        },
        false
      );

      // 2.捕获阶段
      body.addEventListener(
        "click",
        () => {
          console.log("捕获 body");
        },
        true
      );
      box.addEventListener(
        "click",
        () => {
          console.log("捕获 box");
        },
        true
      );

      span.addEventListener(
        "click",
        () => {
          console.log("捕获 span");
        },
        true
      );
    </script>
  </body>
</html>
事件对象
事件对象常用属性
<!DOCTYPE html>
<html lang="en">
  <head>
    <meta charset="UTF-8" />
    <meta name="viewport" content="width=device-width, initial-scale=1.0" />
    <title>Document</title>

    <style>
      .box {
        display: flex;
        justify-content: center;
        align-items: center;
        width: 200px;
        height: 200px;
        background-color: pink;
      }

      .box > span {
        width: 100px;
        height: 100px;
        background-color: #bfa;
      }
    </style>
  </head>
  <body>
    <div class="box">
      <span></span>
    </div>

    <script>
      const body = document.body;
      const box = document.querySelector(".box");
      const span = document.querySelector(".box>span");

      box.addEventListener("click", (e) => {
        // 事件对象常见属性

        // 1.事件类型
        console.log(e.type);
        // 2.当前事件发生的元素
        console.log(e.target);
        // 3.当前事件处理的元素
        console.log(e.currentTarget);
        // 4.事件阶段 捕获1 当前元素2 冒泡3
        console.log(e.eventPhase);
        // 5.事件发生在元素内的位置
        console.log(e.offsetX, e.offsetY);
        // 6.事件发生在客户端内的位置
        console.log(e.clientX, e.clientY);
        // 7.事件发生在客户端相对于documnent的位置
        console.log(e.pageX, e.pageY);
        // 6.事件发生相对于屏幕的位置
        console.log(e.screenX, e.screenY);
      });
    </script>
  </body>
</html>
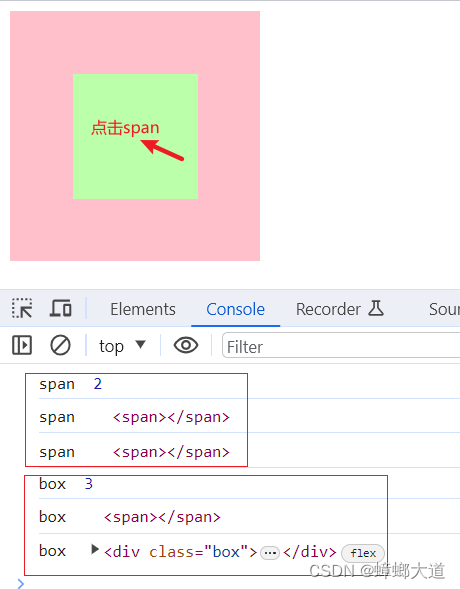
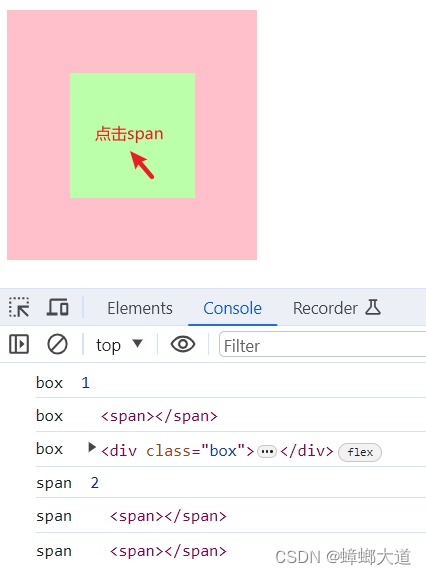
e.target与e.currentTarget区别
<!DOCTYPE html>
<html lang="en">
  <head>
    <meta charset="UTF-8" />
    <meta name="viewport" content="width=device-width, initial-scale=1.0" />
    <title>Document</title>

    <style>
      .box {
        display: flex;
        justify-content: center;
        align-items: center;
        width: 200px;
        height: 200px;
        background-color: pink;
      }

      .box > span {
        width: 100px;
        height: 100px;
        background-color: #bfa;
      }
    </style>
  </head>
  <body>
    <div class="box">
      <span></span>
    </div>

    <script>
      const body = document.body;
      const box = document.querySelector(".box");
      const span = document.querySelector(".box>span");

      box.addEventListener("click", (e) => {
        console.log("box ", e.eventPhase);
        // 当前事件发生的元素
        console.log("box ", e.target);
        // 当前事件处理的元素
        console.log("box ", e.currentTarget);
      });

      span.addEventListener("click", (e) => {
        console.log("span ", e.eventPhase);
        // 当前事件发生的元素
        console.log("span ", e.target);
        // 当前事件处理的元素
        console.log("span ", e.currentTarget);
      });
    </script>
  </body>
</html>
<!DOCTYPE html>
<html lang="en">
  <head>
    <meta charset="UTF-8" />
    <meta name="viewport" content="width=device-width, initial-scale=1.0" />
    <title>Document</title>

    <style>
      .box {
        display: flex;
        justify-content: center;
        align-items: center;
        width: 200px;
        height: 200px;
        background-color: pink;
      }

      .box > span {
        width: 100px;
        height: 100px;
        background-color: #bfa;
      }
    </style>
  </head>
  <body>
    <div class="box">
      <span></span>
    </div>

    <script>
      const body = document.body;
      const box = document.querySelector(".box");
      const span = document.querySelector(".box>span");

      box.addEventListener(
        "click",
        (e) => {
          console.log("box ", e.eventPhase);
          // 当前事件发生的元素
          console.log("box ", e.target);
          // 当前事件处理的元素
          console.log("box ", e.currentTarget);
        },
        true
      );

      span.addEventListener(
        "click",
        (e) => {
          console.log("span ", e.eventPhase);
          // 当前事件发生的元素
          console.log("span ", e.target);
          // 当前事件处理的元素
          console.log("span ", e.currentTarget);
        },
        true
      );
    </script>
  </body>
</html>
事件对象常用方法
// 阻止事件流(冒泡、捕获都能阻止)
e.stopPropagation();
// 阻止默认事件
e.preventDefault();
EventTarget类
window继承自EventTarget类
<!DOCTYPE html>
<html lang="en">
  <head>
    <meta charset="UTF-8" />
    <meta name="viewport" content="width=device-width, initial-scale=1.0" />
    <title>Document</title>
  </head>
  <body>

    <button>移除click事件</button>

    <script>
      const button = document.querySelector("button");

      // 1.监听事件
      window.addEventListener("cjc", handleCjc, false);
      window.addEventListener("click", handleClick, false);

      function handleCjc(e) {
        console.log("cjc事件处理函数", e);
      }

      function handleClick(e) {
        console.log("click事件处理函数", e);
      }

      // 2.抛出自定义事件
      // 注:抛出自定义事件应该在监听之后,否则可能监听不到
      window.dispatchEvent(new Event("cjc"));

      button.addEventListener("click", () => {
        // 3.移除事件
        window.removeEventListener("click", handleClick);
      });
    </script>
  </body>
</html>
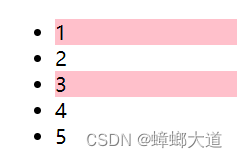
事件委托(event delegation)
通过事件冒泡,将子元素的事件委托给父元素触发
e.target 事件触发的元素
e.currentTarget 事件处理的元素
<!DOCTYPE html>
<html lang="en">
  <head>
    <meta charset="UTF-8" />
    <meta name="viewport" content="width=device-width, initial-scale=1.0" />
    <title>Document</title>

    <style>
      .active {
        background-color: pink;
      }
    </style>
  </head>
  <body>
    <ul>
      <li>1</li>
      <li>2</li>
      <li>3</li>
      <li>4</li>
      <li>5</li>
    </ul>

    <script>
      const ul = document.querySelector("ul");
      const li = document.querySelector("li");

      ul.addEventListener(
        "click",
        (e) => {
          // e.target事件触发的元素
          if (e.target !== ul) {
            e.target.classList.add("active");
          }
        },
        false
      );
    </script>
  </body>
</html>
常见事件类型
鼠标事件
click
dblclick
contextmenu 右键打开菜单
mouseenter、mouseleave鼠标移入、移除
mouseover、mouseout鼠标移入、移除(支持冒泡,故能使用使用事件委托)
mousemove 鼠标移动
鼠标移入移出
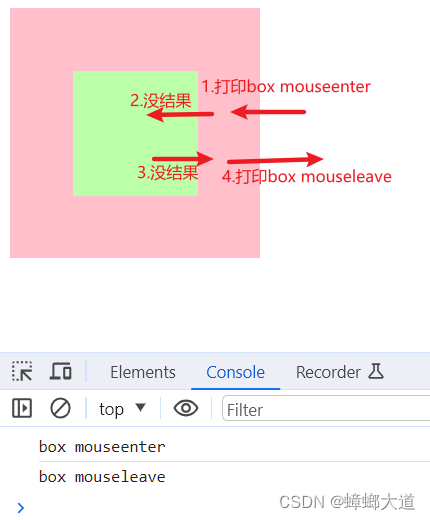
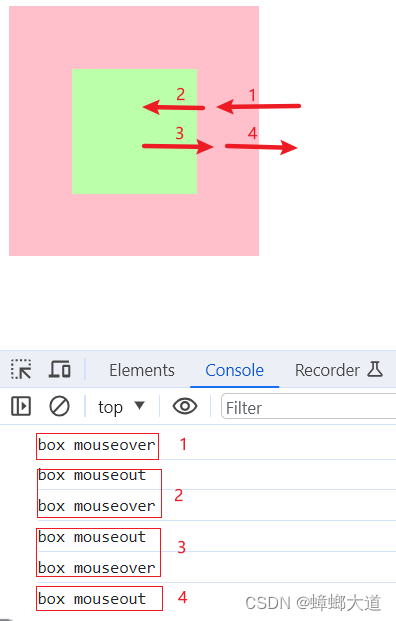
1.当某个元素监听鼠标移入移出事件时,mouseenter与mouseover没有区别
2.嵌套元素时不一致
3.事件委托时,只能使用mouseover、mouseout,因为支持冒泡
<!DOCTYPE html>
<html lang="en">
  <head>
    <meta charset="UTF-8" />
    <meta name="viewport" content="width=device-width, initial-scale=1.0" />
    <title>Document</title>

    <style>
      .box {
        display: flex;
        justify-content: center;
        align-items: center;
        width: 200px;
        height: 200px;
        background-color: pink;
      }

      .box > span {
        width: 100px;
        height: 100px;
        background-color: #bfa;
      }
    </style>
  </head>
  <body>
    <div class="box">
      <span></span>
    </div>

    <script>
      const box = document.querySelector(".box");

      // 1.mouseenter、mouseleave(不支持冒泡)
      // 子元素作为父元素的一部分
      // box.addEventListener("mouseenter", (e) => {
      //   console.log("box mouseenter");
      // });
      // box.addEventListener("mouseleave", (e) => {
      //   console.log("box mouseleave");
      // });

      // 2.mouseover、mouseout(支持冒泡)
      // 子元素与父元素相互独立
      box.addEventListener("mouseover", (e) => {
        console.log("box mouseover");
      });
      box.addEventListener("mouseout", (e) => {
        console.log("box mouseout");
      });
    </script>
  </body>
</html>
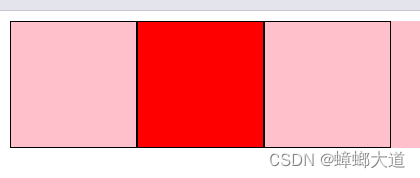
鼠标移入小盒子时,变红:
<!DOCTYPE html>
<html lang="en">
  <head>
    <meta charset="UTF-8" />
    <meta name="viewport" content="width=device-width, initial-scale=1.0" />
    <title>Document</title>

    <style>
      .container {
        display: flex;
        background-color: pink;
      }
      .box {
        width: 100px;
        height: 100px;
        border: 1px solid #000;
      }
    </style>
  </head>
  <body>
    <div class="container">
      <div class="box box1"></div>
      <div class="box box2"></div>
      <div class="box box3"></div>
    </div>

    <script>
      const container = document.querySelector(".container");
      const boxs = document.querySelectorAll(".box");

      // // 方式1:给每个盒子监听鼠标移入事件
      // // 此时mouseover与mouseenter无区别
      // for (let i = 0; i < boxs.length; i++) {
      //   boxs[i].addEventListener("mouseenter", (e) => {
      //     e.target.style.backgroundColor = "red";
      //   });
      //   boxs[i].addEventListener("mouseleave", (e) => {
      //     e.target.style.backgroundColor = "";
      //   });
      // }

      // 方式2:事件委托
      // 只能使用mouseover、mouseout(因为支持冒泡)
      container.addEventListener("mouseover", (e) => {
        if (e.target !== container) {
          e.target.style.backgroundColor = "red";
        }
      });
      container.addEventListener("mouseout", (e) => {
        if (e.target !== container) {
          e.target.style.backgroundColor = "";
        }
      });
    </script>
  </body>
</html>
键盘事件
keydown 键盘按下
keypress 键盘按下(文本输入中)
keyup 键盘弹起(文本输入完成)
区分按键:e.code或e.key
<!DOCTYPE html>
<html lang="en">
  <head>
    <meta charset="UTF-8" />
    <meta name="viewport" content="width=device-width, initial-scale=1.0" />
    <title>Document</title>
  </head>
  <body>
    <input type="text" />

    <script>
      const input = document.querySelector("input");

      // 按下s时,文本框聚焦
      // 在整个文档document上监听键盘事件
      document.addEventListener("keyup", (e) => {
        console.log(e.key, e.code);
        if (e.code === "KeyS") {
          input.focus();
        }
      });
    </script>
  </body>
</html>
表单事件
input 用户输入时触发
focus 聚焦时触发
blur 失去焦点时触发
reset 表单重置时触发
submit 表单提交时触发
change 基于表单元素的类型和用户对元素的操作的不同,change 事件触发的时机也不同
- input元素的值被修改且失去焦点时触发change事件
- radio元素被选中时触发(而不是取消选中)
- checkbox元素被选中或取消选中时
- select点击某个下拉选项
- input:file 上传了文件
<!DOCTYPE html>
<html lang="en">
  <head>
    <meta charset="UTF-8" />
    <meta name="viewport" content="width=device-width, initial-scale=1.0" />
    <title>Document</title>
  </head>
  <body>
    <form action="">
      <input type="text" />
      <label>
        <span>男</span>
        <input type="radio" name="gender" value="0" />
      </label>
      <label>
        <span>女</span>
        <input type="radio" name="gender" value="1" />
      </label>
      <button type="reset">重置</button>
      <button type="submit">提交</button>
    </form>

    <script>
      const form = document.querySelector("form");
      const inputEle = document.querySelector("input");
      const radioMale = document.querySelector('[type="radio"][value="0"]');
      const radioFemale = document.querySelector('[type="radio"][value="1"]');

      // input focus blur
      inputEle.addEventListener("input", (e) => {
        console.log("触发input事件", inputEle.value);
      });
      inputEle.addEventListener("focus", (e) => {
        console.log("触发focus事件");
      });
      inputEle.addEventListener("blur", (e) => {
        console.log("触发blur事件");
      });

      // reset submit
      form.addEventListener("reset", (e) => {
        console.log("触发reset事件");
      });
      form.addEventListener("submit", (e) => {
        e.preventDefault();
        console.log("触发submit事件");
      });

      // change
      radioMale.addEventListener("change", (e) => {
        console.log("触发change事件");
      });
      inputEle.addEventListener("change", (e) => {
        console.log("触发change事件");
      });
    </script>
  </body>
</html>
文档加载事件
DOMContentLoaded:浏览器全部加载完HTML,并构建了DOM树,但img和样式等外部资源可能未加载完成
load:浏览器全部加载完HTML,所有外部资源(图片、样式等)
自定义属性
某些情况下,需要使用自定义属性来区分不同的DOM元素

<!DOCTYPE html>
<html lang="en">
  <head>
    <meta charset="UTF-8" />
    <meta name="viewport" content="width=device-width, initial-scale=1.0" />
    <title>Document</title>

    <style>
      .box {
        width: 200px;
        height: 200px;
        background-color: pink;
      }
    </style>
  </head>
  <body>
    <div class="box">
      <button data-action="1">按钮1</button>
      <button data-action="2">按钮2</button>
      <button data-action="3">按钮3</button>
    </div>

    <script>
      const box = document.querySelector(".box");

      // 使用自定义属性区分不同元素
      box.addEventListener("click", (e) => {
        const action = e.target.dataset.action;

        switch (action) {
          case "1":
            e.target.style.color = "red";
            break;
          case "2":
            e.target.style.color = "green";
            break;
          case "3":
            e.target.style.color = "blue";
            break;
          default:
            break;
        }
      });
    </script>
  </body>
</html>
排他思想
<!DOCTYPE html>
<html lang="en">
  <head>
    <meta charset="UTF-8" />
    <meta name="viewport" content="width=device-width, initial-scale=1.0" />
    <title>Document</title>

    <style>
      .active {
        background-color: pink;
      }
    </style>
  </head>
  <body>
    <ul>
      <li>1</li>
      <li>2</li>
      <li>3</li>
      <li>4</li>
      <li>5</li>
    </ul>

    <script>
      const ul = document.querySelector("ul");
      const lis = document.querySelectorAll("li");

      // 方式3 变量控制
      let activeEle = null;
      ul.addEventListener(
        "click",
        (e) => {
          // 方式1 遍历
          // 去除所有元素的active
          // for (let i = 0; i < lis.length; i++) {
          //   lis[i].classList.remove("active");
          // }
          // if (e.target !== ul) {
          //   e.target.classList.add("active");
          // }

          // 方式2 直接获取到有active类的DOM元素
          // const activeEle = document.querySelector(".active");
          // activeEle && activeEle.classList.remove("active");
          // if (e.target !== ul) {
          //   e.target.classList.add("active");
          // }

          // 方式3 变量控制
          if (activeEle) {
            activeEle.classList.remove("active");
          }
          if (e.target !== ul) {
            e.target.classList.add("active");
          }
          activeEle = e.target;
        },
        false
      );
    </script>
  </body>
</html>
BOM
window对象
window作为全局对象以及窗口相关
# 浏览器的全局对象:
window

# node中的全局对象:
global

# EMCMA规范了统一的全局对象:
globalThis
- window对象相关的属性方法查询MDN
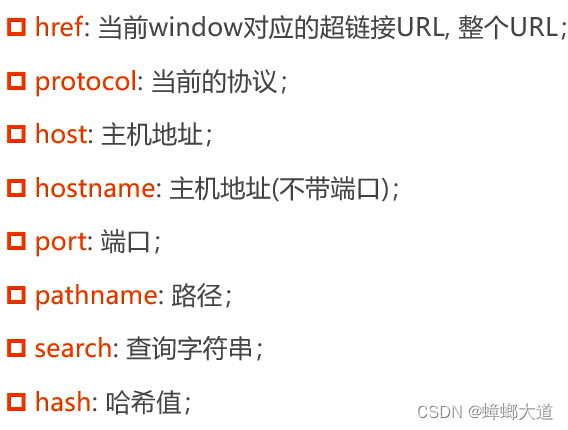
location
location常见属性
 location常见方法

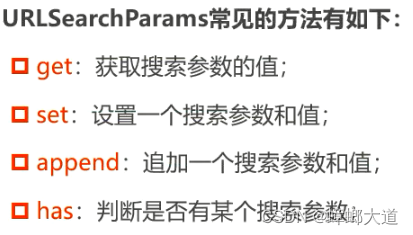
URLSearchParams
用来处理URL查询字符串
// 将查询字符串转化为URLSearchParams类型
let queryStr = new URLSearchParams("?name=ccc&age=999")
中文使用encodeURIComponent和decodeURIComponent进行编码和解码
history
history:浏览器历史
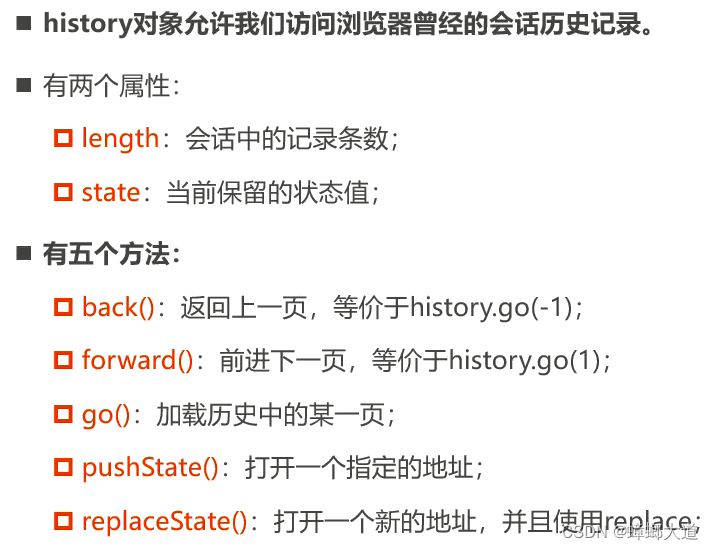
前端路由核心:修改了URL,但是页面不刷新
方式1:修改hash值
方式2:修改history
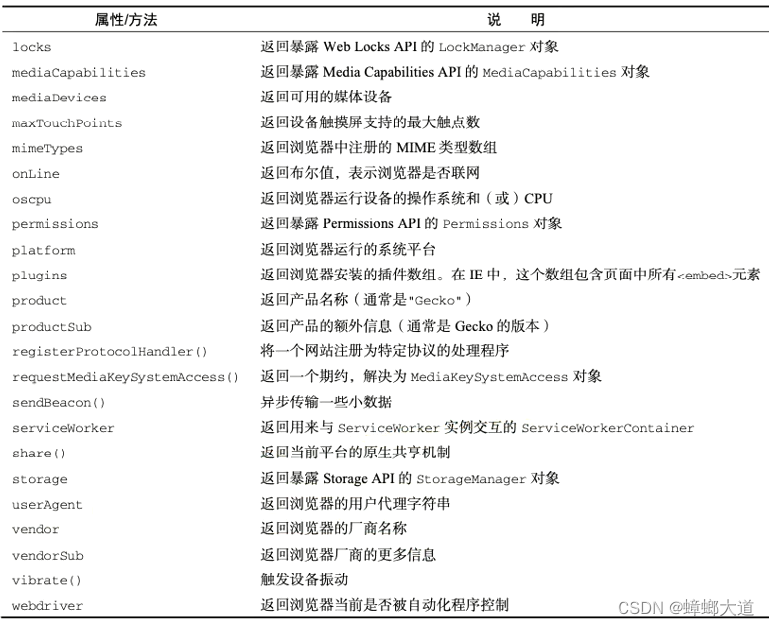
navigator
navigator:用户代理(浏览器)的状态和标识
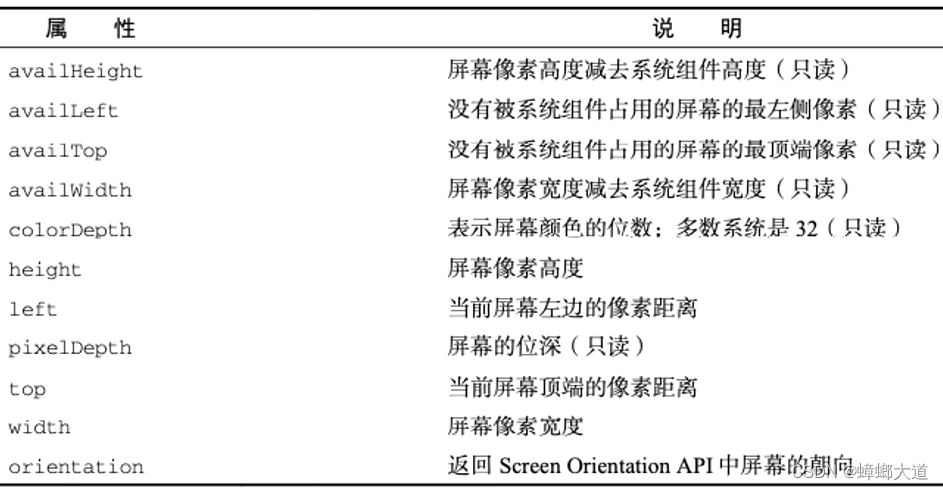
screen
screen:屏幕信息
小案例
实时显示日期
<!DOCTYPE html>
<html lang="en">
  <head>
    <meta charset="UTF-8" />
    <meta name="viewport" content="width=device-width, initial-scale=1.0" />
    <title>Document</title>
  </head>
  <body>
    <div class="box"></div>

    <script>
      // 日期格式化
      function formateDate(timeStamp, formatStr) {
        // 将时间戳转化为日期对象
        const date = new Date(timeStamp);

        if (/(y+)/.test(formatStr)) {
          // 将正则匹配到的年份格式,替换为日期对象date解析出来的年份
          formatStr = formatStr.replace(
            RegExp.$1,
            (date.getFullYear() + "").substr(4 - RegExp.$1.length)
          );
        }

        let o = {
          "M+": date.getMonth() + 1,
          "d+": date.getDate(),
          "h+": date.getHours(),
          "m+": date.getMinutes(),
          "s+": date.getSeconds(),
        };

        for (let k in o) {
          if (new RegExp(`(${k})`).test(formatStr)) {
            let str = o[k] + "";
            // 将正则匹配到的格式,替换为日期对象date解析出来的
            formatStr = formatStr.replace(
              RegExp.$1,
              RegExp.$1.length === 1 ? str : str.padStart(2, "0")
            );
          }
        }
        return formatStr;
      }

      const box = document.querySelector(".box");
      setInterval(() => {
        box.innerHTML = formateDate(+new Date(), "yyyy-MM-dd hh:mm:ss");
      }, 1000);
    </script>
  </body>
</html>
倒计时
<!DOCTYPE html>
<html lang="en">
  <head>
    <meta charset="UTF-8" />
    <meta name="viewport" content="width=device-width, initial-scale=1.0" />
    <title>Document</title>
  </head>
  <body>
    <div id="countdown"></div>

    <script>
      // 设置目标日期和时间
      const targetDate = new Date("2023-12-31 12:00:00").getTime();

      // 更新倒计时的函数
      function updateCountdown() {
        const currentDate = new Date().getTime();
        const timeLeft = targetDate - currentDate;

        // 计算剩余的天、小时、分钟和秒
        const days = Math.floor(timeLeft / (1000 * 60 * 60 * 24));
        const hours = Math.floor((timeLeft / (1000 * 60 * 60)) % 24);
        const minutes = Math.floor((timeLeft / (1000 * 60)) % 60);
        const seconds = Math.floor((timeLeft / 1000) % 60);

        // 更新页面上的倒计时显示
        const countdownElement = document.getElementById("countdown");
        countdownElement.innerHTML =
          days + "天 " + hours + "小时 " + minutes + "分钟 " + seconds + "秒";
      }

      // 初始调用一次,然后每秒更新一次
      updateCountdown();
      const countdownInterval = setInterval(updateCountdown, 1000);
    </script>
  </body>
</html>


 140
140


 被折叠的 条评论
为什么被折叠?
被折叠的 条评论
为什么被折叠?
 到【灌水乐园】发言


