


关于spring aop这里就不多说,详情见下面链接
https://blog.csdn.net/qq_43560721/article/details/88799573
那么,直接着手项目,首先提醒大家把所需要的包导进项目,千万不要漏了哪一个。
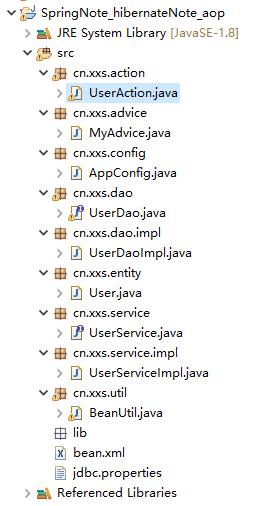
项目结构:
实体类:
package cn.xxs.entity;

import java.util.Date;

import javax.persistence.Entity;
import javax.persistence.GeneratedValue;
import javax.persistence.GenerationType;
import javax.persistence.Id;
import javax.persistence.Table;
@Entity
@Table(name="user")
public class User {
	private Integer id;
	private String name;
	private String pwd;
	private Date createDate;
	public User() {
		super();
		// TODO Auto-generated constructor stub
	}
	public User(Integer id, String name, String pwd, Date createDate) {
		super();
		this.id = id;
		this.name = name;
		this.pwd = pwd;
		this.createDate = createDate;
	}
	@Id
	@GeneratedValue(strategy=GenerationType.IDENTITY)
	public Integer getId() {
		return id;
	}
	public void setId(Integer id) {
		this.id = id;
	}
	public String getName() {
		return name;
	}
	public void setName(String name) {
		this.name = name;
	}
	public String getPwd() {
		return pwd;
	}
	public void setPwd(String pwd) {
		this.pwd = pwd;
	}
	public Date getCreateDate() {
		return createDate;
	}
	public void setCreateDate(Date createDate) {
		this.createDate = createDate;
	}
	@Override
	public String toString() {
		return "User [id=" + id + ", name=" + name + ", pwd=" + pwd + ", createDate=" + createDate + "]";
	}


}
接口与接口的实现
public interface UserDao {
public void print();
}
@Repository
public class UserDaoImpl implements UserDao{
	@Resource
	private SessionFactory sessionFactory;
	@Override
	public void print() {
		Session session =sessionFactory.openSession();
		User u = session.get(User.class, 3);
		System.out.println(u.toString());
	}
}
public interface UserService {
public void print();
}
@Component
@Service("userService")
public class UserServiceImpl implements UserService{
	@Resource
	private UserDao userDao;

	@Override
	public void print() {

		userDao.print();
	}
}
jdbc配置文件jdbc.properties
jdbc.driverClassName=com.mysql.jdbc.Driver
jdbc.url=jdbc:mysql://localhost:3306/hibernate
jdbc.username=root
jdbc.password=root
bean.xml
<?xml version="1.0" encoding="UTF-8"?>
<beans xmlns="http://www.springframework.org/schema/beans"
    xmlns:xsi="http://www.w3.org/2001/XMLSchema-instance"
    xmlns:aop="http://www.springframework.org/schema/aop"
    xmlns:context="http://www.springframework.org/schema/context"
    xsi:schemaLocation="
    http://www.springframework.org/schema/beans
        http://www.springframework.org/schema/beans/spring-beans.xsd
        http://www.springframework.org/schema/aop
        http://www.springframework.org/schema/aop/spring-aop.xsd
        http://www.springframework.org/schema/context
        http://www.springframework.org/schema/context/spring-context.xsd
        ">

     <!-- 开启注解驱动 -->
     <context:annotation-config />
     <!-- 开启组件扫描 -->
     <context:component-scan base-package="cn.xxs"/>

     <!-- 加载jdbc配置文件 -->
     <bean
		class="org.springframework.beans.factory.config.PropertyPlaceholderConfigurer">
		<property name="locations" value="classpath:jdbc.properties" />
	</bean>

     <!-- 配置数据源
     		destroy-method:关闭数据库连接时,它自动销毁连接
      -->
     <bean id="myDataSource" class="org.apache.commons.dbcp.BasicDataSource" destroy-method="close">
        <property name="driverClassName" value="${jdbc.driverClassName}"/>
        <property name="url" value="${jdbc.url}"/>
        <property name="username" value="${jdbc.username}"/>
        <property name="password" value="${jdbc.password}"/>
    </bean>

	<!-- 配置sessionFactory,把myDataSource注入给下面这个类 -->
    <bean id="sessionFactory" class="org.springframework.orm.hibernate5.LocalSessionFactoryBean">
        <!-- 把myDataSource注入到LocalSessionFactoryBean中 -->
        <property name="dataSource" ref="myDataSource"/>

        <!-- 注解方法 -->
        <property name="packagesToScan" value="cn.xxs"></property>

        <!-- hibernate其他配置 -->
        <property name="hibernateProperties">
			<props>
				<prop key="hibernate.dialect">org.hibernate.dialect.MySQLDialect</prop>
				<prop key="hibernate.show_sql">true</prop>
				<prop key="hibernate.format_sql">true</prop>
			</props>
		</property>

    </bean>


</beans>
新建通知类
@Aspect 声明切面,修饰切面类,从而获得 通知。
/* *定义一个方法,用于声明切点表达式,该方法一般没有方法体 *@Pointcut用来声明切点表达式 *通知直接使用定义的方法名即可引入当前的切点表达式 */
//@Before前置通知,方法执行之前执行
package cn.xxs.advice;

import org.aspectj.lang.annotation.Aspect;
import org.aspectj.lang.annotation.Before;
import org.aspectj.lang.annotation.Pointcut;
import org.springframework.stereotype.Component;

@Component
@Aspect
public class MyAdvice {

	@Pointcut("execution(* cn.xxs.service.*.*(..))")
	public void print() {}

    @Before("print()")
	public void log() {
		System.out.println("记录日志");
	}
}
/**
* Jdk代理:基于接口的代理,一定是基于接口,会生成目标对象的接口的子对象。
* Cglib代理:基于类的代理,不需要基于接口,会生成目标对象的子对象。
*
* 1. 注解@EnableAspectJAutoProxy开启代理;
*
* 2. 如果属性proxyTargetClass默认为false, 表示使用jdk动态代理织入增强;
*
* 3. 如果属性proxyTargetClass设置为true,表示使用Cglib动态代理技术织入增强;
*
* 4. 如果属性proxyTargetClass设置为false,但是目标类没有声明接口,
* Spring aop还是会使用Cglib动态代理,也就是说非接口的类要生成代理都用Cglib。
*/
package cn.xxs.config;

import org.springframework.context.annotation.Configuration;
import org.springframework.context.annotation.EnableAspectJAutoProxy;

@Configuration
@EnableAspectJAutoProxy(proxyTargetClass = true)
public class AppConfig {

}
创建工具类BeanUtil.java
public class BeanUtil {
public static Object getBean(String beanName) {
return new ClassPathXmlApplicationContext("bean.xml").getBean(beanName);
}
}
新建测试类:
@Resource 是JDK1.6支持的注解,默认按照名称进行装配,名称可以通过name属性进行指定,如果没有指定name属性,当注解写在字段上时,默认取字段名,按照名称查找,如果注解写在setter方法上默认取属性名进行装配。当找不到与名称匹配的bean时才按照类型进行装配。但是需要注意的是,如果name属性一旦指定,就只会按照名称进行装配。
package cn.xxs.action;

import javax.annotation.Resource;

import org.junit.Test;
import org.springframework.stereotype.Component;
import org.springframework.test.context.ContextConfiguration;


import cn.xxs.service.UserService;
import cn.xxs.util.BeanUtil;
/**
 *
 * @author xxs
 *
 */

public class UserAction{

	@Resource
	private UserService userService;

	@Test
	public void test() {
		//但是 还是需要读取一次bean.xml配置文件,但其他层已经在bean.xml中配置好了,不需要读取配置文件
		userService = (UserService) BeanUtil.getBean("userService");
		userService.print();

	}
}
运行结果:

可见,查询到数据库数据前添加日志,这里并没有真的加日志逻辑,就只是简单打印了一句话做个测试,测试成功。


 103
103


 被折叠的 条评论
为什么被折叠?
被折叠的 条评论
为什么被折叠?
 到【灌水乐园】发言


